Welcome to IRIS® Showcase™—an integrated drawing and presentation program that showcases your work as well as the capabilities of IRIS workstations.
In this chapter, you learn how to get started with the program.
Before starting to use IRIS Showcase software, you should be familiar with the mouse, the windows, and the Indigo Magic™ user interface or IRIX™ operating system. See IRIS Essentials for details.
In addition, you should understand the basics of IRIS Showcase. They're outlined below.
IRIS Showcase is an integrated drawing and presentation program. It provides the tools you need to create simple drawings and images, 3D models, on-screen slide shows, and much more. You'll find:
groups of tools for creating simple 2D pictures and 3D models
import capabilities for inserting images, 3D models, and other types of files
presentation tools for designing your slides and creating a self-running slide show
page layout capabilities for creating multiple-column spreads
basic text-processing capabilities
an audio tool for importing and recording audio files
a video tool for displaying live video and recording out to video
scripting capabilities for creating on-line help and interactive presentations
IRIS Showcase is an object-oriented drawing and presentation program. This means:
Everything you place on the page is an object—the graphics, audio, text, and 3D containers you create, as well as the images you import.
Once an object is on the page, you can manipulate it in various ways: move it, resize it, stack it on top of other objects, change its color, and cut, copy, and paste it. To do this, you must select the object.
You can also edit objects. Editing means changing the contents of an object, for example, changing words in a block of text, or adding another point to a polygon.
The tools and commands you use to create, manipulate, and edit these objects are in pull-down menus and tool palettes called gizmos.
The IRIS Showcase icon looks like the one shown in Figure 1-1. To run the program, double-click the icon using the left mouse button. You can also invoke IRIS Showcase from the command line by typing: showcase
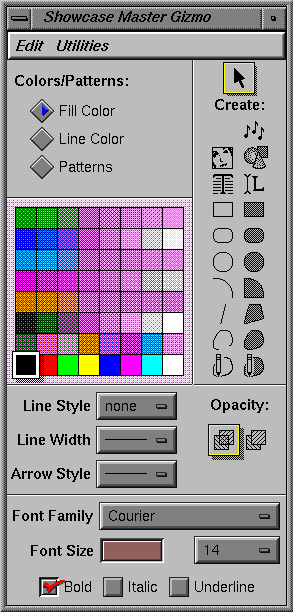
When you run IRIS Showcase, three windows appear on your screen by default. The largest one contains the six pull-down menus and the drawing area, where you place objects. The medium-sized window is the Master gizmo. It contains the tools you use to create objects, the color and pattern palettes, and other frequently used tools. The remaining window is the Status gizmo. IRIS Showcase prints instructions and error messages in this window.
IRIS Showcase presents commands in pull-down and pop-up menus. At the top of the drawing area, you see six pull-down menus. To use pull-down menus:
Press the left mouse button over a pull-down menu. You see a list of menu entries.
While holding down the mouse button, move the cursor up and down over the entries in the menu. As you move the cursor, you highlight individual entries.
Highlight one of the choices; then release the mouse button to activate a command.
If you decide that you don't want to use a command, move the mouse outside of the menu and release the button. As long as none of the entries is highlighted, no command is issued.
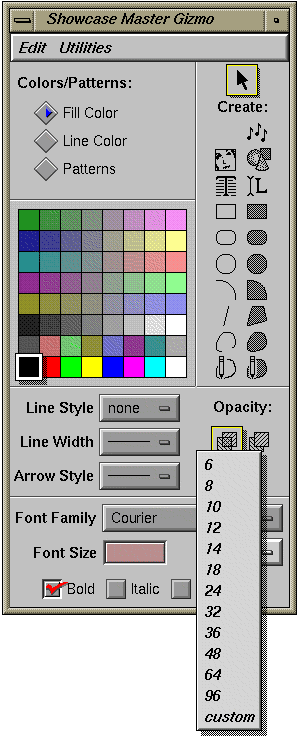
Many IRIS Showcase gizmos contain pop-up menus. These menus resemble buttons. The Font Size pop-up menu in the Master gizmo is an example. See Figure 1-2.
To use a pop-up menu:
Place the cursor over the button next to the menu name; then press the left mouse button.
While holding the mouse button down, move the cursor up and down over the entries in the menu. As you move the cursor, you highlight individual entries.
Highlight one of the choices; then release the mouse button to choose the setting.
The label on the button changes to reflect the current selection.
Some menu choices have an arrow pointing off to the right. This arrow indicates a rollover menu.
Press the left mouse button over a pull-down menu.
Slide the cursor to the right to see the rollover menu choices.
Slide the cursor up and down the rollover menu. (Make sure you keep the mouse button pressed down.)
Highlight one of the choices and release the mouse button to activate a command.
If you decide that you don't want to use a command from the rollover menu, move the cursor outside of all menus and release the button. As long as none of the entries is highlighted, no command is issued.
| Note: You can choose a command on the main menu, even if it has a rollover menu. For example, choosing “Save As” from the File menu is equivalent to rolling over to the submenu and choosing “ ...As.” |
Some menu entries are followed by a special character and then a letter. For example, under the Edit menu, the “Undo” command is followed by Alt + u. This indicates a shortcut. Hold down the <Alt> key and type u to invoke the “Undo” command.
Capitalization is important. <Alt>-c and <Alt>-C are shortcuts for two different commands.
See Appendix B, “Shortcuts,” or the Using Shortcuts help file for a list of all the keyboard shortcuts.
IRIS Showcase groups sets of related commands into toolsets called gizmos. Each gizmo is an independent window; you can work with it and close it just as you do any other window.
Two gizmos—the Master gizmo and the Status gizmo—are displayed by default. The Master gizmo contains the drawing and text tools, the color and pattern palettes, and other tools to let you create your document. Figure 1-3 shows the Master gizmo. The Status gizmo is the window in which IRIS Showcase prints instructions and error messages.
You can open other gizmos by choosing them from the pull-down Gizmos menu. And, if a gizmo gets buried under other windows, you can pop it to the top by choosing the gizmo name from the pull-down menu.
The “Undo” command on the Edit menu lets you reverse your actions. For example, suppose you delete a page then realize you made a mistake. Choose the “ Undo” command to restore the page.
IRIS Showcase provides on-line help. You access this help from the Help menu that appears in the IRIS Showcase drawing area.
If you want to open this book after reading a topic in Help, you can do so by choosing “Go To Book” from the File menu in the Help window. The book opens to the subject that you're reading in Help.
Some conventions are used to make information in this guide easy to access and understand. This list tells you what they are.
References to other documents are in italics.
References to other sections within this guide are in quotation marks.
Names of buttons that appear on gizmos are in italics.
Names of menu commands are surrounded by “quotation marks.”
Numbered sentences are steps you follow to complete a task. Sentences that follow a step and are preceded with a box are substeps; they describe in detail how to accomplish the step. Once you're familiar with the procedure you probably won't need to refer to the substeps.
In the on-line document, links to other sections in the book are colored blue, links to other books are colored red, and links to glossary definitions are underlined.
To learn how to work with IRIS Showcase files, see Chapter 2, “Opening, Saving, and Working with Files.”
To learn how to manipulate objects—select, edit, move, and group them, for example—see Chapter 3, “Working with Objects.”
To learn how to set up, turn, and rearrange pages, see Chapter 4, “Setting Up and Working with Pages.”
To learn how to create and edit graphics objects—squares, circles, polygons, for example—see Chapter 5, “Drawing with IRIS Showcase.”
To learn how to create and edit text, see Chapter 6, “Working with Text.”
To learn how to create 3D models, see Chapter 7, “Building 3D Models.”
To learn how to add audio, images, and video to your files, see Chapter 8, “Working with Images and Audio.”
To learn how to create self-running presentations and add hyperscripts to your presentations, see Chapter 9, “Creating Presentations.”
To learn how to print and mail IRIS Showcase files, see Chapter 10, “Printing and Mailing IRIS Showcase Files.”
For reference information on IRIS Showcase commands and gizmos, see Chapter 11, “A Reference to Commands and Gizmos.”
IRIS Showcase lets you create scrolling text objects. For information on using scrolling text, see Appendix A, “Scrolling Text.”
For a list of keyboard shortcuts, see Appendix B, “Shortcuts.”
For information on the types of files IRIS Showcase lets you import and export, see Appendix C, “Importing and Exporting Files.”
For a list of IRIX commands for running IRIS Showcase, see Appendix D, “IRIX Commands.”
For a list of characters and symbols that IRIS Showcase can create, see Appendix E, “Extended ISO Character Codes.”
For information on fonts, see Appendix F, “About Fonts.”

