IRIS Showcase provides many text processing capabilities. You can create text, import existing text files, and edit your text, including the font, size, and color.
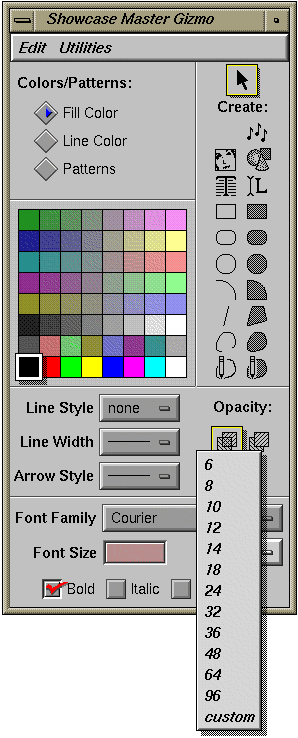
IRIS Showcase provides two main text tools — the Label text tool and the Block text tool. See Figure 6-1. The tool you use depends on what you're writing — a few words on a page or a few pages of words.
Use the Label text tool to type labels, captions, or other strings of text that are only a few lines long.
Use the Block text tool to write most sizable chunks of text, to have lines of text break automatically, or to flow text from one column or page to another.
The tool for each type of text appears on the right side of the Master gizmo. Also see “Creating 3D Text Models.”
For information on typing text, see:
You use the Label text tool to type labels or strings of text only a few lines long, like those that typically appear in presentations.
Click the Label text tool in the Master gizmo. See Figure 6-2.
Click in the drawing area where you want to begin typing. A text cursor appears.
Begin typing. Each character appears as you type it; the line of characters expands to the right. A green rectangle surrounds the text.
Press <Enter> when you want to begin a new line. Label text does not automatically break lines.
When you finish typing, click the left mouse button once in an empty part of the drawing area, or choose “Done Editing” from the Edit menu. This signals that you are finished editing the object.
Use the Block text tool when you want to prepare a memo or report, lay out several columns of text on a page, or type more than several lines of text.
When you use Block text, you begin by creating a box into which you place your text. When text reaches the right edge of the box, it automatically breaks and starts a new line.
Click the Block text tool in the Master gizmo. See Figure 6-3.
Move the cursor into the drawing area. You see the outline of a box.
Click the left mouse button to create a box of that size, or sweep out a text box by:
Pressing the left mouse button and dragging in any direction. The red outline indicates the size of the box.
Releasing the mouse button when the box is the size you want.
When you release the mouse button, a thin green outline appears around the box, and a text cursor appears in the upper left corner of the box. You may begin typing.
When you finish typing, click the left mouse button in an empty part of the drawing area, or choose “Done Editing” from the Edit menu. This signals that you are finished editing the object.
| Note: Only the text that fits inside the box is displayed. You can keep typing after the box is full, but you won't see the text. Green arrows appear along the bottom of the box to indicate that the box is too small to display all of the text. Empty Block text objects are surrounded by a dotted gray line. |
See also “Resizing Text Objects” for information on resizing objects to display hidden text.
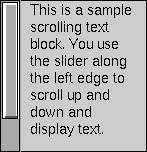
You can create a scrolling Text object by pressing the <Alt> key when you click the Block text tool. (See also “Typing Blocks of Text.”) Scrolling text is useful for creating on-line documentation. Instead of a regular text box, you get a box with a scrolling bar along the left edge, as shown in Figure 6-4. If you type past the bottom of this box, text at the top scrolls up and out of view to make room for the new lines you type. For more information on scrolling text, see Appendix A, “Scrolling Text.”
You can convert Label text to Block text, and vice versa. Additionally, you can convert either of these to and from Scrolling text. See Appendix A, “Scrolling Text,” for further information on scrolling text.
Click the Text object once with the left mouse button to select it.
Bring up the Text gizmo by choosing “Text” from the Gizmos menu.
On the right side of the gizmo, under the label “Type,” are the three text icons. See Figure 6-5. One is outlined, indicating that is the type of Text object selected.
Click one of the other two icons to convert the Text object.
| Note: A 3-inch long Scrolling text block can hold much more than 3 inches of text. If you convert this to Block text, however, the box will be able to hold only the first 3 inches of text. If the box is too small to display all of the text in the file, green arrows appear along the bottom of the box. To regain the remaining text, either enlarge the text box, or create a new Block text box and flow the text into it. See “Flowing Text from One Text Block to Another.” And if you convert Block or Scrolling text to Label text, you may get surprising results. Label text doesn't do automatic line breaks, so it will break the lines only when you force a carriage return in the Block or Scrolling text. |
You can import ASCII and Rich Text Format (RTF) text files into IRIS Showcase files.
Choose “Text...” or “RTF...” from the Insert rollover menu on the File menu.
When the File Browser appears, open the file you'd like to insert.
If you are editing a Text object, the contents of the text file are inserted into that block. If you aren't editing a Text object, IRIS Showcase creates a new one for you and places the text in it. (You can resize this and place it on the page like you do any other Text object.)
| Note: Only the text that fits inside the box is displayed. If the box is too small to display all of the text in the file, green arrows appear along the bottom of the box. If an RTF file uses a font that IRIS Showcase doesn't support, IRIS Showcase substitutes the Times font. |
You can copy text from another open window. Suppose you're reading a mail message and want to place some text from the message into your IRIS Showcase file.
Create a Text object or edit an existing Text object.
See “Typing Blocks of Text” for instructions on creating a new one.
To edit an existing Text object, place the cursor over the object; then double-click the left mouse button. A green outline surrounds the object.
Place the cursor in the window that contains the text you want to copy.
Press the left mouse button and drag the mouse. The selected text is highlighted. This text is placed in a buffer.
Move the cursor into the IRIS Showcase window and into the Text object you're editing; then press the middle mouse button.
The text is pasted at the location of the text cursor. To insert the copy elsewhere, click the left mouse button once in the spot you want to insert the text; then click the middle mouse button.
| Note: See also “Copying and Pasting Text to Other Windows.” It explains how you can copy text from an IRIS Showcase document and paste it into another program. |
When you resize a Block text object, you resize the box that holds your text. You do not increase or decrease the font size. Label text objects behave differently. When you resize a Label text object, the text size increases or decreases to match the size of the box.
Select the Text object you want to stretch or shrink.
Place the cursor over one of the small boxes outlining the object.
Hold down the left mouse button and drag the cursor to enlarge or reduce the object. A red outline of the object shows you how you're resizing the object.

Note: Press the <Shift> key to maintain the aspect ratio while resizing label text objects. Release the mouse button when you're satisfied with the new size.
The container for text becomes larger or smaller in a Block text object; the font size remains the same. The text reformats because the edges of the box act as a boundary. When text hits the right edge, it automatically breaks and starts a new line.
The size of text in a Label text object changes when you resize the object. Make the object larger and the text gets larger; make the object smaller and the text gets smaller.
You can rotate Text objects that you create using the Label text tool on the Master gizmo.
Choose “Show Rotate Handles” from the View menu.
A checkmark appears next to it when it's selected.
Select the angle by which you want to rotate.
Choose “No Rotate Snap” from the Rotate Snap rollover menu on the View menu if you want to rotate freely. This is the default setting.
Choose an angle from the Rotate Snap rollover menu if you want to constrain the rotation..
Select the Label text object you want to rotate.
A rotation handle appears on the selected object. The rotation handle is a small circle with a cluster of four arrows in the center and two arrows along its edge. (See Figure 6-6 .) It's the point around which the object rotates.
Note: If you see a square instead of a circle, you have selected a block Text object. Block text objects cannot be rotated. See “Converting between Text Types: Label, Block, and Scrolling” to learn how you can change Block text objects into Label text objects. Position the cursor inside the rotation handle and press the left mouse button. Do not place the cursor over the arrows in the center; if you do, you'll move the rotation handle.
Start moving the mouse. An outline of the object appears. (Now you can move the mouse outside of the rotation handle.) The outline moves around the rotation point, showing you the object as it's rotated.
Release the mouse button when the object is at the angle you want.

| Note: The farther away the cursor is from the rotation handle, the finer control you have over the rotation. |
If you want to apply a pattern to text, shade text, or scale each letter independently to create a special effect, you can turn text into a 2D Graphics object. Each letter becomes a separate Graphics object.
Select the Text object you want to turn into a 2D Graphics object.
Green boxes surround it when it's selected.
Choose “ Make 2D Graphic” from the Utilities menu on the Text gizmo.
Move the cursor into the drawing window; then click the left mouse button to place the copy.
At this point, each letter is a separate Graphics object. You can scale each letter separately and apply patterns.
| Note: Use the “ Group” command if you want to group the letters into one Graphics object. |
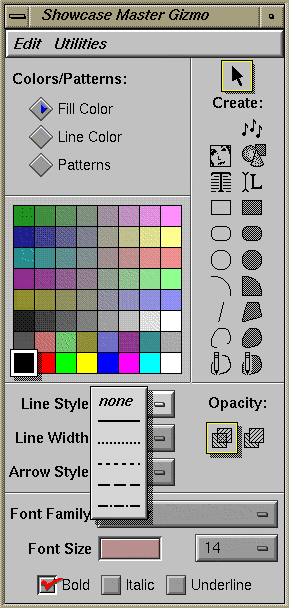
You use the Line Style Controls on the Master gizmo to put an outline or border around a Text object.
Select a Text object around which you want to place a border.
Place the cursor over the button next to the label “Line Style”; then press the left mouse button to reveal a pop-up menu of line styles. See Figure 6-7.
Choose a style from the menu.
A border appears around the Text object. You can change the border's color, making it different from the color of the text. See “Making a Colored Outline.”
IRIS Showcase lets you split text into two columns.
Select a Block Text object.
If you have not yet created the Text object, see “Typing Blocks of Text.”
Bring up the Text gizmo by choosing “Text” from the Gizmos menu.
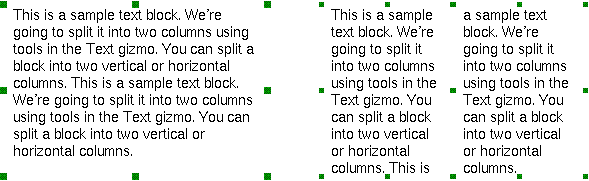
Click one of the two Split block icons in the Text gizmo.
Click the left icon to split the object into two vertical columns; click the right icon to split the object into two horizontal columns. See Figure 6-8.
The columns are now two separate Text objects that are connected. Text flows out from one column and into the other, as illustrated in Figure 6-9.
To flow text from one text block to another or from page to page, or to break the connection between text blocks, see:
When you split a Text object into two columns, text automatically flows from one column to the other. You can also make text flow from one object to another by manually connecting them. This means that any text that doesn't fit in the first Text object will flow into the second Text object.
Bring up the Text gizmo by choosing “Text” from the Gizmos menu.
Select the Text object from which you want to flow text.
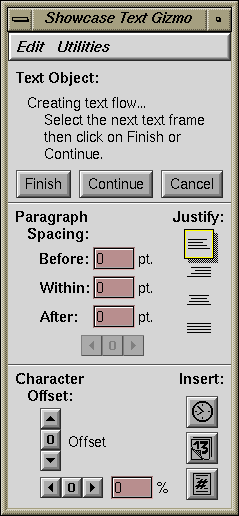
Note: You can only flow text in and out of objects you create using the Block text tool. Click the Create button near the top of the Text gizmo.
That area of the Text gizmo changes. It displays instructions. See Figure 6-10.
Select another Text object — the one into which you want to flow text. This object can be on another page.
Click the Finish button or the Continue button in the Text gizmo.
If you click the Finish button, the Text gizmo returns to its original state and the connection is made. Any text that doesn't fit in the first Text object will automatically flow into the second object.
Click the Continue button if you want to add a third Text object to the chain. After selecting the last Text object to add to the chain, click the Finish button.
If you click Continue then decide you don't want to add another Text object to the chain, click the Cancel button. This preserves the connections you've already made.
See “Flowing Text from Page to Page” to learn how you can create a template that automates this procedure.
“Flowing Text from One Text Block to Another” explains how you flow text from one Text object to another. This section explains how you create an open-ended connection — text flows into the object on the following page, and from the object on the previous page. This technique was used to create the template document in /usr/lib/showcase/templates.
Select a block Text object. (For instructions on creating a block of text, see “Typing Blocks of Text.”)
Bring up the Text gizmo by choosing “Text” from the Gizmos menu.
Choose “ Create Dangling Flow” from the Edit menu on the Text gizmo.
| Note: A template of this sort is useful if you plan to type a multi-page document and want text to flow from page to page automatically. For example, when you fill the box on page one, IRIS Showcase adds a new page, applies the template to it, and automatically flows text into the box on page two. See “Working with Templates” for instructions on creating and using templates. |
You can break the flow of text between Text objects.
Select the Text object whose connection you want to break.
Bring up the Text gizmo by choosing “Text” from the Gizmos menu.
Click the Break button near the top of the Text gizmo.
If the block you select is between two others, a dialog box appears asking which connection you want to break — the one coming in or the one going out.
When you break a connection, you stop the flow of text between two Text objects. For example, suppose you have two Text objects. Break the connection between them, and the text in Object A belongs to Object A; the text in Object B belongs to Object B. If you want all the text to be in one box, copy and paste the text from one to the other.
Editing means a variety of things. You can edit the words — add new words, delete words, copy words. You can change the attributes of the text — change the font, the size, the color. You can change the format of the text — the tabs, the margins, the justification.
No matter what you edit — the words, the attributes, or the format — you need to know two things: how to move around in text and how to select words and groups of words.
For information, see:
To move around in text, you must be editing the Text object. See “Editing Objects.”.
You can move around text in a variety of ways.
The easiest way to move around is to place the cursor where you want it and click the left mouse button.
You can also use the arrow keys located to the right of the <Enter> key. The <Up Arrow> and <Down Arrow> keys move you to the same position on the line above and below the current line. The <Right Arrow> and <Left Arrow> keys move you one character forward or backward. If the cursor is at the end or beginning of a line, they take you to the next line or previous line.
Hold down the <Ctrl> key while using the <Left Arrow> and <Right Arrow> keys to move forward or backward an entire word.You can also jump to a particular line by pressing <Alt>-J while you're editing a Text object. A dialog box appears; type in the line number then press <Enter>.
To select a word, you must be editing the Text object. See “Editing Objects” for detailed instructions on editing an object.
You can select words as follows:
Double-click on a a word to select the word and the space following it.
Double-click on the space separating two words to select a pair of words: the one before the space and the one after the space.
Hold down the left mouse button and drag the cursor over the section of text you want to select. Release the mouse button and the text is highlighted (selected).
Press the <Shift> key to add additional characters and words to the selection.
Once you select a word, a pair of words, or a block of text, you can cut, copy, paste, and delete them in the usual fashion.
To add text to a Text object:
Place the cursor over the Text object; then double-click the left mouse button to edit it. A light-green box surrounds the text.
Position the cursor.
Begin typing to insert text to the right of the cursor.
To delete text:
Place the cursor over the Text object; then double-click the left mouse button to edit it. A light-green box surrounds the text.
Position the cursor.
Delete the text in one of several ways:
Press the <Back Space> key to erase text to the left of the cursor.
Press the left mouse button and drag the cursor over the text you want to delete. When the text is highlighted, press the <Back Space> key to erase it.
You can also begin typing when the text is highlighted. The selected text is replaced with the new words you type.
| Tip: <Alt>-x is the keyboard shortcut. It deletes the text and places it in a cut buffer so you can paste it elsewhere. |
This section explains how you use the “ Copy” and “ Paste” commands to copy and paste selected characters, words, and sentences within or between IRIS Showcase files. You can also copy an entire Text object. For instructions on this, see “Copying and Pasting Entire Text Objects.” For instructions on copying and pasting text to and from other windows, see “Copying and Pasting Text to Other Windows.”.
Place the cursor over the Text object; then double-click the left mouse button to edit it. A light-green box surrounds the text.
Select the word or words you'd like to copy.
Choose “Copy” from the Edit menu.
Move the cursor to the place where you'd like to insert the copy of the text.
To place the text in the Text object you're editing, click the left mouse button at the place you would like the text to be inserted.
To insert the text into another Text object, you must edit that Text object; then click the left mouse button at the place you would like the text to be inserted.
Choose “Paste” from the Edit menu.
The copy is inserted at the cursor location.
You can copy and paste text to and from other open windows. “Copying Text from Another Program” explains how to copy text from another window. This section explains how you copy text from IRIS Showcase and paste it into another window.
Place the cursor over the Text object that you want to edit; then double-click the left mouse button. A light-green box surrounds the text when you're editing it.
Select the word or words you'd like to copy.
Move the cursor into the window in which you want to paste the text.
Click the middle mouse button. The text appears in the window.
You copy and paste an entire Text object the same way you copy and paste any IRIS Showcase object.
Select the Text object.
Click on the text block once with the left mouse button to select it. (If you're already editing an object, you first need to quit editing. To do so, click once with the left mouse button in an empty space in the drawing area, or choose “Done Editing” from the Edit menu.)
Choose “Copy” from the Edit menu.
Choose “Paste” from the Edit menu. A red outline of the block appears.
Move the red outline around until it's in the location you want. Then click once with the left mouse button and the block appears.
| Tip: You can use keyboard shortcuts for “Copy” and “Paste.” “Copy” is <Alt>-c; “Paste” is <Alt>-v. |
You can copy the style of a word or paragraph rather than copying the object itself. For instance, suppose you want all of the subheadings in your report to be Helvetica 18, bold italic, and blue. Create one paragraph in this style; then simply copy the style and paste it to the other subheadings.
Place the cursor over the Text object; then double-click the left mouse button to edit it. A light-green box surrounds the text.
Select the word(s) or paragraph whose style you want to copy.
You copy the style of the first character in the selected section.
Choose “Copy” from the Edit menu.
The “Copy” command makes a copy of the object and all of its attributes — color, style, and so on.
Select the word(s) or paragraph(s) to which you want to apply the copied style.
Open the Edit menu; then choose “Font” or “Paragraph Style” from the Paste Attributes rollover menu.
Select “Font” and you can copy the style of a particular word or words — font, size, style, and color.
Select “Paragraph Style” and you copy the format of a paragraph—the margins, tabs, justification, and leading, or spacing.
The text changes to the new style.
| Tip: Once you set the Paste Attribute rollover, you can just choose “Paste Attribute” from the Edit menu, or use the keyboard shortcut: <Alt>-V. |
You use the Search/Spell gizmo to search for words in a Text object or a string of Text objects that are connected. (See “Flowing Text from One Text Block to Another” and “Flowing Text from Page to Page” for information on connecting Text objects.)
Place the cursor over the Text object; then double-click the left mouse button to edit it. A light-green box surrounds the text.
Bring up the Search/Spell gizmo by choosing “Search/Spell” from the Text rollover menu on the Gizmos menu. See Figure 6-11.
Type the word(s) you are searching for in the field next to the Find button.
If the text cursor isn't visible, click on the field.
Select the options you want by clicking in the box next to “Match full word” or “Match capitalization.” A red checkmark appears in the boxes.
Select “Match full word” if you want IRIS Showcase to find that word alone; don't select it if you want IRIS Showcase to find that sequence of characters. For example, if you're searching for “the,” and don't select “Match full word,” IRIS Showcase will also find “the” in “there.”
Select “Match capitalization” if you want IRIS Showcase to find the word only if it's capitalized exactly as you typed it. If you want IRIS Showcase to find the word, however it's capitalized, don't select “Match capitalization.”
Click the Find button.
If the string appears in the text block you are editing, the cursor moves to that position and IRIS Showcase highlights the string.
To continue searching, click Find again, press <Enter>, or choose “Find” from the Utilities menu on the Search/Spell gizmo. If the string appears again, the cursor moves there and IRIS Showcase highlights the string.
You use the Search/Spell gizmo to search for a word and replace it with a different word.
Place the cursor over the Text object; then double-click the left mouse button to edit it. A light-green box surrounds the text.
Bring up the Search/Spell gizmo by choosing “Search/Spell” from the Text rollover menu on the Gizmos menu.
Fill in the field next to the Find button.
Type the replacement word in the field next to the Replace button.
Click in the box next to “Replace to end” to change all occurrences, or “Replace next” to look at each word before IRIS Showcase replaces it.
A blue triangle appears in the box to indicate which choice you selected.
Click the Find button. If the string appears in the text block you are editing, the cursor moves to that position and IRIS Showcase highlights the string.
Click the Replace button.
IRIS Showcase finds and changes the word. If you selected “Replace to end,” IRIS Showcase replaces all instances of the word between the cursor location and the end of the text.
If you chose “Replace next,” IRIS Showcase highlights the next occurrence of the word. If you want to skip an occurrence, simply click the Find button, and the program finds the next instance of the string.
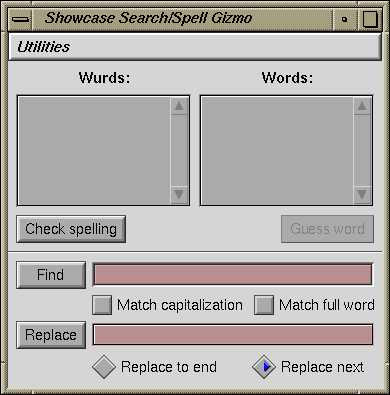
IRIS Showcase provides a Search/Spell gizmo, so you can reduce the number of typos and other spelling errors in your presentations, memos, and reports. See Figure 6-12. It checks the spelling in one Text object or group of Text objects that are connected.
To check spelling in a particular Text object:
Place the cursor over the Text object; then double-click the left mouse button to edit it. A light-green box surrounds the text.
Bring up the Search/Spell gizmo by choosing “Search/Spell” from the Text rollover menu on the Gizmos menu.
Click the Check Spelling button.
IRIS Showcase finds words that are spelled incorrectly and places them in the column labeled “Wurds.” (Some words may be spelled correctly; the spell checker just doesn't recognize them. See “Limitations of the Spell Checking Mechanism.”)
Select a word in the gizmo by clicking on it with the left mouse button. The word is highlighted in the Search/Spell gizmo, and in your document.
Click the Guess Word button. A list of suggested words appears in the column labeled “Words.”
Find the correctly spelled word and click on it once or type the correct word in the field next to the Replace button.
Click the Replace button and the new word replaces the old one.
| Tip: Steps 4 and 5 can be done in one step. Place the cursor over the word; then double-click the left mouse button. The word is highlighted in your document, and a list of suggested spellings appears. Steps 6 and 7 can be done at once as well. Place the cursor over the correctly spelled word; then double-click the left mouse button. IRIS Showcase finds the misspelled word and replaces it with the correctly spelled word. |
Changing the style of text means changing it from plain to bold, bold to italics, and so on. The controls for changing style are in the Master gizmo. This section explains how to change the style of selected characters, words, and sentences. See “Changing the Attributes of an Entire Text Object” to learn how to change the style of an entire Text object.
Place the cursor over the Text object; then double-click the left mouse button to edit it. A light-green box surrounds the text.
Select the word or words you want to change.
Bring up the Master gizmo.
If it's buried underneath other windows, pop it to the top by choosing “Master” from the Gizmos menu.
Click once with the left mouse button in the box next to the style you want. The font style controls are at the bottom of the gizmo.
A red checkmark appears in the box and the selected text changes.
| Tip: <Alt>-B is the keyboard shortcut for “Bold ”; <Alt>-I is the keyboard shortcut for “Italic”; <Alt>-N returns to plain text. |
The Master gizmo contains a pop-up menu that lists the available fonts. This section explains how to change the font of selected characters, words, and sentences. See “Changing the Attributes of an Entire Text Object” to learn how to change the font of an entire Text object.
Place the cursor over the Text object; then double-click the left mouse button to edit it. A light-green box surrounds the text.
Select the word or words you want to change.
Bring up the Master gizmo.
If it's buried underneath other windows, pop it to the top by choosing “Master” from the Gizmos menu.
Place the cursor over the button next to the label “Font Family”; then press the left mouse button to reveal a pop-up menu of available fonts.
Choose a font from the pop-up menu; then release the mouse button.
The name of the selected font appears on the button, and the selected text changes.
The controls for changing the text size are in the Master gizmo. This section explains how to change the size of selected characters, words, and sentences. See “Changing the Attributes of an Entire Text Object” to learn how to change the text size for an entire Text object. Also see “Resizing Text Objects.” It explains how you can make text in a Label text object larger or smaller by resizing the object.
Place the cursor over the Text object; then double-click the left mouse button to edit it. A light-green box surrounds the text.
Select the word or words you want to change.
Bring up the Master gizmo.
If it's buried underneath other windows, pop it to the top by choosing “Master” from the Gizmos menu.
Place the cursor over the button next to the label “Font Size”; then press the left mouse button to reveal a pop-up menu of available sizes. See Figure 6-13.
Choose a size from the pop-up menu; then release the mouse button.
The selected size appears on the button, and the selected text changes.
| Note: You can also select a type size by typing a number into the field next to the label “Font Size.” After typing, press the <Enter> key. If the size you type appears in the pop-up menu, the label on the button changes to display this size; otherwise, the button is labeled “Custom.” |
You change the color of text by using the color palette in the Master gizmo. This section explains how to change the color of selected characters, words, and sentences. See “Changing the Attributes of an Entire Text Object” to learn how to change the color of all text in a Text object.
Place the cursor over the Text object; then double-click the left mouse button to edit it. A light-green box surrounds the text.
Select the word or words you want to change.
Go to the Master gizmo.
If it's buried under other windows, you can pop it to the top by choosing “Master” from the Gizmos menu.
Check to make sure a blue triangle appears in the box next to the label “Fill Color.” If you don't see a triangle, click the button next to the label “Fill Color.”
Click once with the left mouse button over the color you want; it is outlined.
The selected text changes to the new color, and the new color becomes the active color.
You can make a new color and add it to the palette. “Adding New Colors.”
You can make one character write on top of another — a useful trick for placing accents above letters. To use this, type the first character; then press <Alt>- <Back Space>. Then type the other character. The second character sits on top of the first character.
IRIS Showcase supports an extended ISO character encoding. This lets you create, display, and print common European characters along with other special symbols. Appendix E, “Extended ISO Character Codes,” lists the available characters and explains how to create them.
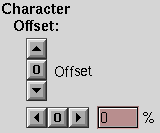
The offset arrows in the Text gizmo let you create subscripts and superscripts quite easily. You also use these controls to adjust the amount of space between characters. See also “Adjusting the Space Between Characters.”
Place the cursor over the Text object; then double-click the left mouse button to edit it. A light-green box surrounds the text.
Select the text you want to change.
Click the up and down arrows under the label “Character Offset.” See Figure 6-14.
The text rises or lowers.
Select the offset text; then click the zero in between the arrows if you want to restore the text to the original position.
You can change the font, size, color, and style of entire Text objects, nearly the same as you do words and characters; select the block and then apply the characteristic. Here's an example of how you change the font used in a block.
Select the Text object.
Click on the Text object once with the left mouse button to select it. (If you're already editing an object, you first need to quit editing. To do so, click the left mouse button in an empty space in the drawing area, or choose “Done Editing” from the Edit menu.)
Bring up the Master gizmo.
If it's buried underneath other windows, pop it to the top by choosing “Master” from the Gizmos menu.
Place the cursor over the button next to the label “Font Family”; then press the left mouse button to reveal a pop-up menu of available sizes.
Choose a font from the pop-up menu; then release the mouse button.
The name of the selected font appears on the button, and all the text changes to the new font.
You can change the format of paragraphs using the Text gizmo and the ruler along the top of the page. You can adjust the line spacing, the character spacing, the margins, the justification, and the tab settings.
For information, see:
The Text gizmo lets you specify how much space you want to add before and after paragraphs.
Place the cursor over the Text object; then double-click the left mouse button to edit it. A light-green box surrounds the text.
Select the paragraph(s) whose spacing you want to change.
Place the cursor in a paragraph, or press the left mouse button and drag the cursor over the paragraphs you want. (You don't need to select entire paragraphs. IRIS Showcase changes the leading of all paragraphs in which any text is selected.)
Bring up the Text gizmo by choosing “Text” from the Gizmos menu.
Place the cursor in the field next to the label “Within”; then type the number for paragraph spacing or use the arrows at the bottom of that section of the gizmo. The space is measured in points.
Type a positive number to add space, or a negative number to reduce space.
If the box already contains a number, hold down the left mouse button and drag over the number(s). When it's highlighted white, type the new number.
If you typed a number, make sure the cursor is in the Text gizmo; then press <Enter>. The selected paragraph changes.
If you used the arrows, the paragraph has already changed.
| Note: Suppose you have two consecutive paragraphs, labeled A and B. Paragraph A has 4 points of space after it; paragraph B has 6 points of space before it. IRIS Showcase takes the larger of the two numbers so you will see 6 points between paragraphs A and B. |
The Text gizmo lets you specify how much space you want between lines in a paragraph. This space is called leading.
Place the cursor over the Text object; then double-click the left mouse button to edit it. A light-green box surrounds the text.
Select the paragraph(s) in which you want to change the spacing.
Place the cursor in a paragraph, or press the left mouse button and drag the cursor over the paragraphs you want. (You don't need to select entire paragraphs. IRIS Showcase changes the leading of all paragraphs in which any text is selected.)
Bring up the Text gizmo by choosing “Text” from the Gizmos menu.
Place the cursor in the field next to the label “Within”; then type the number for paragraph spacing or use the arrows at the bottom of that section of the gizmo. The space is measured in points.
Type a positive number to add space, or a negative number to reduce space.
If the box already contains a number, hold down the left mouse button and drag over the number(s). When it's highlighted white, type the new number.
If you typed a number, make sure the cursor is in the Text gizmo; then press <Enter>. The selected paragraph changes.
If you used the arrows, the paragraph has already changed.
The offset arrows in the Text gizmo let you create subscripts and superscripts and adjust the amount of space between selected characters. See also “Using Subscripts and Superscripts.”
Place the cursor over the Text object; then double-click the left mouse button to edit it. A light-green box surrounds the text.
Select the text you want to change.
Click the left and right arrows.
The text spreads out or becomes more condensed.
Select the offset text; then click the zero in between the arrows if you want to restore the text to the original position.
You have four choices for justifying your text: left, right, justified, and centered. These controls are on the Text gizmo.
Choose left to align paragraphs with the left margin or indent.
Choose right to align paragraphs with the right margin or indent.
Choose justified to expand lines in a paragraphs so they extend from the left to the right margin or indent.
Choose centered to center each line between the margin indents.
To change the justification, you use the four icons under the label “Justify” in the Text gizmo:
Place the cursor over the Text object; then double-click the left mouse button to edit it. A light-green box surrounds the text.
Select the paragraph(s) in which you want to change the justification.
Place the cursor in a paragraph, or press the left mouse button and drag the cursor over the paragraphs you want. (You don't need to select entire paragraphs. IRIS Showcase changes the justification of all paragraphs in which any text is selected.)
Bring up the Text gizmo by choosing “Text” from the Gizmos menu.
Select the type of justification you want by clicking one of the four icons in the middle of the Text gizmo.
You use the ruler along the top of the page to set the left and right text margins.
Place the cursor over the Text object; then double-click the left mouse button to edit it. A light-green box surrounds the text.
Select the paragraph(s) in which you want to change the margins.
Place the cursor in a paragraph, or press the left mouse button and drag the cursor over the paragraphs you want. (You don't need to select entire paragraphs. IRIS Showcase changes the margins of all paragraphs in which any text is selected.)
Move the cursor into the ruler along the top of the page. A symbol marks the left and right margin. (See Figure 6-15.) If the ruler isn't visible, choose “Show Rulers” from the View menu to have it display again.
Note: Text you create using the Label text tool does not have margins that you can set. The margin markers are inaccessible. Adjust the margins by sliding the markers back and forth along the ruler. The text moves as you move the marker. See Figure 6-15.
To adjust the left margin, place the cursor over the bar on the left edge of the margin marker; then press the mouse button and slide the marker back and forth along the ruler.
The left margin marker has three parts: a thin bar and a divided triangle. The bar lets you set the margin for all lines in the paragraph. It moves all three pieces of the marker. The pieces in the divided triangle let you set the margin for the first line in a paragraph and all subsequent lines.
To adjust the right margin, place the cursor over the right margin marker; then press the mouse button and slide the marker back and forth along the ruler.
Release the mouse button when the marker is located where you want. The text shifts over to the new margin.

You use the left margin marker in the ruler along the top of the page to set indents.
Place the cursor over the Text object; then double-click the left mouse button to edit it. A light-green box surrounds the text.
Select the paragraph(s) whose first line you want to indent.
Place the cursor in a paragraph, or press the left mouse button and drag the cursor over the paragraphs you want. (You don't need to select entire paragraphs. IRIS Showcase changes the margins of all paragraphs in which any text is selected.)
Move the cursor into the ruler along the top of the page. (If the ruler isn't visible, choose “Show Rulers” from the View menu to have it display again.)
A symbol marks the left and right margin. The left margin marker has three parts: a thin bar and a divided triangle.You use the top half of the divided triangle to set the indentation. See Figure 6-15.
Note: Text you create using the Label text tool does not have margins that you can set. The margin markers are inaccessible. Place the cursor over the top half of the divided triangle; then press the mouse button and slide the marker along the ruler. The text moves as you move the marker.
Release the mouse button when the marker is located where you want. The text in the first line shifts.
Note: You can move the lower half of the divided triangle to set the left margin for all other lines in the paragraph.
For information on different tab settings, default tabs, and setting, moving, and deleting tabs, see:
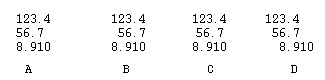
Four types of tab stops are available: flush left, flush right, centered, and decimal-aligned. Figure 6-16 shows a sample of each type. Flush left (A) positions text to the right of the tab stop. Flush right (B) positions text to the left of the tab stop. Centered (C) centers text around the tab stop. Decimal-aligned (D) aligns text around the decimal point.
By default, IRIS Showcase places a series of flush left tab stops. The default tab stops appear as gray triangles in the ruler . They are deleted when you add your own tabs; they reappear when you delete your tab stops.
You can set new tab stops using the ruler along the top of the IRIS Showcase page.
Place the cursor over the Text object; then double-click the left mouse button to edit it. A light-green box surrounds the text.
Select the paragraph(s) in which you want to set new tab stops.
Place the cursor in a paragraph, or press the left mouse button and drag the cursor over the paragraphs you want. (You don't need to select entire paragraphs. IRIS Showcase changes the tab settings of all paragraphs in which any text is selected.)
Move the cursor into the ruler along the top of the page.
If the ruler isn't visible, choose “Show Rulers” from the View menu to have it display again.
Select the type of tab stop you want — flush left, flush right, centered, or decimal-aligned. Figure 6-17 shows the icons; they appear to the left of the ruler at the top of the page.
Press and hold the mouse button over one of the four tab icons.
Keep the mouse button depressed and slide the marker back and forth along the ruler.
Release the mouse button when the marker is located where you want. Text in the selected paragraph(s) adjusts to the new tab stops.
Any default tab stops to the left of the new tab are deleted.
| Note: When creating decimal-aligned tab stops, make sure the width of the column is wide enough to fit the |
You can't move default tab stops; you can move only tabs that you add. (See “The Default Tab Stops” for an explanation of the default settings.)
Place the cursor over the Text object; then double-click the left mouse button to edit it. A light-green box surrounds the text.
Select the paragraph(s) in which you want to move the tab stops.
Place the cursor in a paragraph, or press the left mouse button and drag the cursor over the paragraphs you want. (You don't need to select entire paragraphs. IRIS Showcase changes the tab settings of all paragraphs in which any text is selected.)
Place the cursor over a tab stop in the ruler along the top of the page. (If the ruler isn't visible, choose “Show Rulers” from the View menu to have it display again.)
Press the mouse button and slide the tab marker back and forth along the ruler.
Release the mouse button when the tab stop is located where you want.
You can delete tabs that you have added; you cannot delete a default tab stop. The default tab stops are automatically deleted when you add your own tabs. (See “The Default Tab Stops” for an explanation of the default settings.)
Place the cursor over the Text object; then double-click the left mouse button to edit it. A light-green box surrounds the text.
Select the paragraph(s) that contain tab stops that you want to delete.
Place the cursor in a paragraph, or press the left mouse button and drag the cursor over the paragraphs you want. (You don't need to select entire paragraphs. IRIS Showcase changes the tab settings of all paragraphs in which any text is selected.)
Place the cursor over a tab stop in the ruler along the top of the page. (If the ruler isn't visible, choose “Show Rulers” from the View menu to have it display again.)
Press the mouse button and slide the tab marker out of the ruler.
The tab disappears. If you delete all your tabs, the original default tab settings come back.