IRIS Showcase is an object-oriented program. Everything you place on the page is an object—the graphics, text, audio, images, and 3D containers. This chapter provides an overview of the different object types, and explains how you manipulate these objects once they're on the page. The techniques described apply to all objects except where noted otherwise.
Everything you place on the page is an object. Below is a list of each type of object:
2D graphics
Text blocks
Images
Audio clips
3D containers
The remainder of this chapter describes ways in which you can manipulate these objects.
For information on selecting one, multiple, or overlapping objects, see:
You can select an object in several ways.
Click on the Select tool in the Master gizmo; then move the cursor into the drawing area. Figure 3-1 shows the Select tool.
Click once with the left mouse button on the object you want to select. Small green boxes surround the object, indicating it is selected.
You can also sweep out a box around the object you want to select.
Click on the Select tool in the Master gizmo; then move the cursor into an empty area of the drawing area.
Press the left mouse button and drag. A dashed outline shows the area you are selecting.
Release the mouse button when the object you want to select is completely enclosed by the outline. Small green boxes surround the object, indicating it is selected.
You can select more than one object at a time.
Click on the Select tool in the Master gizmo.
Move the cursor into the drawing area and do one of three things:
Press the left mouse button in an empty spot in the drawing area, and sweep out a box that surrounds the objects you want to select. (You cannot select models in a 3D container using the sweep-select technique.)
Hold down the <Shift> key while clicking on or sweeping a box around the objects you want to select.
Choose “Select All” from the Edit menu. This selects all of the objects on the page.
The first object that you select is the master object. The green boxes outlining the master object are slightly larger than those outlining the other objects. To make another object the master object, place the cursor over the object; then press the <Alt> and <Shift> keys, and click the middle mouse button.
| Note: To deselect one object out of many that are selected, hold down the <Shift> key and click once on the object with the left mouse button. |
If several objects overlap, and you have difficulties selecting one of the objects, try one of the following two techniques to make selection easier:
Position the cursor over the object you want to select; then click the middle mouse button repeatedly without moving the mouse. You will cycle through all of the objects under the cursor.
Press the <Alt> key and sweep out a box around the object you want to select. This prevents you from accidentally moving or selecting a larger object.
| Note: These techniques do not work if you're editing a 3D container and are trying to select overlapping 3D models. |
You edit objects when you want to alter individual elements of the object—letters and words in a Text object, points in a Graphics object, or models in a 3D container. For example, you edit a Text object when you want to add or delete words, or change the color and size of selected words. You edit a Graphics object to move and delete points, or to change the color of individual points. You edit a 3D container when you want to change the color of individual models in the scene.
To edit an object:
Select the object.
Choose “Edit Object” from the Edit menu. A light-green box surrounds the object.
When you're finished editing an object, choose “Done Editing” from the Edit menu.
You can delete objects in one of several ways. If you want to cut an object and paste it somewhere else:
Select the object(s) you want to delete.
Choose “Cut” from the Edit menu. “Cut” stores the object in a buffer, so you can paste it elsewhere.
If you just want to remove an object:
Select the object you want to delete.
Choose “Delete” from the Edit menu, or press the <Back Space> key. The object is deleted; you can't paste it elsewhere.
This section describes the basic procedure for copying and pasting objects. See “Copying and Pasting Objects Between IRIS Showcase Files” to copy and paste objects between IRIS Showcase files. To copy and paste text or 3D models, see “Copying and Pasting Text” and “Copying and Pasting 3D Models.”
Select the object(s) you want to copy.
Choose “Copy” from the Edit menu.
Choose “Paste” from the Edit menu. A red outline of the object appears.
Move the red outline around until it's in the location you want. Then click once with the left mouse button and the object appears.
You can continue pasting this object in other locations.
You can also copy andpaste objects between IRIS Showcase files.
Select the object(s) you want to copy.
Choose “Copy” from the Edit menu.
Open the file into which you want to paste the object; then choose “ Paste” from the Edit menu in that window.
A red outline of the object appears.
Move the red outline around until it's in the location you want. Then click once with the left mouse button and the object appears.
You can continue pasting this object in other locations.
You can group a set of selected objects or models inside of a 3D container. Doing so allows you to manipulate them as one object.
Once you group selected objects, you cannot edit the original objects. For instance, suppose you group a square and a Text object. You need to ungroup the objects if you want to edit the words.
For information on grouping or ungrouping objects, see:
To group objects:
Select the objects you want to group.
Choose “Group” from the Edit menu.
The selected objects meld into one.
You can lock and pin objects. When you lock an object, you can't move or edit it; when you pin an object, you can edit it, but you can't move it. This is useful for several reasons:
If you pin or lock an object, you can't accidentally move it.
If you pin or lock an object, you can copy it from page to page and it will appear in the same position.
For information on locking, pinning, unlocking, or unpinning an object, see:
To pin or lock an object:
Select the object.
Choose “Pin” or “Lock” from the Edit menu.
If you choose “Pin,” a tack appears on the object; if you choose “Lock,” a small padlock appears on the object. See Figure 3-2.
Figure 3-2. The thumbtack appears when you select an object that's pinned; the padlock when you select an object that's locked.

| Note: Models inside of a 3D container cannot be pinned or locked in place. |
Once you place an object on the page, you can easily move it to a different location on the page. This section provides basic instructions for moving all objects. See “Moving 3D Models” for specific information on moving models in a 3D container.
Select the object(s) you want to move.
If a thumbtack or padlock appears, the object is pinned or locked. Choose “Unpin/Unlock” from the Edit menu before continuing.
Press the left mouse button over the selected object and drag it to the new location.
Be careful not to place the cursor on one of the green boxes; you will resize the object.
To move an unfilled object, you must place the cursor on the edge of the object.
An outline of the object shows where you are moving it. Release the mouse button when the object is positioned correctly.
When you select an object, the object is surrounded by small green boxes. These boxes allow you to resize the object.
Select the object you want to stretch or shrink.
If a thumbtack or padlock appears, the object is pinned or locked. Choose “Unpin/Unlock” from the Edit menu before continuing.
Place the cursor over one of the small boxes outlining the object.
Hold down the left mouse button and drag the cursor to enlarge or reduce the object. An outline of the object shows you how you're resizing the object.
If you press the <Shift> key while dragging the mouse, you maintain the aspect ratio of the object.
Release the mouse button when you're satisfied with the new size.
The steps you take to resize all objects are the same. The behavior is slightly different, depending on the object type. See also “Resizing Text Objects” and “Resizing 3D Models.”
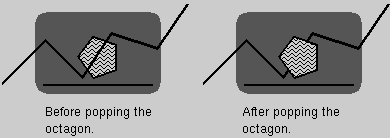
IRIS Showcase provides “Pop” and “Push” commands so you can change the way overlapping objects stack on top of each other. (These commands do not apply to models within the 3D container.) For instance, suppose, in Figure 3-3, you want the line behind the pentagon.
Select the object whose stacking order you want to change—for example, the pentagon.
Choose “Pop” from the Edit menu. The pentagon pops to the top, as shown in Figure 3-3.
Both the “Pop” and “Push” commands have a rollover menu. The rollovers let you specify whether you want the object to push or pop one level, or all the way to the bottom or top. By default, the object pushes and pops all the way to the bottom or top.
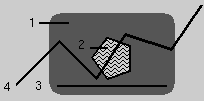
| Note: IRIS Showcase keeps track of the order in which objects are placed on the page. When you pop and push objects, you're changing this order. Because of this, pushing and popping one layer at a time may not work quite as you expect. For instance, consider the previous example. Figure 3-4 includes labels indicating the order in which the objects were originally drawn. If you select the pentagon and pop it just one level, nothing appears to happen. It becomes object number 3, but it's still below the jagged line, which is object number 4. Pop the pentagon up one more layer and it jumps above the line.
|
All text and 2D graphics objects have an opacity setting. They're either opaque or transparent. You can use the opacity controls in the Master gizmo to change this setting. (These controls do not affect 3D models. For instructions on making a 3D model appear transparent, see “Changing the Material of a 3D Model.”)
Select the object whose opacity you want to change.
Click the left opacity icon to make the object transparent; click the right opacity icon to make the object opaque. See Figure 3-5.
| Note: If you want to view an object that's partially buried underneath a solid object, select the object you want to view and use the “Pop” command to pop it to the top. |
This section describes how you use rulers, grids, and the Align gizmo to position objects on the page. For information, see:
Rulers appear along the top and left edge of the IRIS Showcase page. You can use these to position an object on the page.
IRIS Showcase provides eight different grid settings to help you draw and lay out pages with precision. To turn on a grid, choose one of the eight settings from Grid rollover menu on the View menu: “1/16 inch,” “1/8 inch,” “1/4 inch,” and “1/2 inch.”
The grid appears in the drawing area as rows of gray dots. (If you use the Zoom command and look closely, you see that these dots are really small crosses.) Only every fourth grid mark is drawn; none of the grid marks print.
| Note: The grid doesn't affect models inside of the 3D container. |
The grid appears in the drawing area as rows of gray dots. To turn off a grid, choose “ No Grid” from the Grid rollover menu on the View menu.
This section provides an example of how a grid can help you. Suppose you want to create a pie chart. Without a grid, you may have difficulties; with a grid you can do so quite easily.
To create the pie chart, you draw a circle, and cover portions of it with a wedge. The trick is getting the edge of the wedge to line up exactly with the edge of the circle. Below are the steps for creating the circle.
Choose “1/2 inch” from the Grid rollover menu in the View menu.
Select the filled circle tool in the Master gizmo.
Move the cursor into the drawing area and position it over one of the grid marks. This grid mark will be the center point of the circle.
Press the left mouse button and drag in any direction. An outline of the circle appears.
Release the mouse button when the circle is the size you want.
You use the arc tool to draw the wedge. Again, you begin by choosing the center point and sweeping out a circle. Because you've chosen “1/2 inch,” you can easily choose the same center point and make a circle of the same size. The result: the edge of the wedge lines up with the edge of the circle.
| Note: Grids can also help you make perfect squares and straight lines, and line up several different objects.
<Alt>-y lets you cycle through the grid settings. Also, only every fourth grid mark is drawn; the objects don't always line up with a visible grid mark. |
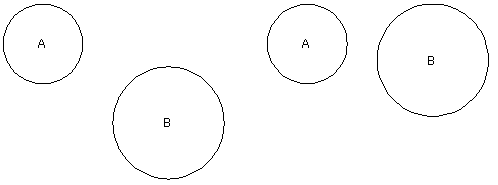
The Align gizmo lets you line up objects with other objects. For example, suppose you create two circles. You can use the Align gizmo to line up their top edges, bottom edges, and more. See Figure 3-6.
| Note: The Align gizmo doesn't align 3D models. For instructions on aligning 3D models, see “Aligning 3D Models.” |
For instance, suppose you want to line up the top edge of circle B with the top edge of circle A.
Move your cursor into the drawing area and select the objects you want to align.
The first item you select is the master object—the object around which all others will be aligned. In this case it's circle A, because you want circle B to line up with it.
Hold down the <Shift> key and select circle B. Notice that the green boxes outlining the master object are slightly larger than those outlining the other objects.
Bring up the Align gizmo by choosing “Align” from the Gizmos menu.
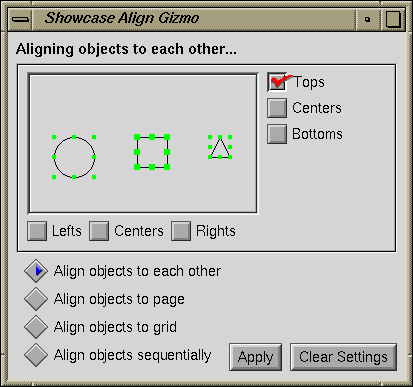
It shows three objects: a circle, a rectangle, and a triangle. These represent the objects you're aligning.
Click the box next to “Align objects to each other” in the lower portion of the gizmo. A blue triangle appears in the box when it's selected.
Click the box next to the word “Tops” on the right side of the gizmo. A red checkmark appears in the box and the circle, square, and triangle in the gizmo move to give you a preview of the alignment.
Click the Apply button. The objects snap into place, as shown in Figure 3-7.
| Note: You can combine alignments to stretch and shrink objects so that they match the width or height of the master object. For example, choose “Left” and “Right” if you want the objects to become the same width. |
You can use the Align gizmo to align objects with a grid. (The Align gizmo doesn't align 3D models. For instructions on aligning 3D models, see “Aligning 3D Models.”)
Choose one of the eight grid settings from rollover menu on the View menu.
Bring up the Align gizmo by choosing “Align” from the Gizmos menu.
It shows three objects: a circle, a rectangle, and a triangle. These represent the objects you're aligning.
Click on “Align objects to grid” in the lower portion of the gizmo. A blue triangle appears in the box when it's selected and gray dots appear in the gizmo.
Move your cursor into the drawing area and select the objects you want to align.
Decide which part of the objects you want to align to the grid, and click the box next to the appropriate words. The circle, rectangle, and triangle in the gizmo move to give you a preview of the alignment.
Choose “Tops” and the top of the object aligns to the grid.
Choose “Centers” from the right side of the gizmo and the object shifts up or down so its center aligns to the grid.
Choose “Bottoms” and the bottom of the object aligns to
the grid.Choose “Lefts” and the left edge of the object aligns to
the grid.Choose “Centers” and the object shifts to the left or right so its center aligns to the grid.
Choose “Rights” and the right edge of the object aligns to
the grid.
Click the Apply button and the objects line up with the grid.
| Note: Every fourth grid mark is drawn; the objects don't always line up with a visible grid mark. |
You can use the Align gizmo to create uniform spacing between objects. For example, you can select three objects and specify that you want the top of each object to be an inch below the other.
Move your cursor into the drawing area and select the objects you want to align.
Bring up the Align gizmo by choosing “Align” from the Gizmos menu.
It shows three objects: a circle, a rectangle, and a triangle. These represent the objects you're aligning.
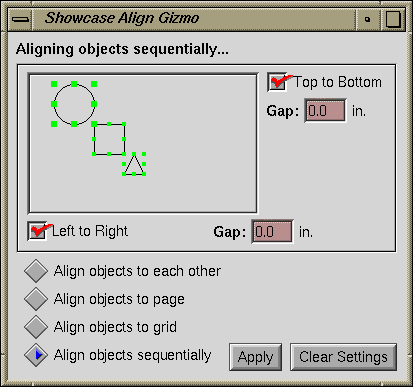
Click on “Align objects sequentially” in the lower portion of the gizmo. A blue triangle appears in the box when it's selected and the Align gizmo changes. See Figure 3-8.
Click the box next to either “Top to Bottom” or “Left to Right.”
Choose “Top to Bottom” to put an equal amount of space between the bottom of one object and the top of the next. IRIS Showcase looks at the objects you have selected and uses the uppermost object as a starting point.
Choose “Left to Right” to put an equal amount of space between the right edge of one object and the left edge of the next. IRIS Showcase looks at the objects you have selected and uses the leftmost object as a starting point.
Type the amount of space you want between objects in the box next to the word “Gap.”
“Gap” appears after you select “Top to Bottom” or “Left to Right.”
Click the Apply button and the objects snap into place.
You can use the Align gizmo to center objects on the page.
Move your cursor into the drawing area and select the object you want to center on the page.
Bring up the Align gizmo by choosing “Align” from the Gizmos menu.
It shows three objects: a circle, a rectangle, and a triangle. These represent the objects you're aligning.
Click the box next to “Align objects to page” in the lower portion of the gizmo. A blue triangle appears in the box when it's selected.
Click the box next to the word “Centers” on the right side and midway down the gizmo. Selecting both horizontally and vertically centers the object on the page.
A red checkmark appears in the boxes when they are selected.
Click the Apply button. The object moves to the center of the page.
You can use the Align gizmo to position objects in a certain location on the page. For example, suppose you have a square that you want to place two inches from the left edge of the page and three inches from the top of the page.
Move your cursor into the drawing area and select the object you want to align.
Bring up the Align gizmo by choosing “Align” from the Gizmos menu.
It shows three objects: a circle, a rectangle, and a triangle. These represent the objects you're aligning.
Click the box next to “Align objects to page” in the lower portion of the gizmo. A blue triangle appears in the box when it's selected.
Click the box next to the word “Tops” on the right side of the gizmo.
A red checkmark appears in the box and a field labeled “Margins” appears.
Type a number in the box next to “Margins.” For this example, type 3. This places the object three inches from the top edge of the page.
Click the box next to the work “Lefts.”
A red checkmark appears in the box and a field labeled “Margins” appears.
Type a number in the box next to “Margins.” For this example, type 2. This places the object two inches from the left edge of the page.
Click the Apply button. The objects snap into place.
