When users run your application on the IRIX Interactive Desktop, they interact with its windows through 4Dwm, the IRIS Extended Motif Window Manager. This chapter describes the look, interactions, and behaviors that your application's windows should support. (For information on individual window components, see Chapter 6, “Application Windows,” and Chapter 9, “Controls.”) This chapter covers the following topics:
“The IRIX Interactive Desktop Look: Graphic Features and Schemes” discusses general characteristics of windows, including the IRIX Interactive Desktop enhanced look provided by the IRIS IM toolkit and its advantages, and color and font schemes.
“Application Window Categories and Characteristics” defines the categories of windows in the IRIX Interactive Desktop environment and presents several models of applications using the various window types. It also lists the required window decorations and Window menu for each window category, prescribes how to choose labels for title bars, and discusses window size and placement issues.
“Keyboard Focus Across Windows” establishes the 4Dwm default keyboard focus policy across windows as implicit, and describes the behavior for applications that need to maintain control of the pointer while it's outside of the application's windows.
“Minimized Windows” provides ideas for designing minimized window images, describes how to choose labels for minimized windows, and discusses application behavior while minimized.
“Desks” describes the tool that provides users with multiple virtual screens or desks. It covers the design implications for your application windows, which can be distributed over these multiple desks.
“Session Management” describes the 4Dwm session manager and the implications of allowing users to log out while your application is running and return automatically to the same state upon subsequent login.
When using the IRIS IM user interface toolkit, you can choose one of two different appearances for your application:
the IRIX Interactive Desktop look (preferred by Silicon Graphics)
the basic OSF/Motif look
The IRIX Interactive Desktop look provides an attractive, 3D look for your application and the default colors and fonts used by the IRIX Interactive Desktop. The two components to the IRIX Interactive Desktop look are described below:
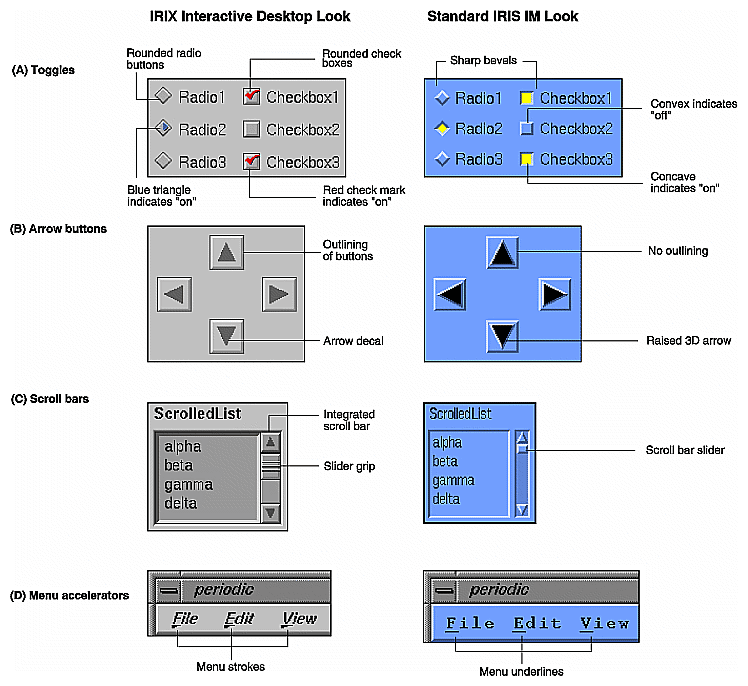
The IRIX Interactive Desktop look contains a number of graphic modifications made to the standard IRIS IM interface. These modifications improve the appearance and ease of use of applications. They have no impact on the component layout and require minimal work on the part of the developer. Some of the differences between the IRIX Interactive Desktop look and the standard IRIS IM look appear in Figure 3-1. In comparison, the IRIX Interactive Desktop look:
Uses smooth shading with a rounded dimensional look to create a high-quality visual appearance. Numerous sharp bevels, such as those found in standard Motif components, detract from rather than add to the visual presentation of an application. (See Figure 3-1A.)
Adds locate highlight (the object brightens as the pointer passes over it) so that users can tell which components are live functional objects and which are passive graphics or are disabled. Locate highlight also gives users feedback as to whether or not the application is listening.
Adds additional visual feedback for selected checkboxes and radio buttons. A distinct red arrow and a blue triangle clearly indicate a selected checkbox and radio button, respectively (see Figure 3-1A).
Enhances scrollbars by providing a grip on the slider used in scrollbars and a temporarily indented impression to indicate the original location of the slider during the scrolling process (see Figure 3-1C). The grip makes it easier for users to recognize the slider as something to be dragged rather than a button to be pressed.
Uses a stroked underline to indicate mnemonics in menus simply to give the look of an application some pizazz (see Figure 3-1D).
Provides a more consolidated treatment for composite objects. For example, the IRIX Interactive Desktop look visually integrates the arrow stepper buttons in scrollbars with the scrollbars themselves to give a less cluttered look. In addition, the scrollbars are visually integrated with the client pane as much as possible to make the whole assembly appear as a single, integrated unit (see Figure 3-1C).
Uses decals instead of stacked, 3D elements to make it easier for users to see the components (see Figure 3-1B). There is no gratuitous use of 3D such as the raised arrows and rectangular option buttons in standard Motif.
Renders black outlines around stand-alone widgets to improve the readability and perception of adjoining color areas (see Figure 3-1B and C). For example, the black outline around buttons and scrollbars make them stand out from a window's background.
Uses closely grouped dialog buttons that are right justified. This style makes the buttons easier to read, and the close grouping may reduce mouse motion.
For details on how to obtain the graphic enhancements of the IRIX Interactive Desktop look, see Chapter 2, “Getting the IRIX Interactive Desktop Look,” in the IRIX Interactive Desktop Integration Guide. For guidance on designing other aspects of your application windows, such as general layout principles and use of controls, see Chapter 6, “Application Windows” and Chapter 9, “Controls.”
In addition to the graphic modifications described in the previous section, “Enhanced Graphics in the IRIX Interactive Desktop Look,” the IRIX Interactive Desktop look includes schemes. A scheme is a pre-packaged collection of colors and fonts that users can apply to application windows.
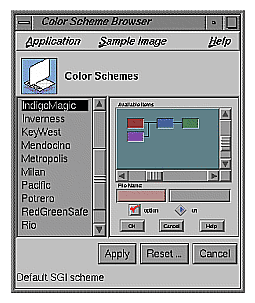
Schemes deliver several benefits to users. When all applications on a workstation use schemes, users can conveniently customize their environment. The schemes are designed with an eye to effective use of color, taking into account both usability and aesthetic considerations. Multiple schemes are provided to address such problems as red/green color-blindness, monochrome X-terminals, and user preference for light or dark text. A user changes the scheme for the desktop by selecting the new scheme from the control panel shown in . (This control panel is accessed from the Desktop->Customize cascading menu in the Toolchest.)
Using schemes also benefits you as a developer by leveraging the work that has already been done on appropriate color and font choices. Using schemes eliminates worrying about different display resolutions, gamma values, user preferences, or most style guide color and font issues.
The model for using schemes as a developer is to specify color and font choices as abstract names from the predefined scheme color and font palettes instead of hard-coding specific color and font values. Then, when the user specifies a scheme, the palette entries are mapped to specific RGB color and font values.
By default, the IRIX Interactive Desktop comes up in the IRIX Interactive Desktop scheme. This scheme is organized around a neutral gray palette with the typographically neutral Helvetica font. Using neutral colors for standard user interface elements preserves the use of color for the application's content areas.
Schemes are meant to apply to any region of an application window built with the standard toolkit components. Don't use schemes for application client areas which are content specific—for example, a rendering window, a movie player, or a molecular modeler. The colors in such client areas will be application-specific and not subject to change when a user selects a new scheme.
For information on supplying schemes in your application, see Chapter 3, “Using Schemes,” in the IRIX Interactive Desktop Integration Guide.
This section defines the four categories of windows in the IRIX Interactive Desktop environment; presents four models of applications using these window types; and lists the decorations, Window menus, and behavior required for each window type. Specifically, this section covers:
The OSF/Motif Style Guide refers to two categories of windows: primary windows and secondary windows. The IRIX Interactive Desktop environment subdivides each of these categories to yield two additional categories useful in many applications. There are two types of primary windows:
A main primary window serves as the application's main controlling window. It's used to view or manipulate data, get access to other windows within the application, and kill the process when users quit. There's only one main primary window per application (and sometimes it isn't visible to users).
A co-primary window is used for major data manipulation or viewing of data outside of the main window.
There are two types of secondary windows:
A support window is a persistent special-purpose window. It typically contains a control panel or tool palette that operates directly on data in a primary window. It is used repeatedly.
A dialog is a transient window, typically used for short, quick, user input, such as an action confirmation, or system output, as in a warning message. It may be user-requested or application-generated.
Although there can be many combinations in an application of the four window types discussed in the previous section (main, co-primary, support, and dialog windows), most applications can be classified as fitting one of four basic models. The distinguishing factors between the models are:
whether they can have one or multiple documents (files) open at a time
their use of primary windows
| Note: The term document means a grouping of data and shouldn't be thought of as simply a text-oriented file. It covers such data types as film clips, audio segments, and Inventor scenes. |
These models are illustrated and discussed in more detail in “Application Models” in Chapter 6. For information about how to implement the various models, see “Implementing an Application Model” in Chapter 5 in the IRIX Interactive Desktop Integration Guide.
“Single document, one primary” is the most basic model—it accomplishes all of its tasks within the main window and uses as many support windows and dialogs as needed. Users can work on only one document at a time. Thus, when a user has one document open and opens a second document, the second document replaces the first. IRIS Showcase operates in this manner.
The “single document, multiple primaries” model uses both main and co-primary windows to accomplish major tasks. In this model, the co-primary windows perform different functions. MediaMail is an example of this model. Its main window lets users select electronic mail messages from a folder and perform actions on them such as viewing, printing, deleting, and sorting. Its Compose and Message windows are typical of co-primary windows with different functions designed to support the functionality of the main window. In this model, each primary window has its own menu bar tailored specifically to the functions in that window.
The “multiple document, visible main” model has a main window that is mostly used to launch co-primary windows. These co-primary windows are identical to each other and perform the same functions on different files or documents. Each co-primary window has its own menu bar. IRIS InSight is an example of this model. Its main window lets users launch co-primary viewing windows, browse available files, and conduct global searches through these files. The co-primary windows are used for viewing online books.
The “multiple document, no visible main” model is identical to the “multiple document, visible main” model except that the main window is invisible to the user and new co-primary windows are launched from co-primary windows that are already open. Users open one document and leave it open while opening others. When the last open document is closed, the process is killed.
Users primarily interact with windows on the IRIX Interactive Desktop through the window decorations and Window menu, which 4Dwm, the IRIS window manager, places on each window. The decorations and Window menu entries vary according to the category of the window (see “Application Window Categories” earlier in this chapter) and whether any of the components in the window are resizable. Figure 3-3 shows the decorations for a typical main window. For complete details of the behavior of each of the window decorations, see Section 7.3, “Window Decorations,” in the OSF/Motif Style Guide.
The recommended decorations and Window menu entries for each category of window are shown in Table 3-1. To meet these requirements, you may have to modify both the default window decorations and Window menu entries for at least some of your application windows. For information on modifying the default window decorations and Window menu entries, see Chapter 5, “Window, Session, and Desk Management,” in the IRIX Interactive Desktop Integration Guide. Table 3-1 also lists the keyboard accelerators and mnemonics provided by 4Dwm for each Window menu item. These keyboard accelerators are reserved; do not assign them to other functions in your application.
The behavior of the window decorations and Window menu entries is consistent with the definitions in Section 7.3 of the OSF/Motif Style Guide, with two notable differences:
4Dwm Window menus include the entry “Raise.” “Raise” allows the user to move the window to the top of the window hierarchy, making it completely visible (in contrast to “Lower”).
“Exit” lets users quit the application completely from a primary window. Your application must do all the appropriate cleanup work for an exit from the Window menu, such as prompting the user whether to save changes to a file. The behavior of “Exit” in the Window menu is the same as that of “Exit” in the File menu. See “File Menu” in Chapter 8 for information on the File menu. (Note that the “Close” entry on a co-primary window closes that window and any associated support windows and dialogs. It doesn't quit the application.)
The Window menu entries are based on the functionality available for that type of window. For example, users can't exit the application from support or dialog windows, so these window types don't include an “Exit” entry. If a window can't be resized, it doesn't need the “Size” entry or the “Maximize” entry in its Window menu. (To eliminate the ability of a window to be resized, set the maximum and minimum window sizes equal to the default window size. See “Window Size” later in this chapter.) Dialogs can't be minimized independently of their parent windows and thus don't have a “Minimize” entry.
Table 3-1. Window Decorations and Window Menu Entries by Window Category
Window Decorations and Window Menu Entries | Main Windows | Co-Primary Windows | Support Windows | Dialogs |
|---|---|---|---|---|
Window menu button | Required | Required | Required | Required |
“Restore Alt+F5” [a] | Required | Required | Requireda | Requireda |
Required | Required | Required | Required | |
Optional; use if user may need to expand work area or other components. If resizable, set minimum and maximum size limits. | Optional; use if user may need to expand work area or other components. If resizable, set minimum and maximum size limits. | Optional; use if user may need to expand any components, such as text input fields or scrolling lists. If resizable, set minimum and maximum size limits. | Optional; use if user may need to expand any components, such as text input fields or scrolling lists. If resizable, set minimum and maximum size limits. | |
Required | Required | Don't use | Don't use | |
Use only if there's a “Size” entry. | Use only if there's a “Size” entry. | Use only if there's a “Size” entry. | Use only if there's a “Size” entry. | |
Required | Required | Required | Required | |
Required | Required | Required | Required | |
Don't use; not relevant for main windows. | Required | Required | Required | |
Required; closes all windows for this application and quits. | Optional; use if users can quit application from this window. | Don't use | Don't use | |
[a] This entry always appears in the Window menu, and it's automatically disabled if there's no “Maximize” entry; this default behavior can't be changed. | ||||
By default, all windows on the IRIX Interactive Desktop have a title bar that contains a label for the window. The default label used in the title bar (the application name) rarely provides enough information for users to be able to distinguish one window from another. Label your title bars according to the rules shown below to help your users distinguish among windows belonging to the same application as well as instances of the same application. (For information on how to set the label in the title bar, see “Interacting With the Window and Session Manager” in Chapter 5 of the IRIX Interactive Desktop Integration Guide.)
In general, use the title bar label to identify the window; don't use it to display general status (such as current page number or viewing mode) or application-critical information. Using the title bar to display information can cause problems. For example:
The title bar may be covered by another window or off the screen.
Users aren't accustomed to looking for status information in the title bar, so they`re likely to overlook it if your application displays it there.
It's expensive for the application to update the title bar continuously.
For more information on where to place status information or application-critical information in your application window's title bars, see “Status Areas in Primary Windows” in Chapter 6.
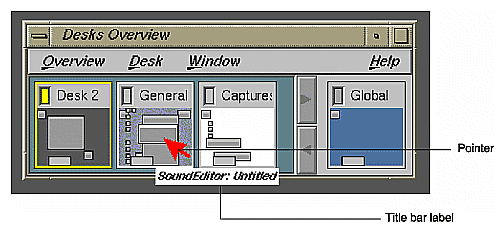
The label you put in the title bar is also used in the Desks Overview window (see “Desks” later in this chapter). By default, as a user moves the pointer over the thumbnail window sketches in the Desks Overview, the thumbnail window's title bar label displays as shown in Figure 3-4. (Note that users can specify that the minimized window label be shown in the thumbnail sketches instead of the title bar label.) This further emphasizes the need for users to be able to distinguish windows using only the title bar information.
The rules for labeling title bars in main windows are illustrated in Figure 3-5.
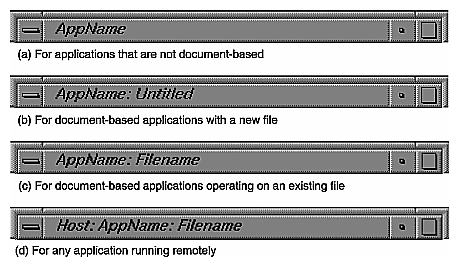
First determine if your application accesses document files. If not, use just the application name.
If your application is document-based, use the application name followed by a colon (:) and the filename (or “Untitled” if it's a new file) as the label in the title bar. Unless you have a real need and enough room, don't include the full pathname in the title bar. Note that if you do include a filename in the label, you need to update the label whenever the file changes.
If your application is displaying remotely, use the host name followed by a colon as a prefix to the title bar label determined above. Be sure to leave spaces between strings and colons in the label.
Don't use the version number in the title bar; make that information available from the “Product Information” entry in the Help menu (see “Types of Online Help” in Chapter 4 for more information).
For those co-primary windows that are used to supplement the main window's functionality as in the “single document, multiple primaries” application model, use the application name and function in the format AppName : Function.
Make sure that the function closely matches the entry in the menu or the label on the button that invokes it. If the co-primary window follows a multiple document model such as the “multiple document, visible main” application model or the “multiple document, no visible main” application model, use the format AppName : Filename (or AppName : Untitled if it's a new file). Unless you have a real need and enough room, don't include the full pathname in the title bar.
Support windows use the application name and the function in the format AppName : Function. Make sure that the function closely matches the entry in the menu or the label on the button that invokes it.
For dialog windows, use the application name, followed by the type of dialog in the format AppName : DialogType, where DialogType can be “Prompt,” “Error,” “Warning,” “Question,” “Information,” “Working,” or “File Selection.” (For information on dialogs, see Chapter 10, “Dialogs.”)
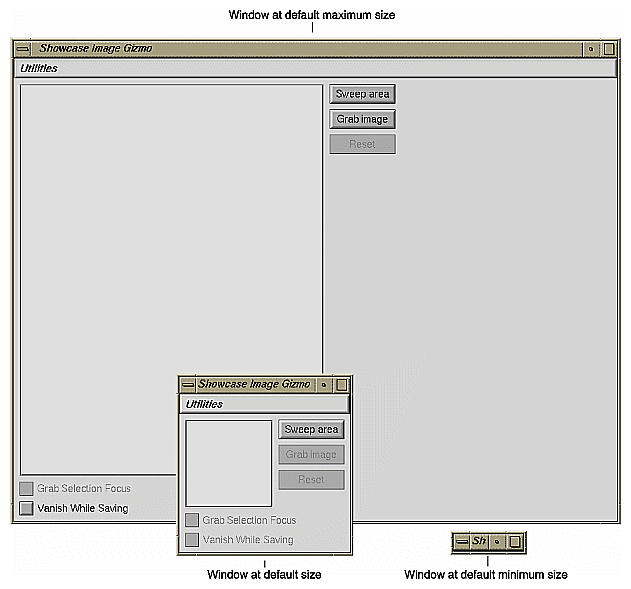
The 4Dwm window manager provides users with complete control over the size of application windows unless the application sets limits. Without a minimum window limit, users can shrink your windows to the point where they're unusable. With no maximum limit, users can expand a window to cover the full screen, potentially wasting valuable screen real estate. These extreme cases, along with a window at its default size, are illustrated in Figure 3-6. Set appropriate maximum and minimum window sizes for all of your application windows. See “Interacting With the Window and Session Manager” in Chapter 5 of the IRIX Interactive Desktop Integration Guide.
In general, windows should be resizable only if they contain areas or components that a user might wish to resize, for example, a primary window with a resizable work area or a support window with a scrolling list or text input field. If a window does not contain resizable areas or components, then it shouldn't be resizable and you should set both the maximum and minimum size equal to the default size. Remember also to remove the Size and Maximize entries from the Window menu as described in “Window Decorations and the Window Menu” earlier in this chapter. For more information on specific window components, see Chapter 9, “Controls.”
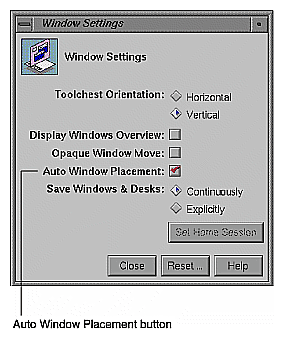
Users expect the placement of all primary windows to respond to the value of the Auto Window Placement option in the Window Settings control panel, as shown in . (Users access this control panel from the Desktop->Customize cascading menu in the Toolchest.) Support windows and dialogs are always placed automatically.
When auto window placement is on (the default), 4Dwm automatically places an application's primary windows. If a primary window does not supply any position information, 4Dwm by default places it in the upper left corner of the screen. When auto window placement is off, users expect to be able to interactively place all primary windows. In this case, a window displays initially as a red outline attached to the pointer at its upper left corner, allowing the user to place the window manually. The user places the window by moving the outline to the desired location on the screen and clicking the left mouse button.
To take advantage of the Auto Window Placement setting, you must supply 4Dwm with a preferred window position for each primary window rather than a required window position. With a preferred window position, when Auto Window Placement is on, 4Dwm places the window at its preferred position. When Auto Window Placement is off, 4Dwm ignores the preferred position, allowing the user to place the window interactively. If the window has a required position, however, 4Dwm always tries to place the window at this preferred position even when users want to place windows themselves.
Furthermore, users expect complete control when moving windows and should be able to move any of your application's windows anywhere on the desktop. Some applications try to “help” the user by repositioning the window programmatically; this strategy is never successful and instead ends up frustrating the user.
For details on how to set a preferred window placement, see “Interacting With the Window and Session Manager” in Chapter 5 of the IRIX Interactive Desktop Integration Guide.
In general, when deciding on the characteristics for your application windows . . .
Determine which category (main, co-primary, support, or dialog) each application window belongs to and assign characteristics appropriately.
When setting up your window decorations . . .
Include a Window menu button for all windows.
Include resize handles only if the window contains resizable components such as work areas, scrolling lists, and text input fields.
Include a Minimize button for all primary windows. Do not include this button on support windows or dialogs.
Include a Maximize button only if the window contains resizable components.
(To see the above window decoration requirements arranged according to window type, see Table 3-1.)
When designing the Window menus for your application windows . . .
Include “Restore Alt+F5” for all primary windows. Include it for support windows and dialogs only if the menu contains a “Maximize” entry.
Include “Move Alt+F7” for all windows.
Include “Size Alt+F8” and resize handles for windows that contain resizable components such as works areas, scrolling lists, and text input fields.
Include “Minimize Alt+F9” and the Minimize button for all primary windows. Do not include the Minimize entry for support windows or dialogs.
Include “Maximize Alt+F10” for windows that are resizable, that is, they have a “Size Alt+F8” entry.
Include “Raise Alt+F2” for all windows.
Include “Lower Alt+F3” for all windows.
Include “Close Alt+F4” for all windows except the main primary window.
Include “Exit Alt+F12” for the main primary window. Include “Exit Alt+F12” for those co-primary windows from which users can quit the application. “Exit” always has the same behavior, that is, it quits the application, no matter how it's activated. Don't include “Exit” for support windows or dialogs.
(To see the above Window menu requirements arranged according to window type, see Table 3-1.)
Always use the default behaviors for the Window menu entries except for “Exit.” Don't add functionality to these commands. When users choose “Exit,” your application must perform any necessary clean up, such as prompting the user to save unsaved changes before quitting.
Don't add application-specific entries to this menu. Users don't expect application-specific entries in the Window menu.
Don't add a title to the Window menu.
Don't use the keyboard accelerators <Alt-F2>, <Alt-F3>, <Alt-F4>, <Alt-F5>, <Alt-F7>, <Alt-F8>, <Alt-F9>, <Alt-F10>, or <Alt-F12> for other functions in your application. They are reserved for the 4Dwm Window menu entries.
When specifying the label in the title bar . . .
For all categories of windows, limit the length of each title bar label such that the entire label displays when the window is viewed at its default size.
Don't include application-critical information or general status information in the title bar such as the current page number or whether a file is in view-only mode.
For main windows, first determine if your application uses document files. If it is not document-based, use the application name only. If it is document-based, use the application name followed by a colon and the filename (or Untitled if new file) in the format AppName : filename and update the label whenever the filename changes. Don't use the full pathname unless that information is required for users to distinguish one window from another. If your application is displaying remotely, add the host name followed by a colon at the beginning of the title bar label in the format Host : AppName ... .
Don't include full pathnames unless that information is required by users to distinguish one window from another. For remote applications, don't include domain information.
Don't use the version number in the title bar; make that information available from the “Product Information” entry in the Help menu.
For co-primary windows used in multiple document models, use the format AppName : Filename (or AppName : Untitled if a new file). For co-primary windows used in the “single document, multiple primaries” model, use the format AppName : Function. Make sure that the function matches the menu entry or the label on the button that invokes it. Don't use the full pathname unless that information is required for users to distinguish one window from another.
For support windows, use the application name and function in the format: AppName : Function. Make sure that the function closely matches the menu entry or the label on the button that invokes it.
For dialog windows, use the application name, followed by the type of dialog in the format: AppName : DialogType, where DialogType is “Prompt,” “Error,” “Warning,” “Question,” “Information,” “Working,” or “File Selection.”
Leave spaces between strings and colons in a label.
For windows without title bars . . .
Display the “Exit” option with the right mouse button.
Allow users to resize the window with the left mouse button.
When determining the default, minimum, and maximum sizes for your windows . . .
Specify a default size for each window.
If the window is resizable, specify a minimum size at which all controls and work areas will be visible and large enough to be usable. If the window is not resizable, set the minimum size equal to the default size.
If the window is resizable, specify a maximum size such that your application window doesn't expand to fill screen space unnecessarily. If the window is not resizable, set the maximum size equal to the default size.
When considering window placement . . .
Set a preferred window position for all primary windows. Don't set a required window position for primary windows.
Try to anticipate other application windows that may be displayed with your application and set your preferred default position appropriately.
As defined in the OSF/Motif Style Guide, the two types of keyboard focus (also referred to as input focus) include:
The IRIX Interactive Desktop uses implicit focus when moving the keyboard focus across windows. Your application should work well under implicit focus and shouldn't require users to change the default keyboard focus policy to explicit. (Note that within windows, applications should use explicit focus to move the keyboard focus between components in the window. Guidelines for using explicit focus within windows are discussed in “Keyboard Focus and Navigation” in Chapter 7.)
Certain applications need to grab the keyboard focus, that is, use the pointer while it is outside of the application window—for example, applications performing screen captures. This is called pointer grab mode.
There are two recommended interaction models for pointer grab mode:
single-action, which permits the user only one action to capture the data before returning to implicit focus
multiple-action, which lets the user perform multiple actions while in pointer grab mode
In the multiple-action model, the user turns on a toggle to maintain keyboard focus while specifying the data to capture. In both the single- and multiple-action models, the application should change the pointer shape to indicate that the pointer belongs to a specific window and no longer adheres to implicit focus. (For a list of standard pointers, see “Pointer Shapes and Colors” in Chapter 11.)
The InPerson desktop conferencing application is a good example of the single-action pointer grab model. The sequence in Figure 3-8 illustrates the single-action pointer grab where the action is to sweep out an area of the screen to be captured as an image. The user chooses the “Snap Screen Area” entry from the screen capture menu in the whiteboard's tool bar. The pointer changes to a sighting pointer (a camera with a cross hair) and the user can then drag a rectangle around the area of the screen that the user wants to capture as an image. When the user completes the single action of dragging, InPerson releases the pointer and it is no longer in pointer grab mode. Note that in pointer grab mode, the active window is the window that has grabbed the keyboard focus, regardless of where the pointer is positioned on the screen.

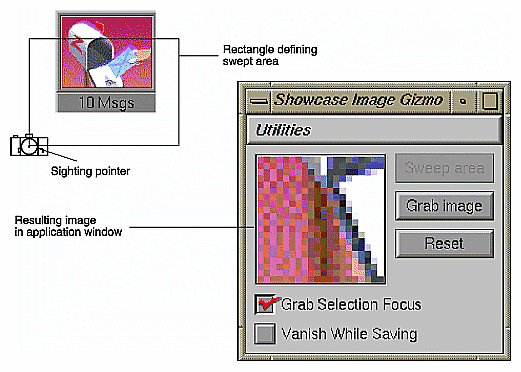
The IRIS Showcase Image Gizmo, used for doing screen captures, is an example of the multiple-action pointer grab model. The IRIS Showcase Image Gizmo lets users capture an area of the screen as an image, then place that image in a IRIS Showcase document. The major difference between the Image Gizmo screen capture and the InPerson screen capture described in the previous section (“Single-Action Pointer Grab Model”) is that the Image Gizmo allows a user to perform multiple actions when defining the screen capture region and not just a single action like InPerson. This allows users to grab the pointer, sweep out an area to capture, and make any adjustments to the capture area before releasing the pointer and returning to implicit focus mode.
The IRIS Showcase Image Gizmo provides an example of entering pointer grab mode. Here's the process:
The user clicks the Sweep Area button in the Image Gizmo. This changes the pointer to a camera with a cross hair, which is used as the sighting pointer. At this point, the sighting pointer is limited to the Image Gizmo window, that is, the user hasn't initiated pointer grab mode yet.
The user enters pointer grab mode by clicking the Grab Selection Focus button. Once in pointer grab mode, the sighting pointer is no longer limited to the Image Gizmo window. Now when the user moves the pointer out of the Image Gizmo window, the Image Gizmo retains the keyboard focus and the sighting pointer continues to display.

Note: A better design would be to eliminate the step of requiring the user to click the Grab Selection Focus button and to instead have the Image Gizmo grab the keyboard focus when the user clicks the Sweep Area button. The user drags a rectangle around the area of interest on the screen. At this point, the user is still in pointer grab mode and can redefine the area by dragging the boundaries of the current rectangle or sweeping out a completely new area.
The user clicks the Grab Image button, which releases the pointer, completes the screen capture, and returns the user to implicit focus mode.
Figure 3-9 shows this example during pointer grab mode.
When designing your application windows . . .
Make sure that your application works well under implicit focus across windows.
Don't have your application move the pointer to another location on the screen. Always allow the user to control the position of the pointer on the screen.
When incorporating a “pointer grab” function into your application . . .
If the user is always going to specify the data to capture with a single action such as a single mouse click or a single mouse drag, use the single-action pointer grab model; otherwise use the multiple-action pointer grab model.
Display a standard or modified sighting pointer whenever your application window grabs keyboard focus. This indicates that the keyboard focus belongs to your application's window and that the pointer isn't currently following implicit focus across windows.
Minimizing windows frees up screen area for other uses. On the IRIX Interactive Desktop, users minimize windows by clicking the Minimize button in the window's title bar or choosing the “Minimize” entry from the Window menu. When a window is minimized, it's replaced by an 85x67-pixel representation with an identifying label of twelve characters or fewer. The 4Dwm window manager determines the placement of all minimized windows. This section describes:
Note that primary windows can be minimized independently of each other. Note also that dialogs and support windows become unmapped when their associated primary windows are minimized.
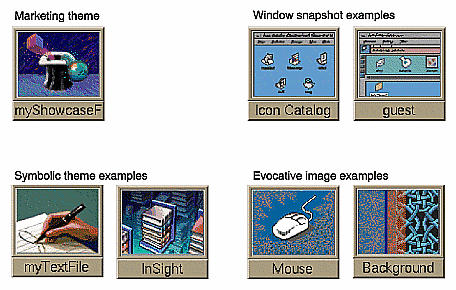
It's important for users to be able to identify application windows readily when minimized. You need to define a specific image for your main window and any co-primary windows in your application. A good example in which users can easily associate the minimized window with the application appears in Figure 3-10. In the example, the IRIS InSight viewer window uses an open book as its minimized window image with the name of the book as the label.

If your application fits either of the single document application models discussed in “Application Models” earlier in this chapter, provide separate images for all primary windows. If your application fits one of the multiple document models, then provide one image for the main window and a second image for the co-primary windows.
When choosing a minimized window image, use:
Marketing theme—If your application has a symbol used in packaging or marketing your product, you can use some or all of it to create an image. The IRIS Showcase minimized window is an example of this approach.
Window snapshots—If your application's main primary window layout is distinctive, you can use a snapshot of a recognizable portion of it, as in the Icon Catalog and Directory View window examples.
Symbolic theme—You can use a symbol that reflects the nature of your application. For example, the text editor Jot uses an image of a writing hand. The IRIS Insight online book viewer uses an image of a stack of books to represent the main library window.
Evocative image—You can use an image that's evocative of the function your application performs. For example, the minimized window image for the mouse control panel is an image of a mouse. The minimized window image for the background control panel is an image that uses a combination of the various background patterns available for users via this tool.
Examples of minimized windows appear in Figure 3-11.
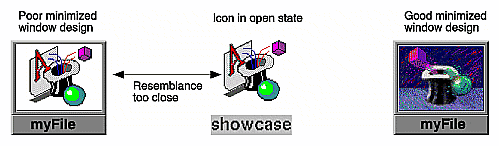
Although it is desirable to keep some family resemblance between the minimized window and other elements of an application, it's a bad idea to use a snapshot of a desktop icon as an image for a minimized window. The problem is that users can mistake the minimized window for the real desktop icon. Figure 3-12 demonstrates this problem. The minimized window at the left (faked for this example) uses a snapshot of the application icon in its open state as its image. Users can confuse the minimized window with the application icon itself. The actual minimized window appears at the right of the figure, demonstrating good design. It reuses the magician's hat theme, showing the family resemblance, but uses a different rendition of the hat to avoid confusion.
Whichever theme you choose, make sure that the significance of your image will be grasped in foreign countries and will not offend international users. Images that are too literal will not be understood by an international audience. For example, the minimized window in Figure 3-13 is for a debugging application and uses an image, with an English acronym “RIP,” that represents dead bugs. This may not be readily apparent to some non-English speaking users.

For information on creating and implementing minimized window images, see Chapter 6, “Customizing Your Application's Minimized Windows,” in the IRIX Interactive Desktop Integration Guide
By default, the 4Dwm window manager reuses the title bar label for the minimized window label. (The guidelines for specifying title bar labels are discussed in “Window Title Bar” earlier in this chapter.) This doesn't usually work due to the space limit (approximately twelve characters) on the minimized window label. Thus, you will need to specify a label for each of your minimized windows.
Those applications that aren't document-based should use the application name as the minimized window label for the main window. Any minimized co-primary windows for these applications should use the label Function, where Function is the same function as in the co-primary window's title bar.
Applications that are document-based and follow the single-document models (see “Application Models” earlier in this chapter) should use Filename (or “Untitled” for new files) for the minimized main window label. Any co-primary windows for these applications should use Function for the minimized window label, where Function is the same function as in the co-primary window's title bar.
Applications that are document-based and follow the multiple-document models (see “Application Models” earlier in this chapter), should use the application name as the label for the main window (if this main window is visible). The co-primary windows in these models represent the multiple documents and should have the minimized window label Filename (or “Untitled” for new files).
The minimized window label is also used in the Desks Overview window (see “Desks” later in this chapter). The user can customize the Desks Overview so that moving the pointer over the thumbnail window sketches in the Desks Overview displays the minimized window labels for those windows. This further emphasizes the need for users to be able to distinguish windows using only the minimized window label.
For more information on specifying a label for a minimized window image, see Chapter 6, “Customizing Your Application's Minimized Windows,” in the IRIX Interactive Desktop Integration Guide.
Users generally expect an application to continue processing while its windows are minimized; when re-opened, the window's contents should have changed appropriately. Of course, it doesn't make sense for all types of functions to continue processing while the window is minimized. For example, you needn't keep moving a clock application's hands while it is minimized. It's up to you to determine which functions are appropriate for continued processing and which are inappropriate. Be sure to stop those functions that don't need to process as they can be a drain on CPU resources.
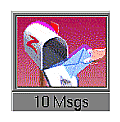
If it is typical for users to minimize your application's windows while processing continues, you may wish to use your minimized application window to indicate status. Figure 3-14 shows how to use the minimized window label to indicate status in an electronic mail application by showing the number of messages in a mail folder.
It is also possible to change the minimized window image to show status, however this is quite difficult. For more information on changing minimized window labels and images to show status, see Chapter 6, “Customizing Your Application's Minimized Windows,” in the IRIX Interactive Desktop Integration Guide.
When designing images for your minimized primary windows . . .
Use a color image rather than the standard two-color Motif bitmap.
Design your images to look best at the default size of 85x67 pixels.
If your application is based on a single document model, create separate images for each of the primary windows. If your application is based on a multiple document model, create one image for the main window and a second image to use for all co-primary windows.
Choose images that clearly identify the window that is minimized. If you have multiple images, make sure that the separate images work well together.
Make sure that the images you use for minimized windows will be understood by an international audience.
Don't use a snapshot of the desktop icon for the image. This could be confused with the real icon.
When choosing labels for your minimized primary windows . . .
Limit the label to approximately twelve characters. If you need a few more characters than this, check that your label will fit with the default size and font for minimized windows (the label may be truncated).
If your application is not document-based, use the application name as the minimized window label for the minimized main window. Use the label Function for minimized co-primary windows where Function is the same function as in the co-primary window's title bar.
If your application is document-based and follows one of the single-document models, use Filename (or “Untitled” for new files) for the minimized main window label. Use Function for minimized co-primary window labels where Function is the same function as in the co-primary window's title bar.
If your application is document-based and follows one of the multiple-document models, use the application name as the label for the main window (if it is visible). The co-primary windows in these models represent the multiple documents and should have the minimized window label Filename (or “Untitled” for new files).
When determining the behavior for a window that the user has chosen to minimize . . .
Decide which operations should and should not continue to be processed while the window is minimized.
Indicate status with the minimized window label if your application is typically minimized during long processes.
Use the default screen locations supplied by 4Dwm for the minimized window. Don't specify your own screen location.
The IRIX Interactive Desktop provides users with a handy tool called Desks Overview for organizing their work (see Figure 3-15). The Desks Overview application allows users to create multiple virtual screens (desks). The user can place any primary window (main or co-primary) on any desk. The window appears in the thumbnail sketch in the Desks Overview window. Support windows and dialogs don't appear in these thumbnail sketches.

There are several things you need to know about desks and the corresponding effects on the design of your application.
4Dwm treats application windows on desks other than the current one as if they are minimized. The windows are no longer mapped to the screen display and the application is informed that it's unmapped. This emphasizes how important it is for you to decide which operations continue processing when the application is in an unmapped (minimized) state. (See “Processing While Minimized” earlier in this chapter.)
As users move the pointer over the miniaturized window representations in the thumbnail sketches, the title bar labels display by default. If the user prefers, the minimized window labels can be displayed instead. This further emphasizes the need to pick title bar labels and minimized window labels so that a user can distinguish windows using only this information. (For information on defining these labels, see “Window Title Bar” and “Labeling a Minimized Window” earlier in this chapter.)
Support windows and dialogs will appear on all desks if their associated parent window is not mapped to the screen. Since support windows and dialogs should only appear on the desk where their parent appears, make sure that all parent windows are visible and mapped to the screen.
Your application should not create a screen background. Screen backgrounds are managed by 4Dwm by default or by the user through the Background control panel. Users typically employ different screen backgrounds on different desks as an aid in orienting themselves.
When designing your application . . .
Make sure that all windows with associated support or dialogs are visible and mapped to the screen so that the support windows and dialogs appear only on the desk where their parent window displays.
Don't design your application to manage the screen background.
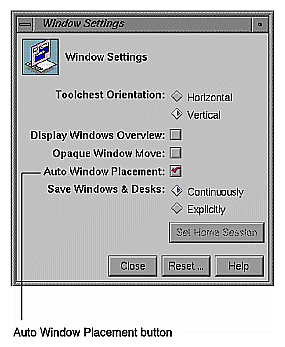
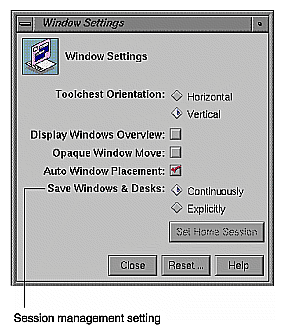
Session management allows users to log out of their accounts and have any running applications automatically restart when they log back in, thus eliminating the need for users to restart applications manually when they log back in. In 4Dwm, users have the option of turning session management on (the default) or off by using the Window Settings control panel (which is available from the Desktop->Customize cascading menu in the Toolchest), as shown in Figure 3-16.
For your application to be restarted via the 4Dwm session manager, your application needs to create a command line that will launch the application and restore its current state. Your application needs to update this command line as the application state changes. For details of specifying this command line and keeping it up to date, see “Interacting With the Window and Session Manager” in Chapter 5 of the IRIX Interactive Desktop Integration Guide. The following scenario outlines the process.
When a user launches an application, that application registers itself with the 4Dwm session manager by creating a command line that will launch the application and restore its current state. For example, if your application is used to edit a specific file, the command line should contain the information necessary to launch your application and open this specific file. There is only one command line per application.
As the state changes over time, your application needs to update this command line. So, to continue the example, suppose the user opens a different file to edit under your application. In such a case, your application needs to create a new command line that will launch the application and open this new file.
If the user opens co-primary windows or support windows (see “Application Window Categories and Characteristics” earlier in this chapter for window definitions), these windows should also redisplay when the user logs out and back in again. (Dialogs typically don't redisplay.) One method for obtaining this behavior is to allow your application to take command line arguments to redisplay these windows so that you can include these arguments on the stored command line when appropriate.
When the user logs out, 4Dwm saves the command lines for all applications that are currently running on the user's desktop. When the user logs back in, 4Dwm attempts to execute the commands that it saved and restore the user's desktop to what it was when the user logged out.
Applications can also request to have 4Dwm inform them when a user chooses “Log Out.” When applications receive this notification, they should not post any dialogs such as “Save unsaved changes before quitting?” Instead, if 4Dwm notifies your application that the user is logging out and there are unsaved changes for the current file, your application should use one of the following strategies:
Save these changes into another file and name it something logical such as original_file_name.save. When the application is restarted at login, post a dialog that tells the user that this file with unsaved changes exists and query the user whether to open the original file or the file with the unsaved changes. This is the preferred strategy.
Ignore the user's unsaved changes, and simply restart the application using the most recent saved version of the file. This strategy is okay, but it is not preferred.
Don't automatically save the user's changes by default. This may cause the user to lose as much data as throwing away all unsaved changes. Let the user control when changes are saved.
For details on how to request log-out notification from 4Dwm, see “Interacting With the Window and Session Manager” in Chapter 5 of the IRIX Interactive Desktop Integration Guide.
When designing your application . . .
Have your application create a command line that will launch the application and restore its current state. This current state should minimally include reopening any files that are currently open under the application and opening any primary or support windows that are currently open.
Update this command line as the state of the application changes.
If your application allows users to create and edit data files, have 4Dwm notify your application when the user chooses “Log Out.”
If your application is running when the user chooses “Log Out” and there are unsaved changes for a specific file . . .
Save these changes into another file and name it something logical such as original_file_name.save. When the application is restarted at login, post a dialog that tells the user that this file with unsaved changes exists and query the user to determine whether to open the original file or the file with the unsaved changes.
If you cannot implement the preferred strategy described above, ignore the user's unsaved changes. Do not automatically save the user's changes by default.