IRIX Interactive Desktop provides desktop services you can take advantage of in your applications. These services save you time by providing common functionality that you don't have to develop on your own. Using the services can also help ensure that your application is consistent with other applications in the IRIX Interactive Desktop environment. This chapter covers the following topics:
“Software Installation” describes how users install, remove, and upgrade applications using Software Manager, an IRIX Interactive Desktop utility.
“Online Help” describes SGIHelp, the standard online help system on all Silicon Graphics platforms.
“Online Documentation” discusses IRIS InSight, an online documentation delivery system available on all Silicon Graphics platforms.
“Desktop Variables” describes certain customization settings that users can choose and their implications for your application.
“File Alteration Monitor (FAM)” describes the FAM service, which informs your application about ongoing changes to the file system, eliminating the need for your application to do its own polling.
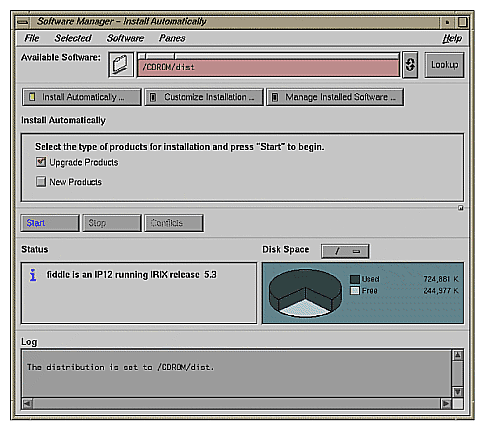
Users install software on Silicon Graphics workstations using the Software Manager, a graphical tool for installing, removing, and tracking software (see Figureá4-1). For your application to work with the Software Manager, you must package your files into software images that it will understand. This packaging process is simplified by the Software Packager tool, which is described in the Software Packager User's Guide.
Although you can create installation and removal scripts independently of the Software Manager, it's strongly recommended that you package your application to use the Software Manager format. The advantages of the Software Manager are:
It gives users a single, graphical tool to install all of their applications, upgrades, and maintenance releases. Users won't have to learn how to use additional tools, read lengthy installation instructions, or enter commands in a UNIX shell.
It allows users to remove their applications cleanly. Users can remove your application and all supporting directories and files using Software Manager. They don't have to rely on specialized removal instructions or guess which directories and files to remove.
It helps users upgrade applications cleanly. When the user installs an upgrade, the Software Manager automatically removes previous versions of that application.
It provides installation status information. Users can query the Software Manager database to quickly obtain information such as whether the application is installed, when it was installed, how much disk space it uses, and whether any upgrades or maintenance releases have been installed. The Software Manager can't track this information for applications that were installed using specialized scripts.
Your application should provide online help. In the IRIX Interactive Desktop environment, users are accustomed to specific kinds of online help information, including context-sensitive help (letting users click on window areas and components to get specific help) and task-oriented help (presenting help information for specific tasks that can be performed using the application). This section covers the following topics:
SGIHelp is the online help system available on all Silicon Graphics platforms. It provides an easy method for delivering help information to users. Although you can supply your own help system, it's strongly recommended that you use SGIHelp. The advantages of supplying SGIHelp with your application are:
Users like it—it's easy to use and convenient. SGIHelp provides context-sensitive help and task-oriented help. It also allows users to get help information by browsing and searching an index of available help topics and by following cross-references (links) to related topics.
Silicon Graphics users are familiar with it. They may get frustrated if they have to learn a different help system for your application, particularly when they're looking for help.
You don't have to create and maintain your own help system. All of the help capabilities that your application supports (which are discussed in the next section, “Types of Online Help”) are provided automatically when you use SGIHelp.
SGIHelp is a full-featured system that provides users with: fast, direct access to any help topic, the ability to navigate forward and backward through cross-referenced help topics, an index of help topics, search capabilities, and convenient printing of help information. SGIHelp is also a multimedia tool—you can include inline images, 3D objects, and audio clips, and you can launch applications from it. For details on how to include SGIHelp in your application, see Chapterá9, “Providing Online Help With SGIHelp,” in the IRIX Interactive Desktop Integration Guide.
The keys to supplying useful online help are to anticipate users' questions and to provide them with easy access to the answers to those questions. Each window in your application should include a Help menu if the window has a menu bar or a Help button if the window doesn't have a menu bar.
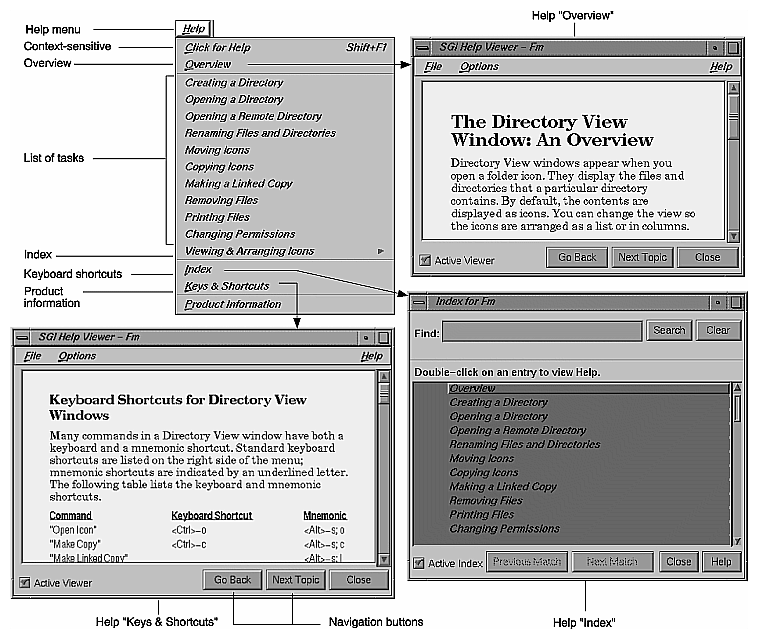
Figureá4-2 demonstrates how users access online help from a Help menu. A typical Help menu showing the various types of information appears in the upper left of the figure. The SGIHelp windows available from the “Overview,” “Index,” and “Keys & Shortcuts” menu entries are shown in clockwise order around the Help menu.
Online help consists of six general categories:
context-sensitive information
overview information
task-oriented information
index of help topics
keyboard shortcut information
product information
These categories are defined and discussed in the following paragraphs.
Context-sensitive information answers the question “What is the purpose of this area or component in this window?” It should be available for all primary and support windows. Context-sensitive help mode should be enabled when the user either chooses the “Click for Help” entry in a Help menu (if the window has a menu bar) or presses <Shift>-<F1> (whether or not the window has a menu bar).
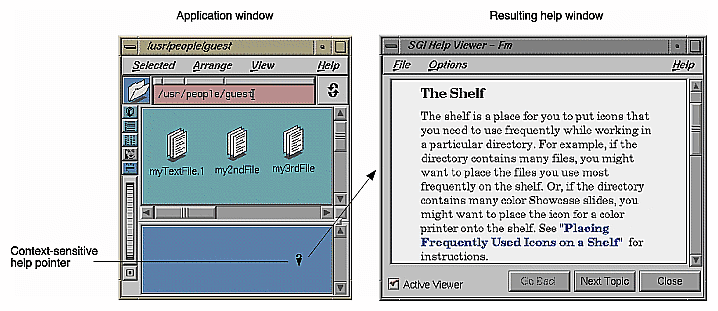
Once the user has enabled context-sensitive help mode for a particular window, the pointer should change to a question mark and the user should be able to click in any area of the window to get specific help information (see Figureá4-3). At a minimum, your application should provide separate context-sensitive help for each control area, work area, status area, and menu in the window. This help should describe the purpose of the corresponding area and include cross-references to task-oriented help topics which describe tasks which use this area.
Overview information answers the question “What does this application or window do?” Provide overview help information in all main windows regardless of whether help is provided from a menu or a button. Co-primary and support windows with menu bars should also provide this information. If the window has a menu bar, the overview information should be accessible from an “Overview” entry in the Help menu. For main windows that don't have a menu bar, this overview information should be contained in the help that's displayed when the user clicks on the Help button in the window.
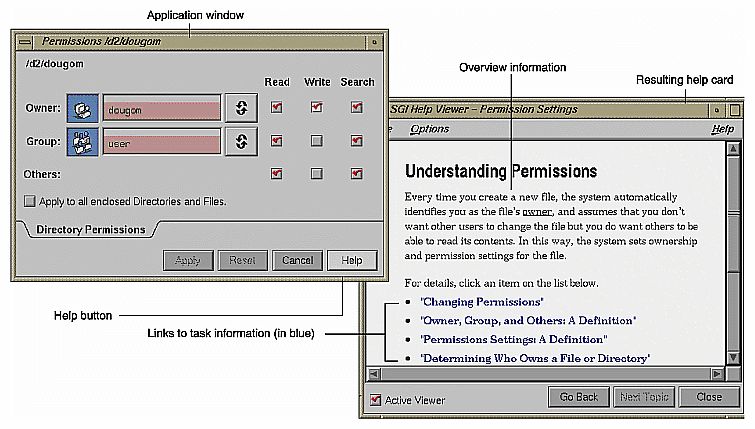
For main windows, the overview information should briefly describe the functionality of the entire application. For co-primary and support windows, the overview should describe the functionality of the current window. It can also provide cross-references to task-oriented information. An example Overview help topic is shown in Figureá4-2.
Task-oriented information answers the question “How do I accomplish a specific task?” It also serves to give users a quick overview of your application; users often scan a new application's menus—especially the Help menu—to get an idea of the application's functionality.
Provide task-oriented help in all windows. Windows with a menu bar should provide Help menu entries for each of the most important tasks that users can accomplish in that particular window. When a user chooses any of these entries, the resulting help topic should present task-oriented information that describes step-by-step instructions for accomplishing the given task. A typical list of tasks is shown in the Help menu for Figureá4-2. For windows without a menu bar, the task-oriented information should be displayed when the user clicks on the Help button in that window. This help information should include step-by-step instructions for accomplishing all of the tasks in that specific window.
The index of help topics answers the question “What help topics are available for this application?” This index should be available from all windows with a menu bar and appear when the user chooses the “Index” entry from the Help menu. It should list all available help topics for the application, including those that are generated using the context-sensitive help mode and those that are available directly from the Help menu. Users should be able to browse the index and select individual help topics as an alternative to the other methods of accessing help. See Figureá4-2 for an example index.
Keyboard shortcut information answers the question “How can I use the keyboard as a shortcut for performing specific actions?” This information should include all mnemonics, keyboard accelerators, and function keys available for the entire application (not just those for a specific window). An example keyboard shortcuts help topic is shown in Figureá4-2.
All main windows should provide information on keyboard shortcuts. Co-primary and support windows with menu bars should also provide access to this information. If the window has a menu bar, the keyboard shortcut information should be accessible from a “Keys & Shortcuts” entry in the Help menu. For main windows that don't have a menu bar, this shortcut information should be contained in the help that's displayed when the user clicks on the Help button in the window.
Product information answers generic questions about the application. At a minimum, it identifies the application and version number, but it can also include general product information such as copyright and trademarking, licensing, and customer support access. Provide access to this information from all main windows. Co-primary and support windows with menu bars should also provide access to this information.
If the window has a menu bar, the product information should be accessible from a “Product Information” entry in the Help menu. For main windows that don't have a menu bar, this product information should be contained in the help that is displayed when the user clicks on the Help button in the window.
Always provide product information using an Information dialog rather than using the SGIHelp system. Some users don't install online help to save disk space, so using a dialog for this information allows more users to access the application's version number and customer support contact information. See “Other Situations for Invoking Dialogs” in Chapterá10 for information about how to design an appropriate product information dialog.
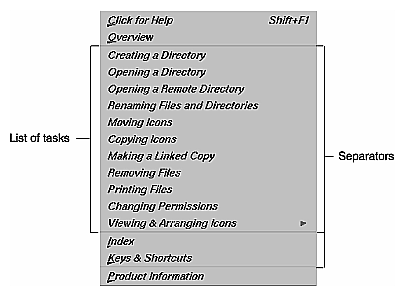
All windows that have a menu bar should provide a Help menu. (See “Standard Menus” in Chapterá8 for more information on standard menus.) Help menus have the general layout, mnemonics, and keyboard accelerators shown in Figureá4-4. The entries are divided into four groups. The list of tasks appears between the “Overview” and “Index” entries and is specific to the application.
Help menus should contain these elements, in the order presented:
“Click for Help” provides context-sensitive information for the current window. It uses <Shift+F1> as the keyboard accelerator. (Note that this differs from the OSF/Motif Style Guide which recommends using the label “Context-Sensitive Help” for this entry.)
“Overview” provides an overview of the entire application when it appears in the Help menu for the main window. Otherwise, it provides an overview of the functionality of the current window and should be labeled “Overview for <window name>”.
The list of tasks provides menu entries for those tasks that can be performed in the current window. This task-oriented information should include step-by-step instructions for how to accomplish the specific task. If you have more than ten or twelve or task entries, consider using a cascading menu such as the “Arranging Icons” entry in Figureá4-4. Cascading menus are described in “Using Cascading Menus” in Chapterá8. Don't use mnemonics or keyboard accelerators in these entries.
“Index” displays a list of all help topics available for the application and allows users to choose topics from this list for viewing.
“Keys & Shortcuts” displays all mnemonics, keyboard accelerators, and function keys available for the entire application and not just those for a specific window. (Note that this differs from the OSF/Motif Style Guide which recommends using the label “Keyboard” for this entry.)
“Product Information” identifies the application and version number. Additionally, this entry can provide general product information such as copyright and trademarking, licensing, and customer support access.
If an application window doesn't have a menu bar, provide a Help button for accessing online help. When users click this button on a main window, they should get information that includes an overview of the functionality of the application (overview), step-by-step instructions for how to perform all of the tasks in this main window (task-oriented), a list of all keyboard shortcuts for the application, and the version number, copyright, licensing, and customer support access information for the application (product information).
When users activate the Help button in a co-primary or support window, they should get information that describes the function of the specific window (overview), and step-by-step instructions for how to perform all of the tasks in this window (task-oriented). For dialogs, activating the Help button should provide help that focuses on the main purpose of the dialog, describes how to use the dialog, and might also provide pointers to additional information, especially in the case of error dialogs.
Both primary and support windows with Help buttons should also provide context-sensitive help when the user presses <Shift>-<F1>. Dialogs typically don't support context-sensitive help mode.
A typical window with a Help button appears in Figureá4-5. For specific information on laying out pushbuttons in windows, see “Control Areas in Primary Windows” in Chapterá6 and “Decorations, Initial State, and Layout of Dialogs” in Chapterá10.
When designing access to online help for your application . . .
Provide access in each window of your application from either a Help menu if the window has a menu bar or a Help button if the window doesn't have a menu bar.
Use SGIHelp. This provides users with a familiar viewer and familiar navigation techniques when reading the online help for your application.
When defining the types of online help for your application . . .
Provide context-sensitive help, overview information, task-oriented help, a list of keyboard shortcuts, product information, and an index of help topics.
Provide context-sensitive help for all primary and support windows.
Enable context-sensitive help mode when the user either chooses the “Click for Help” entry in a Help menu (if the window has a menu bar) or presses <Shift>-<F1> (whether or not the window has a menu bar). Change the pointer to a question mark when context-sensitive help mode is enabled.
At a minimum, provide separate context-sensitive help for each control area, work area, status area, and menu in the window. This help should describe the purpose of the corresponding area and should include cross-references to task-oriented help topics which describe tasks which use this area.
Provide overview information for all main windows whether help is provided from a menu or a button. This overview should briefly describe the functionality of the entire application.
For co-primary and support windows that include a menu bar, provide overview information that describes the functionality of that specific window.
Provide task-oriented information for all windows. This information should include step-by-step instructions for how to accomplish all of the tasks available in the current window.
For windows with a menu bar, provide access to an index of help topics. This index should list all available help topics for the application including those that are generated using the context-sensitive help mode and those that are available directly from the Help menu. In addition, users should be able to browse the index and select topics for reading.
Provide keyboard shortcut information for all main windows (whether help is provided from a menu or a button) and for co-primary and support windows that include a menu bar. This information should include the mnemonics, accelerators, and function keys available for the entire application and not just for the current window.
Provide product information for all main windows (whether help is provided from a menu or a button) and for co-primary and support windows that include a menu bar. This information should minimally include the product name and version number. It might also include other general product information such as copyright and trademarking, licensing, and customer support access.
Display product information using an Information dialog so that users who don't install an application's online help can still access version number and customer support information.
When providing a Help menu in an application window . . .
Include a “Click for Help” entry to enable context-sensitive help mode with the keyboard accelerator <Shift>-<F1>.
Include an “Overview” entry for main windows. For co-primary and support windows, include an entry labeled “Overview for <window name>”.
Include entries that represent a list of tasks that users can accomplish in the current window. If this list of tasks is more than ten or twelve entries, use cascading menus. These entries shouldn't have mnemonics or keyboard accelerators.
Include an “Index” entry that allows the user to access the help index.
Include a “Keys & Shortcuts” entry to display all keyboard shortcuts for the application.
Include a “Product Information” entry.
When providing a Help button in an application window . . .
Provide a Help button for all windows that don't have a menu bar.
For main windows, provide overview, task-oriented, keyboard shortcuts, and product information when the user clicks this button.
For co-primary and support windows, provide overview and task-oriented information when the user clicks this button.
For dialogs, provide help that focuses on the main purpose of the dialog and describes how to use the dialog.
For primary and support windows that include a Help button, also provide access to context-sensitive help when the user presses <Shift>-<F1>. Dialogs typically don't support context-sensitive help mode.
This section discusses the actual writing of the online help content. It might be of interest to both application designers and online help documentation writers.
The basic unit of help information in SGIHelp is the help card (see Figureá4-2, Figureá4-3, and Figureá4-5). Help cards typically cover one topic although they may be divided into subtopics. They can have cross-references (links) to other help cards for the application. These links appear as blue text in the help card viewer window.
Before writing online help content for SGIHelp, read through the help information for some IRIX Interactive Desktop applications to get a feel for content, functionality, and presentation. Some good examples of help in applications with a Help menu are the Directory View windows and the Icon Catalog application. Take a look at the User Manager (accessed from the System menu in the Toolchest) as an example of a utility that provides help through a Help button. Also try out the Help button in dialogs in the desktop applications.
As you experiment with SGIHelp, follow some (blue) hypertext links to other help topics. Trace these cross-reference links both forward and backward. Look at the presentation of inline figures. Print some of the help information. Bring up the help index and search this index for specific keywords and phrases. Be sure to try out the “Click for Help” facility to get a feel for how specific the information is when you click on an area of the window.
Online help is designed to be presented in short pieces (chunks) of information that answer specific questions. (See “Types of Online Help” earlier in this chapter for a list of the types of questions users ask and the types of information that should be available in your online help to answer these questions.) Each help topic consists of one card of information that answers a specific question. The SGIHelp viewer is designed to take up no more than one quarter of the screen. If a help card has more information than will fit in the viewer window at one time, the user can use the scroll bar to scroll through the information. Each help card should span no more than three viewer windows of information to minimize scrolling. The content shouldn't assume that users have read other help topics. Sometimes a help card may depend on another help card. It's better to provide a link to the supplementary card than to repeat the information.
All help cards have titles. Make each title as descriptive as possible to tell the reader what's contained in the specific help card. The titles should also appear in an index of help topics. Users can display the list of help topics in the index by choosing “Index” from the Help menu. Note that the topics listed in the index should match the titles of the help cards as closely as possible.
As in any form of documentation, use familiar terminology and natural, friendly, real-world language. Remember that when users access online help, they're often searching for a quick answer to a specific question. This isn't the time to teach them new technical terms.
Before the writing process begins for context-sensitive help, list all appropriate window components that users might need help on. Describe components in terms of the user tasks they support. That is, don't just say what the component is—tell users when they would find this component useful. Be careful not to mix specific step-by-step instructions with the context-sensitive information; instead, you might include links to the appropriate task-oriented information. Figureá4-3 shows the help card for context-sensitive help on the shelf area in a Directory View window.
Overview information should be a one or two paragraph overview of either the application's functionality (main windows) or the functionality of a specific application window (co-primary and support windows). It should answer the question, “What does this application (or application window) do?” Figureá4-2 shows the overview card for Directory View windows. Notice how it provides an overview of the entire application and limits the information to the application's functionality.
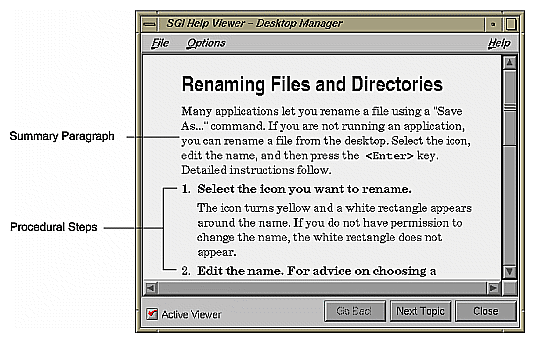
Start by compiling a list of major tasks that users will want to perform using the application. For each task, supply the step-by-step instructions necessary to accomplish that task. If the instructions span more than three or four viewer windows of information, try to divide this topic into several smaller help topics. In addition to the step-by-step information, provide a brief summary paragraph at the beginning of the help card. Some readers take the time to read only the first few sentences of a help card.
Figureá4-6 is an example of a task-oriented help card taken from a Directory View window. Note that it displays the summary paragraph and the initial steps in the in the first viewer window of information. Remember that when displayed in a Help menu, the list of tasks gives users a quick overview of what the application can do, before they've even had to look at a help card. Make sure that you have descriptive titles for your task-oriented help cards and review them as a group. See Figureá4-2.
Users access the help index to browse or to search for specific topics, so it's important to have descriptive titles for your help cards. The help index presents topics roughly in the order in which they appear in the Help menu: overview, list of tasks, context-sensitive topics, and keyboard shortcuts. If the application has more than one window with a Help menu, the help topics are grouped by windows. See Figureá4-2.
Every Help menu should have a “Keys & Shortcuts” entry containing all the mnemonics, keyboard accelerators, and function keys for the entire application. Typically, this help card contains an introductory description and a three-column table containing columns for the menu entry label, keyboard accelerator, and mnemonic. Also include information on function keys and other shortcuts that can be used in your application. See Figureá4-2.
If your main application window has a Help button rather than a Help menu, the initial help card should contain an overview of your application, task-oriented information, a list of all keyboard shortcuts, and product information. To make it easier for users to navigate through this amount of information, after the overview information at the beginning of the help card, place links which take users directly to the other chunks of help information contained in the card. This strategy greatly reduces the amount of scrolling and searching necessary. See Figureá4-5 for an example help card with links to additional information.
On other windows with a Help button, present only the help information for the specific window. If this information is longer than three or four viewer windows of information, use the above strategy of presenting brief overview or summary information followed by a list of links to the individual chunks for the task-oriented information.
When writing any online help for your product . . .
Create separate help “cards” for each help topic.
Limit each help card to no more than three viewer windows full of information.
Write a descriptive heading for each help card.
If a particular help topic needs supplemental information, provide links to that information rather than repeating it in the current card.
Use language your users will understand.
Use figures when appropriate. SGIHelp allows users to view graphics inline with the help text.
When writing “Click for Help” context-sensitive information for your application . . .
Begin by listing the individual controls and areas of your application windows that you need to describe.
At a minimum, provide separate help cards for each group of controls and areas in that window.
Provide descriptions in terms of the user tasks the components support.
Don't include procedural, task-oriented information with the context-sensitive information—include links to the appropriate task-oriented topics instead.
When writing the overview help cards for your application . . .
Restrict the content to information about what the product does, not how to use it.
Limit the text to one or two viewer windows of information.
Use the heading “Overview” for the main window's overview help card and “Overview of <window name>” for co-primary and support windows with overview help cards.
When writing the task-oriented information for your application . . .
Begin by listing the tasks that users will want to accomplish with your application.
For each task, list the step-by-step instructions users will need to accomplish that task. If these instructions span more than three or four viewer windows, try to divide this topic into several smaller help topics.
Provide a brief summary paragraph at the beginning of the help card, followed by the step-by-step information.
When writing the keyboard shortcuts information for your application . . .
Include all shortcuts for your application in a single card—mnemonics, keyboard accelerators, and function keys.
When creating the index for your help topics . . .
Match the titles in the index as closely as possible to the titles of the help cards.
Place the topics in the index in the following order—overview, list of tasks, context-sensitive topics, and keyboard shortcuts.
When writing help information that will be available from a Help button rather than from a Help menu . . .
For the main application window, the help card should contain an overview of your application, task-oriented information, a list of all keyboard shortcuts, and product information.
For Help buttons not on the main application window of your application, present only the help information for the specific window.
If the amount of information on this one help card spans more than three or four viewer windows of information, after the overview or summary information at the beginning of the help card, place links which take users directly to the other chunks of help information contained in that card.
After writing your online help . . .
Have reviewers examine your help content online rather than reviewing a printed copy. Help topics will “read” differently depending on which paths readers (reviewers) traveled to get there.
Have reviewers check the titles of the help topics to make sure they are descriptive and appropriate.
Have reviewers test out all links to make sure they are appropriate.
Silicon Graphics now ships many manuals in online form using IRIS InSight. IRIS InSight is an online documentation delivery system based on SGML (Standard Generalized Markup Language), a portable, platform-independent document description language.
InSight offers users a convenient means of viewing manuals. It can save money for organizations that ship a high volume of manuals, that have frequent releases, and whose users can get by without hardcopy versions of the manual. If your organization fits this description and uses a process based on a standardized approach to document management, consider using IRIS InSight (contact Silicon Graphics for more information).
The IRIX Interactive Desktop allows users to set a variety of variables that can affect the way an application behaves on the desktop. These variables are set using the graphical control panels selected from the Desktop->Customize cascading menu in the Toolchest. Users expect all applications to adhere to the values set in these graphical control panels. Your application should support this expectation by using the values that users have set for these variables.
Desktop settings described in this section include:
Your application needs to be concerned only with those variables listed in this section. For details on having your application respond to the settings of these variables, see Chapterá3, “Using Schemes,” and Chapterá5, “Window, Session, and Desk Management,” in the IRIX Interactive Desktop Integration Guide. Other variables that users can set using the graphical control panels either don't affect your application or automatically apply to your application. These variables define the mouse settings for right-handed or left-handed users and the default permissions for new files.
The Scheme variable allows users to change the color and font scheme used by applications that are currently running on the desktop. This variable is discussed in the section “Schemes for Colors and Fonts” in Chapterá3.
The Auto Window Placement setting allows users to specify whether newly opened windows should be placed automatically by the 4Dwm window manager or be placed interactively by the user. This variable is discussed in the section “Window Placement” in Chapterá3.
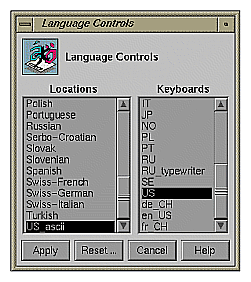
When users launch an application, they expect the application to appear in the language set in the Language Control panel (see Figureá4-7). The default setting is U.S. English. For guidelines on designing an internationalized application, see the online manual Topics in IRIX Programming.
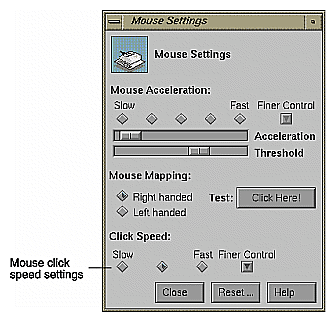
Users expect applications to respond to the mouse double-click speed set in the Mouse Settings control panel (see Figureá4-8). Don't reset the speed in your application.
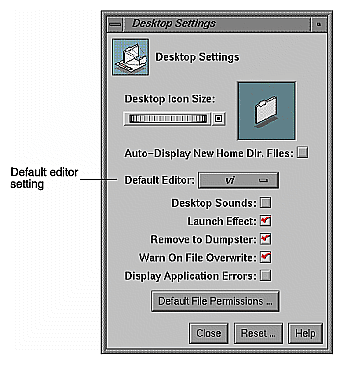
When users open ASCII text files on the IRIX Interactive Desktop, the default editor is jot, a point-and-click graphical editor. Users can change the default editor using the Desktop control panel (see Figureá4-9). Applications that let users modify ASCII text files should default to the text editor specified in the Desktop control panel.
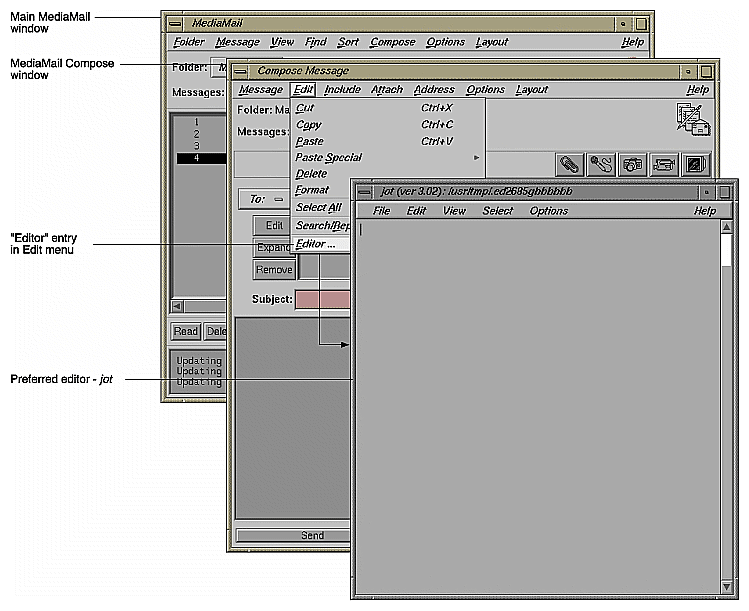
For example, the Compose window in the MediaMail application, shown in Figureá4-10, gives users a simple editor for composing electronic mail messages. In addition, users can also elect to use their preferred editor by selecting the “Editor” entry in the Edit menu for this window. This launches the editor set in the Desktop control panel, which in this example is jot.
Always honor the user's desktop customization settings. Never override or ignore them.
When considering color and font schemes for your application . . .
Use the pre-packaged color and font schemes supplied by Silicon Graphics rather than designing your own.
When considering window placement . . .
Set a preferred window position for all primary windows. Don't set a required window position for primary windows.
Try to anticipate other application and tool windows that may be displayed with your application and set your preferred default position appropriately.
To allow users to control the language for your application . . .
Check the value of the default language each time your application is launched. Don't reset this value while the application is running.
To allow users to control the mouse double-click speed for your application . . .
Check the value of the double-click speed each time your application is launched. Don't reset this value while the application is running.
If users will be editing and/or browsing ASCII text files in your application . . .
Make their preferred editor (specified in the Desktop control panel) available for use on text files.
Check the value for the preferred editor each time your application is launched, but don't reset this value while your application is running.
If users can only browse the ASCII text files, launch the editor in read-only mode.
The File Alteration Monitor (FAM) is a service that monitors changes to files and directories in the file system and notifies interested applications of these changes. If your application needs to stay in sync with the state of any part of the file system, you should use FAM. This process is considerably more efficient than having an application poll the file system itself to detect changes. (See Chapterá8, “Monitoring Changes to Files and Directories,” in the IRIX Interactive Desktop Integration Guide for details on using FAM in your application.)
Here are two examples of IRIX Interactive Desktop applications that use FAM:
The File Manager relies on FAM to track any changes to directories and/or files that are visible on the user's desktop or in any open Directory View windows. When FAM notifies the File Manager of any changes, the File Manager updates the views. This guarantees that the user always sees an accurate view of the file system, both on the desktop and in the Directory View windows.
MediaMail uses FAM to monitor the arrival of new mail by tracking changes to the /usr/mail directory. If a user is running MediaMail and new mail arrives, the user is immediately notified.
