This chapter provides a brief overview of Software Packager (swpkg), a graphical tool for packaging software for installation on Silicon Graphics workstations. It contains these sections:
“About swpkg” provides an overview of swpkg and the Silicon Graphics installation process.
“Running swpkg” describes how to run swpkg.
“Using the swpkg Worksheets” gives an overview of the swpkg worksheets.
“Using the swpkg Menus” describes the swpkg menus.
“Using the Worksheet Selection Tabs” describes how to select swpkg worksheets.
“Using the Message Area” describes the use of the swpkg message area.
| Note: To package your application for installation, you must install the inst_dev product, which contains swpkg, related utilities, and reference pages. |
The swpkg application allows you to quickly and easily package your application for Software Manager (swmgr(1M)), the Silicon Graphics software installation program. swpkg takes your product's files and, using the additional information that you enter into the swpkg worksheets, creates compressed software images, readable by Software Manager. swpkg also creates the two other files required by Software Manager, called the spec and IDB files. (spec and IDB files are the files in which swpkg stores all the information about your product installation that you enter into the swpkg worksheets. For a definition of spec files, see “What's a Spec File?”. For a definition of IDB files, see “What's an IDB File?”).
To use swpkg, you enter information about your product in a series of worksheets. The swpkg window always displays one of the five available worksheets. To see a worksheet other than the one currently displayed, use the Worksheet Selection tabs, discussed in “Using the Worksheet Selection Tabs”.
Here are the five swpkg worksheets, listed in the order in which you should fill them out:
| Create Product Hierarchy |
| |
| Tag Files | “Tagging the Files: The Basic Steps” lists the steps for filling out this worksheet. | |
| Edit Permissions and Destinations |
| |
| Add Attributes | “Adding Installation Attributes: The Basic Steps” lists the steps for filling out this worksheet. | |
| Build Product | “Building the Product: The Basic Steps” lists the steps for filling out this worksheet. |
Work through the worksheets in order (beginning with the Create Product Hierarchy worksheet, which is the worksheet that's automatically selected when you start up swpkg). Fill in all necessary information before moving to the next worksheet. (It's necessary to work through the worksheets in order because the later worksheets depend on information entered in the earlier worksheets.)
If you're new to packaging for Software Manager, you might want to read Chapter 2, “The swpkg Tutorial,” before you try to use swpkg to package your own application.
swpkg has three pull-down menus located on the menu bar, the horizontal bar at the top of the swpkg window.
The three pull-down menus are:
The File Menu, which allows you to clear, open, save, and append spec and IDB files or to quit swpkg
The View Menu, which allows you to hide or show the Message Area
The Help Menu, which provides your main entry point into swpkg's online help
The rest of this section explains each of the three menus in more detail.
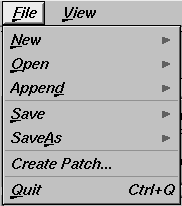
The File pull-down menu, shown in Figure 1-1, provides menu items that allow you to clear, open, save, and append spec and IDB files or to quit swpkg. (spec and IDB files are the files in which swpkg stores all the information about your product installation that you enter into the swpkg worksheets.)
Each item on the File pull-down menu (except “Quit”) has a rollover menu that allows you to choose whether you want the selected action performed on the spec file, the IDB file, or both. All of the File menu items log a message in the Message Area (located below the Worksheet Selection tabs).
| Note: When creating or renaming spec and IDB files, make sure that your spec filenames end with the .spec suffix and IDB filenames end with the .idb suffix. |
Here's a brief description of each of the items on the File pull-down menu:
Use the “New” menu item to clear the spec and or/IDB file(s) for the current swpkg session of all entries. This overwrites any existing spec and/or IDB files for the current session. (swpkg posts a dialog asking if you want to abandon the current spec and IDB files before opening new ones. If you click the Cancel button, swpkg aborts creating a new spec and/or IDB file(s).)
Use the “Open” menu item to open an existing spec and/or IDB file and load the information from the opened file(s) into the current swpkg session. This overwrites any existing spec and/or IDB files for the current session. (swpkg posts a dialog asking if you want to abandon the current spec and IDB files before opening new ones. If you click the Cancel button, swpkg aborts creating a new spec and/or IDB file(s).)
Use the “Append” menu item to append an existing spec and/or IDB file onto the corresponding file(s) for the current swpkg session.
Use the “Save” menu item to save the current spec file, IDB file, or both. These files contain the information you've entered into swpkg's worksheets during the current session. If you haven't yet opened or saved the spec and/or IDB file(s) for the current product, swpkg asks you to specify the filename(s).
Use the “Save As” menu item to save all the information you've entered into the current swpkg session. (This information is saved in the spec and IDB files.) When you select the “Save As” menu item, brings up a file selection box for specifying an arbitrary path and filename for your files.
Use the “Create Patch...” menu item to begin the process of creating a patch product. When you select this item, a dialog opens in which you name your patch product and select the files you want to include in the product. Before using this item, you need to “Open” the spec and IDB files for the original product. See Chapter 8, “Creating a Patch Product.”
Use the “Quit” menu item to quit swpkg.
The View pull-down menu, shown in Figure 1-2, contains “Show Messages” and “Show SGI Board Names.” Here's a brief description:
Check the “Show Messages” menu item when you want the Message Area (shown in Figure 1-5) is displayed. When an important message is logged, the Message Area appears automatically.
Check the “Show SGI Board Names” when you want the board names displayed in the Add Attributes worksheet.
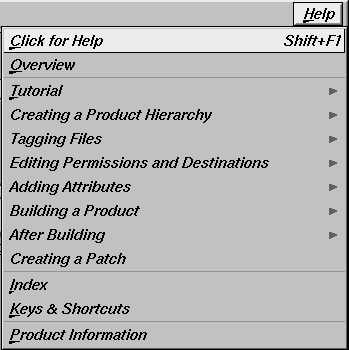
The Help pull-down menu, shown in Figure 1-3, provides easy access to swpkg's online help.
To display help:
Select the “Click for Help” menu item to get help on a specific area of a worksheet. When you select “Click for Help” the cursor turns into a question mark. Position this question-mark cursor over the area that you want information about, then click the left mouse button. A help card appears. If you prefer, you can get the question-mark cursor by holding down the <Shift> key and pressing the <F1> key.
Select the “Overview” menu item to see a brief overview of swpkg.
Select the “Tutorial” menu item to see the swpkg tutorial.
Select any of the listed help topics for help on that topic.
Select the “Index” menu item, to see a list of available help cards.
Select the “Keys and Shortcuts” menu item, to see a list of swpkg's keys and shortcuts.
Select the “Product Info” menu item to see a brief product information message.
Use the five Worksheet Selection tabs, shown in Figure 1-4, to work through swpkg's five main worksheets. You can view only one worksheet at a time. Access each worksheet by clicking the left mouse button on the tab associated with that worksheet.
You can tell which worksheet you're in by looking at which tab is selected. In Figure 1-4, the Create Product Hierarchy tab is selected.
The Message Area, shown in Figure 1-5, is a scrollable text area containing messages from swpkg. In particular, the Message Area shows you error messages and provides feedback during the build process.
If you prefer not to see this window, use the View pull-down menu on the menu bar to hide the Message Area.


