This chapter explains the first step for packaging your application for installation: creating a product hierarchy—an installation structure—for your product. This chapter contains these sections:
“Creating a Product Hierarchy: Before You Begin” provides some background information and lists the prerequisites for creating a product hierarchy.
“Creating a Product Hierarchy: The Basic Steps” lists the basic steps for creating a product hierarchy and explains where to find more detailed instructions for each step.
“Using the Create Product Hierarchy Worksheet” describes the features of the worksheet and explains how to use these features to create your product hierarchy.
This section lists the prerequisites for creating a product hierarchy and defines spec files and product hierarchies.
To package an application successfully, you need know
what objects need to be built
how these objects should be grouped within the product
where the objects are located
where they should be installed on the users' workstations
what permissions they should have on the users' workstations
swpkg requires that you organize your application's files into a three-level hierarchy. The highest level is the product level, the second level is the image level, and the third level is the subsystem level.
At the product level, software is grouped into distinct products. At the image level, a single product's files are grouped according to type: for example, one image for the software, and another for reference pages. At the subsystem level, the files in each image are organized into groups of files that are installed as a unit.
The purpose is to create subsystems consisting of related files that your users might want to install (or decline to install) as a group. For example, if your application provides several optional templates, you might group them together into a single subsystem. That way, users who are short on disk space, or who don't think they need the optional templates, can choose not to install that particular subsystem. Similarly, if all your documentation files (reference pages, release notes, online help, online books, and so on) are grouped into a single image, users can choose to install them all together, rather than subsystem by subsystem. So, if you choose your product structure carefully, you can make the installation process much easier for your users.
Here's an example of how you might create a product hierarchy for a simple application. Suppose you want to package a paint application called magritte. Let's say that the magritte application includes the basic application software, some clip art, a reference page, and some release notes. Here's a good way to structure your files for installation:
Separate the software files (the application software and the clip art) and the documentation (the reference page and release notes) into two separate images, called sw and man, respectively.
Divide the software image (sw) into two subsystems: one, called base, containing the base application software; and the other, called optional, containing the clip art.
Divide your documentation image (man) into two subsystems: one, called manpages, containing the reference page and the other, called relnotes, containing the release notes.
In this example, our product hierarchy would be one product (magritte) containing two images (sw and man), with each image containing two subsystems (base and optional, and manpages and relnotes, respectively). Figure 3-1 illustrates the structure of this example product hierarchy.
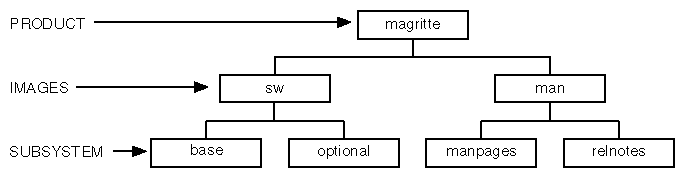
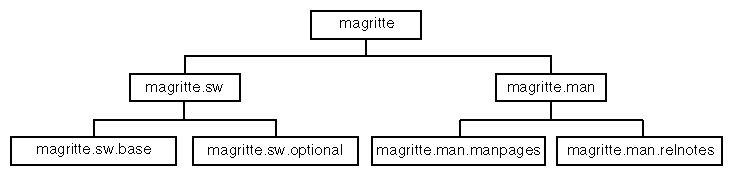
Image and subsystem names must reflect the product hierarchy by following these naming conventions:
Each image has a name of the form:
product.image
For example, if the name of the product is magritte, and the image is sw, then the full image name would be:
magritte.sw
Each subsystem has a name of the form:
product.image.subsystem
For example, if the name of the product is magritte, the image is sw, and the subsystem is base, then the full subsystem name would be:
magritte.sw.base
Figure 3-2 shows the correct product, image, and subsystem names, for the example introduced in “About Product Hierarchies”.
This section lists the Silicon Graphics conventions for structuring your product hierarchy.
Silicon Graphics conventions strongly recommend that:
Your product must contain an image named sw that contains all the software subsystems for your product.
The sw image must contain a subsystem named base that contains the base software for your product. (You might put optional software in a subsystem named optional, but this is not required.)
If your product contains reference pages or release notes, it must also include an image named man that contains the subsystems that include the reference pages and release notes.
The subsystem containing the reference pages must be named manpages and the subsystem containing the release notes must be named relnotes.
You are not required to follow these conventions, but Silicon Graphics strongly recommends that you do.
swpkg stores information about the product hierarchy in the product specification (spec) file for your product. When you enter information about your product hierarchy in the Create Product Hierarchy worksheet, you are actually creating a spec file for your product.
In general, here's what goes in a spec file:
product, image, and subsystem names—these names appear in Software Manager and versions listings
product, image, and subsystem descriptions—these descriptions appear in Software Manager and versions listings
installation order
initial installation information
installation prerequisites and incompatibilities
automatic removal of obsolete subsystems
the version number
These are the steps for creating a product hierarchy:
Edit the nodes in the template displayed in the Product Hierarchy graph so that the graph has the right number of images, each containing the right number of subsystems.
If the template in the Product Hierarchy graph does not provide the right number of images and/or subsystems for your product hierarchy, add or delete existing images or subsystems as necessary. (See “Adding and Deleting Nodes” for instructions.)
Edit the Product Specification sheet to set the product name and description. (See “Entering Product Specifications” for instructions.)
Edit the Image Specification sheet to set image names and descriptions and, if necessary, to specify any of these installation options:
installation order
version number (instead of using the default value)
(See “Entering Image Specifications” for instructions.)
Edit the Subsystem Specification sheet to set subsystem names and descriptions and, if necessary, to specify any of these installation options:
default installation
reboot installation
You might also need to specify:
prerequisite subsystems
incompatible subsystems
replacement subsystems
(See “Entering Subsystem Specifications” for instructions.)
Save the spec file by selecting “Spec” from the “Save” rollover menu in swpkg's File menu.
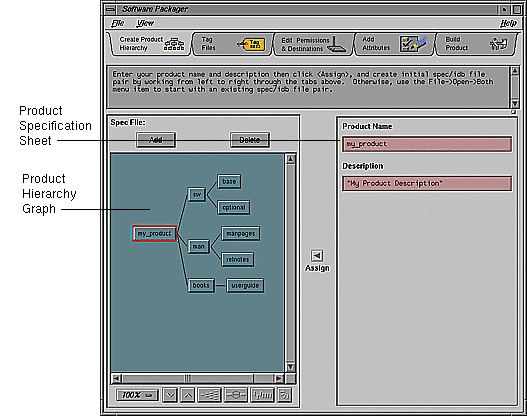
When swpkg first appears, it displays the Create Product Hierarchy worksheet, shown in Figure 3-3. This section describes the features of the worksheet and explains how to use it to create a product hierarchy.
The Product Hierarchy graph, shown in Figure 3-4, displays a template for a standard product hierarchy. You can alter this template to reflect a new product hierarchy. If you open an existing spec file, the Product Hierarchy graph displays the product hierarchy for that spec file. (To open an existing spec file, use the “Open” item in the File menu.)
Use the Product Hierarchy graph to create a structure for your product hierarchy—that is, arrange the nodes in the graph so that the graph has the right number of images, each containing the right number of subsystems. (For an explanation of nodes, see “Selecting Nodes”.) Add or delete nodes as necessary (see “Adding and Deleting Nodes” for instructions).
For a general discussion of product hierarchies, along with guidelines on structuring your product, refer to “About Product Hierarchies”.
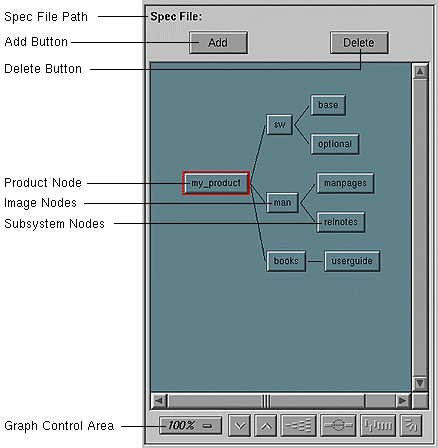
The Product Hierarchy graph provides a graphical display of your product hierarchy, in which products, images, and subsystems are shown as rectangles (or nodes) and relationships as connecting lines (or arcs). (If the graph is larger than the viewing area, scroll bars are enabled.)
When you select a node, the Specification sheet associated with that node appears to the right of the Product Hierarchy Graph. (The Specification sheets are groups of text fields and/or check buttons that you can use to provide the relevant installation information about each product, image, and subsystem in your installation plan.)
To select a node, click it with the left mouse button. The Specification sheet for that node appears to the right of the Product Hierarchy Graph. The Create Product Hierarchy worksheet has three different types of Specification sheets: the Product Specification sheet (described in “Entering Product Specifications”), the Image Specification sheet (described in “Entering Image Specifications”), and the Subsystem Specification sheet (described in“Entering Subsystem Specifications”).
The spec file path label shows the current spec file pathname. If no valid spec file is identified, the path is left blank. For information on creating a spec file or changing the spec file path, see “Using the File Menu”. For a definition of a spec file, read “What's a Spec File?”.
Use the Add button (located at the top of the product hierarchy graph) to add products, images, and subsystems to your product hierarchy (spec file):
To add a new product, make sure no nodes are selected (by clicking the background of the Product Hierarchy Graph), then click the Add button.
To add a new image, select the node for the product to which the image will belong, then click the Add button.
To add a new subsystem, select the node for the image to which the subsystem will belong, then click the Add button.
Use the Delete button to delete a product, image or subsystem by selecting the relevant node and clicking the Delete button.
The product hierarchy graph has a control area containing a row of graph controls, shown in Figure 3-5.
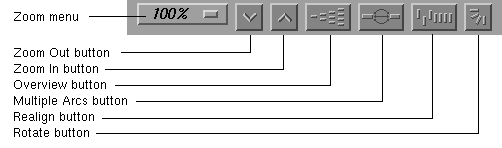
These graphical view controls are:
| Zoom menu |
| |||
| Zoom Out button |
| |||
| Zoom In button |
| |||
| Overview button |
| |||
| Multiple Arcs button |
| |||
| Realign button | Redraws the graph, restoring the positions of any nodes that were repositioned. | |||
| Rotate button | Flips the orientation of the graph between horizontal (calling nodes at the left) and vertical (calling nodes at the top).
|
Use the Product Specification sheet to enter your product's name and description. The Product Specification sheet, shown in Figure 3-6, is visible whenever a product node is selected in the Product Hierarchy graph. For example, if you click the left mouse button on the node labeled my_product in the product hierarchy graph, the Product Specification sheet for the my_product product appears to the right of the product hierarchy graph.
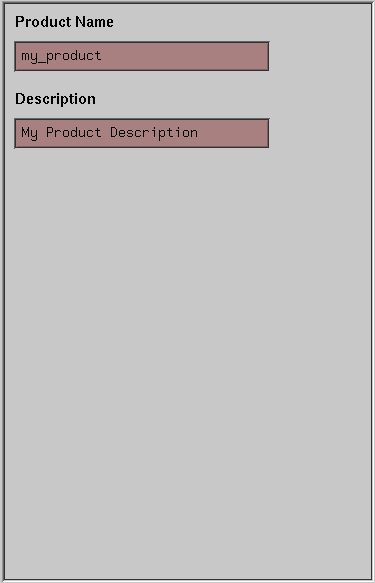
To enter information in the text fields, just delete the existing text, type in the new text, and click the Assign arrow button. If you don't click the Assign arrow button, your changes will be lost when you select a different node.
To name the product, follow these steps:
Delete the existing text in the Product Name text field.
Type in the new text.
Click the Assign arrow button.
The product name is the short name for the product—this is the “short” name that appears in Software Manager listings (the “long” name is the product description). Because the display length for both long and short names in Software Manager is typically 30 characters, the product name should be short so that subsystem names are less likely to overflow their column in versions and Software Manager listings. Short product names are also easier for users to enter. Do not choose a product name that begins with a digit.
To change the product description, follow these steps:
Delete the existing text in the Product Description text field.
Type in the new description.

Note: Always enclose your description within quotes. You can use either single or double quotes. You can use one type of quotes as part of your description if you use the other type of quotes to quote the description. For example, `Acme 1/2” Tape Support' is a valid description as long as you enclose it in single quotes. Click the Assign arrow button.
The product description is a brief description of your product that begins with the product name. This description is the “long” name that appears in Software Manager listings (the description also appears in versions listings). The description should be brief but informative, since this might be the only information users have to help them to decide whether to install your software.
In particular, the product description should begin with the marketing name of the product. Do not use the words “option,” “version,” “system,” or “release,” unless they are part of the name of the product (for example, Maintenance Release and Network File System).
Here are some general guidelines for creating descriptions:
Limit the string to 30 characters, if possible. Anything larger gets wrapped or truncated by Software Manager and versions.
When abbreviating words, use only standard, easily understood abbreviations.
Capitalize the first letter of each word, except prepositions.
Do not use punctuation.
Do not include part numbers or marketing codes
Include a market version number (version 1.2, for example)
So, for example, assume your product is a mortgage calculation application called Mortgage Calculator, that this is the first version of the product, and that its marketing code is M3-486. A good product description would be: “Mortgage Calculator 1.0”—a bad one would be: “Mort.Cal.M3-486.”
The Image Specification sheet, shown in Figure 3-7, is visible whenever an image node is selected in the Product Hierarchy graph. For example, if you click the left mouse button on the image labeled sw in the Product Hierarchy Graph, the Image Specification sheet for the sw image appears to the right of the Product Hierarchy Graph.
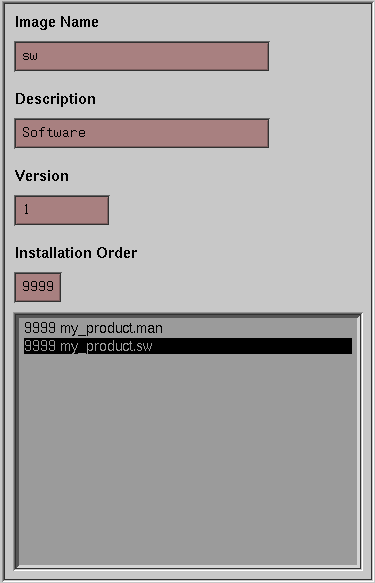
You can select any image in this Specification sheet by clicking the image name in the list of images below the text fields.
Use the Image Specification sheet to enter the image's name, description, version number, and installation order (each of these text fields is discussed in detail in this section).
To enter information in the text fields, delete the existing text, type in the new text, and click the Assign arrow button. If you don't click the Assign arrow button, your changes will be lost when you select a different node.
To change the name of an image, follow these steps:
Select the appropriate image node in the Product Hierarchy graph.
Delete the existing text in the Image Name text field.
Type in the new name for the image.
Click the Assign arrow button.
Refer to “Naming Images and Subsystems” for guidelines.
To change the description of an image, follow these steps:
Select the appropriate image node in the Product Hierarchy graph.
Delete the existing text in the Description text field.
Type in the new description for the image.
Click the Assign arrow button.
| Note: Always enclose your description within quotes. You can use either single or double quotes. You can use one type of quotes as part of your description if you use the other type of quotes to quote the description. For example, `Acme 1/2” Tape Support' is a valid description as long as you enclose it in single quotes. |
If the image in question is the sw or man image, you can just leave the description as it is in the corresponding (sw or man) template.
The image description is a brief description of the image. Since this description appears in Software Manager listings, it's important that the description be informative and distinct from the product and subsystem descriptions.
Like the product description, the image description should begin with the marketing name of the product. This is because Software Manager lists the products, images, and subsystem according to these descriptions—if your product, image, and subsystem names begin differently, they aren't listed together.
Image descriptions should include the product name and a description of the image (for example, Software, Documentation, or Manual Pages). Do not include a version or release number.
Here are some general guidelines for creating descriptions:
Limit the string to 30 characters, if possible. Anything larger gets wrapped or truncated by Software Manager and versions.
When abbreviating words, use only standard, easily understood abbreviations.
Capitalize the first letter of each word, except prepositions.
Do not use punctuation.
Do not include part numbers or marketing codes.
Choose a version number for your images. You can keep the existing, default value for the version number or you can create a version number of your own. Some rules and suggestions for selecting version numbers are:
The version number can contain no more than ten digits.
The version number cannot contain a decimal.
Do not use your software release number as the version number.
Start with a low version number. The version number of each software distribution you create for your product is higher than the last value. Over the lifetime of your product, 999999999 is the highest version number you can use. After that, you must change product or image names.
Type the version number directly into the text field labeled “Version,” then click the Assign arrow button.
The number in the text field labeled Installation Order tells Software Manager the order in which to install the various images. If you want to specify that some of your images be installed before others, select the installation order numbers accordingly. (Remember to click the Assign arrow button after typing in each order number.)
Installation order is specified by numbers in the range of 0 to 9999. The lower the order number, the earlier that image will be installed. If you do not specify an order number, the default is 9999 (the highest order, meaning the last to be installed). Images with equal order numbers are installed in alphabetical order.
Software Manager installs products in alphabetical order by default. Within each product, images are also installed in alphabetical order. Similarly, the subsystems in each image are installed in alphabetical order. For example, suppose there are two products, a and b. Each of them contains two images, sw and man. Each image has two subsystems, x and y. The installation order of these subsystems is:
a.man.x a.man.y a.sw.x a.sw.y b.man.x b.man.y b.sw.x b.sw.y |
You can control the order in which images are installed. In the example above, for instance, when you package the b product you can specify that the subsystems in the b.sw image should be installed before the subsystems in the a.sw image.
In the example above, to force b.sw to be installed before a.sw, give the b.sw image an order number less than 9999. The installation order of the subsystems would then be:
b.sw.x b.sw.y a.man.x a.man.y a.sw.x a.sw.y b.man.x b.man.y |
The Subsystem Specification sheet, shown in Figure 3-8, is visible whenever a subsystem node is selected in the Product Hierarchy Graph. For example, if you click the left mouse button on the subsystem labeled optional in the Product Hierarchy Graph, the Subsystem Specification sheet for the optional subsystem appears to the right of the graph.
Use the Subsystem Specification sheet to enter the subsystem's name, description, installation options, and mapping and rules information (each of these text fields is discussed in detail in this section).
To select installation options, just click the left mouse button on the check button next to the option you want to select, then click the Assign arrow button. If you don't click the Assign arrow button, your changes will be lost when you select a different node.
You can select as many installation options as you wish for each subsystem, but be careful not to select any of these options unnecessarily. For more information, see “Setting Basic Installation Options for the Subsystem.”
To change the name of the selected subsystem, follow these steps:
Delete the existing text in the Subsystem Name text field.
Type in the new text.
Click the Assign arrow button.
Refer to “Naming Images and Subsystems” for guidelines.
To change the description of the selected subsystem, follow these steps:
Delete the existing text in the Description text field.
Type in the new description.
Click the Assign arrow button.
| Note: Always enclose your description within quotes. You can use either single or double quotes. You can use one type of quotes as part of your description if you use the other type of quotes to quote the description. For example, `Acme 1/2” Tape Support' is a valid description as long as you enclose it in single quotes. |
The subsystem description is a brief description of the image. Since this description appears in Software Manager listings, it's important that the description be informative and distinct from the product and image descriptions.
Like the product and image descriptions, the subsystem description must begin with the marketing name of the product. This is because Software Manager lists the products, images, and subsystem according to these descriptions—if your product, image, and subsystem names begin differently, they aren't listed together. (The image description also appears in versions listings.)
Here are some general guidelines for creating descriptions:
Limit the string to 30 characters, if possible. Anything larger gets wrapped or truncated by Software Manager and versions.
When abbreviating words, use only standard, easily understood abbreviations.
Capitalize the first letter of each word, except prepositions.
Do not use punctuation.
Do not include part numbers or marketing codes.
The Installation Options check buttons that appear in the Subsystem Specification sheet represent three installation options. The first two options—Default and reboot—are user selected. The third option—Patch—is selected automatically when you create a patch through the “Create Patch...” menu item in the File menu. You can select none, one, or all of these options.
The Default option specifies that each time a product is installed, some or all of the subsystems are automatically selected for installation (these subsystems are called “default” subsystems). Users can deselect these subsystems if they choose. If you have a lot of subsystems, some of which are not necessary for the average user, you might want to tag the essential subsystems as default.
To set this option, click the left mouse button with the cursor over the option. After making your selection, click the Assign button to assign the option(s) to the selected subsystem.
The Reboot option specifies that the machine must be rebooted after installation of the subsystem. This option is only for subsystems that involve kernel code or other software that cannot be installed normally. Use the Reboot button only when absolutely necessary!
To set this option, click the left mouse button with the cursor over the option. After making your selection, click the Assign button to assign the option(s) to the selected subsystem.
| Note: When using Software Manager to install your product, this option is shown as a flag type of `b'. |
The Patch option specifies that a subsystem is part of a patch product and must have a follows rule. swpkg automatically assigns the Patch option to all subsystems that are part of a patch product. This option is insensitive to user selection. See Chapter 8, “Creating a Patch Product.”
The Rules text field allows you to specify, for each subsystem in your product, those subsystems that:
are prerequisites for installation
are incompatible with the selected subsystem
should be replaced by the selected subsystem
In order to make these specifications, you need to use the special syntax required for writing these rules. The syntax is described in the sections below and examples are provided.
To use the Rules text field, follow these steps:
Select the appropriate subsystem node in the Product Hierarchy Graph.
Type the correct rules specifications into the Rules text field. (The syntax is described in the sections below.)
Click the Assign arrow button.
Adding Replacement Statements
You can tell Software Manager to remove a specified subsystem when it installs the currently selected subsystem. Essentially, this means telling Software Manager to replace one subsystem with another, usually newer, subsystem. You do this using the replaces statement.
Replaces statements are powerful and flexible—taking the time now to learn how they work will help you later when you need to make changes to your product. The replaces line is critical when a product is repackaged (for example, when files in the product get moved around, when subsystems get new names, and so on).
A replaces line simply specifies that you want to replace an older subsystem with a newer subsystem. Specify the name of the subsystem and the range of version numbers you want replaced. Here's the format of the replaces statement:
replaces name lowvers highvers |
or
replaces self |
where
| name | is the name of the subsystem that is going to be replaced. | |
| lowvers | is the lower boundary of the range of versions of name that should be replaced. It can be 0, or any version number value that you supply. | |
| highvers | is the higher boundary of the range of versions to be replaced. highvers can be one of the following:
| |
| self | Software Manager always assumes that a subsystem replaces an older subsystem of the same name. Since this is the default case, you do not need to specify it explicitly. |
You can specify as many replaces statements as you need.
For each subsystem that has a replaces line, Software Manager looks to see if the subsystem specified in the replaces line is installed and if its version falls in the range given in the replaces line. If the installed version is in the range, the new subsystem is selected for installation automatically. If the new subsystem is installed, the old version is removed automatically.
There are four typical ways to use replaces:
Specify that a subsystem replaces older versions of itself.
Specify that a subsystem replaces maintenance versions of itself.
Specify that a subsystem replaces different subsystems that are now obsolete.
Specify replacement directions in complex repackaging situations where one subsystem has become several or several older subsystems have been restructured into several new ones.
Here are some examples of replaces statements:
A subsystem gets a name change. Suppose that the subsystem rfind.man.rfind is split into two subsystems, rfind.man.client and rfind.man.server. To make sure that rfind.man.rfind is replaced properly, you could create a replaces statement that looks like this:
replaces rfind.man.rfind 0 oldvers |
Alternately, you could specify an exact old version number so that your replaces statement would look something like this:
replaces rfind.man.rfind 0 1006000106 |
Or, suppose two or more subsystems get repackaged into a single subsystem. For example, say the rfind.sw.client subsystem and the rfind.sw.server subsystem are combined and the new subsystem is called rfind.sw.rfind. To replace the old client and server, you would use these replaces statements:
replaces rfind.sw.client 0 oldvers replaces rfind.sw.server 0 oldvers |
If either of the old subsystems rfind.sw.client or rfind.sw.server is installed, rfind.sw.rfind will replace them.
Finally, suppose you want to replace a maintenance release of rfind.sw.client with a new base release. You need to replace both the maintenance release and the previous base release. Your replacement statements would look like this:
replaces maint.rfind_sw.client 0 oldvers replaces rfind.sw.client 0 oldvers |
Setting Incompatibilities
You can specify that a subsystem in your product can be installed on a user's workstation only if one or more other subsystems are not installed. This is known as specifying incompatibilities.
| Note: Do not specify incompatibilities unless absolutely necessary. |
When incompatibilities are specified, Software Manager does not allow users to install subsystems that are incompatible. It checks for incompatibilities at two different times:
When a subsystem is selected for installation, Software Manager determines whether or not it is incompatible with something that has already been installed.
When the user quits, Software Manager checks again among the subsystems it has just installed for incompatibilities.
The format for incompatibility statements is the same as for replaces statements. Specify the name of the subsystem and the range of version numbers you want to declare incompatible. The format of the incompatibilities statement is:
incompat name lowvers highvers |
where
| name | is the name of the subsystem that is incompatible. | |
| lowvers | is the lower boundary of the range of versions of name that are incompatible. It can be 0, or any version number value that you supply. | |
| highvers | is the higher boundary of the range of versions that are incompatible. highvers can be one of the following:
|
Here are some examples of incompatibility statements:
To specify that the rfind.man.rfind subsystem is incompatible with the selected subsystem, you could create a incompatibility statement that looks like this:
incompat rfind.man.rfind 0 oldvers |
Alternately, you could specify an exact old version number so that your incompatibility statement would look something like this:
incompat rfind.man.rfind 0 1006000106 |
Setting Prerequisites
You can specify that a subsystem in your product can be installed on a user's workstation only if one or more other subsystems are also installed. That is, you can set prerequisites for the installation of a subsystem.
Do not specify subsystems outside your product as prerequisites unless absolutely necessary. Prerequisites can be a real problem, because the prerequisite product can change names or versions, making your prerequisite statement obsolete—which can prevent installation of your product!
To set prerequisites for a subsystem, first select the appropriate subsystem node in the Product Hierarchy Graph. Then type the text specifying the prerequisites into the Rules text field.
You can specify a list of subsystems that must all be installed in order for users to install the new subsystem:
prereq (
        name lowvers highvers
        name lowvers highvers
        name lowvers highvers
        )
|
where
| name | is the name of the subsystem that is a prerequisite. | |
| lowvers | is the lower boundary of the range of versions of name. It can be 0, or any version number value that you supply. | |
| highvers | is the higher boundary of the range of versions of name. highvers can be one of the following:
|
You can also write a prereq that specifies that only one of the listed subsystems must be installed for the new subsystem:
prereq (
        name lowvers highvers
       )
prereq (
        name lowvers highvers
       )
|
Remember to press the Assign arrow button to update the subsystem node after filling in the text area.
Here are some examples of prerequisite statements:
To specify that the rfind.man.rfind subsystem is a prerequisite for the selected subsystem, you could create a prerequisite statement that looks like this:
prereq rfind.man.rfind 0 oldvers |
Alternately, you could specify an exact old version number so that your prerequisite statement would look something like this:
prereq rfind.man.rfind 0 1006000106 |
To specify that the rfind.man.server subsystem and the rfind.man.client subsystem must both be installed in order for the selected subsystem to be installed, you could write a prerequisite statement that looks like this:
prereq (
         rfind.sw.server 0 oldvers
         rfind.sw.client 0 oldvers
        )
|
To specify that either the rfind.man.server subsystem or the rfind.man.client subsystem must be installed in order for the selected subsystem to be installed, you would need to write two prerequisite statements. They might look like this:
prereq (
         rfind.sw.server 0 oldvers
        )
prereq (
         rfind.sw.client 0 oldvers
        )
|
This field allows you to write your own mapping expressions. It is highly unlikely that you'll need to use this field, since you can create almost any product structure and mapping using the swpkg GUI. However, in cases where you have very complicated existing IDB files that you need to modify, you might find it easier to create mapping expressions rather than restructure your product.
If you decide you want to write your own mapping expressions, refer to Appendix A, “Writing Mapping Expressions.”
| Note: If you use any mapping expression other than a single subsystem name, enclose the expression within quotes. You can use either single or double quotes. |
Clicking the Assign arrow button saves the changes you made in the currently visible Product, Image, or Subsystem Specification sheet. If you switch to a different Specification sheet before clicking the Assign button, your changes are lost.
For example, if you select a product node, then change the product name, then click the Assign button, the new product name is applied to the product node. On the other hand, if you select a product node, then change the product name, then select an image node without first clicking the Assign button, your new product name is not applied to the product node.