After you create a product hierarchy using the Create Product Hierarchy worksheet, you need to assign each of your product's files to a subsystem in your product hierarchy. This is called tagging the files. You tag the files using the Tag Files worksheet.
This chapter contains these sections:
“Tagging the Files: Before You Begin” provides some background information and lists the prerequisites for tagging the files.
“Tagging the Files: The Basic Steps” lists the basic steps for tagging your files.
“Using the Tag Files Worksheet” describes the features of the Tag Files worksheet and explains how to use the worksheet to tag your files.
This section lists the prerequisites for tagging your files, and defines tags and IDB files.
Before you begin tagging the files, you must first create a product hierarchy using the Create Product Hierarchy worksheet (see Chapter 3).
swpkg stores the information you enter in the Tag Files worksheet in an installation database file (IDB file).
The IDB file contains the following basic information for each file in your product:
its location in a built source tree
its location after installation
its owner, group, and mode
what subsystem (group of files) it should be packaged in
An IDB file can include directories, links, and FIFOs as well as files.
The IDB file may also list certain attributes to be associated with each file, including:
the instruction that a binary file not be stripped before including it in the software distribution (the default is to strip binaries automatically)
shell commands that are to be executed just before or after installation of the file (preops and postops)
shell commands that are to be executed when exiting Software Manager (exitops)
a specification that this file is to be installed only on workstations that have certain architectural characteristics, such as a particular type of processor or graphics
an indication that a previous version of this file may have been modified by users, and if so, how to install this file
swpkg requires that you tag each of your files with the name of the subsystem to which you want that file to belong. swpkg stores all of these tags in the IDB file and uses them to build the product.
| Note: You can also create arbitrary tags, and map them to specific subsystems using the mapping expressions described in Appendix A, “Writing Mapping Expressions.” This is almost never a good idea, but it can be useful when you need to modify extremely complicated IDB files. |
You can add the following items to your IDB file:
files
directories (when you add a directory, all of its contents are added)
linked files
linked directories
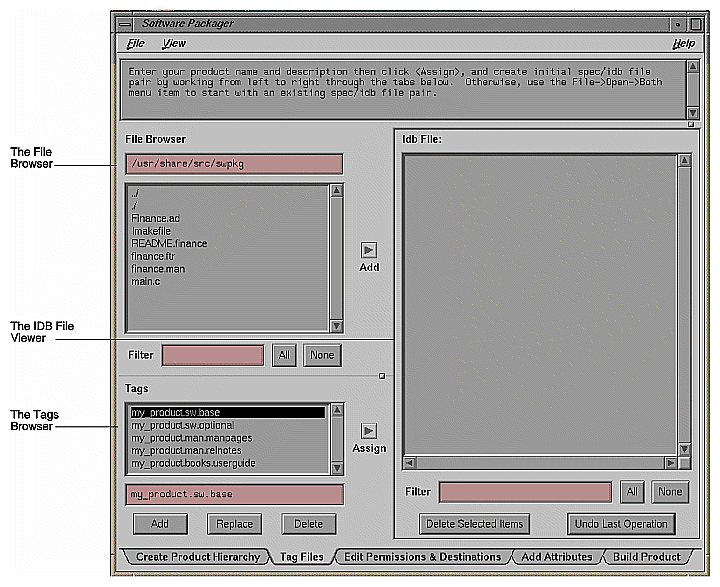
Using the Tag Files worksheet, as shown in Figure 4-1, follow these steps to enter files and directories into your product's IDB file and to assign them a subsystem:
Add all the files and directories in your product to your IDB file. (Remember to add the .ftr and .fti files for your Desktop icon.)
Use the File Browser to select your file(s) and directory(ies).
Click the Add arrow button to add them to your IDB file.
The items appear in the IDB file list.
Select items from the IDB file list for tagging. You can select multiple items, as long as you're going to put them all in the same subsystem.
From the Tags Browser, select the subsystem in which you want the selected items to appear. Then click the left mouse button on the Assign arrow button.
Repeat Steps 2-3 until every item in your product is assigned to a subsystem.
Save the IDB file by opening the File menu and selecting “Save IDB.”
| Caution: Do not include two files with the same full pathname in two different subsystems. If a file is included in two subsystems and both subsystems are installed, and one of the subsystems is subsequently removed, then the common file disappears, leaving a “hole” in the other subsystem. This rule applies only to files, not directories. |
This section describes the features of the Tag Files worksheet, shown in Figure 4-1, and explains how to use the worksheet to tag your files.
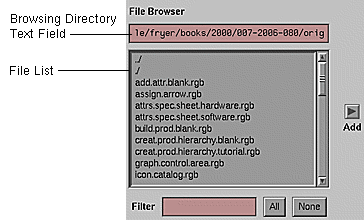
The File Browser, shown in Figure 4-2, is a tool that lets you select directories and files (including linked directories and files) to add to the IDB file. (You must add all the files in your product to the IDB file.) Use the File Browser to scroll through all the files in a directory and select the ones you need by clicking the left mouse button on the filename. Once you've made your selections, you add them to the IDB file by clicking the Add arrow button. The directories and files appear in the IDB File Viewer. When you add a directory, you add the directory and everything in it including subdirectories.
The File Browser consists of the browsing directory text field (which specifies the browsing directory), the file list (a list of all the files and directories in the browsing directory), the Filter text field, and the All and None buttons.
The File Browser lists the contents of the browsing directory, the directory that is named in the text field at the top of the File Browser. The initial browsing directory is the current directory, provided it's within the source root directory (the default is /).
You can select a different directory either by typing it in the text field and pressing <Enter> or, if you want to select a directory that is within the current directory, by double-clicking the left mouse button on the directory of your choice.
You can move up to the parent directory, by double-clicking the line with two periods followed by a slash (../).
You can enter your $HOME directory by typing:
~ |
in the File Browser text field and pressing <Enter>.
To select a file or directory (which includes its contents) from the File Browser's file list, click the left mouse button on it. You can select multiple contiguous entries by pressing and dragging the mouse before releasing the left button. You can select multiple noncontiguous entries by holding down the <Ctrl> key when pressing the left mouse button.
You can also select items in the file list by typing a pattern in the Filter text field, then pressing <Enter>. You can specify any regular expression (see the regcmp(3G) reference page for details).
For example, if you type:
.* |
you select everything in the file list (this is equivalent to clicking the All button).
If you type:
^$ |
you deselect everything in the file list (this is equivalent to clicking the None button).
Click the All button to select all the files in the file list. Click the None button to deselect all the files in the file list.
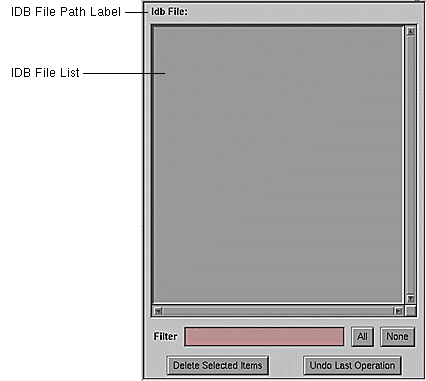
The IDB File Viewer, shown in Figure 4-3, lets you easily scroll through a list of all the files and directories in your product's IDB file and allows you to select and edit each item.
Symbolic links are followed in the Add operation; adding al link to a directory adds the link, the directory and its contents. To avoid adding the directory and its contents, rename the target directory for the duration of the operation.
The IDB File Viewer consists of the IDB file path label, the IDB file list, the Filter text field, the All button, the None button, the Delete Selected Items button, and the Undo Last Operation button.
When you first open the Tag Files worksheet, the IDB file list will probably be empty. You must add each file and directory in your product to the IDB file list by selecting the them from the File Browser, then clicking the Add arrow button.
Once all the files and directories in your product are included in the IDB file list, you need to:
tag each file and directory, using the Tag Files worksheet
set permissions and destinations for each file and directory, using the Edit Permissions & Destinations worksheet
set installation attributes for each file and directory, if necessary, using the Add Attributes worksheet
The IDB file path label shows the current IDB file pathname. Until a valid IDB file is identified, no path is listed. For information on creating an IDB file or changing the IDB file path, see “Using the File Menu”. For a definition of an IDB file, read “What's an IDB File?”.
The IDB file list displays the contents of the current IDB file. It lists all the files and directories that appear in your product's IDB file and, for each file and directory, it displays the associated tags, permissions, destinations, and attributes.
To select an item from the IDB file list, click the left mouse button on it. You can select multiple contiguous items by pressing and dragging the mouse before releasing the left button. You can select multiple noncontiguous items by holding down the <Ctrl> key when pressing the left mouse button.
You can make an item in the IDB file list current, by double-clicking it. When you make an item current, swpkg fills in the rest of the worksheet with the current settings for that item. This allows you to examine the information conveniently and to change some of the information for an item without having to fill in all the fields manually.
You can select items in the IDB file list by typing a pattern in the Filter text field, then pressing <Enter>. You can specify any regular expression (see the regcmp(3G) reference page for details).
Click the All button to select all the items in the IDB file list. Click the None button to deselect all the items in the IDB file list.
You can delete an item from the IDB file list by selecting the item, then clicking the Delete Selected Items button. You can delete more than one item at a time.
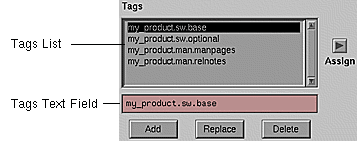
The Tags Browser, shown in Figure 4-4, allows you to easily select a tag from the list of available tags and assign it to any of the items listed in the IDB File Viewer. Each tag corresponds to a subsystem in your product.
Basically, you first select a group of items from the list of items in the IDB File Viewer, use the Tags Browser to select the subsystem to which those items should belong, then click the Assign arrow button to assign the selected tag to the selected items.
The Tags Browser consists of the tags list (which lists all the available tags), the tag text field (which allows you to enter the name of a new tag), the Add button, the Replace button, and the Delete button.
The tags list displays a list of all the tags defined in the spec file. These tags correspond to the subsystems you created using the Create Product Hierarchy worksheet. The selected tag appears in inverse video (the letters are in the background color and surrounded by a black box). To select a tag, click it with the left mouse button.
To select all the items in the IDB File List that are tagged with a particular tag, double-click the left mouse button on that tag.
You can edit the tags list using the tags text field in conjunction with the Add, Replace, and Delete buttons.
It is almost never necessary or desirable to edit the tags list. Instead, change the list of subsystems using the Create Product Hierarchy worksheet. In general, you edit the tags list only when you need to set up a complex mapping of files to subsystems. If you do edit the tags list, any new tag you create must be mapped to one of the subsystems in your spec file. Refer to Appendix A for instructions on creating such a mapping.
Here are the ways in which you can edit the tags list:
To add a new tag, type the new tag into the tags text field, and click the Add button (or just press <Enter>).
To replace an existing tag with a new one, select the tag you want to replace, type the new tag into the tags text field, and click the Replace button.
To remove a tag from the list, select it, then click the Delete button.


