This chapter explains how to set the correct permissions for each file in your product; how to specify where Software Manager should install each file in your product; and how to specify the source tree root.
This chapter contains these sections:
“Editing Permissions and Destinations: Before You Begin” provides some background information and lists the prerequisites for editing permissions and destinations.
“Editing Permissions and Destinations: The Basic Steps” lists the basic steps for editing permissions and destinations.
“Using the Edit Permissions & Destinations Worksheet” explains how to use the worksheet to edit the permissions and destinations for the files in your product.
This section lists the prerequisites for editing permissions and destinations, and briefly explains what is meant by “permissions and destinations” in the context of this worksheet.
Before you begin editing permissions and destinations for your files, you must create a product hierarchy using the Create Product Hierarchy worksheet (see Chapter 3) and tag the files using the Tag Files worksheet (see Chapter 4).
In particular, make sure that all your product's files are listed in the IDB Viewer. If some are missing, go back to the Tag Files worksheet and add them to the IDB file (see “Tagging the Files: The Basic Steps” for instructions). You can't edit permissions and destinations unless your files are listed in an IDB file because that is where swpkg stores them. (Every file that is currently listed in your IDB file is listed in the IDB File Viewer.)
Permissions, in the context of this worksheet, means the permissions of the files in your product as they are installed on your users' workstations—how you want Software Manager to set the file permissions when your users install your product's files.
Destinations refers to the pathnames of the files in your product as they are installed on your users' workstations—where you want Software Manager to put the files when your users install them.
By default, permissions and destinations are picked up from your source files—if your source files have the same pathnames and permissions that you want them to have when installed on the users workstations, then you don't need to edit the permissions and destinations fields. If there are differences, or if you want to set a source tree root, then you need to edit this worksheet.
To fill out the Edit Permissions & Destinations worksheet:
Set the source tree root for all your files, if you want it to be something other than the default (/).
Click the Apply arrow button.
Select a file from the IDB file viewer by single-clicking it.

Tip: If you double-click a file, swpkg selects the file and also displays current settings for permissions, source, and destinations. Set the mode for the file.
Set the owner for the file.
Set the group for the file.
Click the Assign arrow button.
Set the destination directory, if necessary. Click the Assign arrow button.
Set the destination filename, if necessary. Click the Assign arrow button. (See “Setting the Destination Filename” for instructions.)
Repeat steps 3-8 for each file listed in the IDB File Viewer.
Save the IDB file by selecting Save IDB from swpkg's File menu.
| Caution: If you don't click the Assign button after editing the text fields, your changes will be lost when you select a new file from the IDB file list. |
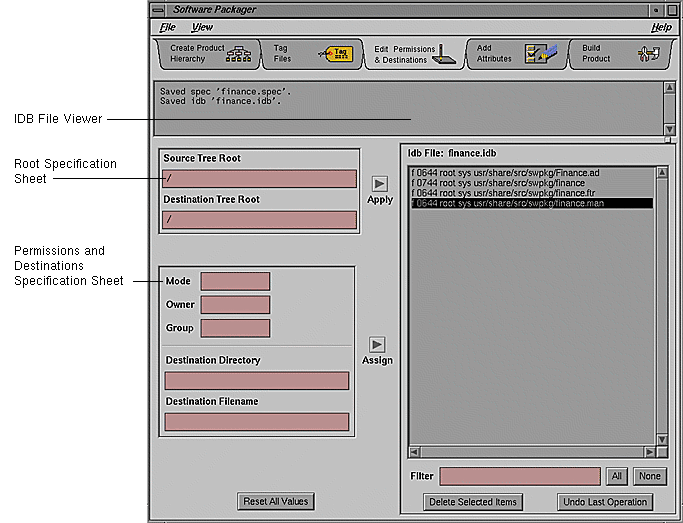
This section provides an overview of the Edit Permissions & Destinations worksheet, shown in Figure 5-1, and explains how to use the worksheet's features.
The Root Specification sheet, shown in Figure 5-2, allows you to specify a root for your source trees.
The source tree contains all of the files that you want to include in your packaged product. The source tree root is the directory relative to which swpkg looks for your product's files on your workstation (the workstation on which you're building your product). Changing the source tree root limits the browsing area in the Tag Files view to the designated tree. swpkg strips the source tree root from the pathnames of all files that you include in your product.
| Caution: swpkg does not save source tree roots for you from session to session. It uses the specified root when you build the product (by clicking the Build All button in the Build Product worksheet), but when you quit swpkg, the tree root is not saved. Next time you run swpkg, you have to set the tree root again. If you forget, then swpkg assumes the tree root should be set to / and it will not be able to find your files. |
Roots are always applied to all entries in the IDB file. To set a source tree root for all the files in your product, type the desired source tree root path in the Source Tree Root text field and click the Apply arrow button.
If the source tree root you specify is invalid, then you will see one of the following dialogs when you build the product:
No files found under Source Root /newroot.
10 (of 20 entries) not found under Source Root /root.
| Note: Instead of the numbers 10 and 20, you see numbers appropriate for your product. The number of files found varies—swpkg might think it has found some files but they are probably the wrong ones. |
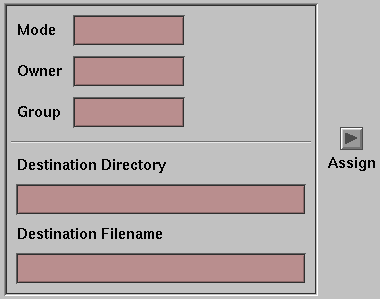
Use the Permissions and Destinations Specification sheet, shown in Figure 5-3, to set the mode, owner, group, destination directory, and destination filename for each file in your product.
| Note: If your source files have the same pathnames and permissions that you want them to have when installed on the users workstations, then you don't need to edit the permissions and destinations fields. |
Use the Mode text field to set the mode of a file as it will be installed on your users' workstations. To set the mode for a file, first make the file current by double-clicking it in the IDB file list. The current settings for the file appear in the text fields. Edit the text in the Mode text field. When you've finished editing, click the Assign arrow button.
The mode of a file is an octal number that represents the permissions of the file. An ASCII representation of the mode is displayed to the right of the text area for reference.
Briefly, an absolute mode is given as an octal number constructed from the OR of the following modes:
| 04000 | set user ID on execution | |
| 020#0 | set group ID on execution if # is 7, 5, 3, or 1, enable mandatory locking if # is 6, 4, 2, or 0. This bit is ignored if the file is a directory; it can be set or cleared only by using the symbolic mode. | |
| 01000 | sticky bit | |
| 0400 | read by owner | |
| 0200 | write by owner | |
| 0100 | execute (search in directory) by owner | |
| 0070 | read, write, execute (search) by group | |
| 0007 | read, write, execute (search) by others |
See chmod(1) and ls(1) for more details on modes.
Use the Owner text field to specify the owner of a file as it will be installed on your users' workstations. To set the owner for a file, first make the file current by double-clicking it in the IDB file list. The current settings for the file appear in the text fields. Edit the text in the Owner text field. When you've finished editing, click the Assign arrow button.
You can use the login ID (for example: root, sysadm, diag, adm, daemon, uucp, nuucp, bin, and guest) or the numerical user ID (uid) to identify who Software Manager should make owner of the file.
For example, entering nothing or 0 is the same as typing in:
root |
In the Owner text field, the uid automatically appears to the right of the login ID for reference.
Use the Group text field to specify the group of a file as it will be installed on your users' workstations.
To set the group for a file, first make the file current by double-clicking it in the IDB file list. The current settings for the file appear in the text fields. Edit the text in the Group text field. When you've finished editing, click the Assign arrow button.
You can use the group ID (for example: sys, root, daemon, bin, adm, mail, uucp, lp, user, and guest) or the numerical group ID (gid) to identify the group to which Software Manager should assign the file.
For example, entering nothing or 0 is the same as typing in:
sys |
In the Group text field, the gid automatically appears to the right of the group ID for reference.
Use the Destination Directory text field to set the directory in which Software Manager should install the selected file(s) on your users' workstations.
To set the destination directory for a file, follow these steps:
Make the file current by double-clicking it in the IDB file list. The current settings for the file appear in the text fields.
Edit the text in the Destination Directory text field. Click the Assign arrow button.
Use the Destination Filename text field to set the name of each file in your product as you want Software Manager to install it on your users' workstations.
To set the destination filename for a file, follow these steps:
Make the file current by double-clicking it in the IDB file list. The current settings for the file appear in the text fields.
Edit the text in the Destination Filename text field.
Click the Assign arrow button.


