This chapter explains how to set certain installation options, called attributes, for the files in your product. It contains these sections:
“Adding Attributes: Before You Begin” provides some background information and lists the prerequisites for adding installation attributes.
“Adding Installation Attributes: The Basic Steps” lists the basic steps for adding attributes.
“Using the Add Attributes Worksheet” describes the features of the worksheet and explains how to use it to add installation attributes to your product's files.
This section lists the prerequisites for adding installation attributes, and explains what installation attributes are.
Before you begin specifying attributes for your products files, you must first have created a product hierarchy using the Create Product Hierarchy worksheet (see Chapter 3), tagged the files using the Tag Files worksheet (see Chapter 4), and edited permissions and destinations for the files using the Edit Permissions & Destinations worksheet (see Chapter 5).
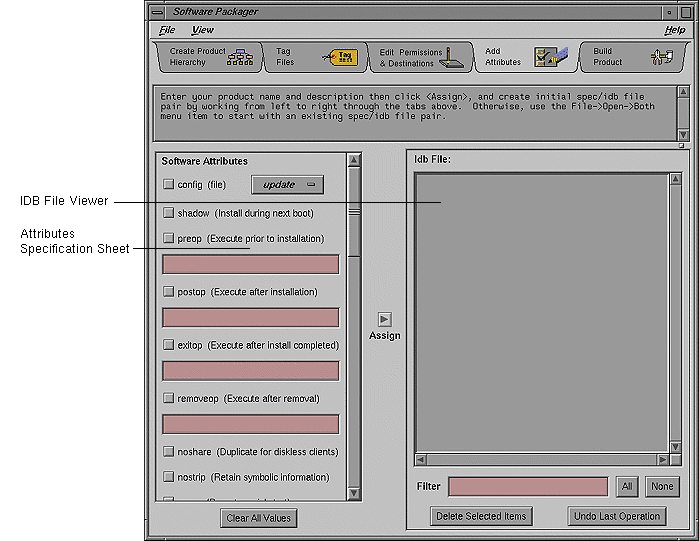
In particular, make sure that all your product's files are listed in the IDB Viewer. If some are missing, go back to the Tag Files worksheet to tag them and include them in the IDB file (see “Tagging the Files: The Basic Steps” for instructions). You can't add attributes to your product's files unless they are listed in the IDB file, because that is where swpkg stores them. (Every file that is currently listed in your IDB file is listed in the IDB File Viewer.)
For each file in your product, you can specify certain attributes—installation options that govern the installation of that file. For example, you can specify
that the installation occur during the next boot
shell commands for Software Manager to run automatically at different points in the installation
that a separate copy of your application be installed for diskless client
that a binary not be stripped
on which hardware configurations your application can be installed
swpkg stores attributes information in your product's IDB file.
To specify attributes for your product's files, follow these steps:
Select a file or files from the IDB file list.
Select the desired attributes from the Attributes Specification sheet.
Click the Assign arrow button.
Repeat Steps 1-3 for each file or group of files for which you wish to specify attributes.
Save the IDB file by selecting Save IDB from swpkg's File menu. (This step is optional; you can wait and save the IDB file when you build the product.)
This section describes the features of the Add Attributes worksheet, shown in Figure 6-1, and explains how to use the worksheet to add installation attributes to your product's files.
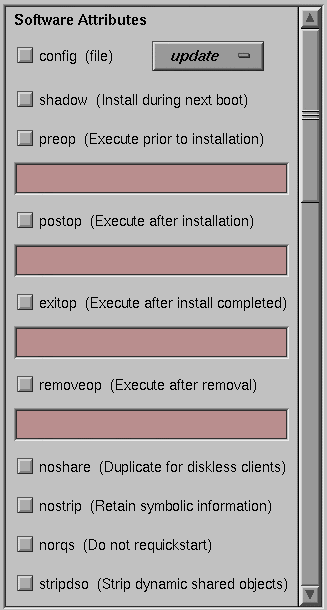
Figure 6-2, lists the for Software Installation Attributes. To the left of each attribute is a check button. You select (or deselect) the attribute by clicking the check button. When the attribute is selected, a red check mark appears over the button.
Users sometimes modify the configuration files for your product. Typically, these modifications are made to reflect site- and machine-specific information. It's important that you identify all the configuration files in your product so that modifications users made to older versions of these files are not lost during installation on the new versions.
By checking the config attribute check button, you identify the selected file as a configuration file. You must then specify a configuration type to specify how to deal with each configuration file. There are three configuration types. The first configuration type, update, is listed on the large button located to the right of the config attribute. Click this button to see all three choices, then select the appropriate configuration type from the list.
After you've selected a configuration type, click the Assign arrow button to assign the attribute to the selected file.
Here are the three configuration types:
| update | Software Manager automatically installs the new configuration file, but saves the old file as filename.O, where filename is the name of the configuration file. | |
| noupdate | Software Manager retains the existing (old) file, if it exists. | |
| suggest | Software Manager retains the existing file, if it exists, and install the new configuration file as filename.N, where filename is the name of the configuration file. |
The configuration types are listed below in a table that describes what Software Manager does with each type of configuration file.
Table 6-1. Configuration Types
Configuration File Type | Before installation | After installation |
|---|---|---|
update | No previous version was installed. | The new version is installed. |
| A previous version was installed, but not modified. | The new version is installed. |
| A previous version was installed and modified. | The older version is filename.O and the new version is installed. |
noupdate | No previous version was installed. | The new version is installed. |
| A previous version was installed, but not modified. | The previous version is still installed. |
| A previous version was installed and modified. | The previous version is still installed. |
suggest | No previous version was installed. | The new version is installed. |
| A previous version was installed, but not modified. | The new version is installed. |
| A previous version was installed and modified. | The new version is installed as filename.N. |
Very few applications need this attribute—in general, don't select it. Selecting the shadow attribute delays the installation of the specified file until the next time the workstation is booted. So, Software Manager does not immediately install the file on the users' workstations.
This attribute is useful for products that might be used by a variety of applications at any given time—such as shared libraries—where a replacement of the existing product files might affect those applications that are using the product at the time a new version of the product is installed.
After selecting this attribute, click the Assign arrow button to assign the attribute to the selected file.
Use the preop attribute when you want swpkg to execute a list of commands before installing a selected file.
See the following sections:
Example: Send Email Before Installing Executable
The following example sends email to the developer (you) just before the executable is installed by the user:
"echo $USER@`hostname`.`domainname` installed my_product| Mail developer@abc.com" |
You can cut, paste, and edit this example.
Use the postop attribute when you want swpkg to execute a list of commands after installing a selected file. Configuration files cannot have postops.
See the following sections:
Example: Send Email After Installing Executable
The following example sends email to the developer (you) after the executable is installed by the user:
"echo $USER@`hostname`.`domainname` installed my_product| Mail developer@abc.com" |
You can cut, paste, and edit this example.
Use the exitop attribute when you want to execute a list of commands after the user quits Software Manager (assuming the user is installing the selected file).
See the following sections:
Example: Installing an Application Icon
The following example installs your application's icon into the Icon Catalog:
"if [ -x \$$rbase/usr/sbin/iconbookedit ]; then chroot \$$rbase /usr/sbin/iconbookedit -add \"Category:File Name:/usr/bin/X11/my_product " -syspage Application; fi" |
You can cut, paste, and edit this example.
For a more detailed discussion of the iconbookedit command, see the iconbookedit(1M) reference page or Chapter 11, “Creating Desktop Icons: An Overview” in the Indigo Magic Desktop Integration Guide.
| Caution: Do not use exitop to add directories. Doing so can cause the size of your product to change, and because inst doesn't know about directories created through exitop, it cannot account for the size change. Add directories through the Tag Files worksheet. |
Use the removeop attribute to specify a list of command for swpkg to execute after a file is removed. removeops are executed only when a subsystem is removed (not during an upgrade).
See the following sections:
Example: Send Email After Removing Executable
The following example sends email to the developer (you) after the user removes the executable (e.g. versions remove my_product).
"echo $USER@`hostname`.`domainname` removed my_product| Mail developer@abc.com" |
You can cut, paste, and edit this example.
Steps for Using an Ops Command
To use an ops command, follow these steps:
Select a file from the IDB file list.
Select the ops attribute.
Type commands into the ops text field.
–or–
Cut and paste the example code found in the specific ops section, and replace code as necessary.
If you type the commands, be sure to
enclose the list of commands in a pair of double quotes
precede semicolons with a backslash, if you want them taken literally
press <Enter> after each separate command
Click the Assign arrow button.
| Note: When saving your ops commands into the IDB file, swpkg converts new lines into semicolons. When you start a new session with this IDB file, swpkg converts the semicolons back to new lines. To tell swpkg that you really do want a semicolon and not a new line, put a backslash in front of all “real” semicolons. |
Although an ops attribute provides the flexibility to perform many types of processing at installation time, you should limit its use for these reasons:
If the commands in the list do any type of processing that increases the use of disk space, such as uncompressing files, the user could run out of disk space during installation because Software Manager has no way of knowing how much disk space is required.
If files in the software product are modified during installation, the versions -m command reports them as being modified. This can be confusing for users because they have no way of finding out what the changes were and in many cases won't know that they were done during installation.
Extensive processing in an ops command makes installations take longer.
Errors that occur while running an ops command are very hard for users to diagnose and correct.
When your software product is “installed” on a diskless workstation, each file is installed on a server in the share tree by default. This means that just one copy of each file is installed on the server and that copy is used by all diskless clients of that server. Your product may contain files that need to be duplicated for each client, typically because they are configuration files that must be modified for each client workstation.
To indicate that a file is to be replicated for each diskless client, select the noshare attribute from the Attribute Viewer. After selecting this attribute, click the Assign arrow button to assign the attribute to the selected file.
By default, swpkg automatically strips all binaries. You can override this behavior by selecting the nostrip attribute from the Attribute Viewer. After selecting this attribute, click the Assign arrow button to assign the attribute to the selected file. (See the strip(1) reference page for more information.)
Use the norqs attribute when you don't want an executable to be included on the list for rqsall (see the manpage for rqsall). For example, add this attribute to any executable you don't want modified as a result of a quickstart.
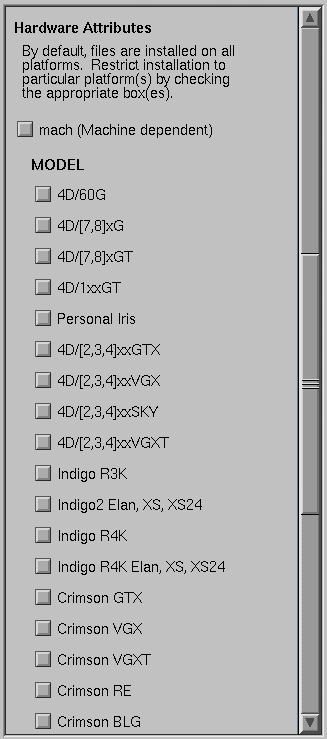
The lower portion of the Add Attributes worksheet (see Figure 6-3) titled Hardware Attributes, provides a list of the model names for selection. Clicking on a name selects/deselects it for assignment. Click the Clear All Values button to deselect all items.
In most cases, the files you include in your software product are applicable to all models of Silicon Graphics workstations. However, swpkg does provide a mechanism for restricting the installation of files to particular models on a per-file basis. You can use this mechanism to prevent users from installing files on a workstation that can't run them (which is better than allowing users to install files that won't work properly).
You'll need to set up installation restrictions if:
your application doesn't run on all Silicon Graphics workstations
different versions of a file are required for different models
a file in your product doesn't apply to particular models
You can restrict installation by specifying model or board names.
The lower section of the Add Attributes view labeled Hardware Attributes presents a list of model names for selection. Clicking on a name selects or deselects it for assignment. Clicking on the Clear All Values button deselects all items.
To see a list of boards used with specific models, choose “Show SGI Board Names” from the View menu.
To restrict installation to specific models:
Select the file(s) from the IDB File List.
Select the models on which the selected file(s) can be installed.
Click the Assign arrow button.
You can restrict installation to specific boards in three categories; CPUBOARD (Central Processing Unit Board), GFXBOARD (Graphics Board), and SUBGR (Subgraphics Board).
Model and board names are interdependent. swpkg references a matrix (/var/inst/machfile) of legitimate model and board combinations. For example, pressing the R3k Boards Only button selects all of the R3000 based cpuboards, and makes R4000 based models insensitive. You can still make further CPU board selections and deselections by clicking the check button corresponding to a particular CPU board.
| Note: The R4000 boards include derivatives of the R4000 architecture, such as R4400. |
To get the values for CPUBOARD, GFXBOARD, and SUBGR for a particular workstation, use the hinv(1M) command. From the output, to find out whether the workstation has an R3k or an R4k processor, look at the line that starts with “CPU.” For more information on the type of CPU board, look at the first line of the hinv output.
The hinv output provides graphics board and subgraphics board information using a different terminology than is used in the GFXBOARD and SUBGR sublists. To determine the values for GFXBOARD and SUBGR from hinv output, first look at the line labeled “Graphics board.” The IRIS Software installation Guide provides a table that maps the hinv output for each type of graphics board to the corresponding GFXBOARD and SUBGR values.
Since new values of CPUBOARD, GFXBOARD, and SUBGR may have been added for new models of workstations released after the IRIS Software Installation Guide was published, always check the most recent Release Notes for System Software for a current list of possible values.
Use the Assign arrow button to assign selected attributes to a file or files in the IDB file list. To do this, select the file(s) from the IDB file list, make your selections from the Attributes Specification sheet, then click the left mouse button on the Assign arrow button.


