This chapter provides a brief (ten-minute) tutorial that takes you through the basic steps for installing a simple product. When you've finished, you'll have packaged an example application for installation. It's best to work along with the tutorial, completing the steps on your own workstation as you read through them.
| Note: swpkg is a versatile tool that allows you a great deal of freedom in creating installable files. Many of swpkg's features are not required to package an average product for installation. Rather than present all the features, this tutorial focuses on the basics needed to package an application. Don't worry that we don't use some of the buttons and text entry fields that appear in the worksheets. swpkg's more advanced features are discussed in the remaining chapters of this book. |
Before you begin this tutorial, make sure you have the example application on your system. The example application is a loan calculator called finance. Given a term in years, the principle loan amount and interest rate, finance computes the monthly payment.
The files you use for this sample application are part of the swpkg product and include:
Finance.ad—Application defaults file.
Imakefile—System independent imake description file.
Finance.ftr—File typing rules file.
README.finance—File describing the finance tutorial.
finance.man—Manual page (nroff source).
main.c—Calculator source program.
Before you begin this tutorial, set up the finance application by following these steps:
Become superuser:
% su
Change to the directory containing the finance files:
# cd /usr/share/src/swpkg
To create the Makefile, enter:
# xmkmf
To compile the finance application, enter:
# make
To run swpkg, enter:
# swpkg |
A small dialog box appears with a copyright notice, requesting that you wait while the system initializes. Then swpkg appears.
When swpkg first appears, it displays the first of its five main worksheets: the Create Product Hierarchy worksheet, shown in Figure 2-1.
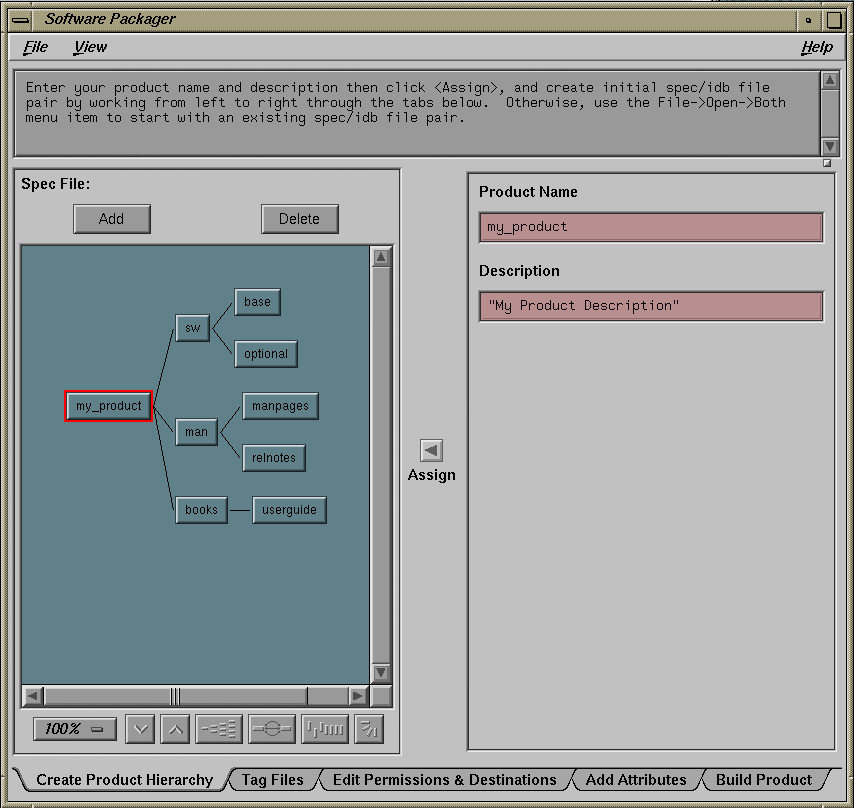
The Create Product Hierarchy worksheet helps you structure your product into three levels: product, images, and subsystems. This is called creating a product hierarchy. swpkg stores this product structure information in the spec file. (If you want more information now about spec files and product hierarchies, see “What's a Spec File?”, and “About Product Hierarchies”.)
For our example program, finance, we're just going to use the simplest product hierarchy: a software image and a reference page image with one subsystem each. We enter this information into the Create Product Hierarchy worksheet and tell swpkg to save it in the spec file.
To create the product hierarchy, follow these steps:
In the text field labeled Product Name, replace “my_product” with “finance.” (See “Setting the Product Name” for more detailed instructions on setting product names.)
In the text field labeled Product Description, replace “My Product Description” with “Mortgage Calculation Program.” (See “Setting the Product Description” for more detailed information on setting product descriptions.)

Note: Remember to enclose the description in quotes. You can use either single or double quotes. Click the Assign arrow button.
If you neglect to click the Assign arrow button, swpkg ignores your changes. After you click the Assign arrow button, the name of the node originally labeled “my_product” reads “finance.”
That's it. You've created a product structure for your product. Your completed worksheet should look like the one shown in Figure 2-2.

| Note: The template in the Product Hierarchy graph follows Silicon Graphics conventions for structuring and naming a product. Silicon Graphics strongly recommends that you follow these conventions. Users are presented with this structure when they use Software Manager. The descriptions you provide for your product, images, and subsystems are the first information about your product that users see. |
The next step is tagging the files, so that swpkg knows which files belong in which subsystem. To keep track of this information, swpkg stores this information in an installation database file (IDB file).
swpkg uses the IDB file to keep track of all sorts of information about the files that comprise your product, such as which files are included in which subsystem, where the files are located, and where Software Manager should put the files when it installs them. (IDB files can include other information too—for a more detailed explanation of IDB files, see “What's an IDB File?”). For now, we'll use the Tag Files worksheet to create a simplest-case IDB file.
First, switch to the Tag Files worksheet by clicking the tab labeled “Tag Files” (the second of the five Worksheet Selection Tabs at the top of the worksheet). When you do this, the Create Product Hierarchy worksheet is replaced by the Tag Files worksheet, shown in Figure 2-3.
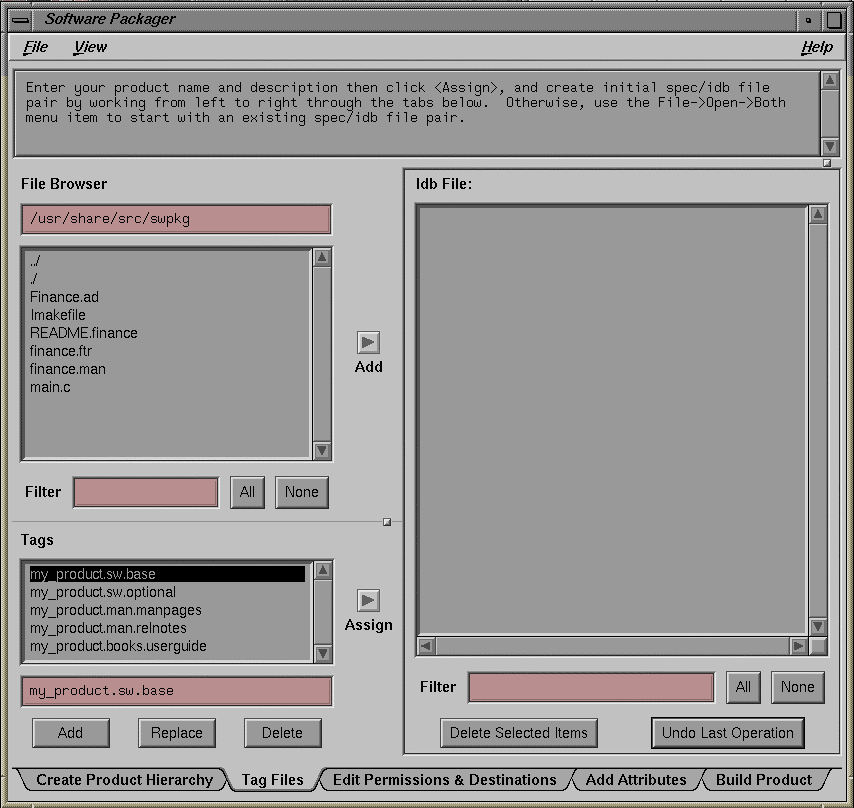
To create a simple IDB file for the Finance product, follow these steps:
In the field labeled File Browser, replace the text in the text:
/usr/share/src/swpkg
Press the <Enter> key. The contents of the /usr/share/src/swpkg directory appear in the File Browser.
Select the files named finance, Finance.ad, finance.ftr, and finance.man.
Using the scroll bar, scroll through the list of files until you find the finance.
Click the left mouse button on finance.
The line listing finance is highlighted in black.
Hold down the <Ctrl> key and click the left mouse button on Finance.ad, finance.ftr, and finance.man.
Click the Add arrow button (located just to the right of the File Browser). These lines appear in the IDB File Viewer:
finance.sw.base usr/share/src/swpkg/Finance.ad
finance.sw.base usr/share/src/swpkg/finance
finance.sw.base usr/share/src/swpkg/finance.ftr
finance.sw.base usr/share/src/swpkg/finance.man
(Don't worry about the lack of the slash before the usr directory. swpkg strips the source root from the pathname and uses the root that you specify in the Source Tree Root text field in the Edit Permissions & Destinations worksheet. The default source root is slash [/].)
Notice that the lines listing the finance, Finance.ad, finance.ftr, and finance.man files now appear in bold in the File Browser. Files that are listed in the IDB File Viewer appear in bold in the File Browser so that they're easier to spot.
Notice also that swpkg has assigned all four of these files to the finance.sw.base subsystem. This is because, when we added the files to the IDB File Viewer, the tag finance.sw.base was selected in the Tags Browser. The finance, finance.ftr, and Finance.ad files do belong in the finance.sw.base subsystem, but we'll need to switch the finance.man file to the finance.man.manpages subsystem.
Click the left mouse button on the entry for finance.man in the IDB files list.
In the Tags Browser, click the left mouse button on the finance.man.manpages tag. The line listing finance.man.manpages is highlighted in black.
Click the left mouse button on the Assign arrow button.
The IDB File Viewer now shows this line for the finance.man file:
finance.man.manpages usr/share/src/swpkg/finance.man
Now the finance.man file is assigned to the finance.man.manpages subsystem.
Now swpkg knows which files belong in which subsystems. Your completed Tag Files worksheet should look like the one shown in Figure 2-4.

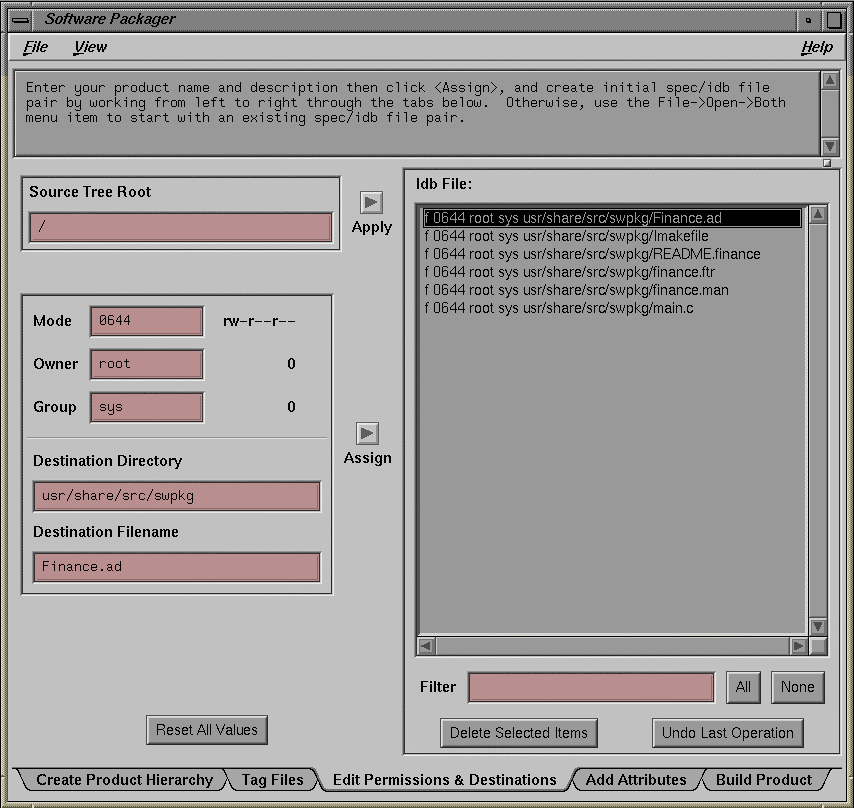
swpkg now knows which files are in which subsystems and where to find each file, but it doesn't know where you want the files installed or what the permissions should be. You provide this information using the Edit Permissions & Destinations worksheet, and swpkg stores it in the IDB file.
Open the Edit Permissions & Destinations worksheet by clicking the worksheet selection tab labeled “Edit Permissions & Destinations.” The Tag Files worksheet is replaced by the Edit Permissions & Destinations worksheet, shown in Figure 2-5.
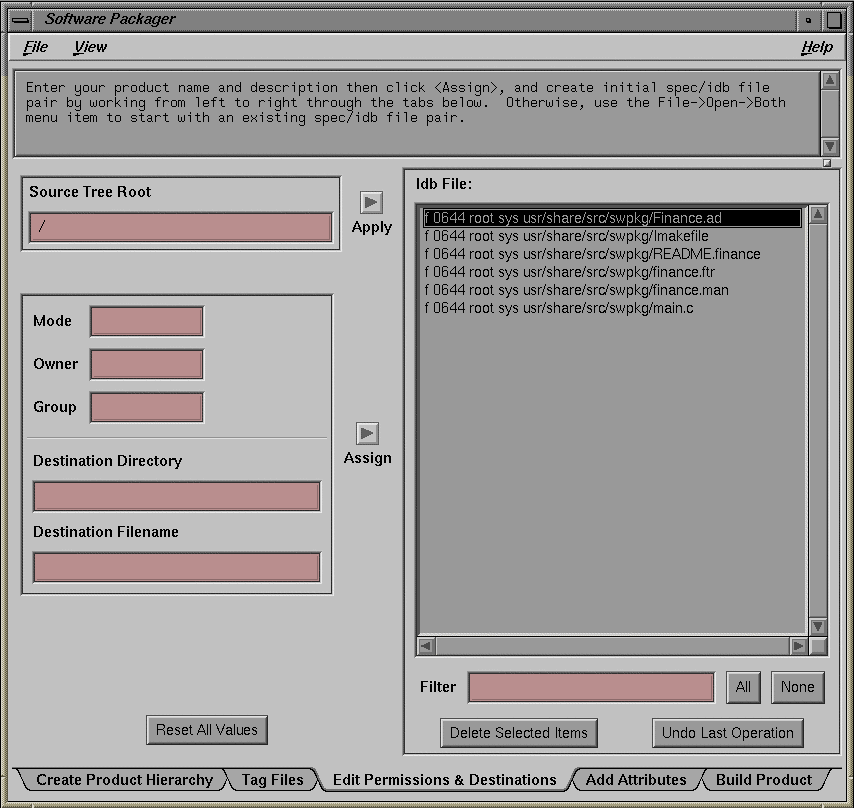
In the Edit Permissions & Destinations worksheet, you enter permissions and destination information for each file in your product. swpkg stores the information you enter in this worksheet in the IDB file. Later, when users install your product, Software Manager uses these lines to figure out where to install the files and how to set the file modes, owners, and groups.
To edit the permissions information for the Finance.ad file, follow these steps:
In the IDB File Viewer, double-click on the Finance.ad file. The current values for all the fields in the worksheet appear.
In the Mode text field replace the value with:
444
In the Owner text field replace the value with:
root
In the Owner text field replace the value with:
sys
In the Destination Directory text field replace the value with:
usr/lib/X11/app-defaults
In the Destination Filename text field replace the value with:
Finance
Click the Assign arrow button.
We're going to leave the Source Tree Root text field alone, since we want to use the default value (/). For information on setting source roots, see “Setting Source Tree Roots”.
You've finished filling in the worksheet for the Finance.ad file. The Edit Permissions & Destinations worksheet should now look like the one shown in Figure 2-6. For more detailed information on working with the text fields in the Permissions and Destinations sheet, see “Setting Permissions and Destination Directories”.
Now, using Table 2-1 as your guide, edit the permissions and destinations information for each of the remaining files:
Double-click a file.
Complete its data as shown in Table 2-1:
Click the Assign arrow button.
Table 2-1. Permissions and Destinations for Remaining Files
File
Mode
Owner
Group
Destination DirectoryDestination Filename
finance
775
root
sys
usr/bin/X11
finance
finance.ftr
444
root
sys
usr/lib/filetype/install
finance.ftr
finance.man
644
root
sys
usr/man/u_man/man1
finance.1
You've finished filling in the Edit Permissions & Destinations worksheet, now you're ready to add installation attributes to your product.
The next step is to add any necessary installation attributes to the product's files. To add an installation attribute, you need to switch from the Edit Permissions & Destinations worksheet to the Add Attributes worksheet. Click the left mouse button on the Worksheet Selection Tab labeled “Add Attributes.” The Add Attributes worksheet, shown in Figure 2-7, appears.
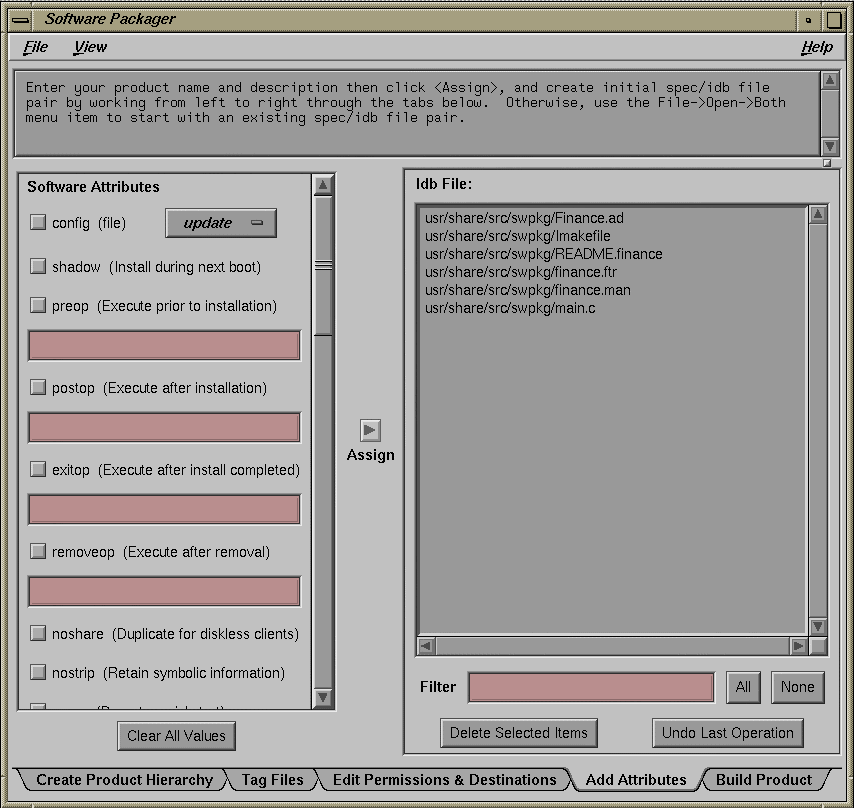
This worksheet allows you to set up certain installation attributes for the files in your product. In this example, we'll go with the simplest case: we'll use the exitop installation attribute to tell Software Manager to install the application's icon in the Icon Catalog after the user gives the quit command.
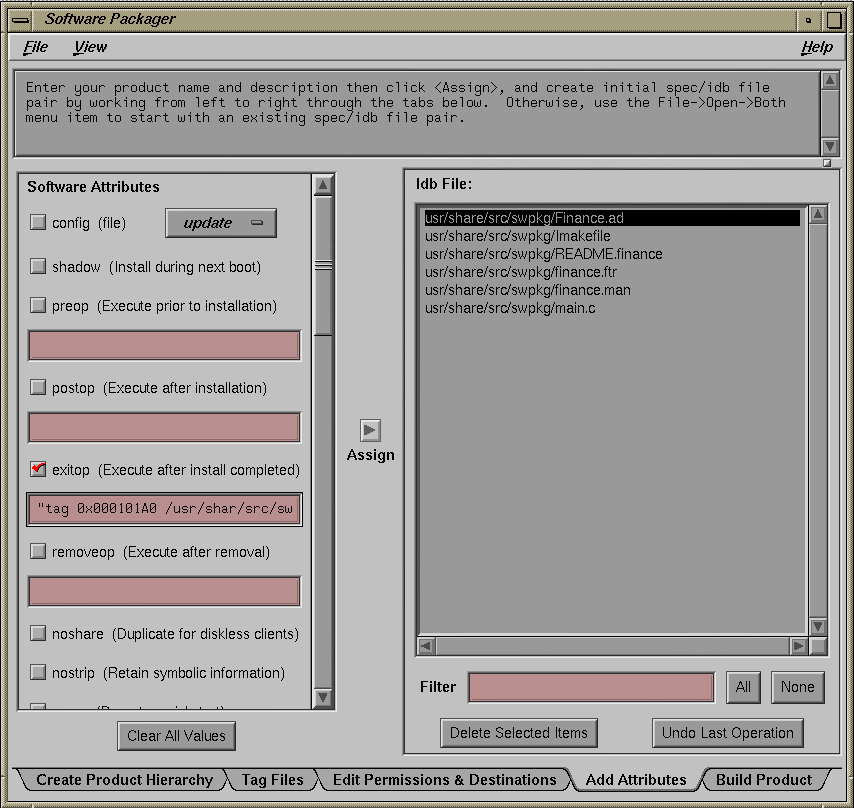
Double-click the left mouse button on the first item in the IDB File Viewer, the Finance executable.
Click the left mouse button on the exitop check button under “Software Attributes.”
In the text field under the exitop check button, type:
"tag 0x000101A0 /usr/bin/X11/finance
iconbookedit -add 'Category:File Name:/usr/bin/X11/finance' -syspage DesktopTools
cd /usr/lib/filetype
make -u"
Note: The entire list of commands is enclosed in a pair of double-quotes (" "). Click the Assign arrow button.
For more information on the iconbookedit command, see section “Step Five: Installing Your Application in the Icon Catalog,” and for more information on updating the Desktop database, see section “Step Four: Compiling the Source Files.” Both sections are in Chapter 11 of the Indigo Magic Desktop Integration Guide.
You've finished filling in the Add Attributes worksheet. The worksheet should now look like the one shown in Figure 2-8.
To build your product, you need to switch to the Build Product worksheet. Click the left mouse button on the Worksheet Selection Tab labeled “Build Product.” The Build Product worksheet, shown in Figure 2-9, appears.
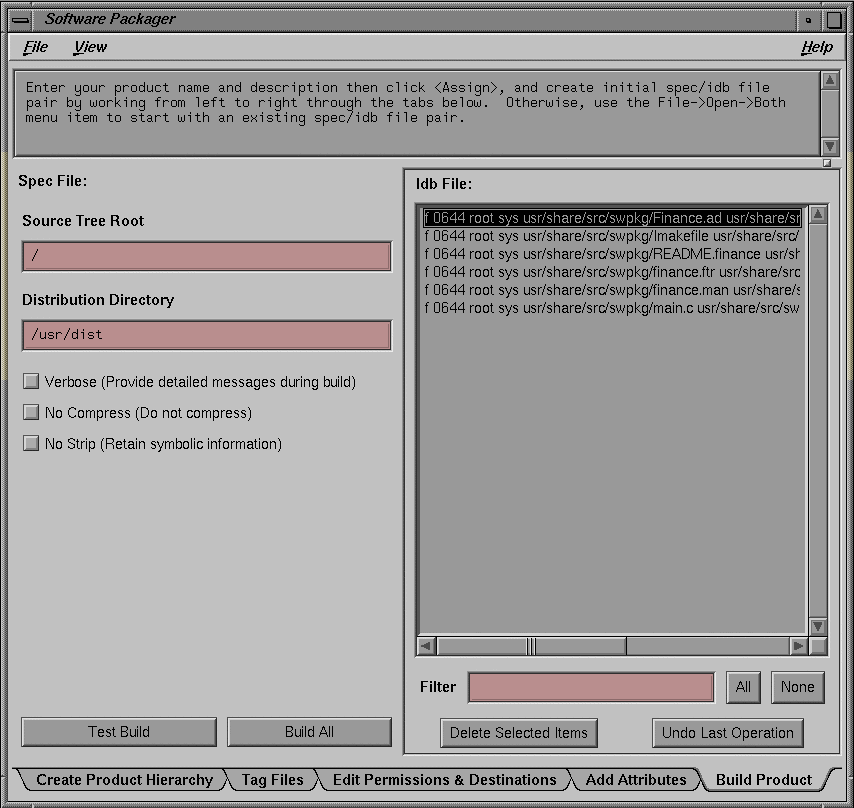
This worksheet lists the lines in the IDB file and shows the settings for the source root and the distribution directory. (The distribution directory is the directory where you want swpkg to put all the installable files it creates. This directory is often named dist, which is short for distribution.)
For this simplest-case example, we're going to stick with the default distribution directory, /usr/dist and we won't select any of the Build Options check buttons (located below the distribution directory text field). For more information on the build options, see “Selecting Build Options”.
Before building the product, it's a good idea to try a test and see if any problems crop up without having swpkg actually try to build the product.
Click the left mouse button on the button labeled Test Build at the bottom right corner of the worksheet.
If you haven't already saved your spec and idb files, swpkg displays a Save dialog asking where you want them saved.
Click the OK button in the Save dialog for both files.
If swpkg runs into problems, it lists them in the Message Area near the top of the worksheet.
If no problems are listed, you're ready to build the product. To build the product:
Click the left mouse button on the Build All button at the bottom of the worksheet.
As swpkg builds your product, it displays any error messages in Message Area. When it's finished, it displays a message to that effect in the Message Area. Now you're ready to quit swpkg.
Quit by selecting the “Quit” menu item from the File pull-down menu (described in “Using the File Menu”).
After you've built the product, use Software Manager to install it on your local workstation. Look at the short and long names Software Manager lists for your product, images, and subsystems—are they clear and distinct? After your product is installed, quit Software Manager. Were all the files installed in the correct places? Does the icon appear in the Icon Catalog?