This chapter describes how to operate an Origin200 or Origin200 GIGAchannel server. It covers these topics:
The front panel provides the following features:
status LED
front power switch
reset button
nonmaskable interrupt (NMI) button
Figure 4-1 shows the locations of these features.
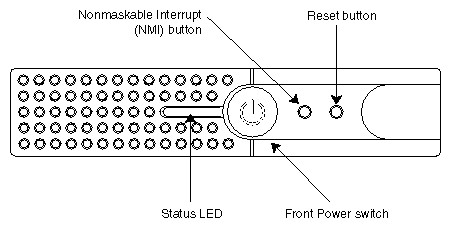
The actual status LED is part of the module system controller (MSC) assembly, which is located behind the front panel. A piece of light-conductive plastic (light pipe) channels the light from the LED to the front panel.
When the master power switch on a CPU module (master and slave) and a GIGAchannel expansion chassis is turned on, the status LED briefly flashes all three of its colors in sequence. When the system boots, for example after pressing the front power switch of a master CPU module or issuing a power-up command through the module system controller, the LED blinks green.
For a complete list of status LED codes for both the CPU module and the GIGAchannel expansion chassis, see the Origin200 and Origin200 GIGAchannel Maintenance Guide.
The front power switch causes the module system controller to either turn on or turn off power to the system. The master power switch at the rear of the system must be on in order for the front power switch to work.
When you press the front power switch to turn the system on, the module system controller (MSC) signals the power supply to turn on power to the drive bays, PCI backplane, and main system board and CPU daughter card. Beginning with MSC versions 3.2S, the default is for the system to turn on whenever the master power switch is turned on. You can change this behavior by changing the aut variable in the MSC. See “Causing the System Not to Power On Automatically”.
The module system controller itself remains active until the master power switch is turned off.
Use the reset button if the system is completely unresponsive (you cannot type commands to it) and you want to reboot the server without shutting it off. The reset button skips the automatic power-on diagnostic tests.
To reset the system, press the reset button. (See Figure 4-1). After you press the reset button, the system status LED on the front panel turns red briefly, then green, and the system reboots.
The nonmaskable interrupt is similar to reset, except that the system's current state is saved. When you press the nonmaskable interrupt button, this is referred to as “generating a nonmaskable interrupt” or “NMI.”
Generating an NMI is can be useful when attempting to solve application and system problems that cause the system to halt. If you experience problems with your system or an application, your support provider may instruct you to generate an NMI in order to recover data or examine the system.
To generate an NMI, press the NMI button. (See Figure 4-1). What happens when you generate an NMI depends upon the state of the system at the time:
If the system was running in PROM mode, the CPU immediately enters power-on diagnostics (POD) mode.
If a kernel debugging facility (such as symmon) is available, the system may start that utility.
If the kernel debugging facility fails due to data corruption, you can generate a second NMI and force the system into POD mode.
You can also generate an NMI using a module system controller command. See “Using the AUX Port and Module System Controller Commands.”
Occasionally, a system may not respond to an NMI. If this happens, you can either press the reset button or turn the system off and on again.
This section describes the functions of the two power switches and how to turn the system on and off.
Each Origin200 CPU module and GIGAchannel expansion chassis has two power switches: the master power switch and the front power switch.
The master power switch is located at the rear of the module or chassis. This switch controls whether or not current flows into the power supply.
When the master power switch is on, the power supply sends power (5 VDC) to the system controller at all times. Because of this, you should turn the master power switch off before servicing module or chassis, even if the system appears to be off otherwise.
When the master power switch is off, no current flows to the power supply and the system is completely off.
The front power switch is located on the front panel, between the 3.5-inch and 5.25-inch drive bays.
When you press the switch to turn the system on, the module system controller signals the power supply to send power to the other components of the server, thus causing the system to boot.
When you press the switch to turn the system off, the module system controller signals the power supply to immediately shut off current to the various parts of the system (disk drives, CPU, PCI boards, and so forth). The system controller remains active until the master power switch is turned off.
Instead of using the front power switch to control whether or not the system powers up or down, you can instead use a module system controller (MSC) command. This is described in “Powering the System On and Off”.
Beginning with MSC version 3.2S, the system powers on whenever the master power switch is turned on. However, you can cause the system to wait until the front power switch is pressed (or a power-up command is given to the MSC through the AUX port) before powering on. See “Causing the System Not to Power On Automatically”.
| Caution: Wait at least 10 seconds between turning the master power switch off and turning it on again. If you do not wait at least 10 seconds, the system controller may fail to initialize properly. |
Follow these steps to turn on the system:
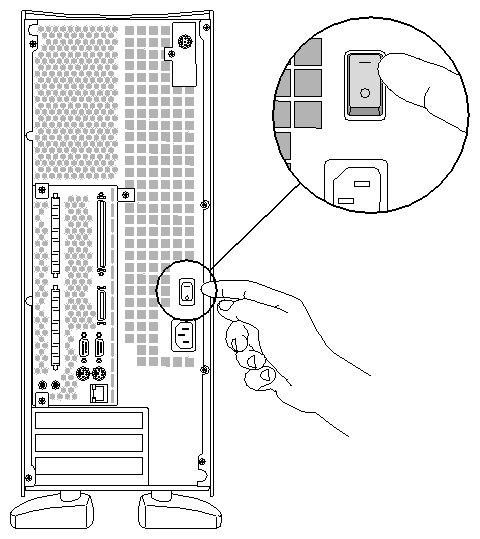
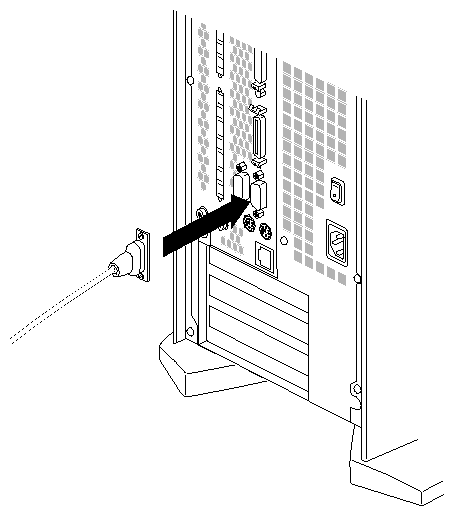
At the rear of the system, turn the master power switch on, as shown in Figure 4-2.
If you have more than one cabinet in your Origin200 server, turn on the master power switches in the following order: Origin Vault expansion cabinet, GIGAchannel expansion chassis, slave CPU module, and finally the master CPU module.
When you turn on the master power switch, the status LED on the front panel briefly flashes all three of its colors in sequence.

Note: If you have an Origin200 GIGAchannel server, be sure the XIO cables are properly connected before you turn on the master power switches on the CPU module and GIGAchannel expansion chassis. If you turn on the master power switches without the XIO cables properly connected, the hardware may not function correctly. Wait a few moments for the server to start. You should see some messages boot-up displayed on the system console.
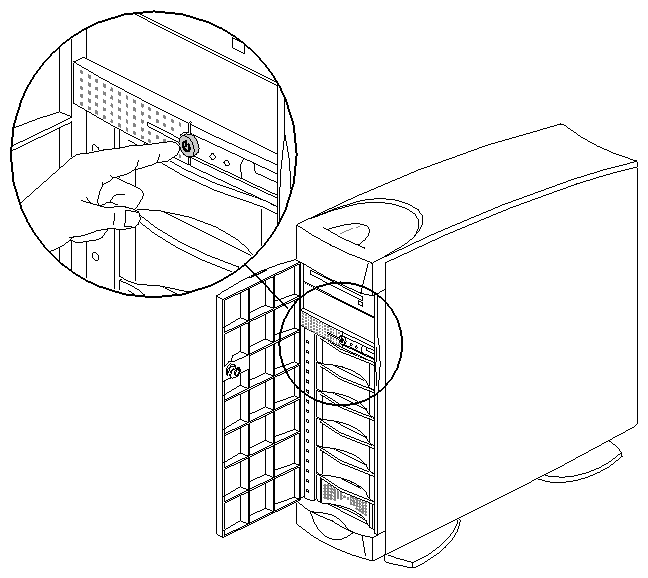
If you do not see any messages after turning on the main power switch, press the front power button, as shown in Figure 4-3.
In a two-module system, press the front power switch on the master node. (The front power switch on the slave node is inactive.)
Press the button far enough to feel a slight “click.”
After you press the button, the status LED turns red, then green as the system boots.
As the system boots, power is applied to the 3.5-inch peripherals in order, starting with the drive in slot 1 (the system disk) and proceeding to slot 6. After the 3.5-inch peripherals have power, power is applied to the 5.25-inch peripherals.
If the LED does not change colors, and the system does not appear to power on, switch the main power switch off, wait 10 seconds, turn the main power back on, and press the front panel switch again.
By default, the module system controller does not apply power until you press the front power switch. However, you can set it to automatically power on using the aut module system controller command. See “Using the AUX Port and Module System Controller Commands”.
You see several screens of diagnostic messages as the system performs various self-tests.
Note: Be aware that the more memory installed in the system, the longer the tests may take. For example, a system with 512 MB of memory may take over 2 minutes to complete its diagnostics. When the diagnostics finish, you see the System Maintenance Menu:
Running power-on diagnostics...
System Maintenance Menu
1) Start System
2) Install Software
3) Run Diagnostics
4) Recover System
5) Enter Command Monitor
   Option?
At the System Maintenance Menu, type 1 and press Enter.
The Origin200 server starts booting IRIX. You should see various messages, followed by the login prompt:
IRIS login:
When you see the “login” prompt, the system is finished booting and it is ready to use.
When you turn off the system, you can either
turn the system off, but leave the system controller active (for example, if you want to turn the system on remotely through the AUX port)
turn off all power to the system (for example, if you are servicing internal components, replacing drives, removing XIO cables, or moving the system)
Follow these steps to turn off the system:
Log in to the system as root.
Verify that no one is using the system, or that it is not in the middle of a critical task.
At a shell prompt, enter this command:
/etc/shutdown -g0
This causes the system to begin shutting down immediately. See shutdown(1M) for more information.
You see various messages about the system shutting down, then you see the System Maintenance Menu:
Running power-on diagnostics...
System Maintenance Menu
1) Start System
2) Install Software
3) Run Diagnostics
4) Recover System
5) Enter Command Monitor
   Option?
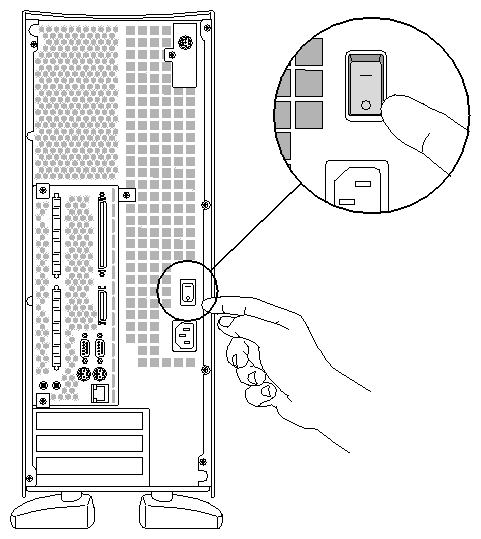
Once you see the System Maintenance Menu, locate the power button at the front of the chassis (the master chassis in a two-module system) and press it once. See Figure 4-4.
The status LED on the front of the system blinks, then goes out when the system is powered off.
If you are going to move the system, wait a few more seconds to allow the internal disks to stop spinning.
If you wish to leave the system controller active (so that you can turn the system on remotely through the AUX port), do not continue to the next step (turning off the master power switch).
Note: If you plan to disconnect the XIO cables from an Origin200 GIGAchannel server, you must also turn off the master power switches in the GIGAchannel expansion chassis and the CPU module to which it is connected, as described in the next step. If you leave the master power switches on when you disconnect the XIO cables, the system may not function properly. If you wish to turn off all power to the system (for example, to service it), turn off the master power switch at the rear of the server, as shown in Figure 4-5.
If you are power-cycling the system, wait 10 seconds after turning off the main power switch before turning it back on again. Otherwise, the module system controller may not initialize properly.
Note: If you have an Origin200 GIGAchannel server, always turn the master power switches on the CPU module and the GIGAchannel expansion chassis off before you disconnect the XIO cables. If you disconnect the XIO cables while the master power switches are on, the system may not function properly the next time it is booted.
| Note: Once you turn off the master power switch, the system controller is no longer active and you cannot boot the system remotely through the AUX port. |
Your Origin200 server is bundled with World Wide Web server software that allows you to access the system with a browser from any other computer on your network. In order to do this, your Origin200 server
must be attached to the network; see “Unpacking the Server and Checking the Shipment” in Chapter 2
must be configured to access the network; see “Logging In for the First Time” in Chapter 2
Once your server is attached to the network and properly configured, follow these steps to access the server with a Web browser:
Start the Web browser on a computer attached to your network.
Open the URL that corresponds to your server's name and domain, using port 2077.
For example, if your server is atlas, and your domain is donut.com, open the following URL:
http://atlas.donut.com:2077/
Use this URL to administer various aspects of your server that relate to networking and file (ftp, World Wide Web) access.
Your server is also shipped with a default system home (Web) page. Using the above example of a server called atlas in the domain donut.com, access this page with the following URL:
http://atlas.donut.com/ |
The HTML source for this page is stored in the directory /var/www/htdocs/index.html.
If you wish to separate a system with two CPU modules into two individual servers, follow these steps:
Shut down the dual-module system completely. See “Turning the System On and Off”.
Be sure to turn off the main power switch at the rear of the system in order to properly reset the module system controller.
Disconnect the CrayLink Interconnect cable from each chassis. See Figure 2-26.
Detach the grounding cable from each chassis. See Figure 2-26.
Reset the system controller DIP switch on the slave system so that it is a master module. See Figure 2-10.
Reassemble the individual chassis.
Attach a system console to the former slave module and boot the system.
The former slave system may not display any output on the system console for up to 5 minutes. This is normal. Allow the system to run through its normal process of determining what components are installed on the system. Eventually, you will see output on the system console.
If you want to run an Origin200 GIGAchannel server module without a GIGAchannel expansion cabinet attached, you must connect one of the XIO cables in a loop between the XIO A and XIO B connectors on the server module. This is called loopback mode. See Figure 4-6.
| Note: You must turn off the system completely before removing XIO cables from an Origin200 GIGAchannel server. Be sure to turn off the main power switch at the rear of both the CPU module and the GIGAchannel expansion chassis before removing XIO cables. |
Figure 4-6. Running an Origin200 GIGAchannel Without the GIGAchannelExpansion Cabinet (Loopback Mode)
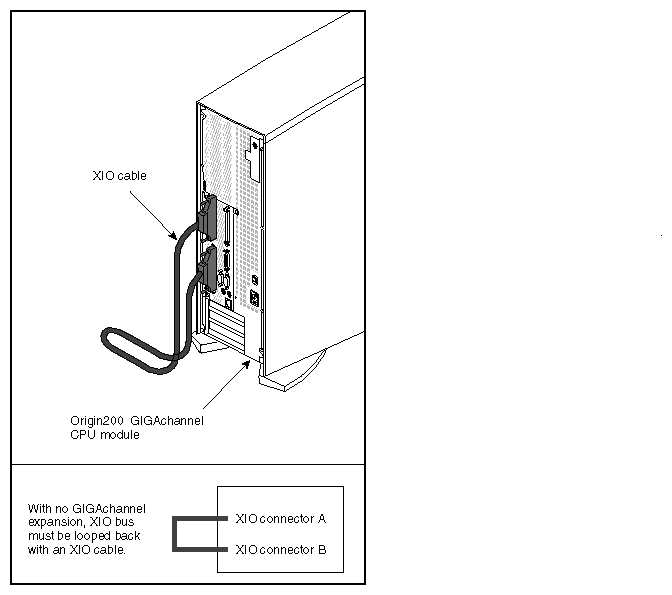 |
You cannot run an Origin200 GIGAchannel server module without either a GIGAchannel expansion cabinet attached, or a loopback cable.
As an alternative to a character-based (ASCII) terminal, you can use another computer (such as a laptop, IBM compatible computer, or Macintosh computer) or UNIX based workstation as the system console. The following sections provide basic information:
To use an IBM compatible or Macintosh computer as the system console, you need the following:
a serial adapter cable with proper connectors and wiring to connect your computer with the Origin200 server
a terminal emulation program (such as Term, HyperTerm, TERMINAL.EXE, Bitcom, ProComm, ZTerm, SITcomm, or Macterm)
These are the basic steps to using a computer as a system console for your Origin200 server:
Connect a serial port of the computer to serial port 1 of the Origin200 server.
Start your terminal emulator software and log in to the Origin200 server.
The next sections describe this process:
SGI has adapter cables that you can attach to the serial cable provided with your Origin200 server. Using these adapter cables and the serial cable provided, you can connect your computer to the Origin200 server. Table 4-1 lists the adapter cables and part numbers.
Table 4-1. Serial Adapter Cables for Connecting IBM compatible and Macintosh Computers to an Origin200 Server
Computer | Description | Length | SGI Part Number |
|---|---|---|---|
IBM compatible | DB25 Female to DB9 Female | 6 feet (2 meters) | 9290134 |
Macintosh | DB25 Female to DIN-8 Male | 6 feet (2 meters) | 9290135 |
Contact SGI or your local service provider for information on obtaining these adapters. If you wish, you can build your own serial cables using the information in Appendix B, “Cable Descriptions.”
Once you have obtained the correct adapter cable, follow these steps to connect the computer and the Origin200 server:
Make sure the Origin200 server is turned off.
Locate the serial cable that was shipped with your Origin200 server.
Attach the DB9 connector to serial port 1, as shown in Figure 4-7.
Attach the DB25 connector of the serial cable to the DB25 connector of the adapter cable.
Attach the other end of the adapter cable to one of the serial ports on your computer.
You can use any available serial port on your IBM compatible or Macintosh computer.
Make a note of which serial port you use. You may need this information later when you set up your terminal emulator.
To communicate with the serial port of an Origin200 server, you need a terminal emulator for your IBM compatible or Macintosh computer. Many operating systems, such as Microsoft Windows, ship with a terminal emulator package (also known as modem or communications software.) Some examples of terminal emulator software are the following:
Term
HyperTerm
TERMINAL.EXE
Bitcom
ProComm
ZTerm
SITcomm
Macterm
Regardless of the type of terminal emulator you use, make sure it has the settings shown in Table 4-2
Table 4-2. Terminal Emulator Settings
Setting | Value |
|---|---|
Baud rate | 9600 |
Data bits | 8 |
Stop bits | 1 |
Parity | None |
Local echo | off |
Terminal type | DEC V100, VT102, Wyse 60, ANSI, or dumb |
Flow Control | None or XON/XOFF |
To configure your terminal emulator, follow these general steps:
Power on your IBM compatible or Macintosh computer.
Do not turn on the Origin200 server yet.
When the system has booted, locate and start the terminal emulator.
Adjust the settings for your terminal emulator as indicated in Table 4-2.
Be sure the terminal emulator software is configured to use the serial port on your computer to which you attached the serial cable.
Note which terminal type (such as VT100 or ANSI) you choose to emulate. You will need this information when you log in to the Origin200 server.
Other settings, such as upload and download protocol, initialization strings, and file transfer settings do not matter for this procedure. You can leave them set to their defaults.
Follow these steps to log in to the server using your computer as a system console:
Turn on the Origin200. (See “Turning On the System”.)
Press Enter once or twice on your computer. You should see a power-on diagnostics message, followed by a menu similar to the following:
Running power-on diagnostics...
System Maintenance Menu
1) Start System
2) Install Software
3) Run Diagnostics
4) Recover System
5) Enter Command Monitor
   Option?
If you do not see the System Maintenance Menu, and nothing happens when you press Enter, make sure the cables are correctly attached. The DB9 connector on the long serial cable (shipped with the Origin200 server) must be in port 1 of the server.
Make sure you have configured the terminal emulator to use the correct serial port on your computer.
Make sure the baud rate and other emulator settings are correct. See Table 4-2. If you see strange characters on your screen (such as xx``x`) when you press the return key, you may not have set the baud rate correctly
Type 1 and press Enter.
The Origin200 server starts booting IRIX.
You should see various messages, followed by the login prompt:
IRIS login:
At the login: prompt, enter root, setup, guest, or another account name (if you have already created one) as appropriate, and press Enter.
If you have already assigned a password to the account you are logging in to, enter the password when prompted.
You see some brief messages and the following prompt:
TERM = (vt100)
Enter the appropriate terminal type for your emulator and press Enter. (See Table 4-2.) If you are using the VT100 terminal type, you can simply press Enter.
You can use another workstation, such as a Silicon Graphics O2, Indy, Indigo2, or Onyx2 system as the system console for your server. To do this, connect the workstation and the Origin200 server together using a serial cable, then use terminal emulation software (such as cu) to log in to the Origin200 server.
The procedures in the following sections assume that you are connecting your Origin200 server to a Silicon Graphics workstation. They describe how to
obtain the correct serial cable
make sure the eoe.sw.uucp subsystem is installed on the workstation
configure the workstation, which includes modifying some configuration files
connect a serial cable between port 1 of the Origin200 server and another serial port on the workstation
use the cu command on the workstation to connect to the Origin200 server
and log in
If you are connecting the Origin200 to a Silicon Graphics workstation, you need one of three RS-232 serial cables:
DB9 to DIN-8, null modem (has a D-shaped nine-pin connector on one end and a small, round connector on the other end): use this cable to connect the Origin200 server to a Silicon Graphics Indy, Indigo2, Indigo, Personal IRIS 4D/30, or Personal IRIS 4D/35 workstation.
DB9 to DB9, null modem (has a D-shaped, nine-pin connector on each end) with older cable wiring: use this cable to connect the Origin200 server to a Silicon Graphics Onyx, Personal IRIS, or POWER Series workstation.
DB9 to DB9, null modem with IBM compatible wiring: use this cable to connect the Origin200 server to a Silicon Graphics O2 or Onyx2 workstation.
Appropriate DB9 to DIN-8 and DB9 to DB9 cables are available from Silicon Graphics or your local service provider. You can also make the necessary cable using the pin-to-pin descriptions provided in the sections “Origin200 to Indy and Indigo 2 Cable (DB9 to DIN-8)” and “Origin200 to O2, Onyx2, and IBM Compatible (DB9 to DB9)” in Appendix B.
The UUCP subsystem contains the program cu and several configuration files necessary for checking for the correct software. To make sure the UUCP subsystem is installed, enter the following command at a shell prompt:
versions | grep uucp |
If the UUCP subsystem is installed, a line like this appears:
I eoe.sw.uucp 11/26/96 UUCP Utilities |
If you do not see the above line, the UUCP subsystem is not installed on your workstation. You should install or eoe.sw.uucp now.
Once the UUCP subsystem is installed, continue with the next section, “Configuring the Workstation.”
Follow these steps to configure the workstation:
Log in as root (or use su to invoke superuser privileges) on the workstation that you will connect to the Origin200 server.
Use a text editor (such as vi, jot, or emacs) to edit the file /etc/inittab.
Find the line that corresponds to the serial port you wish to use on the workstation. For example, this line corresponds to port 2:
t2:23:off:/sbin/getty -N ttyd2 co_9600 # port 2
Note: You can use any port you wish on the workstation, but keep in mind that port 1 is the workstation's alternate console port. If the third field in the line is the word “off” (as in the example above), exit the file and continue with step 3.
If the third field is the word “on,” change it to “off.”
Save the file, exit, and at the shell prompt enter this command:
telinit q
Using a text editor, open the file /etc/uucp/Devices.
Locate the following line:
# Direct ttyd2 - 9600 direct
Remove the number sign (#) and subsequent space at the beginning of the line:
Direct ttyd2 - 9600 direct
This change allows you to use port 2 on the workstation to connect to the Origin200 server. If you are using a different serial port, replace ttyd2 in the line above with the name of the actual port you are using, for example, ttyd3 or ttyd4.
Save the file and exit.
Edit the file /etc/uucp/Systems.
At the end of the file, add this line:
Direct Any Direct 9600 -
Save the file and exit.
Test the configuration on the workstation:
Enter this command at a shell prompt:
cu Direct
You should see this message:
Connected
This message means that cu has successfully opened the serial port. You are ready to proceed to the next section, “Connecting the Serial Cable.” Enter the following command to exit from cu and return to the shell prompt:
~.
(This command is the tilde character, followed by a period.)
If you do not see the message Connected, you may have made an error in one of the previous steps. Repeat this procedure, starting from step 2. In particular, make sure that you reference the same port in each of the files /etc/inittab and /etc/uucp/Devices.
Connect one end of the cable to port 1 of the Origin200 server, and the other end of the cable (either DB9 or DIN-8) to the appropriate port on the workstation, for example port 2.
Follow these steps:
On the workstation, enter this command at a shell prompt:
cu Direct
You should see this message:
Connected
Press Enter once or twice. You should see a login prompt from the Origin200 server:
IRIS login:
At the IRIS login: prompt, enter root, guest, or another account name (if you have already created one) as appropriate. You see some brief messages and the following prompt:
TERM = (vt100)
Enter the following terminal type:
iris-ansi
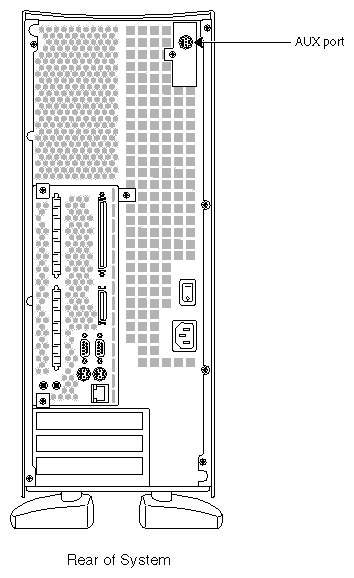
The AUX port is an 8-pin mini-DIN connector at the rear of an Origin200 CPU module that connects to the module system controller (MSC). You can use the AUX port to communicate with the MSC and perform various functions such as powering the server up and down, checking the temperature and fan status, and changing whether or not the server boots automatically when power is applied (for example, after an unexpected power outage). The AUX port only allows access to the MSC of the master CPU module. Neither of the module system controllers in a slave module or a GIGAchannel expansion cabinet can be accessed through the AUX port of a master module.
Figure 4-8 shows the location of the AUX port.
The AUX port uses a standard RS-232 interface, and the pin assignments are identical to those used on Silicon Graphics Indy and Indigo2 workstations and the CHALLENGE S server. (See Appendix A, “Connector Pinout Assignments.”) However, you cannot use the Origin200 AUX port to log in to IRIX.
To attach a terminal, modem, or other computer to the AUX port, you need a serial cable with a DIN-8 connector at one end (for the AUX port) and an appropriate connector for the terminal, modem, or computer at the other end. SGI has DIN-8 to DB25 terminal and modem cables and a DIN-8 to DIN-8 cable for use with Silicon Graphics Indy and Indigo2 workstations and the CHALLENGE S server.
Example cables are listed in Appendix B, “Cable Descriptions.” Appendix B also provides descriptions of cables that you can use to connect other computers and workstations (such as IBM compatible and Macintosh systems) to the AUX port. If necessary, you can use the descriptions provided in that appendix to construct your own cables. If you wish to use another computer to communicate with the AUX port, see also the instructions in “Using Another Computer or Workstation as the System Console” for general information about configuring a terminal emulator.
Follow these steps to attach the cable:
Plug the DIN-8 connector into the AUX port at the back of the system. See Figure 4-8 for the location of the AUX port.
Attach the other end of the cable to your input device, for example a terminal, modem, or other computer.
Use the following settings with your terminal (or modem or other computer):
9600 baud
8 data bits
1 stop bit
no parity
None, or XON/XOFF flow control
Test the connection by typing Ctrl+t and pressing Enter. You should see the module system controller prompt:
MSC>
If you do not see any response, check your cable and communications settings for your input device (terminal, modem, and so on). If this is a two-module system, be sure to plug the cable into the AUX port of the master module. Be sure there is power to the module system controller; the master power switch at the rear of the system should be on. (See Figure 4-2.)
Once you are able to see the MSC prompt, you are ready to use the module system controller.
The first task you should perform with the MSC is to reset the MSC password. See the section, “Using the Module System Controller.”
Once you have attached a terminal or other input device to the AUX port, use the module system controller by typing Ctrl+t, followed by a command. If you type Ctrl+t and press Enter, you should see the MSC prompt:
MSC> |
The following sections describe various common tasks you can perform with the MSC. In all cases, you enter commands and see the indicated responses on a terminal or other input device connected to the AUX port of the Origin200 server.
To use many of the MSC functions (such as power on and power off), you must be in Supervisor mode, and a four-character password is required to enter that mode. If you attempt to use a protected function and are not in Supervisor mode, you see the following error message:
err perm |
(See “MSC Error Messages” below for a list of possible messages.)
To enter Supervisor mode, type the following command:
Ctrl+t pas xxxx |
In the above example, xxxx is the four-character password. The default for all Origin200 servers shipped from SGI is the word “none.” To enter Supervisor mode on an Origin200 system with the default Supervisor mode password, type:
Ctrl+t pas none |
SGI recommends that you change this password to a different one. See the next section, “Setting the MSC Password.”
Supervisor Mode on the MSC is protected by a four-character password. By default, every Origin200 server ships with an MSC password, which is the word “none.” To change the password, enter Supervisor Mode as described in the preceding section, then enter
Ctrl+t pas s xxxx |
In the above example, xxxx is the new four-character password. The password must be exactly four characters long.
The Origin200 server contains a temperature sensor, located on the module system controller. To check the system temperature, enter this command:
Ctrl+t tmp |
If you see the letter n, the system is running at a normal temperature. If you see the letter h, the system is running at a higher-than normal temperature. If you see the letter o, the system is running at far-over the normal temperature and it will likely shut down.
If your server runs at higher than normal temperatures (h), verify that all the fans are working properly and that airflow into and out of the system is not blocked. If there are no problems with airflow, check the ambient air temperature. When the ambient air temperature is between 83.3˚ F (28.5˚ C) and 104˚ F (40˚ C), this can cause the system to run over the normal temperature. Be aware that the fan speed is automatically increased if the system is over normal temperature. See the sections “Checking the Fans (Origin200 CPU Module)” and “Checking and Setting the Fan Speed”.
If you see the letter o, the system is running at a dangerously high temperature and should be shut down immediately (if it has not already shut itself down automatically) until the cause of the problem is determined. Ambient air temperature higher than
104˚ F (40˚ C) causes a high system temperature.
To check the fans in the Origin200 CPU module, enter this command:
Ctrl+t fan |
If the fans are all functioning normally, the letter n or the letter h appears, indicating that the fans are running at normal speed or high speed, respectively. See “Checking and Setting the Fan Speed” for more information.
If a fan has failed, you see the following response:
ok f xxx [yyy] |
The letter f indicates a fan failure. The letters xxx represent a three-digit error code for the master CPU module that indicates which fans have failed, and yyy indicates any failed fans in a slave CPU module (if there is a slave CPU in the system). Table 4-3 shows how to interpret the error codes.
Table 4-3. Fan Failure Error Codes
Code | Meaning |
|---|---|
001 | Fan 1 has failed |
010 | Fan 2 has failed |
100 | Fan 3 has failed |
011 | Fans 1 and 2 have failed |
101 | Fans 1 and 3 have failed |
111 | All fans have failed |
The fans are numbered in order 1, 2, and 3, with fan 1 directly behind the 5.25-inch drive bay, fan 2 in the middle, and fan 3 closest to the PCI backplane. See “Air Flow, Fans, and Blower” for a diagram of the fan locations.
| Note: There is only a single fan, called a blower, in the GIGAchannel expansion chassis and the only way to determine the status of the blower is by examining the status LED on the front of the GIGAchannel chassis. See the Origin200 and Origin200 GIGAchannel Maintenance Guide for a description of the status LED codes. |
To check the fan speed, enter this command:
Ctrl+t fan |
If you see the letter n, the fans are running at their normal speed. If you see the letter h, the fans are running at high speed. Be aware that if the fans are running at high speed it could be because one of the fans has failed or the ambient air temperature is over 83.3˚ F (28.5˚ C) and the MSC has automatically increased the speed of the fans to compensate. You should inspect the system to make sure all the fans are running properly, that airflow through the system is not blocked, and that the temperature of the air where the Origin200 server is installed is within proper specifications. To determine the proper ambient air temperature, see “Physical and Environmental Specifications” in Chapter 1.
To run the speed the fans at high speed, enter this command:
Ctrl+t fan h |
To run the speed the fans at low speed, enter this command:
Ctrl+t fan n
Be aware that if the system temperature is high, you cannot run the fans at slow speed.
To check if the system is on or off, enter this command:
Ctrl+t pwr |
If you see the letter u, the power supply is on (sending power to the drives, PCI boards, fans, and logic carrier). If you see the letter d, the power supply is sending only 5 V to the MSC and the reset of the system is off.
To turn on power to the system (drive, CPU, memory, PCI cards, and so forth), enter this command:
Ctrl+t pwr u |
To turn off power to the system, enter this command:
Ctrl+t pwr d |
Be aware that the power-off command does not halt the operating system (IRIX) and applications gracefully. To shut the system down gracefully, first shut down the operating system, then turn off power. See “Turning the System On and Off”.
You can set the MSC to prevent the system from turning on automatically when the master power switch is turned on. By default, the MSC turns on power to the system as soon as the master power switch is turned on. (Be aware that this is the default for MSC versions 3.2S and later. Use the MSC ver command to determine the MSC version number. Earlier versions of the MSC had the exact opposite default.)
To cause the MSC to wait for you to press the front panel switch (or issue a pwr u command), enter this command:
Ctrl+t aut 0 |
To cause the system to power on automatically, enter this command:
Ctrl+t aut 1 |
To find out the current setting (automatic power on or not), enter this command:
Ctrl+t aut |
You see 0 if the system is not set to power on automatically, and 1 if the system is set to power on automatically.
| Note: Setting the system to automatically power on does not cause it to boot to IRIX. To cause the system to automatically load IRIX, set the PROM environment variable AutoLoad to “yes.” See prom(1) for complete information about the system PROM. |
If your server was shipped from the factory with a redundant power supply installed and you have not changed the configuration of the power supply since then, you do not need to perform any configuration to use the redundant power supply.
However, if you upgrade an Origin200 or Origin200 GIGAchannel server from a standard power supply to a redundant power supply, you should configure the MSC to check the status of the new redundant power supply.
With the system off (only the MSC active), use this command:
Ctrl+t pwr y
If you type this command while the system is running, you see the error message
err pwr_state.
| Note: The redundant power supply is not supported with versions of IRIX prior to 6.5.4. |
You can check the status of the redundant power supplies in the master and slave CPU modules with this command:
Ctrl+t pwr r
You see one of the following messages:
| m:n | No redundant power supply detected in the master module. | |
| m:y:ok | Redundant power supply in the master module is OK. | |
| m:y:fl | One half of the power supply in the master module has failed. | |
| s:n | No redundant power supply detected in the slave module. | |
| s:y:ok | Redundant power supply in the slave module is OK. | |
| s:y:fl | One half of the power supply in the slave module has failed. |
You cannot check the status of the power supply in the GIGAchannel expansion chassis. The status LED on the front of the GIGAchannel expansion chassis is the only indicator of the state of the power supply. See the Origin200 and Origin200 GIGAchannel Maintenance Guide for information on the status LED.
If you have a redundant power supply but wish to install a standard power supply instead, you can configure the MSC so that it no longer checks for the presence of a redundant power supply.
With the system off (only the MSC active), use this command:
Ctrl+t pwr n
If you type this command while the system is running, you see the error message
err pwr state.
Many of the commands display the text ok if they succeed. If there is a problem, the MSC prints the error messages shown in Table 4-4 when you enter incorrect commands.
Table 4-4. Module System Controller (MSC) Error Messages
Message | Meaning |
|---|---|
err perm | You do not have permission to use this command. You must enter Supervisor mode with pas in order to use this command. |
err cmd | The command you entered is not valid, or you typed the command incorrectly. |
err arg | The argument you gave with a command is not valid, or you typed it incorrectly. |
The module system controller (MSC) accepts the commands shown in Table 4-5.
Table 4-5. Module System Controller (MSC) Commands
Command | Function |
|---|---|
aut | Displays 0 if the system is not set to automatically power on and 1 if the system is set to automatically power on. The default is 0. |
aut 0 | Do not power on automatically when the master power switch is turned on. The MSC waits for an explicit power-on command (either from the front panel or via the pwr command) when the master power switch is turned on. |
aut 1 | Automatically powers on the system (applies power to the logic carrier, PCI backplane, fans, SCSI devices) after the master power switch is turned on. Does not wait for the front panel switch to be pressed or for a pwr command via the AUX port. This is the default setting. |
clr | Resets all MSC options to their power-on defaults. This includes echo mode, no heartbeats, and so forth. |
ech 0 | Turns off echoing as MSC commands are entered; what you type does not appear onscreen. |
ech 1 | Turns on echoing. You see what you type. |
ech | Toggles the echoing. (Echoing is on by default after the system is reset.) |
fan | Checks the speed of the fans. The command displays an n if the fans are operating at a normal speed, and an h if the fans are operating at a high speed. Note that the MSC automatically switches the fan speed to high if one of the fans fails or if the ambient air temperature is between 83.3˚ F (28.5˚ C) and 104˚ F (40˚ C). |
fan n | Sets the fans to run at normal speed. |
fan h | Sets the fans to run at high speed. |
nmi | Sends a hardware nonmaskable interrupt (NMI) to the system. |
pas xxxx | Enters Supervisor mode; xxxx is the four-character password for your system. All Origin200 servers ship with the word “none” as the default password. |
pas s xxxx | Sets the password to xxxx. Note that the password must be exactly 4 characters long. |
pwr | Displays u if the power is on and d if the power is off. |
pwr u | Turns on power to the drives, logic carrier, fans, and PCI boards. |
pwr d | Turns off power to the drives, logic carrier, fans, and PCI boards. |
pwr d N | Waits N seconds and then powers off the system. N is a hexadecimal value from 5 to 258 (5 to 600 decimal). |
pwr c N | Waits N seconds and then powers on the system. N is a hexadecimal value from 5 to 258 (5 to 600 decimal). |
pwr r | Checks the status of the redundant power supply in the master and slave
modules. |
pwr r y | Tells the MSC that a redundant power supply is present in both the master and
slave modules of the system. |
pwr r n | Tells the MSC that a redundant power supply is no present in both the master and
slave modules of the system. |
rst | Sends a hardware reset to the system. |
sel cpu | Selects the CPU to receive input from the MSC. Anything typed on the MSC that is not an escaped command is sent through to the selected CPU. CPUs are named by module and slice. For example, sel 1a selects CPU A in module 1 for input, and sel 2b selects CPU B in a second (slave) module. |
sel | Displays which CPU is currently selected to receive MSC input. Prints none if no CPU is selected. |
sel auto | The last CPU to have output anything is automatically selected to receive MSC input (this is the power-on default). |
see cpu | No CPU is selected to receive MSC input. |
see | Discards output from all CPUs other than a specific CPU (ordinarily, the output from all CPUs is displayed intermixed by line). CPUs are named by module and slice. For example, see 2a shows only CPU 2A's output. |
see all | Displays output from all CPUs (this is the power-on default). |
tmp | Displays n, h, or o, indicating whether the system is running at a normal temperature, high temperature, or seriously over-temperature (with a system shutdown impending). |
ver | Reports the MSC firmware revision number. |
Because the Origin200 server, like the rest of the Origin product line, is a highly configurable multimodule system, there are some differences in the way that devices are identified and configured from prior SGI systems.
You can still use the hinv command to list devices installed in the system. However, there is a new tool available, the /hw filesystem, and some things to be aware of regarding the way devices are detected and numbered.
When the system boots, it probes all of the attached hardware. As it enters multiuser mode, it runs the ioconfig utility, which examines the /hw filesystem (described in “How to Use the Hardware Graph”) to assign unique controller numbers for each device it finds. The results of this process are stored in the file /etc/ioconfig.conf, which maps logical controller numbers to device names.
Be aware of the following:
When the system boots and probes hardware, there is no guarantee that it will detect devices in a particular order (except for certain fixed devices in the master module, such as the console serial port, SCSI controllers 0 and 1, and the primary Ethernet port).
When you remove devices from the system, the logical controller numbers are not automatically removed from /etc/ioconfig.conf.
You can change the way that devices are numbered by editing the file /etc/ioconfig.conf. See ioconfig(1M) for more information.
The hardware graph is a tool for inventorying the I/O devices on all Origin and Onyx2 systems. Unlike hinv, the hardware graph is an IRIX filesystem, whose branching character accommodates the possibility of multiple nodes, each with multiple I/O devices of several types. The hardware graph keeps track of information in the kernel that is associated with the hardware.
Most of the hardware graph directories are much like their /dev counterparts, but module numbers are persistent across reboots and hardware changes (until you change the module numbers).
To see the hardware graph, use the ls command. For example:
# ls /hw console input2 mmem scsi zero cpunum kmem module scsi_ctlr disk machdep nodenum tape external_int mem null ttys input midi rdisk unknown |
The contents of the directories can be either IRIX special device files or subdirectories. In this output, for example, ttys, scsi, rdisk, and scsi_ctrl are subdirectories containing files:
# ls /hw/ttys tty4d1 tty4f1 tty4m1 ttyc1 ttyd1 ttyf1 ttym1 ttymidi1 tty4d2 tty4f2 tty4m2 ttyc2 ttyd2 ttyf2 ttym2 ttymidi2 tty4d3 tty4f3 tty4m3 ttyc3 ttyd3 ttyf3 ttym3 ttymidi3 tty4d4 tty4f4 tty4m4 ttyc4 ttyd4 ttyf4 ttym4 ttymidi4 # ls /hw/scsi sc0d1l0 sc0d2l5 sc0d4l2 sc0d5l7 sc1d3l4 sc2d2l1 sc2d3l6 sc2d5l3 sc0d1l1 sc0d2l6 sc0d4l3 sc1d1l0 sc1d3l5 sc2d2l2 sc2d3l7 sc2d5l4 sc0d1l2 sc0d2l7 sc0d4l4 sc1d1l1 sc1d3l6 sc2d2l3 sc2d4l0 sc2d5l5 sc0d1l3 sc0d3l0 sc0d4l5 sc1d1l2 sc1d3l7 sc2d2l4 sc2d4l1 sc2d5l6 sc0d1l4 sc0d3l1 sc0d4l6 sc1d1l3 sc2d1l0 sc2d2l5 sc2d4l2 sc2d5l7 sc0d1l5 sc0d3l2 sc0d4l7 sc1d1l4 sc2d1l1 sc2d2l6 sc2d4l3 sc2d6l0 sc0d1l6 sc0d3l3 sc0d5l0 sc1d1l5 sc2d1l2 sc2d2l7 sc2d4l4 sc2d6l1 sc0d1l7 sc0d3l4 sc0d5l1 sc1d1l6 sc2d1l3 sc2d3l0 sc2d4l5 sc2d6l2 ... # ls /hw/rdisk dks1d2s0 dks1d2vh root volume_header dks1d2s1 dks1d2vol swap # ls /hw/scsi_ctlr 0 1 3 4 |
To determine the number of nodes present in the system, enter
# ls /hw/module 1 2 |
This indicates two nodes.
Modules and slots are numbered starting with 1; PCI slots are numbered starting with 0. Nodes are numbered 1 and 2. The hardware graph lists only devices actually present, skipping the numbers of unfilled slots.
To determine I/O devices of the module, follow the directory structure. Figure 4-9 shows a simplified example of a /hw/module filesystem with two nodes (modules); in the second module, there are two CPUs and one XIO board.
You can use the -S option to the ls command to determine where devices in the /dev directory are located in the /hw filesystem. For example:
# ls -S /dev/dks0d2s7 dks0d2s7 -> /hw/module/1/slot/io1/MotherBoard/pci/0/scsi_ctlr/0/target/ 2/lun/0/disk/partition/7/block |
For more information about using the hardware graph, see the ioconfig(1m) and hwgraph(4) reference pages.
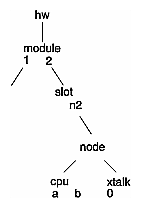
For example:
# ls /hw/module/1/slot/n2/node/link/cpu 0 1 # ls /hw/module/1/slot/n2/node/link/xtalk 0 |
To see connectivity of an I/O device, use ls in the /link subdirectory with the -l flag. For example, determine the links present in the system:
# ls -l /hw/module/1/slot/n1/node/link 1 2 3 5 6 |