This chapter provides an overview of the Origin200 and Origin200 GIGAchannel server, and includes the following sections:
The Origin200 server is a multiprocessor system that consists of one or two chassis, which are called modules. The Origin200 GIGAchannel uses an additional chassis to provide four extra PCI slots and five XIO slots. Each Origin200 system ships from SGI in either a tower (free-standing) or rackmountable configuration.
The tower configuration provides extra cosmetic “skins” (side panels and top-cap) and feet. The rackmountable configuration does not have these cosmetic features and feet, but does provide a mounting shelf, mounting ears, a different front bezel, and two pairs of end-caps (for use in 19-inch and 21-inch equipment racks).
If you wish to change your system from a tower configuration to a rack mountable configuration, contact SGI or your local support provider for information about obtaining a conversion kit (P-S-RM-KIT).
Figure 1-1 shows a two-module Origin200 server and a two-module Origin200 GIGAchannel server in tower configurations.
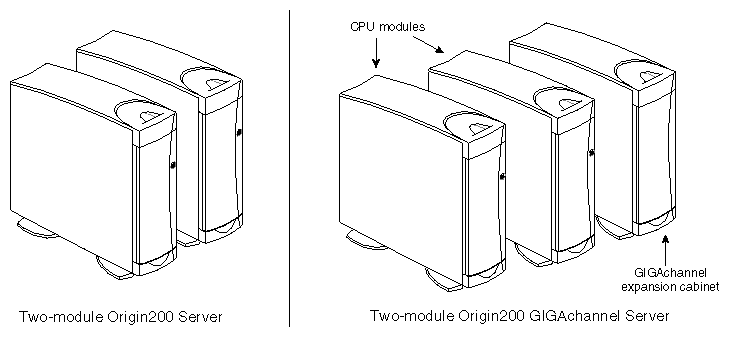
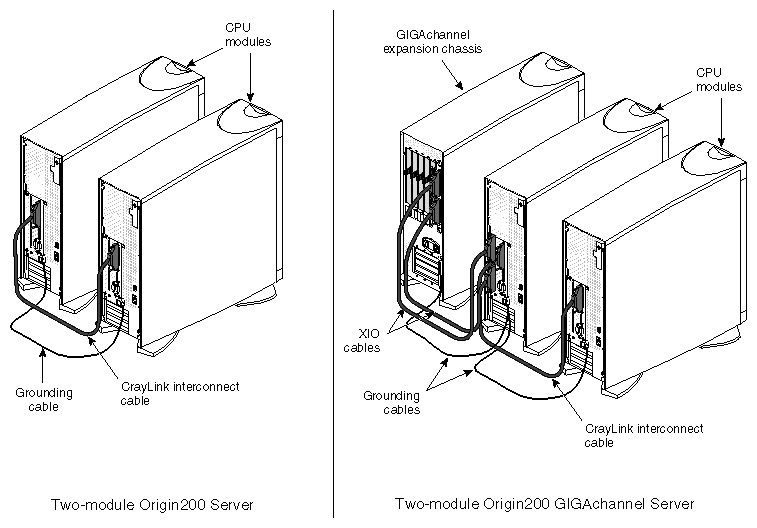
Figure 1-2 shows a rear view of a two-module Origin200 server and a two-module Origin200 GIGAchannel server.
The Origin200 server can be mounted in a 21-inch SGI rack or a standard 19-inch rack. Figure 1-3 shows an example of a two-module system in a 19-inch rack.
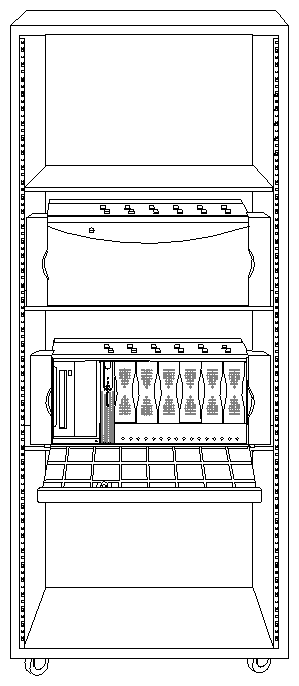
Table 1-1 summarizes the general features of Origin200 systems:.
Table 1-1. General Features of Origin200 Systems
For additional information about power requirements and features of the standard and redundant power supplies, see “Power Supply”. For environmental specifications, including operating and non-operating conditions, see “Physical and Environmental Specifications”.
Figure 1-4 shows the logical relationships between the major components of the Origin200 server. The major components are discussed in more detail in subsequent sections.
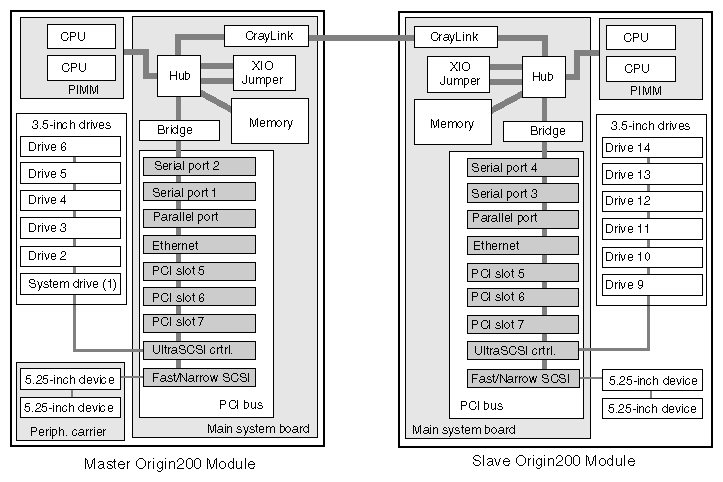
Figure 1-5 shows the logical relationship between the major components of an Origin200 GIGAchannel server.
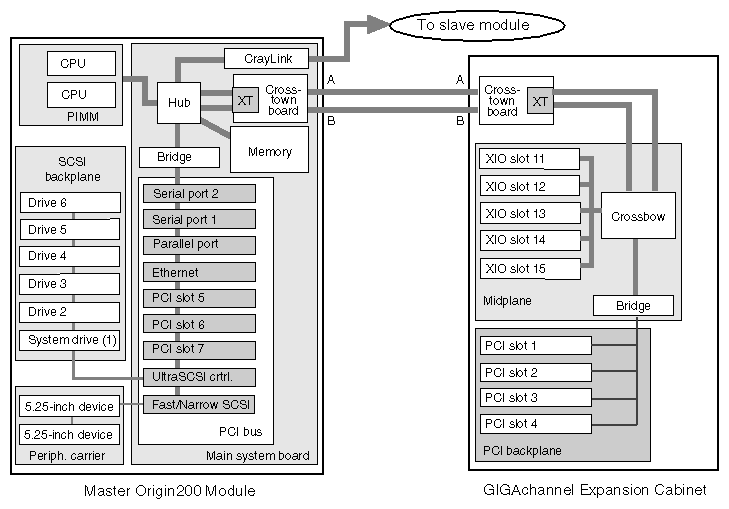
In Figure 1-5, although the GIGAchannel expansion cabinet is shown connected to a master CPU module, it can also be connected to a slave CPU module.
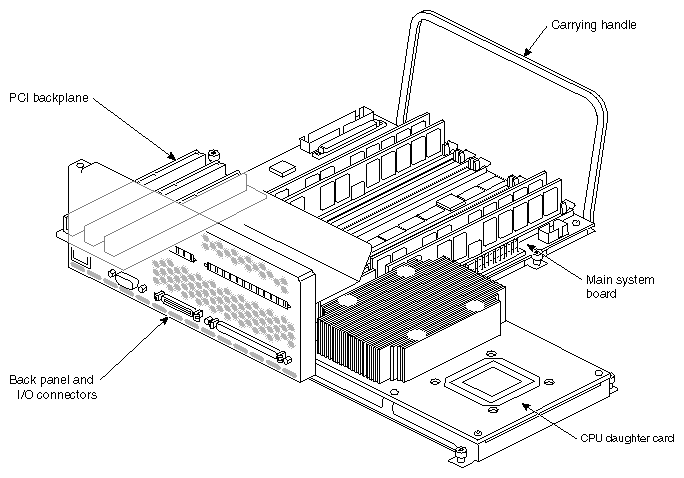
Each Origin200 module contains a logic carrier, which is a sheet-metal tray that holds
Together, the logic carrier sheet metal, the main system board, CPU daughtercard, and the PCI backplane form a single, field-replaceable unit. Figure 1-6 shows the complete logic carrier.
The main system board contains
two SCSI controllers for internal drives
an Ethernet controller
two serial port interfaces (UARTs)
a parallel port interface
three PCI expansion slots
four banks of two dual inline memory module (DIMM) sockets (eight total DIMM sockets)
a CrayLink connector
a Crosstown adapter board (Origin200 GIGAchannel only)
XIO A and XIO B cable connectors (Origin200 GIGAchannel only)
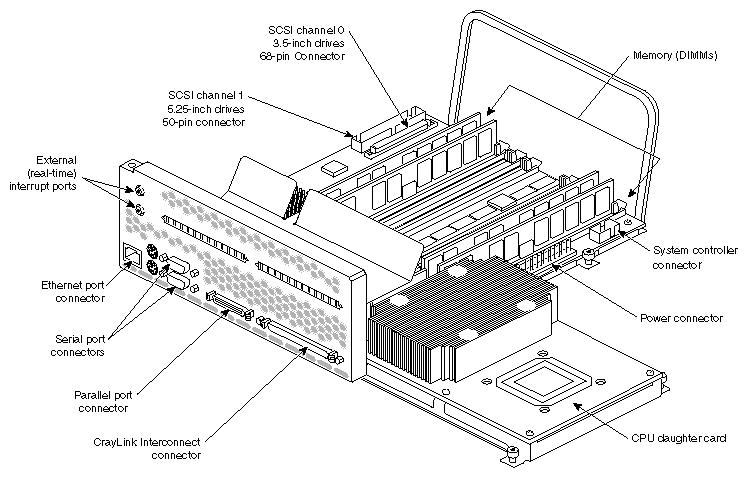
External connectors for the serial, Ethernet, and parallel interfaces, and the CrayLink interconnect technology are all mounted directly to the main system board. See Figure 1-7.
Figure 1-7 shows the main system board and the CPU daughtercard, and points out the locations of various components.
The module system controller (MSC), located behind the front power switch and status LED, performs the following functions:
holds the system serial number on a device called the number in a can (NIC)
provides power on, power off, reset, and other low-level functions
displays system status information using a tricolor LED
Power-on, power-off, reset, and nonmaskable interrupts are performed by pressing buttons on the front panel. You can also perform these and other functions by issuing commands to the MSC via a terminal or modem connected to the AUX port at the rear of the system.
See “Front Panel Functions of a CPU Module: Status LED, Power, Reset, NMI” in Chapter 4 for a description of the front panel.
See “Using the AUX Port and Module System Controller Commands” in Chapter 4 for a description of the commands that the MSC can accept.
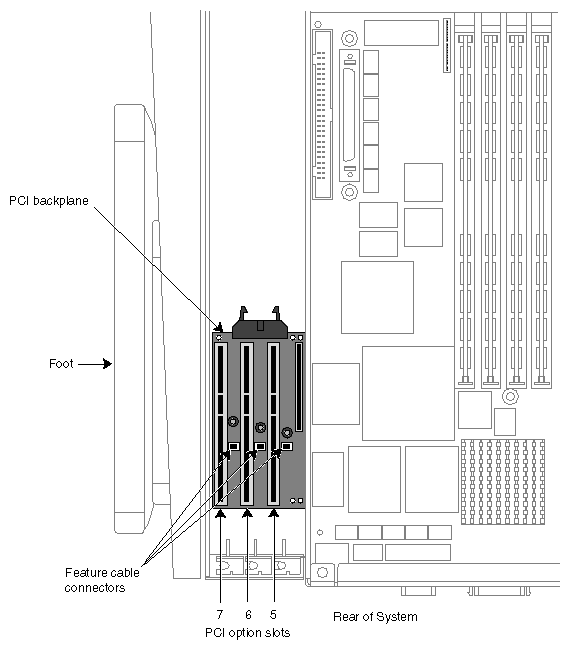
There are three expansion slots available on each Origin200 logic carrier for peripheral component interconnect (PCI) bus cards. The slots provide PCI IDs 5, 6, and 7. See Figure 1-8.
Boards can be full-size, 32-bit, or 64-bit. In addition to providing 5 V, the PCI backplane also accommodates 3.3 V PCI cards with a total of up to 30 watts of 3.3 V power.
Figure 1-8 shows the location and slot numbers of the PCI backplane.
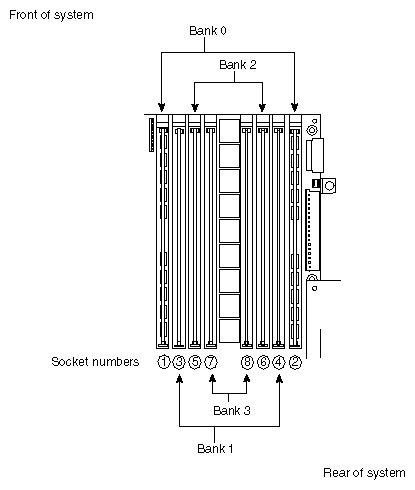
Each Origin200 module can have between 32 MB and 2 GB of memory, depending upon the type of dual inline memory module (DIMM) that you install. DIMMs are installed in sockets that are grouped into two banks of four sockets each. Figure 1-9 shows the layout of the DIMM sockets on the main system board.
Note the following about installing DIMMs in an Origin200 module:
DIMM sockets are numbered as shown in Figure 1-9: 1, 3, 5, 7; 8, 6, 4, 2.
All modules must have at least one DIMM pair installed in Bank 0.
DIMMs in each bank must be of the same type, but each bank may have a different type of DIMM.
Interleaving between banks and DIMMs is designed into the memory architecture; you cannot alter the interleaving factors. Maximum interleaving is achieved with a single bank.
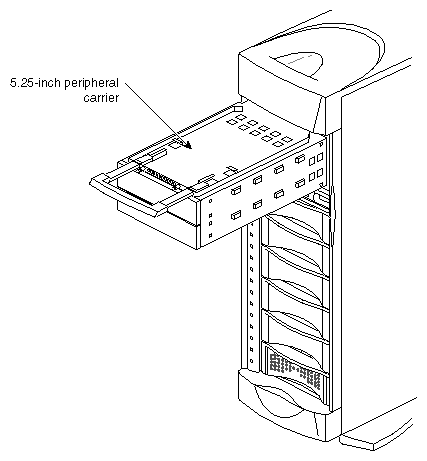
The Origin200 server provides bays for two sizes of internal drive options: 5.25-inch drives and 3.5-inch drives.
The 5.25-inch drive bay can be used for two combinations of drive form-factor:
one full-height drive
two half-height drives or two 1-inch drives
The 5.25-inch drives are controlled by SCSI channel 1, and drive IDs are set by jumpers on the drives. Drives are mounted in a removable peripheral carrier, shown in Figure 1-10.
The 3.5-inch drive bay has room for six drives, mounted individually on sleds. The 3.5-inch drives are attached to SCSI channel 0.
Each sled attaches to the 3.5-inch SCSI midplane with SCA connectors. Drive IDs are set by the position of the drive in the drive bay, with ID 1 at the bottom of the drive bay and ID 6 at the top of the drive bay. Figure 1-11 shows a 3.5-inch drive, sled, and drive bay.

There are two SCSI channels in each Origin200 module. Table 1-2 lists the channels in each module and their characteristics.
Table 1-2. SCSI Channel Numbers and Characteristics
First Module | Second Module | Drives | Description |
|---|---|---|---|
0 | 2 | 3.5-inch | Fast-20 SCSI-II, 16-bit (wide), running at 20 MHz, and capable of transferring 40 MB per second |
1 | 3 | 5.25-inch | Fast SCSI-II, 8-bit (narrow), running at 10 MHz, and capable of transferring 10 MB per second |
| Note: SCSI channels in a one-module system are fixed at 0 and 1. The master module in a two-module server also uses channels 0 and 1. However, the slave module channel numbers may vary depending upon the order in which they are detected the first time the system is powered on. Table 1-2 shows typical channel numbers for a second module in a two-module system. See “Determining the Devices Installed on Your Server” in Chapter 4 for an explanation of device detection and numbering. |
Each Origin200 module provides two serial ports capable of transferring data at speeds ranging from 50 baud to 460 Kbaud in RS-232 mode.The default serial port configuration is RS-232, but the serial ports can be opened programmatically in RS-422 mode. The serial ports can also be used to send and receive MIDI information.
The serial port connectors are DB9 male, and are designed to be IBM compatible. Because of this, they do not use the same pinouts as prior SGI DB9 serial ports. See Appendix A, “Connector Pinout Assignments” for a description of the serial port pin assignments.
Table 1-3 lists the serial ports and their correspondence to IRIX device files.
Table 1-3. IRIX Device Files for Serial Port Numbers
Module | Serial Port Number | IRIX Device File | IRIX Device File | IRIX Device File |
|---|---|---|---|---|
First | 1 (system console) 2 | /dev/tty[c,d,f,m]1 | /dev/tty4[d,f,m]1 | /dev/ttymidi1 |
Second | 3 | /dev/tty[c,d,f,m]3 | /dev/tty4[d,f,m]3 | /dev/ttymidi3 |
Serial ports in a single-module system and in the master module are fixed at 1 and 2, with port 1 being the system console. See “Determining the Devices Installed on Your Server” in Chapter 4 for an explanation of device detection and numbering.
The AUX port is a DIN-8 connector that provides access to the module system controller. See “Using the AUX Port and Module System Controller Commands” in Chapter 4. For a description of the pin assignments of the AUX port, see Appendix A, “Connector Pinout Assignments.”
The parallel port is a 36-pin, high-density connector that meets the IEEE-1284 specification. See Appendix A, “Connector Pinout Assignments” for a description of the pin assignments.
Each Origin200 module contains a single RJ-45 connector for 10-Base-T or 100-Base-TX Ethernet. The connector has two integral LEDs that provide basic status. Network speed is automatically negotiated. For a description of the pin assignments of the Ethernet port, see Appendix A, “Connector Pinout Assignments.”
| Note: Category 5 wiring is required for proper 100-Base-TX operation. |
The Origin200 server has two connectors for use with the external interrupt interface. This interface allows separate systems to send and receive interrupts over a dedicated wire for purposes of inter-system synchronization. Using this device, a user process may generate outgoing interrupts to other systems, or receive interrupts from other machines in a variety of ways.
The connectors are 1/8-inch (3.5 mm) stereo jacks: one jack to send interrupts and one jack to receive interrupts. For more information on using the external interrupt interface and specifics about the jacks, see the ei(7) reference page. The wiring and voltages of the jacks are also described in Appendix A, “Connector Pinout Assignments.”
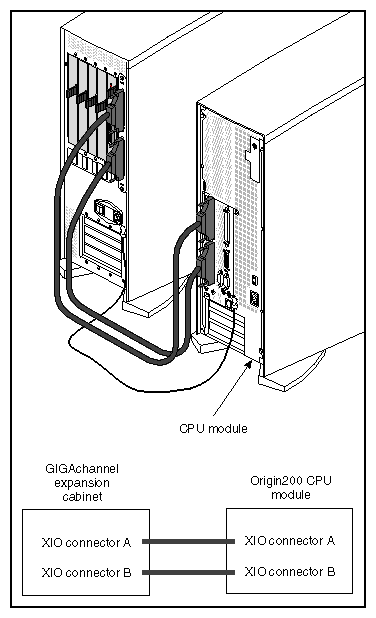
The Origin200 GIGAchannel has a pair of XIO connectors that attach to XIO cables, which route data between the server module and the GIGAchannel expansion cabinet. The connectors are labeled A and B, as shown in Figure 1-12.
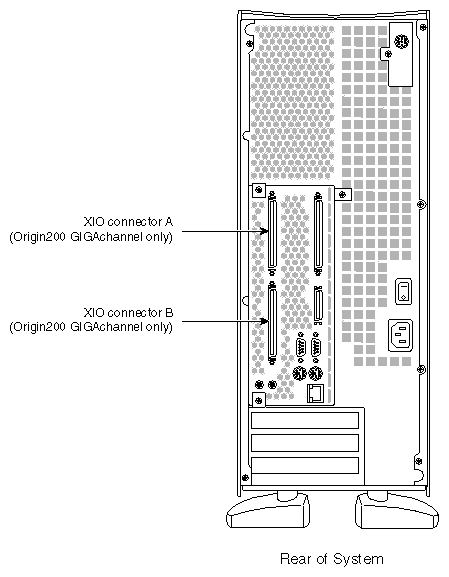
These connectors may be found on either the master or slave module of an Origin200 GIGAchannel server, and are attached directly to the Crosstown adapter board. The Crosstown adapter board replaces the sheet metal baffle and Crosstalk jumper normally found in an Origin200 CPU module.
The Origin200 GIGAchannel provides additional I/O capability beyond the standard Origin200 models. The GIGAchannel expansion chassis can hold all of these boards:
Figure 1-13 shows the back of a GIGAchannel expansion chassis, slots for PCI and XIO boards, and the location of the XIO connectors that attach the cabinet to a CPU module.
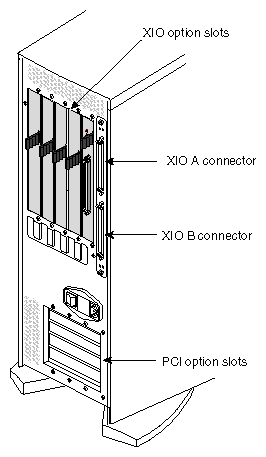
The GIGAchannel expansion chassis is connected to either a master or slave Origin200 GIGAchannel module by two XIO cables. The XIO cables attach to the XIO A and XIO B connectors on the server module and GIGAchannel expansion cabinet. See Figure 1-13.
The XIO cables complete the XIO bus, running from the Origin200 GIGAchannel server module to the GIGAchannel expansion cabinet. See “Block Diagrams of Origin200 and Origin200 GIGAchannel Servers”.
The configurations of an Origin200 GIGAchannel server are as follows:
Origin200 GIGAchannel CPU module (either a master or slave module) connected to a GIGAchannel expansion cabinet
Origin200 GIGAchannel master and slave module each connected to their own GIGAchannel expansion cabinets (one GIGAchannel per module)
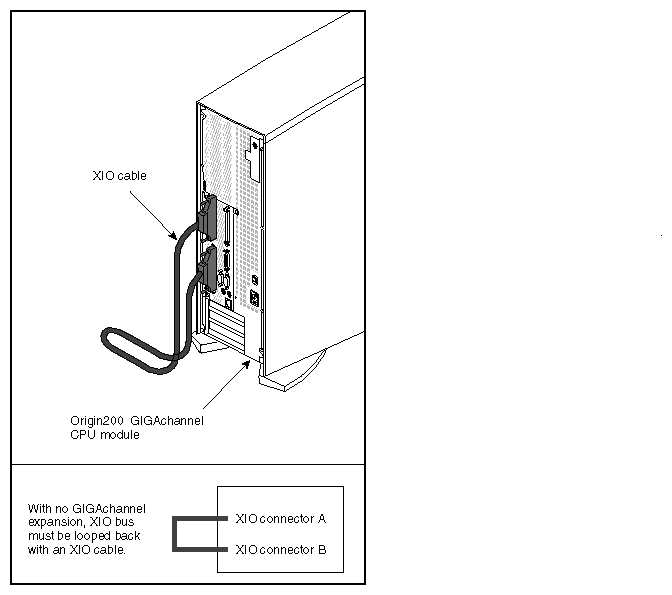
Origin200 GIGAchannel in loopback mode (no GIGAchannel expansion cabinet)
| Note: Loopback mode only applies to Origin200 GIGAchannel modules that have XIO A and B connectors. If the module does not have the XIO A and B connectors, loopback mode does not apply. |
You cannot connect the CPU modules and the GIGAchannel expansion cabinet in the following ways:
You cannot daisy-chain two GIGAchannel cabinets.
You cannot connect the same GIGAchannel simultaneously to two CPU modules, regardless of whether the CPU modules comprise a single server (a master and a slave module) or the CPU modules are completely separate servers.
Figure 1-14 shows how a CPU module is connected to a GIGAchannel expansion cabinet. Figure 1-15 shows the cabling for loopback mode.
A GIGAchannel expansion cabinet can be connected only to an Origin200 GIGAchannel CPU module. The standard Origin200 models do not have the additional XIO connectors required to attach the expansion cabinet. The GIGAchannel expansion cabinet may be connected to either a master CPU module or a slave CPU module.
There are two types of power supplies available for Origin200 and Origin200 GIGAchannel servers:
The following sections describe each of these power supplies.
Table 1-4 summarizes specifications of the Origin200 and GIGAchannel power supply.
Table 1-4. Origin200 and GIGAchannel Power Supply Specifications
Specification | Value Per Server Module or GIGAchannel Chassis |
|---|---|
100 to 120 VAC, and 200 to 240 VAC, autoranging | |
| |
Input amps | 8 amps at 100 VAC |
Input volt-amps | 800 VA |
Frequency | 47 Hz to 63 Hz |
Output volts | +5 VDC |
| |
Power factor | Unity power-factor corrected (0.98) |
Efficiency | 60% |
| Warning: When using an uninterruptable power supply (UPS) with an Origin200 server, be sure that the UPS can supply up to 140 amp of inrush current per chassis in the system. There is the possibility of fire, damage to the UPS, damage to the Origin200 server, and other hazards if the UPS cannot supply sufficient current. |
Each Origin200 module and GIGAchannel expansion chassis can draw up to 140 amp of current briefly when you power it on, even though the sustained current drawn is only a fraction of that. Some UPS units cannot supply that much inrush current and may cause damage to the Origin200 server and to themselves.
The redundant power supply is an option available for Origin200 and Origin200 GIGAchannel servers (as well as for the optional Origin Vault disk expansion cabinet). The redundant power supply is actually two complete power supplies contained in a sheet metal housing that is almost identical to the standard power supply, although the redundant power supply is about 1/2 inch (12.5mm) longer than the standard power supply and about twice as heavy. It has the same input and output connectors as the standard power supply and can be used interchangeably with all of the previously-mentioned servers.
In normal operation, the redundant power supply is identical to the standard power supply, drawing the same amount of input power and providing identical power output. (See Table 1-4.) If one of the internal supplies fails, the second supply automatically takes over and powers the system and an LED error code indicates that the system is now running on the second power supply. See the Origin200 and Origin200 GIGAchannel Maintenance Guide for a description of the LED error code.
You can also query the module system controller (MSC) to determine the status of the redundant power supplies in a master or slave CPU module. See “Using the AUX Port and Module System Controller Commands”.
| Note: The redundant power supply only works with Origin200 and Origin200 GIGAchannel servers that have module system controller (MSC) firmware versions 3.3S and later. You can use the MSC ver command, as described in “MSC Command Reference” of Chapter 4, to determine the version of your module system controller. |
Air flows through both the Origin200 server module and the GIGAchannel expansion chassis from the front to the rear. The Origin200 server uses three fans to provide cooling air, whereas the GIGAchannel expansion chassis uses a single blower.
The following sections describe the details of air flow through each chassis:
Air is drawn through the server module by three DC fans located just behind the internal drive bays. The maximum flow rate is 100 cfm (0.047 m3/sec). Figure 1-16 shows the direction of air flow through an Origin200 CPU module.
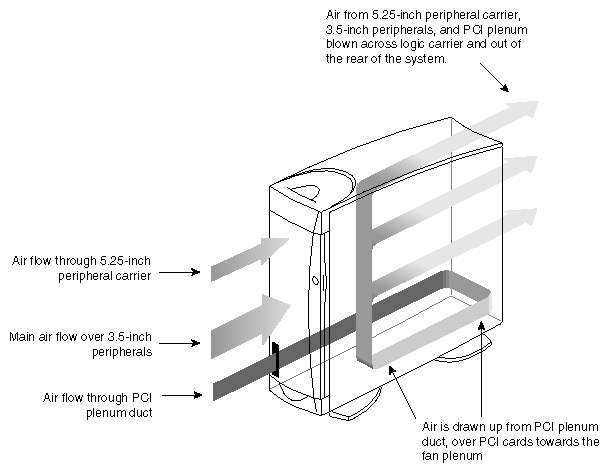
Air is drawn through the system in the following way:
Fan 1, directly behind the 5.25-inch peripheral carrier, draws air from the front of the system through the 5.25-inch peripheral carrier.
Fans 2 and 3 draw air from a common plenum just behind the SCSI backplane. This in turn draws air from the front of the system through the 3.5-inch peripherals.
The lower pressure in the fan plenum behind the SCSI backplane also draws air from a duct located at the front of the system next to drive 1 to the rear of the PCI plenum, where it is channeled forward through the PCI plenum, cooling any PCI boards that are installed.
Figure 1-17 shows the locations and numbering of the fans in a CPU module.

| Caution: Because of the way that air is drawn through the PCI plenum, make sure PCI blanking plates cover any unused PCI slots. |
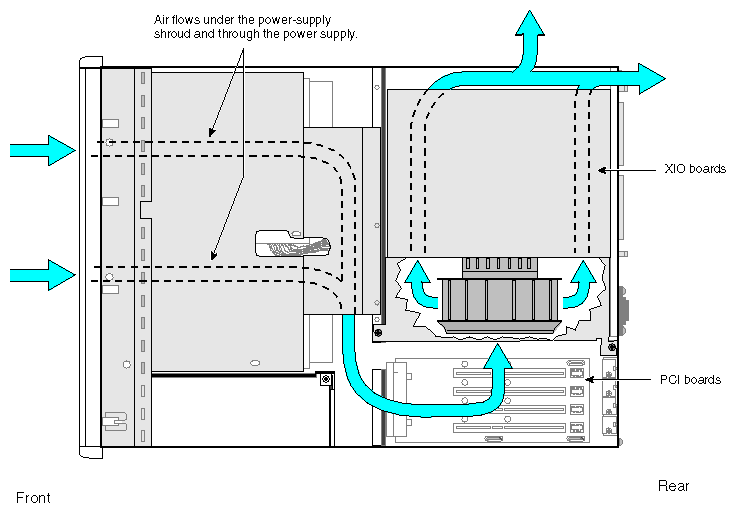
The GIGAchannel expansion chassis uses a single blower to draw air through the cabinet. Figure 1-18 shows the direction of airflow through the GIGAchannel expansion chassis and the location of the blower.
In an Origin200 CPU module, fan speeds adjust automatically depending upon the outside air temperature. A sensor inside the server monitors the temperature of the air being drawn into the system. Depending upon the air temperature and the number of fans working, the module system controller (MSC) operates the fans at one of two speeds: low or high. Table 1-5 describes the relationship of the air temperature to fan speed.
Table 1-5. Relationship of Air Temperature to Fan Speed in an Origin200 Server Module
Air Temperature | Action |
|---|---|
Less than 83.3° F (28.5° C) | Fans run at normal speed. |
83.3° F (28.5° C) to 95° F (35° C) | Fans run at high speed. |
You can check the fan speed using the module system controller via the AUX port. See “Using the AUX Port and Module System Controller Commands”.
The blower runs at a constant speed throughout the entire operating temperature range of the system (+41° F to +95° F or +5° C to +35° C).
If one of the three fans in an Origin200 CPU module fails, the status LED displays solid amber. Also, the MSC automatically adjusts the speed of the remaining two fans, or shuts down the system if the temperature is too high. See Table 1-6.
Table 1-6. How Fan Speed Is Adjusted In a CPU Module When One Fan Fails
Air Temperature | Action If One CPU Module Fan Fails |
|---|---|
Less than 83.3° F (28.5° C) | Fans run at high speed. |
83.3° F (28.5° C) to 95° F (35° C) | System shuts down. |
You can use the MSC to determine which fan has failed. See “Using the AUX Port and Module System Controller Commands” in Chapter 4 for more information. For information about replacing fans, see the Origin200 and Origin200 GIGAchannel Maintenance Guide.
Table 1-7 lists the various physical and environmental specifications of an Origin200 server module.
Table 1-7. Origin200 CPU Module Physical and Environmental Specifications
Table 1-8 lists the various physical and environmental specifications of the GIGAchannel expansion chassis.
Table 1-8. GIGAchannel Expansion Chassis Physical and Environmental Specifications
If you are installing a two-module system or an Origin200 GIGAchannel server, all parts of the system must be connected to the same grounded power source (for example, to the same electrical service entrance or breaker box). See “Power Supply” for the amount of current each power supply draws.
Modules may be on separate circuits, but the circuits must be connected to the same power source and ground. See Figure 2-1 in the section “Providing Correct Electrical Grounding (Earthing)” for examples of correct and incorrect power and grounding configurations.