This system is designed to be user maintainable. If diagnostic tests identify a faulty part, contact your service organization before removing it. In some cases you may be instructed to return the system.
This chapter tells you how to
order a replacement part and package the faulty part for return
replace the system
replace the following internal parts
GIO option board (optional video, network, or Fast SCSI-2 boards)
IOPLUS board
GIO extender board
CPU module
SIMMs (single inline memory modules)
internal drives (floptical, second hard disk, and system disk)
power supply
external SCSI (small computer systems interface) devices
It also describes the tools you need to replace components and lists the sizes of some of the screws and standoffs used in the Challenge S server.
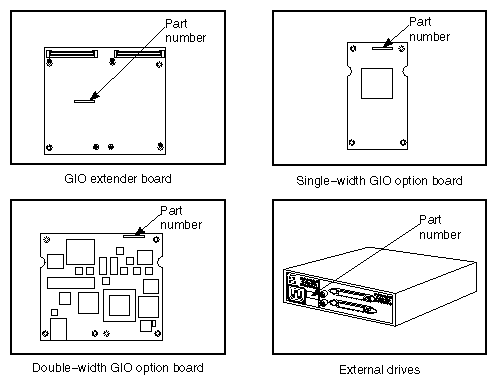
If diagnostics have identified a faulty part, call your service provider. You will be instructed either to order a replacement part, or to ship the system back. If instructed to return the system, go to “Replacing the System”. If asked to return the part, Figure 9-1 and Figure 9-2 will help you locate the part number of the faulty part.

Follow these steps to order a replacement part:
Contact your service provider.
You will be asked for the system serial number, configuration information, the faulty part's part number, and a description of the problem. You may be instructed to remove the faulty part, or you may be asked to return the entire system.
Make a photocopy of the “Part Request Form” at the back of this guide.
Note the name of the faulty part on the copy of the form.
Note the serial number of your system. It is on a label on the back of the system.
Remove the faulty part if instructed to do so. Go to the appropriate instructions on replacing parts in this chapter.
Look the part number of the faulty part; it's shown on the part. (Refer to Figure 9-1 and Figure 9-2.)
Pack and ship the faulty part to your service provider:
If possible, package the part in an antistatic bag. GIO option boards, CPU modules, and SIMM modules are extremely sensitive to static electricity.
For maximum protection to the part, use two sturdy boxes for shipping.
Place the faulty part and “Part Request Form” into one of the two boxes. Pack them in plenty of packing material so the part won't sustain further damage. Tape the box securely.
Place the box containing the faulty part into a larger box and fill the empty space with packing materials. Tape the box securely and affix a mailing label. Ship the box to your service provider.
If diagnostics have identified a problem with the system, call your service provider. If instructed to return the system, follow these instructions to prepare it for shipping and complete the necessary paperwork.
To preserve your data, remove all disk drives from the system:
Remove the floptical disk drive or second hard disk drive in the top drive slot (if installed). Go to “Replacing the Internal Floptical Drive or Second Hard Disk Drive”.
Remove the system disk drive. Go to “Replacing the System Drive”.
Remove any components (such as memory modules or option boards) that are were not provided by Silicon Graphics. Refer to the appropriate section in this chapter to remove the parts.
Remove any external SCSI devices or external parts such as expansion chassis and cables. Do not ship these external parts unless told to do so by your service provider.
Make a photocopy of the “Part Request Form” on the last page of this guide.
Complete the “Part Request Form.” You need to know the serial number of your system; it is on a label on the back of the system. The serial number allows your service provider to identify the correct replacement system for you.
Pack the server in the original packing materials that came with it. The server should include all the internal parts that it shipped with (except for the system drive): power supply, system board, CPU module, IOPLUS or GIO Slot Extender board, and memory modules.

Note: It is important that you use the original packing materials to prevent further damage to the server and its internal parts. If you don't have the original packing materials, contact your service provider. Ship the system to your service provider.
Table 9-1 lists the tools that are required to remove and replace components of the Challenge S server:
Table 9-1. Tools Required to Remove and Replace Components
Tool | Description | Use |
|---|---|---|
Screwdriver | #1 Phillips screwdriver | Removing most screws. |
Screwdriver | Flat-bladed, small | Removing screws that connect the Ethernet AUI connector to the chassis backplane. |
Hex wrench (see Figure 9-3) P/N 040-8326-001 | 4.5 mm and 3/16”double-sided hex wrench, provided with certain upgrades | Removing standoffs (4.5 mm) on system board. Removing cable-fasteners (3/16”) on external SCSI connectors |
Wrist strap | Grounding strap (provided with Silicon Graphics option products and memory upgrades) | Preventing damage to system components from Electrostatic Discharge (ESD) |
| Warning: If you do not have a grounding strap, we strongly recommend you obtain one. Always follow proper electrostatic discharge (ESD) procedures when handling internal system components. |
Certain upgrades are shipped with a double-sided hex wrench that is used to remove and install standoffs and cable-fasteners on the external SCSI connectors. See Figure 9-3.
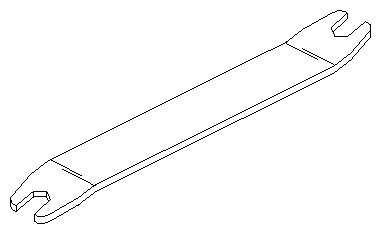
Table 9-2 lists some of the screws and standoffs used in the Challenge S server:
Table 9-2. Standoffs and Screws Used in Challenge S Server
Part | Size/Description |
|---|---|
Standoff | 4.5 mm x 9/16" |
Screw | 2-56 x 5/16", self-tapping |
Screw | M3 x 6 mm, machine thread (DIN) |
Screw | 4-40, slotted |
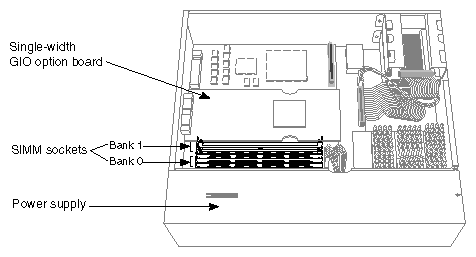
Internal replacement parts include the IOPLUS board, GIO option board, CPU module, SIMMs, internal drives, and power supply (and optional GIO extender board).
| Note: Before replacing an internal part, call your service provider for instructions. If the system is under warranty, you may be instructed to ship the system back. |
Follow the steps below to shut down the system, remove the cover, attach a wrist (grounding) strap, replace the part, replace the cover, and start up the system.
For GIO option boards that are not provided by Silicon Graphics, contact the supplier for maintenance instructions.
To replace a single-width GIO option board, follow these steps:
Note: You can also follow these steps to replace a double-width GIO option board. The only difference is that there will be more screws to remove on the double-width board.
If the system is powered on, press and release the power button on the front of the system to shut down the software and power off the system.
The system powers off automatically after about a minute.
Disconnect the power cable from the back of the Challenge S server.
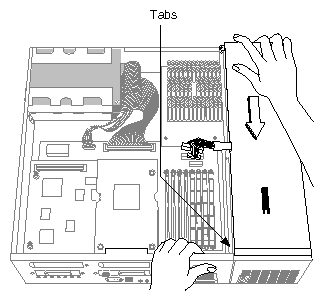
Remove the top cover by releasing the latch on the rear of the cover and sliding it forward.
Ground yourself to a metal part of the Challenge S chassis.
Put the wrist strap (included with the option board) around your wrist, making sure it is tight against your arm.
Attach the alligator clip to a metal part of the Challenge S chassis.

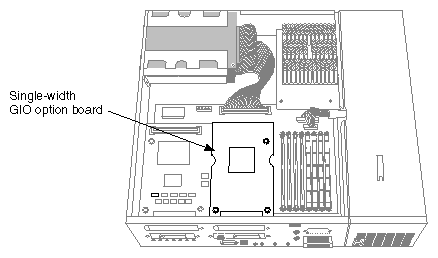
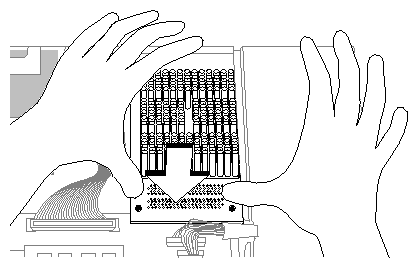
Caution: The GIO option board is extremely sensitive to static electricity. Wearing the wrist strap prevents the discharge of static electricity, which could damage the board. Move the system or position yourself so that you are facing the rear of the system, as shown in Figure 9-4.
GIO option boards are installed on top of either the IOPLUS or GIO Slot Extender boards (depending upon your system model). A single-width GIO option board covers half of the lower board (IOPLUS or GIO extender); a double-width covers the entire lower board. Figure 9-4 shows a single-width board.
If there are external cables connected to the GIO board connector on the rear of the server, disconnect them.
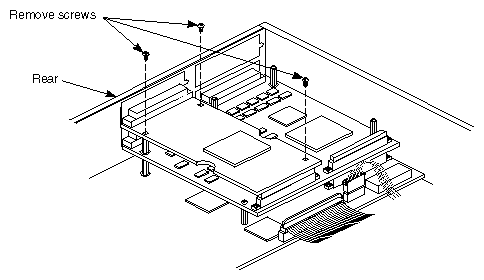
Using a Phillips screwdriver, remove the screws from the GIO board connector on the rear of the server, as shown in Figure 9-5.
Using a Phillips screwdriver, remove the screws that connect the GIO option board to the lower board, as shown in Figure 9-6.
Note: A double-width GIO option board has more than two screws to remove.
Disconnect the GIO board from the lower board by grasping the GIO board firmly and pulling it up.
Install the replacement GIO option board.
To install the new board, follow the instructions in “Installing a GIO Option Board” .
To replace either the IOPLUS or GIO extender board, you first need to remove any GIO option boards installed on it. Follow these steps:
If the system is powered on, press and release the power button on the front of the system to shut down the software and power off the system.
The system powers off automatically after about a minute.
Disconnect the power cable from the back of the Challenge S server.
Remove the top cover by releasing the latch on the rear of the cover and sliding it forward. For more details, see “Removing the Top Cover”.
Ground yourself to a metal part of the Challenge S chassis.
Put the wrist strap (included with the Silicon Graphics option boards and memory upgrades) around your wrist, making sure it is tight against your arm. If you do not have a wrist strap, it is strongly recommend you obtain one.
Attach the alligator clip to a metal part of the Challenge S chassis.
Caution: The IOPLUS board is extremely sensitive to static electricity. Be sure wear a wrist strap to prevent the discharge of static electricity, which could damage the board. Move the system or position yourself so that you are facing the rear of the system, as shown in Figure 9-7.
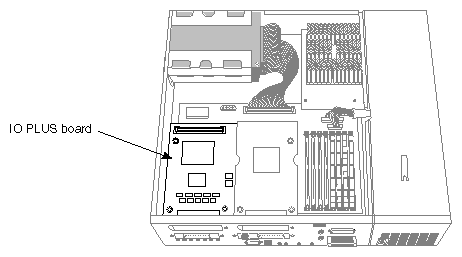
To gain access to the IOPLUS or GIO extender board, remove any GIO option boards, if installed.
There might be one double-width GIO option board, or one single-width board, or two single-width boards installed on the IOPLUS or GIO extender board. Figure 9-7 shows one single-width GIO option board installed.
Refer to “Replacing a GIO Option Board” for instructions, and then continue with the next step.
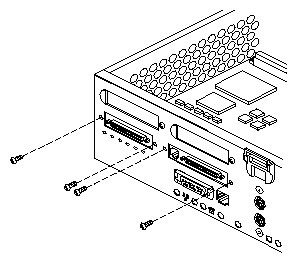
Use a Phillips screwdriver to remove the four screws from the IOPLUS or GIO extender board's I/O connector on the rear of the server, as shown in Figure 9-8.
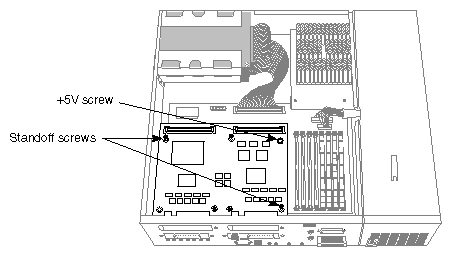
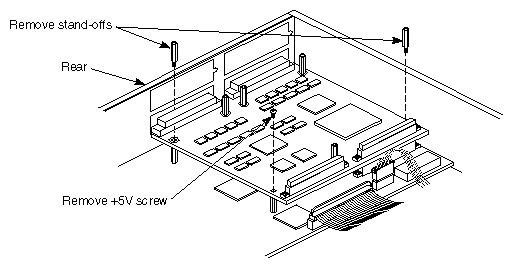
Use the hex-wrench tool to unscrew the two standoff screws (tall, hexagonal posts) from the IOPLUS or GIO extender board, as shown in Figure 9-9.
Use a Phillips screwdriver to remove one screw from the IOPLUS or GIO extender board.

Warning: As indicated in Figure 9-10, the standoff between the main system board and the IOPLUS that is closest to the CPU module carries +5 VDC. Do not use this as a grounding attachment. Disconnect the IOPLUS or GIO extender board from the system board, as shown in Figure 9-10. The IOPLUS is shown, but the standoff and screw pattern is identical for the GIO extender.
Grasp the board firmly with two hands on the side close to the system disk drive and pull up. This will disconnect the two connectors under the IOPLUS/GIO extender board from the sockets on the system board.
Lift the board up and remove it.
Lower the replacement board over the system board, tilting it as necessary to insert the IOPLUS board's I/O connectors through the open I/O slot on the rear of the chassis.
Align the screw holes on the new board over the vacant standoff screws (tall, hexagonal posts) on the system board.
Connect the new board to the system board.
Seat the connectors under the new IOPLUS/GIO extender board over the sockets on the system board. Make sure they are positioned correctly before going on to the next step.
Press down firmly on all four corners of the new board until it is securely seated in the two sockets on the system board. If the board is not seated all the way, the screws will not tighten correctly.
Reinsert the two standoff screws that you removed earlier on the IOPLUS or GIO extender board, as shown in Figure 9-9. Use the double-sided hex wrench to tighten them. As you tighten the screws, alternate between them so that the board is connected evenly.
Insert and tighten the +5 VDC screw (IOPLUS only). See Figure 9-9.
Reattach the screws that secure the board to the backplane. See Figure 9-8.
If you removed any GIO option boards, re-install them. Refer to “Replacing a GIO Option Board”.
Replace the top cover by inserting the tab through the hole in the rear of the chassis and sliding it back until it snaps into place. For more information, see “Replacing the Top Cover”.
Reconnect the power cable to the connector on the back of the Challenge S server.
You are finished replacing the IOPLUS or GIO board and you are ready to power on the system.
Follow the steps below to remove the CPU module and install a new one.
If the system is powered on, press and release the power button on the front of the system to shut down the software and power off the system.
The system powers off automatically after about a minute.
Disconnect the power cable from the back of the Challenge S server.
Remove the top cover by releasing the latch on the rear of the cover and sliding it forward. For more details, see “Removing the Top Cover”.
Ground yourself to a metal part of the Challenge S chassis.
Put the wrist strap (included with the server) around your wrist, making sure it is tight against your arm.
Attach the alligator clip to a metal part of the Challenge S chassis.
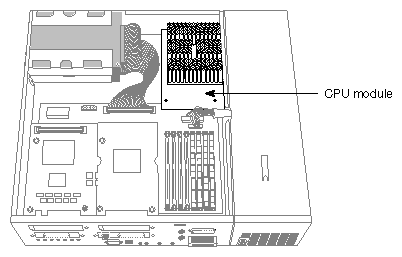
Caution: The CPU module is extremely sensitive to static electricity. Wearing the wrist strap prevents the discharge of static electricity, which could damage the board. Locate the CPU module, as shown in Figure 9-11.
The CPU module is elevated on the system board and is located at the front of the system between the power supply and the system disk drive. It is protected by a textured heat sink. Do not remove the heat sink.
Note: Two types of CPU modules are supported on the Challenge S server. Your system may have a smaller CPU module than the one shown below.
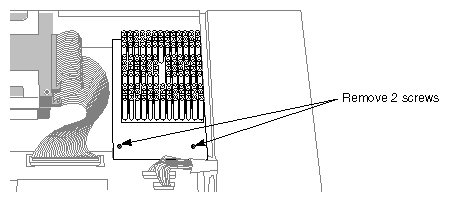
Remove the two screws that connect the CPU module to the system board, as shown in Figure 9-12.
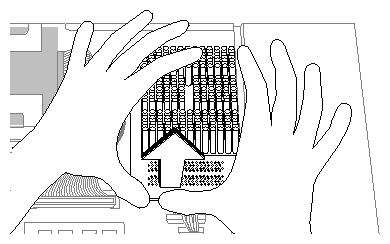
Lift the board by bracing your hands against the power supply and the chassis and pushing the board up with your thumbs, as shown in Figure 9-13.
Note: When the board disconnects, it pops up quite quickly and may startle you.
Install the replacement CPU module, as shown in Figure 9-14.
Slide the feet on the bottom of the CPU module into the slippers on the base of the chassis.
Align the two screw holes on the CPU module over the screw holes on the system board.
Seat the connector under the CPU module over the connector on the system board. Make sure it is positioned correctly before going on to the next step.
Press down firmly on the CPU module until it is securely seated in the socket on the system board.
If the connector does not seem to fit into the socket, do not force it. Lift the end of the CPU module slightly and lower it again, making sure it's seated correctly over the connector before pressing it all the way down.
To connect the CPU module to the system board, insert and tighten the two screws you removed earlier. As you tighten the screws, alternate from one to the other so that the board is connected evenly.
Replace the top cover by inserting the tab through the hole in the rear of the chassis and sliding it back until it snaps into place. For more information, see “Replacing the Top Cover”.
Reconnect the power cable to the connector on the back of the Challenge S server.
You are finished replacing the CPU module and you are ready to power on the system.
You may need to remove and replace SIMMs (single in-line memory modules) if one fails or if you want to upgrade the memory in your system.
Follow these steps to shut down the system, remove the cover, remove the SIMMs, and replace the cover.
If the system is powered on, press and release the power button on the front of the system to shut down the software and power off the system.
The system powers off automatically after about one minute.
Disconnect the power cable from the back of the Challenge S chassis.
Remove the top cover by releasing the latch on the rear of the cover and sliding it forward. For more details, see “Removing the Top Cover”.
Ground yourself to a metal part of the chassis.
Put the wrist strap (included with the server) around your wrist, making sure it's tight against your arm.
Attach the alligator clip to a metal part of the chassis.
Caution: SIMMs and the system's internal components are sensitive to static electricity. Handle the SIMMs carefully, and wear the wrist strap to avoid discharging static electricity. Move the system or position yourself so that you are facing the power supply, as shown in Figure 9-15.
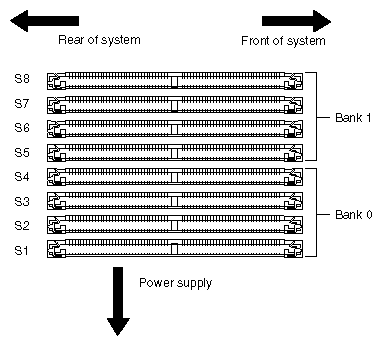
Locate the SIMMS next to the power supply. There are eight SIMM sockets, split into two banks—0 and 1. Figure 9-16 shows the bank and socket arrangement:
Locate the SIMMs you want to remove. In order to replace a faulty SIMM, you need to remove the SIMM farthest from you first, then remove the other SIMMs until you reach the SIMM you want to replace.
With your thumbs, pull the latches away from the SIMM, as shown in Figure 9-17.
The SIMM releases and tips away from you.
Note: Some GIO option boards, if installed in GIO slot 0, close to the SIMMs (as shown in Figure 9-18), may impede your installation of the SIMM in the last socket of bank 1 (socket S8). If this is the case, you may have to remove the GIO option board to gain access to the SIMM socket. Turn to “Replacing a GIO Option Board” for instructions and then return to this section.
Remove the other SIMMs the same way.
Install the replacement SIMMs. To install the SIMMs, turn to “Installing SIMMs”.

To remove the internal floptical or second hard disk drive from the top drive slot, follow these steps:
If the system is powered on, press and release the power button on the front of the system to shut down the software and power off the system.
The system powers off automatically after about a minute.
Disconnect the power cable from the back of the Challenge S server.
Remove the top cover by releasing the latch on the rear of the cover and sliding it forward. For more details, see “Removing the Top Cover”.
Ground yourself to a metal part of the Challenge S chassis.
Put the wrist strap (included with the server) around your wrist, making sure it is tight against your arm.
Attach the alligator clip to a metal part of the Challenge S chassis.
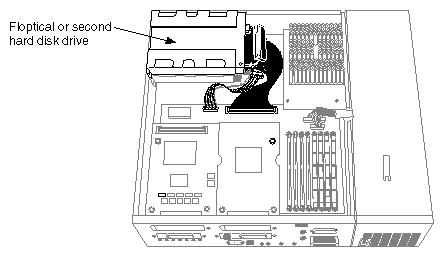
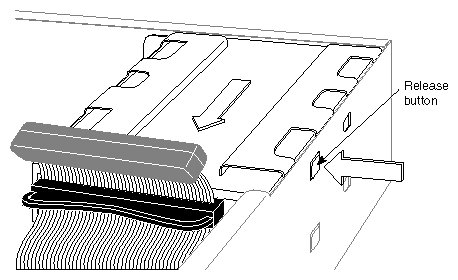
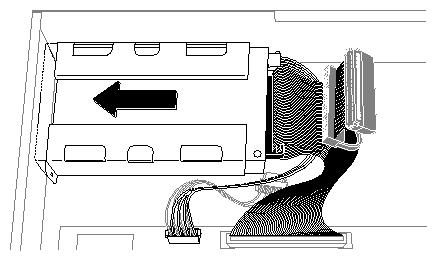
Locate the floptical or second hard drive, as shown in Figure 9-19.
Remove the drive and bracket by pressing the release button that protrudes through the hole on the side of the chassis and pulling the unit toward you, as shown in Figure 9-20.
Disconnect the following cables:
Disconnect the power cable connector from the drive, as shown in Figure 9-21.
Disconnect the SCSI ribbon cable connector from the drive. Pull the plastic loop behind the connector to disconnect the cable.
Install the replacement drive.
To configure a new hard disk, follow the instructions in “Configuring Additional Hard Disks”.
To replace the system drive, you must first remove the drive and bracket, or the empty bracket if no drive is installed, from the upper drive slot. The drive could be a floptical drive or second hard disk drive.
If the system is powered on, press and release the power button on the front of the system to shut down the software and power off the system.
The system powers off automatically after about a minute.
Disconnect the power cable from the back of the Challenge S chassis.
Remove the top cover by releasing the latch on the rear of the cover and sliding it forward. For more details, see “Removing the Top Cover”.
Ground yourself to a metal part of the Challenge S chassis.
Put a wrist strap (included with Silicon Graphics option products) around your wrist, making sure it is tight against your arm.
Attach the alligator clip to a metal part of the Challenge S chassis.
Locate the floptical drive or second disk drive (if installed) in the top drive slot, as shown in Figure 9-22. (This might also be a second hard disk drive.)
If no drive is installed, there will be an empty bracket.
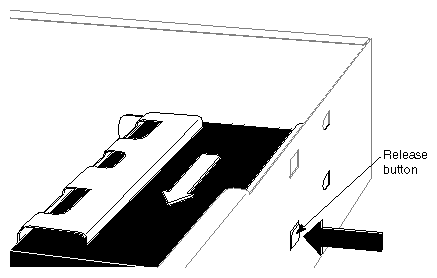
Remove the drive and bracket, or the empty bracket if no drive is installed, by pressing the release button that protrudes through the hole in the side of the chassis and pulling the unit toward you.
Save the empty bracket; you must re-install it after replacing the system disk drive.
Caution: The empty drive bracket provides structural support for the chassis. You must replace it if you're not installing a drive in the top slot. Disconnect the following cables:
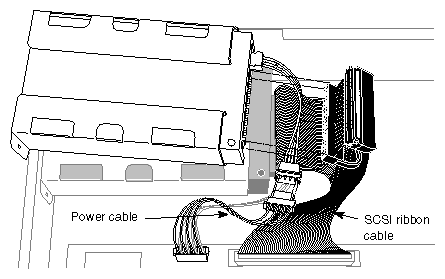
Disconnect the power cable connector from the drive, as shown in Figure 9-23.
Disconnect the SCSI ribbon cable connector from the drive. Pull on the plastic loop on the back of the connector to help you disconnect the cable.
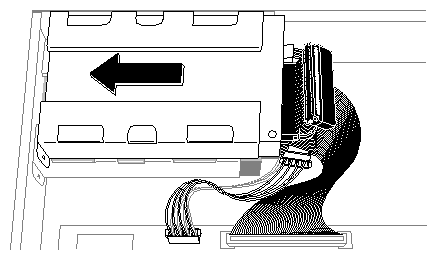
Remove the system drive and bracket from the lower drive slot by pressing the release button that protrudes through the hole on the side of the chassis and pulling the unit toward you, as shown in Figure 9-24.
Disconnect the following cables:
Disconnect the power cable connector from the system drive, as shown in Figure 9-25.
Disconnect the SCSI ribbon cable connector from the drive. Pull on the plastic loop behind the connector to disconnect it.
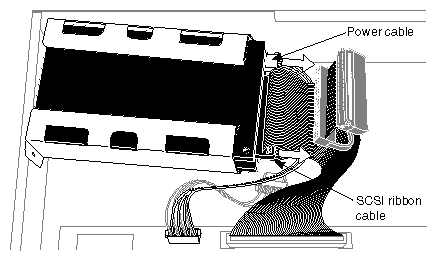
Pick up the replacement system drive, and reconnect the SCSI cable and the power cable to the replacement system drive.
Install the replacement system drive, as shown in Figure 9-26.
Lower the drive and bracket onto the chassis, making sure it engages in the metal tab on the floor of the chassis. At the same time, the button on the right side of the bracket snaps into the hole on the side of the chassis.
If you don't hear it snap, push the bracket forward until you hear the snap and can see the button protruding through the hole.
Reconnect the SCSI ribbon cable connector and the power cable connector to the floptical drive.
Reinstall the floptical drive in the upper drive slot, as shown in Figure 9-27.
Position the drive and bracket over the system drive.
Slide the metal tabs underneath the bracket into the holes on the top of the system drive's bracket. At the same time, make sure that the button release on the right side of the bracket snaps into the chassis.
Replace the top cover by inserting the tab through the hole in the rear of the chassis and sliding it back until it snaps into place. For more information, see “Replacing the Top Cover”.
Reconnect the power cable to the connector on the back of the Challenge S chassis.
You are finished replacing the system disk drive and ready to power on the system.
To replace the power supply, follow these steps:
If the system is powered on, press and release the power button on the front of the system to shut down the software and power off the system.
The system powers off automatically after about a minute.
Disconnect the power cable from the back of the Challenge S chassis.
Remove the top cover by releasing the latch on the rear of the cover and sliding it forward. For more details, see “Removing the Top Cover” .
Ground yourself to a metal part of the Challenge S chassis.
Put the wrist strap (included Silicon Graphics option products) around your wrist, making sure it is tight against your arm.
Attach the alligator clip to a metal part of the Challenge S chassis.
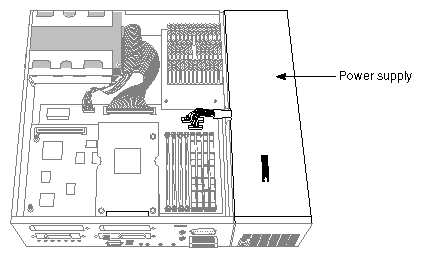
Move the system or position yourself so that you are facing the rear of the system. Locate the power supply, as shown in Figure 9-28.
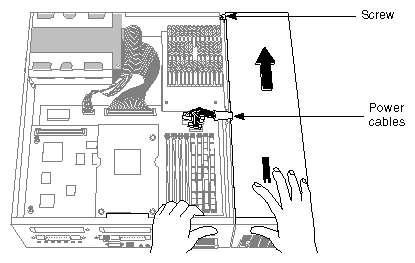
Disconnect the two power cables that connect the power supply to the system board. (Refer to Figure 9-29.)
Disconnect the smaller of the two cables by grasping the connector (not the cables) and pulling it upward.
Disconnect the larger cable by grasping the connector, pressing in the lever on its side, and pulling it upward. Do not pull the connector up by the cables.
Use a Phillips screwdriver to remove the screw that connects the power supply to the chassis.
Remove the power supply.
Place your right hand on the power supply and your left hand on the chassis a few inches from the power supply, as shown in Figure 9-29.
Slide the power supply forward about one quarter-inch to disengage it from the chassis. You may have to exert some pressure.
Remove the power supply by pulling it away from the chassis.
Install the replacement power supply.
Grasp the replacement power supply with your right hand and place your left hand on the front of the chassis as shown in Figure 9-30.
Place the power supply against the chassis and slide it toward you, making sure that the two metal tabs on its side engage in the two holes on the chassis.
Insert and tighten the screw that you removed on the power supply.
Connect the two power cables to the system board.
Insert the larger of the two power connectors into the socket on the system board, pressing it firmly until seated.
Insert the smaller power connector into the socket on the system board, pressing it firmly until seated.
Replace the top cover by inserting the tab through the hole in the rear of the chassis and sliding it back until it snaps into place. For more information, see “Replacing the Top Cover”.
Reconnect the power cable to the connector on the back of the Challenge S chassis. You are finished replacing the power supply and ready to power on the system.
To replace an external SCSI device, follow these steps:
If the system is powered on, press and release the power button on the front of the system to shut down the software and power off the system.
The system powers off automatically after about a minute.
Disconnect the power cable from back of the Challenge S chassis.
Disconnect the power cable from the SCSI device.
Disconnect the SCSI cable from the back of the Challenge S chassis.
Squeeze the clips on both sides of the connector.
Pull off the connector.
If you are not going to install another external device, replace the terminator that came with your Challenge S server.
Note: The terminator that shipped with your Challenge S server is a high-density active terminator. The terminator on an external drive may be a low-density terminator. Use only an active high-density terminator to terminate the Challenge S system. Put the terminator on the SCSI connector on the back of the Challenge S chassis.
The SCSI connector is designed so that you can put the terminator on only one way.
Secure the clips on each side of the terminator.
Reconnect the power cable to the back of the system.
Press and release the power button on the front of the system to power up the system.
To install a replacement external SCSI device, follow the instructions in “Installing External SCSI Devices”.