This chapter includes information on
diagnosing some of the more common hardware problems
using the system tests (power-on, interactive diagnostic environment, and confidence) to diagnose hardware problems
recovering from a system crash
disabling the system password
service and support
In the section “Common Problems”, you'll find a list of some of the more common problems that you may have with your system. If the problem you have is not listed there, you can use the system tests, as described below, to further diagnose hardware problems before calling your service provider.
| Note: If your system is under warranty, or if you have a full-service maintenance contract, call your service provider before removing any parts. |
Power-on tests run automatically on the major hardware parts of the system each time it is turned on. If the tests find a faulty part, the power indicator light (LED) on the front of the system turns red and there an error message may appear on the system console. For a description of the LED colors, and of hardware diagnostic error messages and how to interpret them, go to “Power-On Tests”.
Interactive Diagnostic Environment (IDE) tests check your system's hardware when you suspect a problem. These tests are more comprehensive than the power-on tests. If these tests find a fault, you are informed with an error message. To run the IDE tests, go to “Interactive Diagnostic Environment (IDE) Tests”.
Here are a few of the more common hardware problems and the actions you can take.
Check that the power cable is firmly connected to the rear of the system and to a working wall outlet.
If you're using a power outlet strip, make sure it is turned on.
Troubleshooting problems with printers can be found in the IRIX Advanced Site and Server Administration Guide (for IRIX 5.3 systems) and in IRIX Admin: Peripheral Devices (for IRIX 6.2 systems).
If no external SCSI devices are connected to the system, make sure there is an active terminator connected to the SCSI port on the rear of the system. The Challenge S server ships with an active terminator connected to the SCSI port(s).
Try reinstalling the drive, making sure that the SCSI ribbon and power cables are connected properly. Refer to “Installing an Internal Floptical Drive or Second Hard Disk”.
Verify that the system recognizes the drive. Turn on the system, log in, and enter the following at a shell prompt:
hinv
This lists the hardware that is installed on the system and that the system recognizes.
Check that the SCSI address of the drive is set to 2. Go to Appendix C, “Floptical Drive Jumper Settings” for more information on how to do this. (For drives not supplied by Silicon Graphics, refer to the documentation included with the drive.)
If the problem persists, call your service provider.
Make sure you've turned on all external devices before turning on the system.
Follow these steps to ensure that the device has been installed correctly. (Refer to “Installing External SCSI Devices”.)
Check that the SCSI and power cables are connected properly.
If the device is the last one on the daisychain, check that it has an active terminator connected to it. (The active terminator comes with the SCSI device.)
Check that the SCSI address of each external device does not conflict with other SCSI devices. Do not use SCSI address 1 or 2 for external devices; they are reserved.
If more than one external SCSI devices is connected to the system, make sure that the combined length of all external SCSI cables does not exceed two meters.
Check that no more than five external SCSI devices attached to the main SCSI channel (0) and no more than fifteen devices to each of channels 4 and 5.
If the device is a tape drive, make sure you're using tapes of the correct density. To find out which densities are supported, see tps(7M).
Verify that the system recognizes the device. At a shell prompt, enter this command:
hinv
You should see something similar to this:
Tape drive: unit 3 on SCSI controller 0: DAT
When you turn on the power button, your system goes through these steps:
The power indicator light (called an LED) on the front of the machine is amber first and then changes to green with the boot “tune.” The system initiates power-on diagnostics.
The LED light is amber while the system runs power-on diagnostics for about five seconds; then the disk spins up. This takes about 15 seconds.
When the system passes all power-on tests, the LED turns green.
The system boots the IRIX operating system or brings up a menu if you configured your system to do so.
If the LED light doesn't turn green after the power-on tests, the tests found a faulty part, and the LED light will be either solid red or blinking red. Table 8-1 summarizes the symptoms and possible causes, which are described in detail in the following sections.
Table 8-1. Troubleshooting Symptoms and Probable Causes
Indicator | Symptom | Cause |
|---|---|---|
No power indicator light (LED) | No power to system | Power supply failure. Check rear of system for fan operation or power cable not connected. |
No sound | No sound | This is normal for Challenge S. There is no audio processor in the system. |
Blinking red power indicator light (LED) | Memory diagnostic failure | SIMM failure. Check error messages for faulty SIMM. |
Solid red power indicator light (LED) | One of the parts of the workstation is faulty | Graphics board, system board, or CPU module failure. |
If during power-on, the power indicator light (LED) on the front of the system doesn't light up and no error message appears on the screen, follow these steps:
Make sure that the power cables are plugged in to a working wall outlet. (The power supply is autoranging, so there is no possibility of switching it to the wrong setting.)
If you're using a power outlet strip, check that it is turned on.
Press the power button again.
If you hear the system drive spin up, check for airflow out the rear of the system (near the power connector) and listen for the sound of the fan. If the system disk spins up and the fan is blowing air, then the LED may be burned out or disconnected.
If you have recently disassembled the system, verify that you reconnected the internal power harness properly.
If there is no airflow and no sound of the fan, and if the power harness is connected properly inside the chassis, the power supply is probably faulty.
Contact your service provider for further instructions.
If the power indicator light (LED) is blinking red and no error message appears on the screen, one or more SIMMs (memory modules) may be faulty.
Press the power button on the front of the workstation to power off the system.
After the system shuts down, press the power button to power it on again.
If you still see the message, check that the memory modules are seated all the way into the sockets. Go to “Checking the SIMM Installation” and follow the instructions there.
If the power indicator light (LED) on the front of the system is blinking and a message appears on the screen, look for one of the messages below and follow the instructions.
No usable memory found. Make sure you have a full bank (4SIMMs) |
Press the power button on the front of the server to power off the system.
After the system shuts down, press the power button to power it on again.
If you still see the message, check that the memory modules are seated all the way into the sockets. Go to “Checking the SIMM Installation” and follow the instructions there.
If you see this message:
Check or replace: SIMM# |
Press the power button on the front of the workstation to power off the system.
After the system shuts down, press the power button to power it on again.
If you still see the message, check that the memory modules are seated all the way into the sockets. # represents the SIMM number that failed the test (for example, SIMM S1, SIMM S2).
Go to “Checking the SIMM Installation” and follow the instructions there.
If the power indicator light (LED) on the front of the system is solid red and does not turn green, one of the parts in the workstation is faulty.
Press the power button to power off the system. Wait a few seconds and then press it again to power on again. If the LED is still solid red, contact your service provider for further instructions.
If the power indicator light (LED) on the front of the system is solid red and a message appears on the screen, look for one of the messages below and follow the instructions.
If you see this message:
Check or replace: Graphics board
|
Press the power button on the front of the workstation to power off the system.
After the system shuts down, press the power button to power it on again. If you get the same error message, try running the Interactive Diagnostics Environment (IDE) tests. Go to “Interactive Diagnostic Environment (IDE) Tests”.
Contact your service provider for further instructions.
If you see this message:
Check or replace: CPU module
|
Press the power button on the front of the workstation to power off the system.
After the system shuts down, press the power button to power it on again. If you get the same error message, try running the Interactive Diagnostics Environment (IDE) tests. Go to “Interactive Diagnostic Environment (IDE) Tests”.
Contact your service provider for further instructions.
If the power indicator light (LED) on the front of the system is green, the system has passed the power-on tests. However, if you suspect a problem with the system, you can use the following diagnostics tests to help isolate the problem before calling your service provider.
When you power on the system, power-on tests check the system's essential hardware parts. Interactive Diagnostic Tests give you a greater depth of testing capabilities. Diagnostic tests take at least 30 minutes to run. If you have a large amount of memory or more than one hard disk, they take longer. The system stops the testing if it finds errors, and reports failures on the screen.
Follow these steps to run the tests:
Press and release the power button on the front of the workstation to power off the system.
After a few seconds you see the notifier shown in Example 8-1, and the system shuts down automatically.
Example 8-1. System Shutdown Message
INIT: New run level: 0
The system is shutting down.
Please wait.
Press and release the power button to turn on the system.
After the system performs its power-on diagnosis, you should see the System Maintenance menu, shown in Example 8-2.
Example 8-2. System Maintenance Menu
System Maintenance Menu
1) Start System
2) Install Software
3) Run Diagnostics
4) Recover System
5) Enter Command Monitor
Option?
If you cannot reach this menu, your system is faulty. Contact your service provider.
To start the diagnostics, enter
3
You see a screen similar to the following (your system may vary somewhat, depending upon CPU type and when it was manufactured):
Example 8-3. Interactive Diagnostic Environment (IDE) Start-up Screen
          Starting Diagnostic Program
       Press <Esc> to return to the menu.
SGI Version 5.3 IP22 IDE field Feb 11, 1995
              System: IP22
           Processor: 150 Mhz R4400, with FPU
Primary I-cache size: 8 Kbytes
Primary D-cache size: 8 Kbytes
Secondary cache size: 1024 Kbytes
           SCSI Disk: scsi(0)disk(1)
           SCSI Disk: Controller 0, ID 2, removeable media
/
Note: If you do not see this screen, you cannot run the diagnostics. You may have a faulty disk drive. Contact your service provider. The character on the last line is a “spinning” combination of pipes (vertical bars), slashes, and dashes while the tests are running. Also, the LED on the front of the system blinks slowly throughout the testing process.
Watch for messages.
If the system's hardware is completely healthy, after 10 to 30 minutes (or more, if you have more than one hard disk or a lot of memory) you see this message:
Diagnostic tests completed with no failures detected.
Press <Enter> to continue.
Press <Enter> to return to the System Maintenance menu, where you can restart the system by clicking on the Start System icon. If problems persist, or if you still cannot restart the system, you may have a software problem. See “Recovering From a System Crash”.
If the diagnostics find a problem, you see a message similar to the following:
ERROR: Failure detected on the <name>
where <name> is the internal part or circuit, peripheral, or subsystem that is faulty.
Record this information and call your service provider for further instructions.
If your system crashes because of a software malfunction, first try powering off the system by pressing the power button on the front panel. Wait until the system shuts off and then power it on again. If this doesn't solve the problem you can use the CD-ROM that came with your system and your most recent full backup to recover your system.
To recover from a system crash, follow these steps:
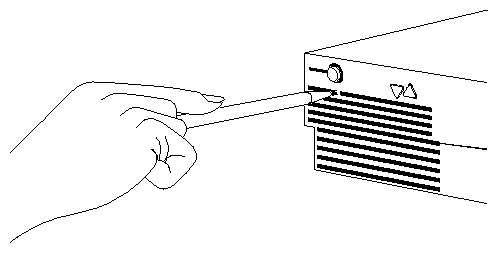
If you cannot communicate with the system using the console, or over the network, or if the power button on the front of the system doesn't respond, use a pencil or an unwound paper clip to press the recessed reset button located on the front panel, as shown in Figure 8-1.
When the System Maintenance menu appears, enter
4
The System Recovery menu appears, as shown in Example 8-4.
Example 8-4. System Recovery Menu
                System Recovery
        Press <Esc> to return to the menu.
1) Remote Tape 2) Remote Directory X) Local CD-ROM X) Local tape
Enter 1-4 to select source type, <esc> to quit,
or <enter> to start:
Choose the appropriate source by typing its number.
Insert the CD included with your system, then press <Enter>.
The CD-ROM drive begins accessing information from the CD. The system takes approximately five minutes to copy the information from the CD that it needs.
You may see a warning message, after which the system pauses; this is normal.
After everything is copied from the CD to the system disk, you can restore your data from a recent full backup tape. You see series of messages and prompts. Note that at most question prompts, you may enter
sh
to get a shell prompt.
The first message is the following:
**********************************************
SYSTEM RECOVERY
**********************************************
If you have a local tape device, you see this message:
Restore will be from <tapename> OK? ([Y]es, [N]o): [Y]
In the prompt above, <tapename> is the name of the local tape device. Enter y to use a local tape drive.
If you have a remote (network) tape device, when no tape device is found, or when you answered “N” to the question in the previous bullet, you see this message:
Remote or local restore ([r]emote, [l]ocal):
If you answer “remote,” you have chosen to restore from the network and you see this message:
Enter the name of the remote machine:
Enter the name of the tape device on <remote>
In the prompt above, <remote> is the name of the network host you identified in the previous question.
If you answer “local,” you have chosen a tape device that must be connected to your system and you see this message:
Enter the name of the tape device:
Enter the name of the tape device and press <Enter>. Then you see this message:
Insert the first backup tape in the drive, then press <Enter>, [q]uit (from recovery), [r]estart:
Remove the CD-ROM, insert your most recent full backup tape, then press <Enter>. If you are recovering using a tape drive on another workstation, the system asks for its name.
Then you see this message:
Erase /x filesystems and make new ones (y,n)? [n]
In the prompt above, x is a filesystem. You are prompted for every filesystem.
Answer by typing either y or n.
If you answer no to this question, the system tries to salvage as many files as possible, then it uses your backup tape to replace the files it could not salvage. Usually you should answer n for no, especially if your backup tape is not very recent.
If you answer y for yes, the system erases the filesystem and copies everything from your backup tape to the disk. The system loses any information you created between now and when you made your backup tape.
You see this message:
Starting recovery from tape.
After two or three minutes, the names of the files that the system is copying to the disk start scrolling. When the recovery is complete, you see this message:
Recovery complete, restarting system.
Then the system restarts. When you see the System Maintenance Menu, the system is ready to boot.
The system maintenance password keeps unauthorized people from using the Command Monitor to gain superuser access to the system, or otherwise altering the system configuration. You can set the system maintenance password from the Command Monitor.
Once the system maintenance password is set, whenever you are in the System Maintenance Menu and you choose the “Install System Software,” “Run Diagnostics,” “Recover System,” or “Enter Command Monitor” menu items, you are prompted for a password, as shown in Example 8-5.
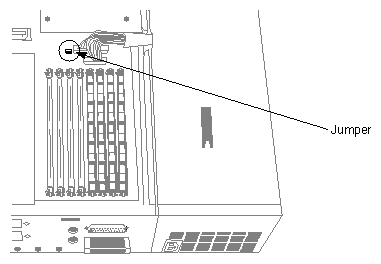
If you do not know the system maintenance password, you can disable it by removing a jumper from the system board inside the sever, as shown in Figure 8-2.
| Note: To prevent unauthorized access to the jumper on the system board, you can lock the cover of the Challenge S server. For more information, go to “Locking the Top Cover”. |
To remove the jumper and disable the password, follow these steps:
Shut down the system.
Press and release the power button to power off the system.
Disconnect the power cable from the rear of the system.
Remove the cover by releasing the latch on the rear of the cover and sliding the cover forward. For more details, see “Removing the Top Cover”.
Locate the jumper beside the power supply cable connectors on the system board, as shown in Figure 8-2.
Remove the jumper and save it. You must reinstall it if you choose to reset the password.
Replace the cover by inserting the tab through the hole in the rear of the chassis and sliding the cover back until it snaps into place.
Reconnect the power cable to the rear of the system.
Press and release the power button on the front of the system to power on the system.
When you return to the System Maintenance Menu and choose one of the four menu options mentioned before, you see the notifier shown in Example 8-6.
Example 8-6. Disabled PROM Password Message
Warning: Password jumper has been removed. Not enforcing PROM password |
If you want to reenable the password, you can do so by entering the Command Monitor and giving the command resetpw to clear the password. Then power the system down, remove the top cover, and replace the jumper. Replace the top cover and power on the system.
When you purchased your system, you may have purchased a support program from either Silicon Graphics or a vendor who supplies software. Whenever you encounter any problems that you cannot solve using the methods in this chapter, contact the organization from which you purchased the support program.
If your products are supported by Silicon Graphics and you need help, contact your service provider.