This chapter tells you how to set up your Challenge S server. It includes instructions on
putting the pieces together
connecting network cables
turning on the system
logging in and setting yourself up on a network
turning off the system
removing, replacing, and locking the top cover
using another workstation as a system console
When you assemble the Challenge S server, you will attach various cables (system console, power, network) to connectors on the back-panel. The following figures in this section provide an overview of the various connectors on the back of Challenge S systems.
Figure 3-1 shows the various back-panel connectors on the Challenge S server.
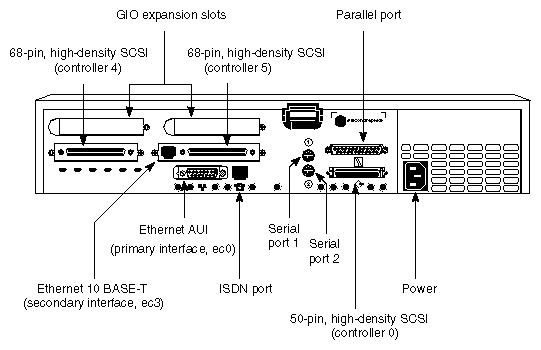
For a complete description of these connectors, see Chapter 2, “Chassis Tour and Theory of Operation.”
Place the Challenge S chassis on a flat, hard surface. A soft surface such as a carpet interferes with the airflow through the bottom of the chassis and may cause overheating.
The only way to disconnect power to this system is to unplug the power cable. To ensure the safety of the server, the electrical outlet must be close to the server and easily accessible.
When opening the system chassis, for example to install additional peripherals, always observe proper electrostatic discharge (ESD) procedures. Make sure you are properly grounded with a wrist or heel strap before handling sensitive boards and drives. All Silicon Graphics peripheral options, including disks, option boards, and memory, are shipped with wrist straps.
Follow these steps to assemble the Challenge S server and attach a system console (ASCII terminal):
Unpack the system from the shipping carton and set up the chassis on a hard, flat surface. Allow several inches of clearance around the system for proper airflow, and do not place the chassis on a soft surface (such as a rug or carpet) that might block the vent on the bottom of the system.
If you wish to install any internal components (such as a system disk, an option disk, a floptical drive, additional memory, or an expansion board), do so now.
See “Removing the Top Cover” for instructions on removing the chassis cover.
To install additional memory, go to Chapter 4, “Installing Memory.”
To install a GIO option board such as a video, network, or fast SCSI controller board, go to Chapter 5, “Installing GIO Option Boards.”
To install an optional internal drive (floptical, or second hard disk drive), or external SCSI devices, go to Chapter 6, “Installing Internal and External Peripherals.”
See “Replacing the Top Cover” for instructions on replacing the chassis cover.
After you have installed any additional internal components, or if you do not have any additional internal components to install, proceed to the next step.
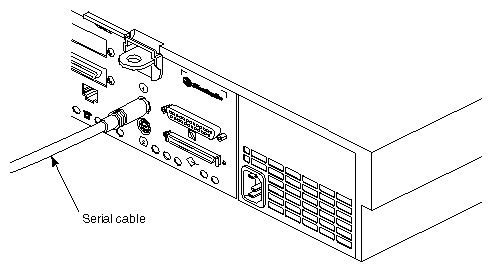
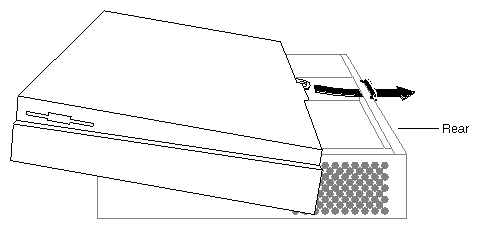
Connect the RS-232 serial cable (provided) to an ASCII terminal. The cable is approximately 10 feet (3 meters) long. Plug the round, 8-pin DIN connector into serial port 1 on the back of the system, as shown in Figure 3-2.
You can also use a Silicon Graphics Indy™ or other workstation as a system console. See “Using Another Workstation as the System Console” for more information.
If you misplaced the RS-232 serial cable that was provided with the Challenge S server, you can order a replacement from your service provider. Also, see “Printer/Character (ASCII) Terminal Serial Cable” in Appendix B for a description of the cable.
Connect the power cable to the server and to the electrical outlet. The power cable supplied is approximately 10 feet (3 meters).
Connect the ASCII terminal's power cable to an electrical outlet.
When the system is powered on, it automatically uses serial port 1 as the system console.
| Note: If your site has multiple Challenge S servers, you may wish to save at least one set of packing materials in the event that you need to return a system for upgrading or for service. |
Now you are ready to connect any network cables.
The Challenge S server supports two types of Ethernet:
Challenge S also provides an ISDN connector.
To connect an Ethernet AUI (Access Unit Interface) cable, turn to “Connecting an Ethernet AUI Cable”.
To connect an Ethernet 10-BASE T cable, turn to “Connecting an Ethernet 10-BASE T Cable”.
To connect an ISDN cable, turn to “Connecting an ISDN Cable”.
To connect an Ethernet AUI cable to your system, follow these steps:
Obtain a drop cable that reaches from the wall to the back of the Challenge S server.
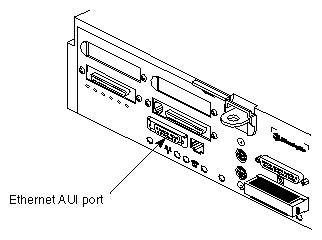
Connect the Ethernet AUI cable to the Ethernet AUI port on the back of the Challenge S server, as shown in Figure 3-3.
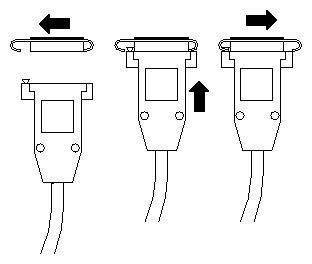
Make sure the sliding bracket on the Ethernet port on the system is pushed all the way left, as shown in Figure 3-4.
Plug the cable into the port.
Slide the bracket right to hold it in place.
You are finished installing the Ethernet AUI cable. If you do not have other network cables to install, turn to “About the Controls on the Front Panel” to power on the server.
To connect an Ethernet 10-BASE T cable to the system, follow these steps:
Obtain a 10-BASE T cable that reaches from the wall to the back of your Challenge S server.
Plug one end of the cable into the port in between the two SCSI connectors on the back of the Challenge S server, as shown in Figure 3-5. Note that the Ethernet 10-BASE T and the ISDN port below it look similar. The Ethernet 10-BASE T port is the one on top, immediately next to the SCSI connector, as shown below.
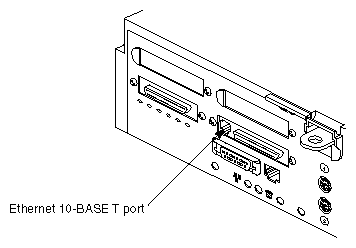
You are finished installing the Ethernet 10-BASE T cable. If you do not have other network cables to install, turn to “About the Controls on the Front Panel” to power on the server.
| Note: See “ISDN Port,” in Chapter 2, “Chassis Tour and Theory of Operation” for more information about ISDN on the Challenge S server. |
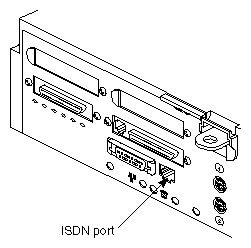
To connect an ISDN cable to your system, follow these steps:
From your network administrator or your phone company, obtain an ISDN cable and an NT1 network terminator.
Plug one end of the ISDN cable into the port above the ISDN label on the back of the Challenge S server, as shown in Figure 3-6. Note that the ISDN port and the Ethernet 10-BASE T port above it look similar. The ISDN port is the one on the bottom, as shown below.
Plug the other end of the cable into the NT1 network terminator.
You are finished setting up your Challenge S server. Turn to “About the Controls on the Front Panel” to power on the server.
Before turning on the server, you may want to familiarize yourself with the controls on the front panel of the Challenge S server, as shown in Figure 3-7.
The Power button turns the server on and off. This is a “soft” power button that signals the Challenge S PROM to turn on or shut off internal power.
If the system is off, press the power button to start it.
If the system is on, press the power button once to gracefully halt the operating system and turn off power.
The Reset button resets the hardware. Press it only if your system is malfunctioning and you cannot communicate with it. The button is recessed, so you need the tip of a pencil or an unwound paper clip to reach it. For more information, see Chapter 8, “Troubleshooting.”
The Volume buttons do not function, since there is no audio processor on the Challenge S.
| Warning: If you press the power button twice in a row while the system is on, the server will power off immediately without waiting for the operating system to halt gracefully. |

When you start the server for the first time, you do the following:
Power on the system.
Start the system and log in as root.
Configure the system to use any optional hard disks that you have installed.
Install additional software or remove software that you do not need.
Add additional user accounts (if needed).
The following sections describe each of these tasks.
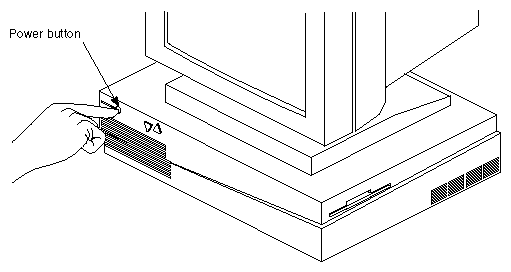
Follow these steps to power on the server:
Turn on the system console (ASCII terminal).
Turn on the system power.
Press and release the power button to turn on the system, as shown in Figure 3-8.
When you power on your system, the power indicator LED on the front of the machine is amber for a few seconds, and then turns green.
The LED changes back to amber while the system runs the power-on diagnostics. You see the message shown in Example 3-1.
If the system passes all of the diagnostics tests, the light turns green, the system continues booting, and you see the System Maintenance Menu, shown in Example 3-2.
Example 3-2. System Maintenance Menu
System Maintenance Menu 1) Start System 2) Install Software 3) Run Diagnostics 4) Recover System 5) Enter Command Monitor Option? |
If the LED is red and does not turn green, or the System Maintenance Menu does not appear, there may be a problem. Go to Chapter 8, “Troubleshooting,” to run some tests.
To start the system from the System Maintenance Menu (shown in Example 3-2), type 1, then press <Enter>. You see start-up messages similar to Example 3-3.
Example 3-3. System Start-Up Messages
Starting up the system... IRIX Release 5.3 IP22 Version 02111257 System V Copyright 1987-1995 Silicon Graphics, Inc. All Rights Reserved. System is coming up... IRIS login: |
At the IRIS login: prompt, you are ready to log in and configure the system. Type root and press <Enter>. You see some copyright messages followed by a TERM = prompt, as shown in Example 3-4.
Example 3-4. Example System Login Messages and Terminal-Type Prompt
IRIX Release 5.3 IP22 Version 02111257 IRIS Copyright 1987-1995 Silicon Graphics, Inc. TERM = (vt100) |
The default terminal type is VT-100. If you are using a VT-100 terminal, or one that emulates a VT-100, press <Enter>. You can also type the shorthand name of a supported terminal. Table 3-1 lists ten common supported terminals and their shorthand names.
Table 3-1. Ten Common, Supported Terminals
Name | Shorthand Name |
|---|---|
Adds Viewpoint | viewpoint |
Adm3a | adm3a |
AT&T 4410/5410 | 4410 |
HP 2621 | hp2621 |
IBM 3101-10 | ibm |
Qume Sprint 11 | qume |
TVI 912 | tvi912 |
Visual 50 | vi50 |
VT-100 | vt100 |
Wyse 60 | wy60 |
If you are using a Silicon Graphics workstation as the system console, type iris-ansi and press <Enter>. See “Using Another Workstation as the System Console” .
See Appendix D, “Supported Terminals” for more information about supported terminals. See also your terminal documentation for information about how to set the terminal's emulation mode, in the event that you have to change it to match one of the supported types.
| Note: The default keyboard language is U.S. English. |
To configure an additional disk as a single, mounted file system, you can use the Add_disk command. For example, the following command configures a single disk that is set to SCSI ID 6 and is attached to the main SCSI connector (controller 0):
Add_disk 0 6 |
SCSI controller 0 controls the main system disk, any disk or other SCSI device installed inside the system chassis, and any disk or other SCSI device attached to the main, external connector. The main connector is the one located beneath the parallel port on the rear of the chassis. See Figure 3-1.
The following command configures a disk that is set to SCSI unit ID 2 and is attached to one of the secondary, external SCSI ports, for example,
controller 4 (on models so equipped):
Add_disk 4 2 |
See Figure 3-1 to determine the controller numbers of the available SCSI ports. for your model of Challenge S server. For complete information about adding peripherals to the Challenge S, see Chapter 6, “Installing Internal and External Peripherals.” For more information about formatting disks and using disk drives, see the IRIX Advanced Site and Server Administration Guide (for IRIX 5.3 systems) and IRIX Admin: Disks and Filesystems (for IRIX 6.2 systems).
If you want to add a disk or disks using a different configuration (for example, several disks as a single filesystem), or if you want to stripe several disks for performance reasons, refer to the IRIX Advanced Site and Server Administration Guide (for IRIX 5.3 systems) and IRIX Admin: Disks and Filesystems (for IRIX 6.2 systems).
You may receive software for your system from two different sources: Silicon Graphics, Inc., or other companies that write application software that runs on the Challenge S server. For basic information about installing and removing software from your Challenge S server, turn to Chapter 7, “Installing and Removing Software.” For complete information about installing and removing software, see the Software Installation Administrator's Guide (for IRIX 5.3 systems) and IRIX Admin: Software Installation and Licensing (for IRIX 6.2 systems).
The default set of software subsystems that are installed at the factory are suitable for a variety of Silicon Graphics systems. However, you can save a great deal of disk space by removing packages that are not required (or usable) on your system.
For a list of software subsystems that you might be able to remove, as well as basic instructions for using the versions command to remove software, see “Removing Optional Software”.
By default, the IRIX operating system provides several accounts that can be used to log in to the server. These are listed in Table 3-2.
Table 3-2. Default Login Accounts, Their Uses, and System Access
Name of Account | Use | May Access |
|---|---|---|
root | System administration | All areas of the system |
guest | Guest access to the system | Limited areas of the system |
demos | Running demonstration programs | Limited areas of the system |
4Dgifts | “Gift” software account | Limited areas of the system |
EZsetup | Runs a graphical setup program (not usable on Challenge S systems) | Limited areas of the system |
OutOfBox | Runs a graphical demonstration program (not usable on Challenge S systems) | Limited areas of the system |
There are other accounts on the system (such as bin and lp), but these cannot (and should not) be used to log in to the server.
If you would like to set up additional accounts on the server, follow these steps:
Edit the file /etc/passwd with your preferred text editor.
Find this line:
guest:+:998:998:Guest Account:/usr/people/guest:/bin/csh
Copy it, then add it to the end of the file.
Change the first field (guest in this example) to the name of the new account; for example, alice.
Remove the plus sign (+).
The first occurrence of “998” is the user ID of the account. Change it to a number that is 1 greater than the current highest user ID on your system. Do not use user ID numbers between 0 and 100, as these are reserved for system use.
The next field (the second “998”) is the group ID number of the account. Check the file /etc/group and pick a suitable group ID for the new user account. The /etc/group file lists all the groups on the system by group ID, followed by a list of the current users who belong to that group.
Change the words Guest Account to the name of the new user, for example Alice Cramden. If you wish, you can add an “office” and “phone number” to this field. After the user's name, add a comma, then the office location, another comma, and the phone number. For example:
:Alice Cramden, Brooklyn, (212) 555-1212:
Change the next field (/usr/people/guest) to the location of the user's home directory. For example, /usr/people/alice.
The last field (/bin/csh) is the user's login shell. For most users, the C shell (/bin/csh), Korn Shell (/bin/ksh), or Bourne shell (/bin/sh) is appropriate.
Repeat steps 1 through 9 for each user account you want to add.
Write the changes you made to /etc/passwd and exit the file.
Use the mkdir command to create home directories for each user account you added in steps 1 through 8. For example, use this command to create a home directory for the user “alice”:
mkdir /usr/people/alice
Make the directory owned by user alice, who is in group bowling:
chown alice /usr/people/alice
chgrp bowling /usr/people/alice
Make sure the new home directory has the appropriate access permissions for your site. Use this command for a site with relaxed security:
chmod 755 /usr/people/alice
(For more information on the chown(1), chgrp(1), and chmod(1) commands, see the respective reference pages.)
Copy the shell startup files to each new user's home directory.
If the new account uses the C shell, use these command:
cp /etc/stdcshrc /usr/people/alice/.cshrc
cp /etc/stdlogin /usr/people/alice/.login
If the new account uses the Korn or Bourne shell, use these commands:
cp /etc/stdprofile /usr/people/alice/.profile
Make these shell startup files owned by the users. For C shell accounts, type this command:
chmod 755 /usr/people/alice/.cshrc /usr/people/alice/.login
For Korn or Bourne shell, type this command:
chmod 755 /usr/people/alice/.profile
Issue the pwck command to check your work. This command performs a simple check of the /etc/passwd file and makes sure that no user ID numbers have been reused and that all fields have reasonable entries. If your work has been done correctly, you should see output similar to the following:
sysadm:*:0:0:System V Administration:/usr/admin:/bin/sh
        Login directory not found
diag:*:0:996:Hardware Diagnostics:/usr/diags:/bin/csh
        Login directory not found
nuucp::10:10:Remote UUCP User:/var/spool/uucppublic:/usr/lib/uucp/uucico
        Login directory not found
        Optional shell file not found
auditor:*:11:0:Audit Activity Owner:/auditor:/bin/sh
        Login directory not found
dbadmin:*:12:0:Security Database Owner:/dbadmin:/bin/sh
        Login directory not found
rfindd:*:66:1:Rfind Daemon and Fsdump:/var/rfindd:/bin/sh
        Login directory not found
EZsetup::992:998:System Setup:/var/sysadmdesktop/EZsetup:/bin/csh
        First char in logname not lower case alpha
        2 Bad character(s) in logname
OutOfBox::995:997:Out of Box Experience:/usr/people/tour:/bin/csh
        First char in logname not lower case alpha
        3 Bad character(s) in logname
        Login directory not found
4Dgifts::999:998:4Dgifts Account:/usr/people/4Dgifts:/bin/csh
        First char in logname not lower case alpha
        1 Bad character(s) in logname
        Login directory not found
nobody:*:-2:-2:original nobody uid:/dev/null:/dev/null
        Invalid UID
        Invalid GID
These messages are normal and expected from pwck. All errors generated by pwck are described in detail in the pwck(1M) reference page.
For more complete information about user accounts and groups, see the IRIX Advanced Site and Server Administration Guide (for IRIX 5.3 systems) and IRIX Admin: System Configuration and Operation (for IRIX 6.2 systems).
You can shut down the system and turn off power inside the system chassis simply by pressing the power button on the front of the Challenge S server. Press and release the power button once, as shown in Figure 3-9.
| Warning: If you press the power button twice before the system has shut down, the server will power off immediately without waiting for the software to shut down gracefully. |
Messages about the system shutdown are displayed and the LED on the front of the chassis blinks green and amber. Then the system powers off automatically within the next minute.
Although it is not necessary to shut down the system software before pressing the power button, we strongly recommend that you warn any other users that you are about to shut down the system and give them enough time to log off the server, or exit from any applications that depend upon the server. The IRIX Advanced Site and Server Administration Guide (for IRIX 5.3 systems) and IRIX Admin: System Configuration and Operation (for IRIX 6.2 systems) describe the proper method of warning users of an impending shutdown.
| Note: The power button is software-controlled: this means that the system does not automatically shut down if it is unplugged or if power is interrupted (for example, by a power outage or by a power box being turned off). |
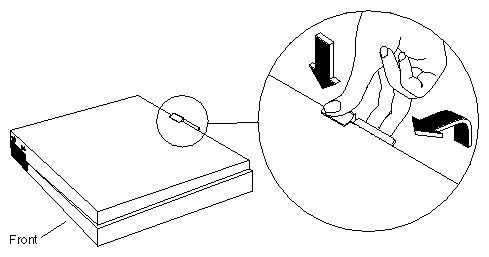
Follow these steps to remove the top cover of your Challenge S server:
If the system is powered on, press and release the power button on the front of the system to shut down the software and power off the system.
Disconnect the power cable from the back of the Challenge S server.
Facing the front of the Challenge S server, place your right thumb on the small channel at the back of the cover, and your second and third fingers under the finger ledge, as shown in Figure 3-10.
Snap the cover loose by bracing your thumb against the lip and pushing up the finger ledge with the second and third fingers, followed by a small push toward the front.
Slide the cover forward about one inch and remove it.
To replace the cover of your Challenge S server, follow these steps:
Facing the front of the system, lower the cover about one inch from its fully closed position, as shown in Figure 3-11.
Tilt the cover and insert the tab through the hole in the rear of the chassis.
Slide the cover toward the back of the chassis until it snaps into place.
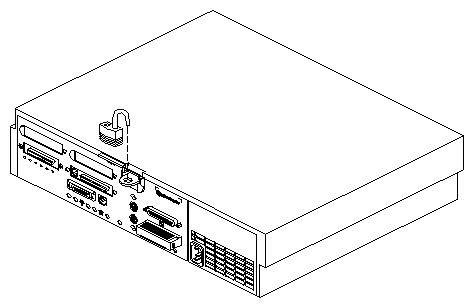
To prevent anyone from tampering with the internal parts of the Challenge S server, attach a lock through the hole in the lockbar, as shown in Figure 3-12. To prevent theft of the server, attach a cable lock.
You can use another workstation, such as a Silicon Graphics Indy, Indigo2™, or Onyx®
as the system console for your server. To do this connect the workstation and the Challenge S server together using a serial cable, then use terminal emulation software (such as cu) to log in to the Challenge S server.
The procedures in the following sections assume you are connecting your Challenge S server to a Silicon Graphics workstation. They describe how to
obtain the correct serial cable
make sure either the eoe.swuucp or eoe2.sw.uucp subsystem is installed on the workstation
configure the workstation, which includes modifying some configuration files
connect a serial cable between port 1 of the Challenge S server and another serial port on the workstation
use the cu command on the workstation to connect to the Challenge S server and log in
If you are connecting the Challenge S to a Silicon Graphics workstation, you need one of two RS-232 serial cables:
DIN-8 to DIN-8, null modem (has a small, round connector on each end); use this cable to connect the Challenge S server to a Silicon Graphics Indy, Indigo2, Indigo, Personal IRIS™ 4D/30, or Personal IRIS 4D/35 workstation
DIN-8 to DB9, null modem (has a small, round connector on one end, and a D-shaped, nine-pin connector on the other); use this cable to connect the Challenge S to a Silicon Graphics Onyx, Personal IRIS, or POWER Series workstation.
Appropriate DIN-8 to DIN-8 and DIN-8 to DB9 cables are available from Silicon Graphics, or your local service provider. You can also make the necessary cable using the pin-to-pin descriptions provided in the sections “Challenge S to Indy and Indigo2 Cable (DIN-8 to DIN-8)” and “Challenge S to Onyx Cable (DIN-8 to DB9)” in Appendix B.
The UUCP subsystem contains the program cu and several configuration files necessary for this procedure. To make sure the UUCP subsystem is installed, enter the following command at a shell prompt:
versions | grep uucp
If the UUCP subsystem is installed, you will see a line similar to one of the following:
For IRIX 5.3 systems:
I eoe2.sw.uucp 11/26/95 UUCP Utilities
For IRIX 6.2 systems
I eoe.sw.uucp 02/20/96 UUCP Utilities
| Note: If you are not sure which version of IRIX is installed on the workstation, enter the following command at a shell prompt: uname -r. |
If you do not see one of the above lines, the UUCP subsystem is not installed on your workstation. You should install either eoe2.sw.uucp or eoe.sw.uucp now. For basic information on installing software, see “Installing Optional Software” .
Once the UUCP subsystem is installed, continue with the next section, “Configuring the Workstation.”
Follow these steps to configure the workstation:
Log in as root (or use su to invoke superuser privileges) on the workstation that you will connect to the Challenge S server.
Use a text editor (such as vi, jot, or emacs) to edit the file /etc/inittab.
Find the line that corresponds to the serial port you wish to use on the workstation. For example, this line corresponds to port 2:
t2:23:off:/sbin/getty -N ttyd2 co_9600 # port 2

Note: You can use any port you wish on the workstation, but keep in mind that port 1 is the workstation's alternate console port. If the third field in the line is the word “off” (as in the example above), exit the file and continue with step number 3.
If the third field is the word “on,” change it to “off.” Then save the file, exit, and at the shell prompt enter this command:
telinit q
Using a text editor, open the file /etc/uucp/Devices.
Locate the following line:
# Direct ttyd2 - 9600 direct
Remove the number sign (#) and subsequent space at the beginning of the line:
Direct ttyd2 - 9600 direct
This change allows you to use port 2 on the workstation to connect to the Challenge S server. If you are using a different serial port, replace ttyd2 in the line above with the name of the actual port you are using, for example ttyd3 or ttyd4.
Save the file and exit.
Edit the file /etc/uucp/Systems.
At the end of the file, add this line
Direct Any Direct 9600 -
Save the file and exit.
Test the configuration on the workstation:
Enter this command at a shell prompt:
cu Direct
You should see this message:
Connected
This means that cu has successfully opened the serial port. You are ready to proceed to the next section, “Connecting the Serial Cable.” Enter the following command to exit from cu and return to the shell prompt:
~.
(This is the tilde character, followed by a period.)
If you do not see the message “Connected,” you may have made an error in one of the previous steps. Repeat this procedure, starting from step number 2. In particular, make sure that you reference the same port in each of the files /etc/inittab and /etc/uucp/Devices.
Connect one end of the cable into port 1 of the Challenge S server, and the other end of the cable (either DB9 or DIN-8) into the appropriate port on the workstation, for example port 2.
On the workstation, enter this command at a shell prompt:
cu Direct |
You should see this message:
Connected |
Press <Enter> once or twice. You should see a login prompt from the Challenge S server:
IRIS login: |
At the IRIS login: prompt, enter root, guest, or another account name (if you have already created one) as appropriate, and press <Enter>. You see some brief messages and the following prompt:
TERM = (vt100) |
Enter the following terminal type and press <Enter>:
iris-ansi