This chapter tells you how to install single inline memory modules (SIMMs). If you are removing and replacing SIMMs, go to “Replacing SIMMs”.
Follow these steps to shut down your system, remove the cover, install the SIMMs, replace the cover, and check to make sure the SIMMs are installed and working properly.
If the system is powered on, press and release the power button on the front panel to power off the system.
The system powers off automatically after about a minute.
Disconnect the power cable from the back of the Challenge S server.
Remove the top cover by releasing the latch on the rear of the cover and sliding it forward. For more details, see “Removing the Top Cover”.
Ground yourself to a metal part of the chassis.
Put the wrist strap (included with the server) around your wrist, making sure it's tight against your arm.
Attach the alligator clip to a metal part of the chassis.

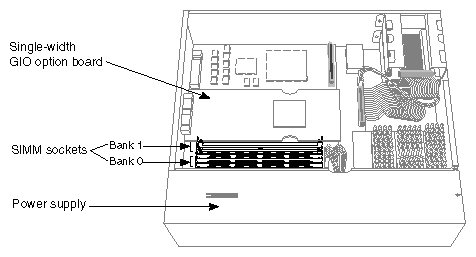
Caution: The system's internal components are sensitive to static electricity. Handle the parts carefully, and wear the wrist strap to avoid discharging static electricity. Move the system or position yourself so that you are facing the power supply. The SIMM sockets are located as shown in Figure 4-1.
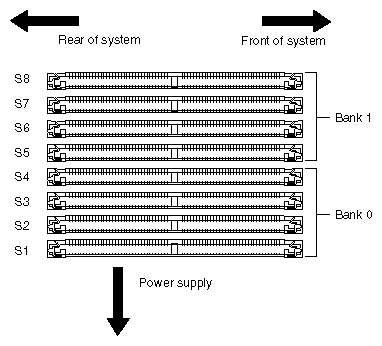
There are eight sockets, split into two banks—0 and 1. Bank 0 is closer to the power supply and contains sockets S1 through S4. Bank 1 is closer to the graphics board and contains sockets S5 through S8. The system ships with four SIMMs installed in Bank 0. See Figure 4-2.
(If you are upgrading memory or replacing faulty memory and need to remove any SIMMs that are already installed, go to “Replacing SIMMs” and then return to this section.)
Install the SIMMs consecutively in groups of four, beginning with the open slot closest to the power supply (from bank 0 to 1). Each bank must have four SIMMs of the same capacity installed.
For example, you may install four 4 MB SIMMs in bank 0, and four 8 MB SIMMs in bank 1, but you may not install 4 MB and 8 MB SIMMs in the same bank.
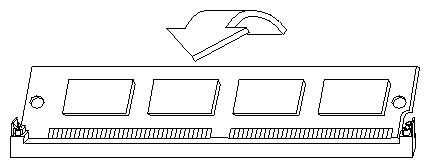
Using both hands, grasp the top of the SIMM so the notch in the bottom corner of the SIMM is on your right, as shown in Figure 4-3. (This is the side closest to the CPU module.)
Start with the socket closest to the power supply. Tip the top of the SIMM away from the power supply, and press the SIMM firmly into the socket at a slight angle (from straight upright).
Tilt the SIMM up into a vertical position, as shown in Figure 4-4. There should be a slight click when the SIMM reaches the vertical position as the metal latches snap up around the SIMM.The SIMM is positioned correctly when the latches on both sides of the SIMM socket are hugging the edges of the SIMM.

Note: Some GIO option boards, if installed in slot 0 (on the side of the IOPLUS or GIO extender board close to the SIMMs), may impede your installation of the SIMM in the last socket of bank 1 (closest to the graphics board). If this is the case, you may have to remove the GIO option board to gain access to the SIMM socket. Turn to “Replacing a GIO Option Board” for instructions and then return to this section. Install the rest of the SIMMs the same way.
If you removed a GIO board to gain access to the last SIMM socket, reinstall it, referring to “Replacing a GIO Option Board”.
Now, go to the next section to check that the SIMMs are installed correctly before closing up the system.
Before replacing the cover, make a final visual check that the SIMMs are installed correctly.
Check that each SIMM is vertical and perpendicular to the system board.
Look across the tops of the SIMMs to make sure they are even and inserted all the way into the socket.
If a SIMM appears to be leaning, push it up into a vertical position.
Make sure the latches on the sides of each SIMM fit snugly around it.
If you have no other internal parts to install, replace the top cover by inserting the tab through the hole in the rear of the chassis and sliding the cover back until it snaps into place. For more information, see “Replacing the Top Cover”.
It is important to replace the cover before testing the SIMMs. This ensures proper airflow through the system while the system is running the test.
Reconnect the power cable to the connector on the back of the system.
You are now ready to power on the system and check if the system recognizes the new memory.
To confirm that you've installed the memory modules correctly, check whether the system recognizes the new memory. Follow these steps:
Press and release the power button to turn on the power.
You see the power-on diagnostics message, as shown in Example 4-1.
The system boots up and brings you to the System Maintenance menu.
If nothing appears on the console and the LED on the front panel is blinking red, one or more SIMMs are not installed correctly. Check to make sure the SIMMs are installed correctly by referring to “Checking the SIMM Installation” then try this procedure again.
Press 1 to start the system.
When you see the login prompt, log in to your own account.
At the system prompt, enter the following command:
hinv
Look for a line similar to the following:
Main memory size: 64 Mbytes
The amount of memory shown in megabytes should equal the amount of memory that came with the server plus the amount of memory you installed. For example, if you had 32 MB of memory when you started and you installed another 32 MB, you should have a total of 64 MB.
If the system does not show the total amount of memory you now have installed, the SIMMs may not be installed correctly. Go to “Installing SIMMs” and try re-installing the SIMMs, following the instructions carefully. Then try this procedure again.


