The WorkShop Debugger lets you debug threaded applications as well as programs that use multiple processes spawned by fork or sproc. You can also control a single process or all members of a process group, attach child processes, and specify that spawned processes inherit traps from the parent process. The Trap Manager provides special commands to facilitate debugging multiple processes by setting traps that apply to the entire process group.
The Multiprocess Explorer window is for use by C, C++, and Fortran users. If you are debugging Ada code, you should use the Task View window available through the View menu of the Main View window (see the ProDev WorkShop: Debugger Reference Manual for a description of that menu).
Currently, Multiprocess Explorer handles the following multiple process situations:
True multiprocess program, which refers to a tightly integrated system of sproc'd processes, generated by the MIPSpro Automatic Parallelization Option. For more information on parallel processing, see the apo(5) man page.
Auto-fork application, which is a process that spawns a child process and then runs in the background.
Fork application, which is a process that spawns child processes and can interact with them.
Locally distributed application, which is an application that involves two different executables running in different processes on the same host coordinated by a rendezvous mechanism.
MPI single system image application, which is an MPI application that runs on the same host.
This chapter discusses the details of multiprocess debugging in WorkShop and includes the following topics:
The Multiprocess Explorer window is brought up by selecting Admin -> Multiprocess Explorer from the menu bar of the Main View window.
This window can display individual processes or operate on a process group. By default, a process group includes the parent process and all descendants spawned by sproc. Processes spawned with fork during the session can be added to the process group automatically when they are created. For a program compiled with the MIPSpro Automatic Parallelization Option, a process group includes all threads generated by the option. Any process to which you have read/write access can also be added to the process group. All sproc 'd processes must be in the same process group, since they share information.
| Note: Any child process that performs an exec with setuid (set user ID) enabled does not become part of the process group. |
Each process in the session can have a standard main view window session associated with it. However, all processes in a process group appear on a single Multiprocess Explorer window.
When debugging multiprocess applications, you should disable the SIGTERM signal by selecting Views -> Signal Panel from the Main View window menu bar. Although multiprocessing debugging is possible with SIGTERM enabled, the multiprocess application may not terminate gracefully after execution is complete.
The first step in debugging multiple processes is to invoke the Debugger with the parent process. Then select Admin -> Multiprocess Explorer from the menu bar.
The following figure shows a typical Multiprocess Explorer window.
The process display area of the Multiprocess Explorer lists the status of all processes and threads in the process group. For definitions of the various statuses and states, see the ProDev WorkShop: Debugger Reference Manual.
To get more information about a process or thread displayed in the process display area, right-click on the process or thread entry. A Process menu pops up which is applicable to the selected entry. From this menu you can do the following:
change Main View focus to a different process or thread
create a Main View window for a different process and/or thread
focus Main View attention to a user-entered thread
show process or thread-specific details
add or remove a process entry
For complete details about the Process menu, see the ProDev WorkShop: Debugger Reference Manual.
The Multiprocess Explorer window uses the same control buttons as the Main View window with the following exceptions:
Buttons are applied to all processes as a group.
There are no Return, Print, or Run buttons.
Control buttons in the Multiprocess Explorer window have the same effect as clicking the corresponding button in the Main View window of each individual process. For definitions of the buttons, see the ProDev WorkShop: Debugger Reference Manual.
As discussed in Chapter 5, “Setting Traps (Breakpoints)”, the trap qualifiers [all] and [pgrp] are used in multiprocess analysis. The [all] entry stops or samples all processes when a trap fires. The [pgrp] entry sets the trap in all processes within the process group that contains the trap location. The qualifiers can be entered by default by using the Stop All Default and Group Trap Default selections, respectively, in the Traps menu of Trap Manager. The Trap Manager is brought up from the Views menu of the Main View window.
The Multiprocess Explorer supports a hierarchical view of your pthreaded applications. Select the folder icons of your choosing to get more information about a process or thread.
Perform the following from within the Multiprocess Explorer window to get additional information about a process or thread:
In Display -> Process mode:
Double-click on a folder icon.
The process display expands to show its pthreads, if any. If there are no pthreads, the call stack for the process is displayed if the process is displayed.
Double-click to select the pthread of your choosing.
The call stack for that pthread displays if the pthread is stopped.
In Display -> Status mode:
Double-click on a folder icon.
The status display expands to show a list of processes.
Double-click to select the process of your choosing.
The process display expands to show its pthreads if any. If there are no pthreads, the call stack for the process is displayed if the process is stopped.
Double-click to select the pthread of your choosing.
The call stack for the selected pthread is displayed if the pthread is stopped.
To add a process, select Add from the Process menu. In the Switch Dialog dialog window, select one of the listed processes or enter a process ID in the Process ID field and click the OK button.
To remove a process, click on the process name in the Multiprocess Explorer window and select Remove from the Process menu. Be aware that a process in a sproc process group cannot be removed. Likewise, you cannot remove a pthread from a pthread group.
The Preferences option in the Config menu brings up the Multiprocess Explorer Preferences dialog. The preferences on this dialog let you determine when a process is added to the group, specify process behavior, specify the number of call stack levels to display, and so forth.
For details about Multiprocess Explorer Preference options, see the ProDev WorkShop: Debugger Reference Manual.
To create a Main View window for a process, highlight that process in the Multiprocess Explorer window. Then, select Process -> Create new window in the Multiprocess Explorer window. Starting with WorkShop 2.9.2, the user can “dive” via the mouse button on entries in the Multiprocess Explorer window. In the above example, the right mouse button can be held over the process selection and a dynamic process menu is displayed. You can then select Create new window.
This section uses a C program that generates numbers in the Fibonacci sequence to demonstrate the following tasks when using the debugger to debug multiprocess code:
Stopping a child process on a sproc
Using the buttons in the Multiprocess Explorer window
Setting traps in the parent process only
Setting group traps
The fibo program uses sproc to split off a child process, which in turn uses sproc to split off a grandchild process. All three processes generate Fibonacci numbers until stopped. You can find the source for fibo.c in the /usr/demos/WorkShop/mp directory. A listing of the fibo.c source code follows:
#include <stdio.h>
#include <sys/types.h>
#include <sys/prctl.h>

int NumberToCompute = 100;
int fibonacci();
void run(),run1();

int fibonacci(int n)
{
int f, f_minus_1, f_plus_1;
int i;

      f = 1;
      f_minus_1 = 0;
      i = 0;

      for (; ;) {
          if (i++ == n) return f;
          f_plus_1 = f + f_minus_1;
           f_minus_1 = f;
           f = f_plus_1;
      }
}

void run()
{
int fibon;
      for (; ;) {
          NumberToCompute = (NumberToCompute + 1) % 10;
          fibon = fibonacci(NumberToCompute);
          printf("%d'th fibonacci number is %d\n",
               NumberToCompute, fibon);
      }
}

void run1()
{
int grandChild;

      errno = 0;
      grandChild = sproc(run,PR_SADDR);

      if (grandChild == -1) {
          perror("SPROC GRANDCHILD");
      }
      else
          printf("grandchild is %d\n", grandChild);
      run();
}

void main ()
{
int second;

      second = sproc(run1,PR_SADDR);
      if (second == -1)
          perror("SPROC CHILD");
      else
          printf("child is %d\n", second);

      run();
      exit(0);
} |
Perform the following to start, compile the program, and run the Debugger:
Copy the program source from the demo directory as follows:
% cp /usr/demos/WorkShop/mp/* .
Compile fibo.c by entering the following command:
% cc -g fibo.c -o fibo
Invoke the Debugger on fibo as follows:
% cvd fibo &
Call up the Multiprocess Explorer by selecting Admin -> Multiprocess Explorer from the Main View menu bar.
The next section uses the fibo program to illustrate some of the functionality of the Multiprocess window.
To examine each process as it is created, you must set preferences so that each child process created stops immediately after being created. The following steps show how this can be done:
Select Config -> Preferences from the menu bar in the Multiprocess Explorer window.
Toggle off Resume child after attach on sproc in the Multiprocess Explorer Preferences window.
Toggle off Copy traps to sproc'd processes so you can experiment with setting traps later.
Click on the OK button to accept the changes.
Click on the Run button in the Main View window to execute the fibo program.
Watch the Multiprocess Explorer window, you will see the main process appear and spawn a child process, which stops as soon as it appears. This is because you turned off the Resume child after attach on sproc option. Notice also that the Main View window switched to the stopped child process.
Click on the Stop button in the Multiprocess Explorer window.
The control buttons on the Multiprocess Explorer window may be used to control all processes simultaneously, or the control buttons on any Main View window may be used to control that individual process separately.
Click on the first line (that is, the main process) in the process pane of the Multiprocess Explorer window to highlight this line.
Select Process -> Create new window from the menu bar of the Multiprocess Explorer window.
A new Main View window displays with a debug session for the main process.

Note: You may get a warning that .../write.s is missing. This refers to assembly code and can be ignored. The new Main View window does not have source in its source pane.
Select Views -> Call Stack from the menu bar of the Main View window you just created to create a Call Stack window.
Double-click on the line in the Call Stack window that contains run (). This brings up the fibo.c source for the main process in the Main View window.
Select Admin -> Close from within the Call Stack window to close it.
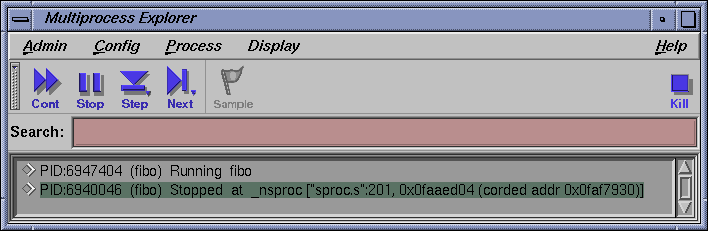
Click on Cont in the Multiprocess Explorer window. The first child, created in Step 5, now spawns a grandchild process that stops in _nsproc.
A Main View window switches to the new stopped process. Click on Stop in the Multiprocess Explorer window.
Repeat steps 7 through 11 to bring up a Main View window for the parent process.
The instructions in this section assume that you have just run the tutorial in “Using Multiprocess Explorer to Control Execution”.
This section shows you how to use the Trap Manager to set traps that affect one or all processes in the fibo process group. For complete information on using the Trap Manager, refer to Chapter 5, “Setting Traps (Breakpoints)”.
Select Views -> Trap Manager from the Main View window for the parent process. Traps are specific to the processes in the Main View window in which they are set.
Select Display -> Show Line Numbers (from the same Main View window) to turn on line numbering in the source pane, if not already showing.
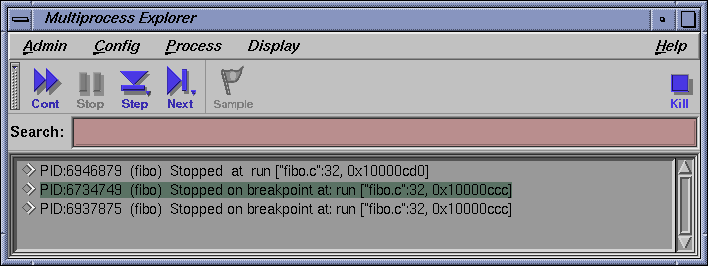
Click to the left of line 32, to set a breakpoint/stop trap for the parent process. Line 32 reads as follows:
32 Number to Compute = (NumberToCompute + 1) % 10
Line 32 highlights in red to indicate that a breakpoint has been set. A corresponding trap command appears in the Trap text box in the Trap Manager window; and the trap is added to the list on the Active Traps list of the same window. Remember, this trap affects only the parent process.
Click on the Cont button in the Multiprocess Explorer window. The parent process has stopped, but the other processes are probably still running.
Insert the word pgrp (that is, “process group”) after the word stop in the Trap field of the Trap Manager window.
The trap should now read Stop pgrp at .... As the command suggests, pgrp affects the whole process group.
Click on the Modify button.
The trap now affects two child processes. Watch the Multiprocess Explorer window to see the running processes in the process group stop at the trap on line 32.
Select Traps -> Group Trap Default from the Trap Manager window. Any additional traps that you set using the Trap Manager affect the entire process group. Any previously set traps are not be affected.
Select the text of line 23, found in the source pane of the Main View window associated with the parent process. This line reads as follows:
23 f_minus_1 = f;
Select Traps -> At Source Line from the menu bar of the Trap Manager window. The trap you have just set includes the modifier pgrp.
Select Admin -> Exit from any Main View window to close your session and end this tutorial.
The section of this chapter presents a few standard techniques to assist you in debugging a parallel program. This section shows you how to debug the sample program.
See also Chapter 2, “Basic Debugger Usage” for important related information.
Debugging a multiprocessed program is more involved than debugging a single-processor program. Therefore, you should debug a single-processor version of your program first and try to isolate the problem to a single parallel DO loop.
After you have isolated the problem to a specific DO loop, change the order of iterations in a single-processor version. If the loop can be multiprocessed, then the iterations can execute in any order and produce the same answer. If it cannot be multiprocessed, you will see that changing the order in which the loops execute causes the single-processor version to produce wrong answers. If wrong answers are produced, you can use standard single-process debugging techniques to find the problem. (See Chapter 2, “Basic Debugger Usage” for important related information.)
If this technique fails, you must debug the multiprocessed version. To do this, compile your code with the -g and -FLIST:=ON flags. The -FLIST:=ON flags save the file containing the multiprocessed DO loop Fortran code in a file called total.w2f.f and a file tital.rii and an rii_files directory.
This section shows you how to debug a small segment of multiprocessed code. The source code for this tutorial, total.f, can be found in the directory /usr/demos/WorkShop/mp.
A listing of this code is as follows:
program driver
      implicit none
      integer iold(100,10), inew(100,10),i,j
      double precision aggregate(100, 10),result
      common /work/ aggregate
      result=0.
      call total(100, 10, iold, inew)
      do 20 j=1,10
        do 10 i=1,100
          result=result+aggregate(i,j)
10    continue
20  continue
      write(6,*)' result=',result
      stop
      end

      subroutine total(n, m, iold, inew)
      implicit none
      integer n, m
      integer iold(n,m), inew(n,m)
      double precision aggregate(100, 100)
      common /work/ aggregate
      integer i, j, num, ii, jj
      double precision tmp

      C$DOACROSS LOCAL(i,ii,j,jj,num)
      do j = 2, m-1
        do i = 2, n-1
          num = 1
          if (iold(i,j) .eq. 0) then
            inew(i,j) = 1
          else
          num = iold(i-1,j) +iold(i,j-1) + iold(i-1,j-1) +
&         iold(i+1,j) + iold(i,j+1) + iold(i+1,j+1)
            if (num .ge. 2) then
              inew(i,j) = iold(i,j) + 1
            else
              inew(i,j) = max(iold(i,j)-1, 0)
            end if
          end if
          ii = i/10 + 1
          jj = j/10 + 1
          aggregate(ii,jj) = aggregate(ii,jj) + inew(i,j)
        end do
      end do
end |
In the program, the local variables are properly declared. The inew always appears with j as its second index, so it can be a share variable when multiprocessing the j loop. The iold, m, and n are only read (not written), so they are safe. The problem is with aggregate. The person analyzing this code deduces that, because j is always different in each iteration, j/10 is also different. Unfortunately, since j/10 uses integer division, it often gives the same results for different values of j.
While this is a fairly simple error, it is not easy to see. When run on a single processor, the program always gets the right answer. Sometimes it gets the right answer when multiprocessing. The error occurs only when different processes attempt to load from and/or store into the same location in the aggregate array at exactly the same time.
Perform the following to debug this code:
Create a new directory for this exercise:
% mkdir demos/mp
cd to the new directory and copy the following program source into it:
% cp /usr/demos/WorkShop/mp .
Edit the total.f file in a shell editor, such as vi:
% vi total.f
Reverse the order of the iterations for demonstration purposes.
Replace
do j = 2, m-1
with
do j = m-1, 2, -1
This still produces the right answer with one process running, but the wrong answer when running with multiple processes. The local variables look right, there are no equivalence statements, and inew uses only simple indexing. The likely item to check is aggregate. Your next step is to look at aggregate with the Debugger.
Compile the program with -g option as follows:
% f77 -g -mp total.f -o total
If your debugging session is not running on a multiprocessor machine, you can force the creation of two threads, for example purposes, by setting an environment variable. If you use the C shell, type:
% setenv MP_SET_NUMTHREADS 2
Is you use the Korn or Bourne shell, type:
$ MP_SET_NUMTHREADS=2
$ export MP_SET_NUMTHREADS
Enter the following to start the Debugger:
% cvd total &
The Main View window displays.
Select Display -> Show Line Numbers from the Main View menu bar to show the line numbers.
Select Source -> Go To Line from the Main View menu bar.
And enter 44.
Line 44 is as follows:
aggregate(ii,jj) = aggregate(ii,jj) + inew(i,j)
You will now set a stop trap at this line, so you can see what each thread is doing with aggregate, ii, and jj. You want this trap to affect all threads of the process group. One way to do this is to turn on trap inheritance in the Multiprocess Explorer Preferences dialog. To open this dialog, select -> Admin -> Multiprocess Explorer from the Main View menu bar to open the Multiprocess Explorer window.
Then, select Config -> Preferences from within the Multiprocess Explorer window.
Another way is to use the Trap Manager to specify group traps, as follows.
Select Views -> Trap Manager from the Main View window menu bar to open the Trap Manager.
Select Traps -> Group Trap Default from the Trap Manager window.
Click-drag to select line 44 in the Main View window.
Open the Trap Manager window from the Main View window menu bar by using Views -> Trap Manager.
Then select Traps -> At Source Line from the Trap Manager window.
This sets a stop trap that reads as follows in the cvd pane of the Main View window:
Stop pgrp at file /usr/demos/WorkShop/mp/total.f line 44
Select Admin -> Multiprocess Explorer from the menu bar in the Main View window to monitor status of the two processes.
You are now ready to run the program.
Click the Run button in the Main View window.
As you watch the Multiprocess Explorer, you see the two processes appear, run, and stop in the function _mpdo_total_1. It is unclear, however, if the Main View window is now relative to the master process, or if it has switched to the slave process.
Right-click on the name of the slave process in the Multiprocess Explorer window and select Process -> Create a new window.
A new window is displayed that launches a debug session for the process. Now, both master and slave processes should display in respective Main View windows.
Invoke the Variable Browser as follows from the Menu Bar of each process: Views -> Variable Browser.
Look at the values for ii and jj. They have the same values in each process; therefore, both processes may attempt to write to the same member of the array aggregate at the same time. So aggregate should not be declared as a share variable. You have found the bug in your parallel Fortran program.
Using the Debugger you can view pthread creation and execution through the Multiprocess Explorer window. Through this window you can:
View a hierarchal display of a threaded application
View a process/pthread relationship
Expand individual call stacks
C, C++, and Fortran users should use the Multiprocess Explorer window when debugging pthreads. Ada users should use the Task View window.
The next sections give hints on debugging pthreaded programs and illustrate how to debug a program that uses IRIX 6.5 pthreads.
The ability to “continue” or “free run” a single POSIX pthread under IRIX 6.5 is available at the user level with WorkShop release 2.8. However, use of this new debugging feature can, in certain specific circumstances, lead to anomalous and possibly confusing behavior. Such behavior occurs when the single thread that is continued or free run encounters either a “blocking” or “scheduling” situation in the operating system or the pthreads library.
When such situations arise, the operating system (or, in some cases, the pthreads library) must take action to dispose of the single continued or free run thread and, possibly, newly created threads. In the course of this action the debugging user sees things occur, with both the single continued or free run thread as well as all other threads, that are confusing because complex thread scheduling algorithms are invoked by both the operating system and the pthreads library to recover from the original blocking or scheduling incident. Debugging true POSIX pthreads is difficult, and users of this new feature, allowing a continue or free run of a single 6.5 POSIX pthread, gain even more appreciation of this fact.
This feature has been used internally for some time by the WorkShop debugger. The continue or free run of a single 6.5 pthread is used each time a user requests a single thread step-over of a function. The single thread is allowed to free run through the function which is being stepped over. Thus, if any blocking or scheduling situations occur in the course of this stepping over and associated free run of a single thread, then anomalous behavior can, and does, occur. This is described in the following subsections.
Scheduling anomalies may occur when the single 6.5 POSIX pthread which is being continued or free run creates a new pthread via a call to the pthread_create routine. At the time of the call to pthread_create the OS kernel and the pthreads library get into a complex algorithm in deciding how to create the new child pthread. An actual OS kernel thread (OS kernel threads are not available at the user level -- they differ from the user level pthread) must be either created anew or found elsewhere to support the user's new child pthread.
First, assume the OS kernel thread is to be found elsewhere, depending on a vast number of things (for example, number of CPUs, environment variables, and so on). The OS kernel may (this is very non-deterministic) decide to just put the child pthread on a ready queue, in need of an OS kernel thread. Thus the child does nothing immediately.
Meanwhile, if the parent pthread (via a call to the pthread_cond_wait routine) monitors the child pthread's struggle for life, it (the parent) gets parked on a mutex (mutual exchange lock) because the child obviously has not been created yet; it is on the ready queue.
The parent pthread's OS kernel thread becomes available, which causes the OS scheduler to check for work for this newly freed OS kernel thread. It finds the child sitting in the ready queue and assigns the parent's OS kernel thread to the new child pthread. The child then runs to completion and releases its (parent's old) OS kernel thread. The parent, checking for the child's new life via pthread_cond_wait, now recaptures its OS kernel thread and things appear to work correctly.
Now, assume the OS kernel thread required by the new child pthread must be created anew. The child is not placed on the 'ready queue'. Again, this is a non-deterministic decision which depends on a large number of variables (number of CPUs, and so on). The OS kernel creates a new OS kernel thread for the child pthread and “engages” it (the child) to that new OS kernel thread.
However, “marriage” of the OS kernel thread and the new child pthread cannot occur until the new OS kernel thread actually runs. This never occurs because, in allowing the single parent 6.5 pthread to continue or run free, it was requested that only one user pthread be run -- the parent.
If the parent, however, is using pthread_cond_wait to monitor the new life of its child, then it (the parent) is parked on a mutex waiting for the child to run. The parent awaits the child but the child cannot run because only one pthread, the parent, has been requested to run. The debugger displays “running” as the overall status and this is because no events of interest are occurring. Everything is waiting on everything else. Things are not working.
Blocking anomalies occur when the single 6.5 POSIX thread which is being continued or free run encounters a blocking condition in the course of its running. Blocking has three distinct types:
Blocking syscalls in the OS kernel (see the ProDev WorkShop: Debugger Reference Manual for a list). When one of these kernel syscalls is blocked by another thread's usage, the OS kernel decides what the next move is regarding the OS kernel thread attached to the user pthread making the call. Control could just transfer to another application, to disk I/O, or whatever.
These syscalls are all I/O-related. The OS kernel thread is, in effect, “blocked”, and it is immediately available for reassignment. The best example of a blocking kernel syscall is writev, which is used by the common library routine printf.
Various lock blocking in the pthread library, such as mutex (mutual exchange lock). This occurs in user space (libc, user code, and so on). The pthread library senses that a pthread is going to block due to another pthread's usage. Control transfers to the usync_control routine, which eventually calls a blocking kernel syscall (see the preceding item in this list). Again, the OS kernel decides the fate of the associated OS kernel thread. Unexpected things could start running.
Other lock blocking in the pthread library, whereby the pthread library senses that a user pthread is going to block but does not go off to usync_control. Instead it goes to the pthread_scheduler in the pthread library for the disposition of the associated OS kernel thread. The pthread_scheduler then reassigns the associated OS kernel thread to another user pthread and unexpected things could start running.
Observe the following guidelines when debugging pthreaded programs:
Be aware that the cvmain (Main View) for release 2.8 (and later) contains options (such as Continue, StepOver, StepInto, and Return) that are for a single 6.5 pthread -- the pthread that is displayed, or the focus thread. Do not use the Main View options unless you intend to use them for a single thread.
C++ exception handling works per process not per thread.
Using the step over function on a pthread_exit may produce unexpected results.
Use Multiprocess Explorer not Task View.
Use the WorkShop tools instead of dbx for 6.5 pthread debugging whenever possible.
Do not do a Next of printf.
Pthread debugging is highly variable not only from environment to environment but also from IRIX release to IRIX release. Because of this, it is not possible to provide a representative pthread debugging tutorial that can be used by all users. However, a pthread example is provided in this section.
See “User-Level Continue of Single 6.5 POSIX Pthread”, for an in-depth description of current pthread implementation in IRIX.
The following is a sample program used in this pthread example:
#################### begin highlight program###########################
#include        <unistd.h>

#define PTMAX 4
#define ERR(t,m) if (t) {printf("%s\n",m); exit(1);}

pthread_t phandle[PTMAX];
int     arg[PTMAX];

int foo( int *threadnum )
{
  int num, val = 0;

  num = (*threadnum) & 0x0000000F;
  printf("enter foo ( 0x%08x)\n", *threadnum);

  switch ( num ) {
    case  1: val = foo1(*threadnum);  break;
    case  2: val = foo2(*threadnum);  break;
    case  3: val = foo3(*threadnum);  break;
    case  4: val = foo4(*threadnum);  break;
    default: {printf("ERROR: foo(%d)\n",num); break;}
  }

  return val;
}

int foo1(int threadnum)
{
  return threadnum;
}

int foo2(int threadnum)
{
  return threadnum;
}

int foo3(int threadnum)
{
  int l0,j0;
  l0 = threadnum;
  j0 = l0+threadnum;
  return j0;
}

int foo4(int threadnum)
{
  return threadnum;
}

void create(int threadnum)
{
  int stat;

  arg[threadnum]=threadnum+1;
  printf("create: threadnum=0x%08x\n",arg[threadnum]);
  stat= pthread_create(&phandle[threadnum],0,(void *(*)(void *))&foo,&arg[threadnum]);

  ERR(stat!=0,"pthread_create failed");
}

void join(int threadnum)
{
  int out, stat;

  printf("join  : threadnum=0x%08x\n",threadnum+1);
  stat= pthread_join(phandle[threadnum],(void **)&out);
  ERR(stat!=0,"pthread_join failed");
  printf("return: threadnum=0x%08x: out=0x%08x\n",threadnum+1,out);
}

int main( int argc, char **argv )
{
  int threadnum;

  for( threadnum=0; threadnum<PTMAX; threadnum++ ) {
    create(threadnum);
    sleep(1);
  }

  for( threadnum=0; threadnum<PTMAX; threadnum++ ) {
    join(threadnum);
  }
}
#################### end highlight program########################### |
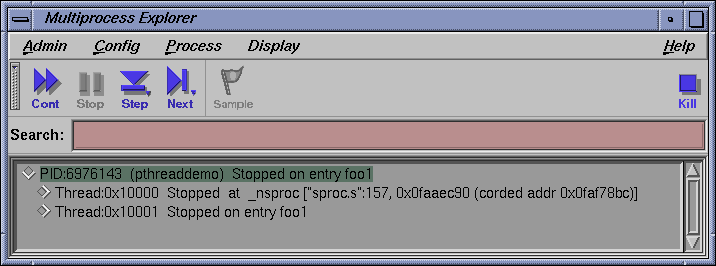
The pthreaddemo is a simple program that creates 4 pthreads. Each pthread is created via the pthread_create() routine, which in turn calls its start routine. Then pthread 0x10001 calls foo1(), pthread 0x10002 calls foo2(), pthread 0x10003 calls foo3(), and finally pthread 0x10004 calls foo4(). The master will sleep 1 second after each call just to make this example more predictable. As each routine encounters a breakpoint, control is given back to the user.
Perform the following to stat, compile the program, and run the Debugger:
Copy the program source from the demo directory as follows:
% cp /usr/demos/WorkShop/pthread/* .
Compile pthreaddemo.c by entering the following command:
% cc -g -o pthreaddemo pthreaddemo.c -lpthread -lc
Invoke the Debugger on pthreaddemo as follows:
% cvd pthreaddemo
Invoke the Multiprocess Explorer by selecting Admin -> Multiprocess Explorer from the Main View menu bar.
The next section uses the pthreaddemo program to illustrate some of the functionality of the Multiprocess window when using 6.5 pthreads.
At the cvd prompt in the Main View window, enter the following to set breakpoints:
cvd> stop in foo1
cvd> stop in foo2
cvd> stop in foo3
cvd> stop in foo4
This sets a breakpoint in a unique routine that will be called by each pthread.
Click the Run button in the Debugger Main View window to run the program. The breakpoint in pthread 0x10001 should stop in foo1().
In the Main View window, you should be able to confirm this by noting the program counter (PC) being highlighted in the source. Also, in the Multiprocess Explorer you should see the following:
At the cvd command prompt at the bottom of the Main View window, enter the following command:
cvd> print threadnum
thread = 1
It should be the same number as the pthread you are focused on (for example, 1 for 0x10001 at this breakpoint.)
Click the Cont button in the Main View window. The second breakpoint, the one set in pthread 0x10002, should stop in foo2().
In the Main View window, you should be able to confirm this by noting the green program counter (PC) being highlighted in the source. Also, in the Multiprocess Explorer you should see:
Thread:0x10002 Stopped on entry foo2
The Multiprocess Explorer should confirm this location for pthread 0x10002.
Click the Cont button in the Multiprocess Explorer. The third breakpoint, the one set in pthread 0x10003, should stop in foo3(). Both the Main View window and the Multiprocess Explorer window should confirm this location for pthread 0x10003.
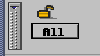
In the Debugger Main View window toggle the button below the lock to Single. Toggling this button to Single ensures the Debugger commands (cont, next, etc.) will only pertain to the Single pthread currently focused on in the Main View window.
Click on the Next button in the Main View window. Only pthread 0x10003 should advance one source line.
Clicking on the Return button in the Main View window should return pthread 0x10003 to its calling function.
Click the Cont button in the Multiprocess Explorer. The Main View window should stop at the fourth and final breakpoint in foo4().
A final click on the Cont button in the Mulitprocess Explorer should continue to completion.


When debugging IRIX 6.5 (or greater) pthreads, if you attempt to 'step over' a function call, there is a possibility that pthreads will block. This blocking can occur if you attempt to step-over either a direct or indirect call to one of the following:
One of several blocking pthread library routines (see “Blocking pthreads Library Routines”)
One of several blocking kernel syscalls (see the ProDev WorkShop: Debugger Reference Manual for a list of the syscalls).
If a pthread does block in either of these situations, an internal breakpoint is reached at _SGIPT_sched_block (for blocking pthread library routines) or _SGIPT_libc_blocking (for blocking kernel syscalls).
Without these internal breakpoints, when a pthread blocks, control is returned to the OS kernel, at which point any number of events could occur, including a recycling of the kernel micro-thread attached to the user pthread. This might allow another user pthread to resume execution, thereby causing the debugger to appear to be running or appear to be hung because the original thread which blocked is not allowed to run to its return point (since it had its microthread swapped out underneath it).
The OS kernel uses complex algorithms to determine what action to take when a pthread blocks. The debugger's use of the internal breakpoints allows you to take back a degree of control over these complex algorithms by deciding what to do with a thread that has blocked in either _SGIPT_sched_block or _SGIPT_libc_blocking.
Usually you can simply use Continue All Pthreads to release the blocking condition or continue a different individual pthread (different from the one that blocked).
For OS level 6.5 pthreads, the Libpthread entry point _SGIPT_libc_blocking is entered when a specific pthread blocks in a kernel syscall. See the ProDev WorkShop: Debugger Reference Manual for a list of these syscalls.
There are many library routines that can call one of these blocking system calls; it is impossible to list all such routines which utilize a blocking system call. Users must be knowledgeable enough to know that if, for example, they call the library routine printf, it eventually calls writev() which is a blocking system call and thus may block.
For OS level 6.5 pthreads, the Libpthread entry point _SGIPT_sched_block is entered when a specific pthread blocks in the pthread library. The following routines are known to block:
pthread_cond_wait()
pthread_cond_timedwait()
pthread_mutex_lock()
pthread_join()
pthread_exit()
pthread_rwlock_rdlock()
pthread_rwlock_wrlock()
sem_wait()
The Debugger supports the debugging of a single system image MPI application. The debugging session is set up so that, initially, mpirun is being debugged.
The following is the typical command line used to invoke cvd on an MPI application:
% cvd mpirun -args -np 2 MPI_app_name |
This example command line indicates that the -np 2 MPI_app_name arguments are passed to mpirun and that cvd is initially focused on the mpirun process.
An entry point into the MPI application can be used to set a pending trap (breakpoint) in the MPI application. This breakpoint is resolved when the Run button is activated and the actual MPI application is running. If the breakpoint target is valid, the MPI application stops at the breakpoint and further debugging can be done.
| Note: As of the WorkShop 2.9.2 release, cvd stops first in a special breakpoint in the mpirun command. If you have set a pending breakpoint in the actual MPI application, use the Multiprocess Explorer continue button to reach the breakpoint. |
The use of the Multiprocess Explorer for debugging MPI applications is very similar to presentations in the previous and following sections of this chapter. The current implementation does not filter out other processes created by login shells so some extra processes may be shown in the Multiprocess Explorer window.
MPI debugging is highly variable, not only from environment to environment but also from IRIX release to IRIX release and the version of MPT installed on the system. Because of this, it is not possible to provide a representative MPI debugging tutorial that can be used by all users. However, an MPI example is provided in this section.
The following sample program is used in this pthread example (/usr/demos/WorkShop/mp/mpidemo.c):
#include <alloca.h>
#include <assert.h>
#include <stdio.h>
#include <stdlib.h>
#include <unistd.h>
#include <mpi.h>
#if __linux
#include <malloc.h>
#endif

#define ALIGN   16384

main(int argc, char **argv)
{
    MPI_Status status;
    int i, len, num, tag, size, rank, peer;
    double s, t, min, max, ave, *vec;
    char *stmp, *rtmp;

    MPI_Init(&argc, &argv);

    MPI_Comm_size(MPI_COMM_WORLD, &size);
    MPI_Comm_rank(MPI_COMM_WORLD, &rank);

    len = 0;
    num = 10000;

    if (argc > 1) len = atoi(argv[1]);
    if (argc > 2) num = atoi(argv[2]);


    vec = alloca(num * sizeof(double));

    stmp = memalign(ALIGN, len + 163840);
    assert(stmp);

    rtmp = stmp + 128;

    tag = 0;

    switch (rank) {
     case 0:
            peer = 1;

            MPI_Send(stmp, len, MPI_BYTE, peer, tag++, MPI_COMM_WORLD);
            MPI_Recv(rtmp, len, MPI_BYTE, peer, tag++, MPI_COMM_WORLD, &status);
            t = MPI_Wtime();

            s = MPI_Wtime();

            for (i=0; i<num; i++) {
                MPI_Send(stmp, len, MPI_BYTE, peer, tag++, MPI_COMM_WORLD);
                MPI_Recv(rtmp, len, MPI_BYTE, peer, tag++, MPI_COMM_WORLD, &status);

                t = MPI_Wtime();

                vec[i] = t - s;

                s = t;
            }

            min = 100000000.0;
            max = 0.0;
            ave = 0.0;

            for (i=0; i<num; i++) {
               t = vec[i];

               if (min > t) min = t;
               if (max < t) max = t;

               ave += t;
            }

            if (num) {
               ave /= num;

              printf("%d bytes @ %d reps  best: %f MB/s  %f us  average: %f MB/s  %f us\n",
                   len, num, 2.0e-6*len/min, 0.5e6*min, 2.0e-6*len/ave, 0.5e6*ave);
            }

            break;

     case 1:
            peer = 0;

           MPI_Recv(rtmp, len, MPI_BYTE, peer, tag++, MPI_COMM_WORLD, &status);
           MPI_Send(stmp, len, MPI_BYTE, peer, tag++, MPI_COMM_WORLD);

           for (i=0; i<num; i++) {
                MPI_Recv(rtmp, len, MPI_BYTE, peer, tag++, MPI_COMM_WORLD, &status);
                MPI_Send(stmp, len, MPI_BYTE, peer, tag++, MPI_COMM_WORLD);
           }

           break;

     default:
           break;
    }

    while (num == 0) ;

    MPI_Finalize();
    return 0;
}
|
Perform the following commands to stat, compile the program, and run the Debugger. MPI must be installed on the system to compile and run this program. Array services must be running to run the actual MPI application:
Copy the program source from the demo directory as follows:
% cp /usr/demos/WorkShop/mp/mpidemo.c .
Compile mpidemo.c by entering the following command:
% cc -g -o mpidemo mpidemo.c -lmpi -lc
Load the mpirun command into cvd with the mpidemo executable and 4 processors as the arguments of to mpirun (see the mpirun man page for more information about mpirun arguments).
% cvd mpirun -args -np 4 mpidemo
cvd> run
This executes the command mpirun -np 4 mpidemo under cvd control.
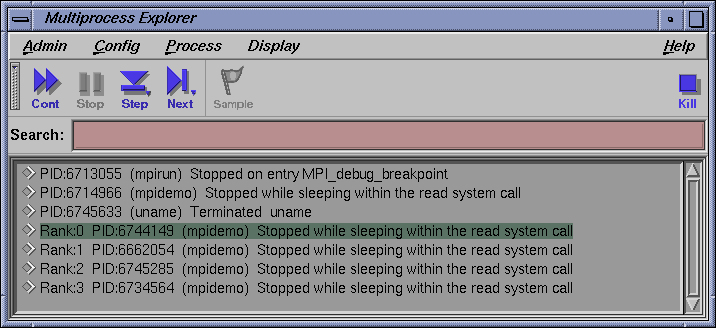
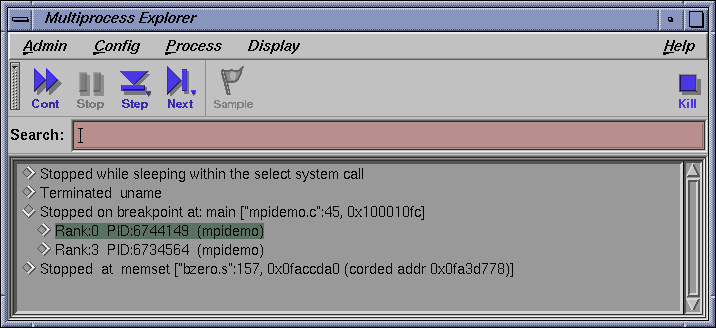
The MultiProcess Explorer should stop with the following output when Display by Process mode is selected (PID values will differ from run to run):
The mpirun command is now stopped at a special breakpoint for debuggers.
The process running mpidemo with no Rank value (PID:167060 in this example) is an MPI daemon process that controls the Rank children which are running the actual mpidemo MPI program. In some cases after the initial run command from cvd, cvd may stop this process in _fork. Use the Multiprocess Explorer continue button to continue the launching of the mpidemo program. After the mpidemo MPI rank children appear in the Multiprocess Explorer display, the Multiprocess Explorer focuses the Main View on the MPI rank 0 process and stops.
Depending on what shell is running, other processes that mpirun used to launch mpidemo may appear. In this example using ksh, the uname process shows up as a terminated process. You can ignore any terminated processes, the MPI daemon process, and the mpirun command.
The real MPI processes of interest are the MPI rank children processes. Those are displayed with the string Rank:N prior to the PID string. N is an integer from 0 to number of MPI processes -1. The number of MPI processes is the value of the argument to the mpirun -np option. In this case, N is an integer from 0-3. After the MPI rank children are launched, the Multiprocess Explorer displays them as "Stopped while sleeping within the read system call" and focuses the Main View on the MPI rank 0 process.
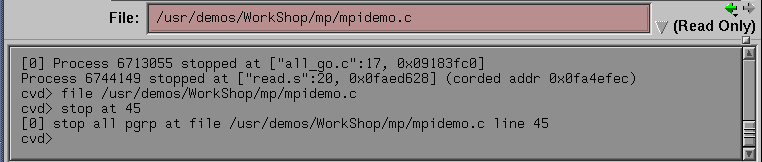
At this point, you are now ready to set a breakpoint in mpidemo.c.
cvd> file mpidemo.c
This brings the mpidemo.c file into the Source View pane of the MainView window.
Issue the following command to set a breakpoint at line 45:
cvd> stop at 45
Continue running the demo with the Continue command (all must be selected), or use the Multiprocess Explorer continue button::
cvd> continue
This continues all the MPI processes and the MPI rank chilren until one (or more) of the rank children hits the breakpoint at line 45 of mpidemo.c. The following screen shows the Display by Status mode with the node entry for the processes "Stopped on breakpoint at: main ["mpidemo.c":45,0x100010fc]” opened.
The Multiprocess Explorer focuses the Main View window on the first MPI rank process that reaches the breakpoint.
Note: Depending on system load and other OS issues, some MPI rank children may not reach the breakpoint. If you need all rank children (or a specific rank child) to be at the breakpoint, you will need to put Main View into single mode and then use the Multiprocess Explorer "Change MainView focus to this entry" methods to select a rank child process not yet at the breakpoint and issue a continue (single) from Main View. You can use the Multiprocess Explorer continue button to continue program execution to termination (depending on where the rank children processes are stopped, more than one continue may be needed) or use the Multiprocess Explorer kill button to terminate this example.

Improvements have been made to OpenMP debugging for the WorkShop 2.9.2 release. The Array Visualizer, Data Browser, Variable Browser, and command line views now display OpenMP shared and private variables accurately, across all storage types and language nuances, to truly reflect parallel processing. Correct evaluation and display of shared and private entities in both $omp parallel and $omp do regions, across pertinent WorkShop views, for both C/C++ (especially in the use of stack variables) and FORTRAN 77 and Fortran90, have been addressed.
Stability improvements have been made in both the client and server portions of WorkShop cvd and the user will see fewer error and outright abort conditions while doing OpenMP debugging. Internal compiler errors, WorkShop view aborts, and server internal errors have been addressed extensively.
The following debug examples (one each for C and Fortran), illustrate the improvements that have been made. Use of these scenarios with earlier versions of WorkShop yields different and unsatisfactory results.
The following sample program is used with this debug example:
#include <ctype.h>
#include <stdio.h>
#include <stdlib.h>
#include <sys/types.h>
#include <unistd.h>

void init(int *tablo, int *sum, int *indi) {
  bzero(tablo, sizeof(int) * 10);
  *sum = 0;
  *indi = 0;
}

void test_06(int ncpus) {

  int tablo[10];
  int sum = 0;
  int indi = 0;
  int mycpu;

  init(tablo, &sum, &indi);

#pragma omp parallel private(indi, mycpu) shared(sum, tablo, ncpus)
 {
  mycpu = mp_my_threadnum();
  for (indi = 0; indi < 10; indi++) {
    tablo[indi] = tablo[indi] + indi;
    sum += indi*mycpu + indi;
  }
 }
}

static void fun(int ncpus) {
  test_06(ncpus);
}

int main(void) {
  char *mp_set_numthreads_env;
  int mp_set_numthreads;

  if ((mp_set_numthreads_env = getenv("MP_SET_NUMTHREADS")) == NULL) {
    fprintf(stderr, "MP_SET_NUMTHREADS not defined\n");
    return 1;
  }

  mp_set_numthreads = atoi(mp_set_numthreads_env);
  fun(mp_set_numthreads);
  return 0;
}
|
Prior to starting the debugging session, set the number of CPUs to run:
% setenv MP_SET_NUMTHREADS 4 |
Compile the program and use the debugger on the resulting test file:
% cc -g -mp -o test test.c
% cvd ./test
At the cvd prompt in the Main View window, enter the following:
cvd> stop at 26
This sets a breakpoint in the program in the pragma omp parallel region.
Click the run button in the Debugger Main View window to run the program with the breakpoint.
In the Debugger Main View window, click on the lock icon on the left side of the screen. Also toggle the button below lock to single. When the lock button is set to lock, it ensures that the OpenMP thread that is currently in focus remains in focus. Toggling the button below the lock to Single ensures that the Debugger commands (cont, next, etc.) will only pertain to the focused Single OpenMP thread.
At the cvd command prompt at the bottom of the Main View window, enter the following commands:
cvd> print mycpu
mycpu is a private variable, unique to a master/slave process. OmpThread0 (master) should be first to reach the breakpoint.
cvd> next 10 times
Again, via the lock button, select single process and lock.
cvd> print sum
This is a shared variable that sums across all CPUs; it should return 6 (or a number close to that) after the previous 10 next command. It will not change when shifting focus (via Multiprocess Explorer) to another CPU.
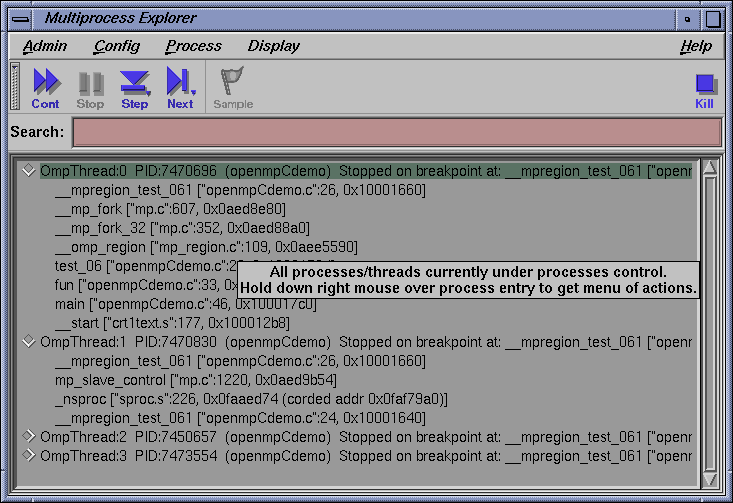
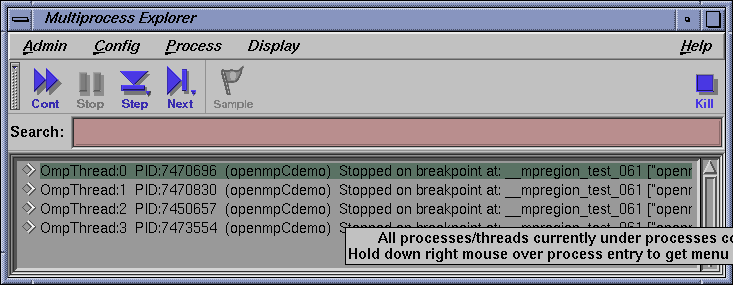
Select Admin -> Multiprocess Explorer to bring up the Multiprocess Explorer. Note in the Multiprocess Explorer window that OmpThread0 is the 'master' and the other 'OmpThread' entries are the true 'slaves'. All should be stopped on the breakpoint.
Select Views -> Variable Brower. Note all 5 local variables are displayed correctly. Because you are still focused on OmpThread0 (the master) in the MainView window, the value of the private (for OmpThread0 only) variable indi should be 3 (approximately) and the value of the shared (all OmpThreads) variable sum should be approximately 6 after the next 10 commands issued previously.
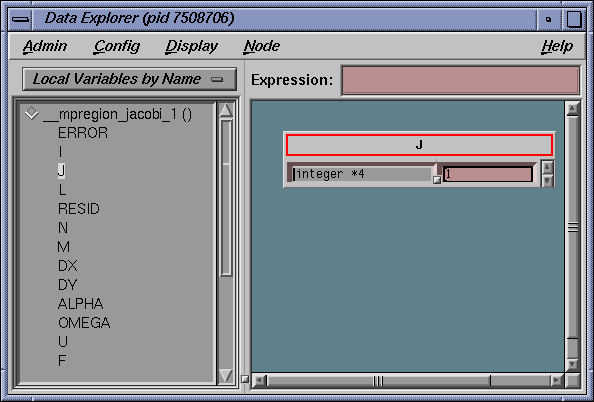
Select Views -> Data Explorer in the Main View window. Click on the private variable indi and the shared variable sum. Only the private variable should change with the next step.
In the Multiprocess Explorer window, select one of the slave proceses (for example, OmpThread2) by using the left mouse to highlight the name.
Note in the Variable Browser that indi now has a value of 0 because OmpThread2 has not been stepped. The shared variable sum still has a value of 6 and the private variable mycpu has a value of 2 to reflect the OmpThread2 now in focus in the Main View window.
Note in the Data Explorer window that indi, sum and mycpu have same values as those shown in the Variable Browser.
In the cvd command line of the Main View window, enter the following commands:
cvd> print mycpu
The value will be 2, showing the “private” nature of mycpu.
Make sure that the single and the lock are chosen on the lock icon. Only OmpThread2 will advance.
cvd> next 15 times
cvd> print indi
The value returned should be approximately 5. This private value is unique to OmpThread2.
cvd> print sum
The value returned should be approximately 66. This shared value is accessible to all OmpThreads.
Note in the Variable Browser and the DataExplorer that the values for mycpu, indi and sum agree with those printed in the cvd command line with the print command.
Using the Multiprocess Explorer, click the right mouse button over the process entry to switch the MainView focus back to the master process (OmpThread0).
In the cvd command line portion of the Main View window, enter the following commands:
cvd> print mycpu
The value should be 0 for OmpThread0, which is a private variable.
cvd> print indi
This should still be 3 because OmpThread2 (not OmpThread0) was just recently stepped in the sequence of 15 steps. OmpThread0's private value of indi cannot change while stepping OmpThread2.
cvd> print sum
This is a shared variable, so it should still show changes from the next 15 times for OmpThread2 above. Its value should still be about 66.

Note in the Variable Browser and Data Explorer that the values for mycpu, indi and sum agree with those printed in the command line with the print command.
This is the end of the C/C++ OpenMP debugging example. If this is used with WorkShop versions prior to 2.9.2, unsatisfactory results ocur.
To exit this example, select Admin -> Exit from any Debugger window.
The following sample program is used in this example:
program main
      implicit none
      integer n,m,mits
      double precision tol,relax,alpha

      common /idat/ n,m,mits
      common /fdat/tol,alpha,relax

      n = 3
      m = 5
      alpha = 4.4444
      relax = 3
      tol = 10
      mits = 50
      call driver ()
      stop
      end

      subroutine driver ( )
      implicit none

      integer n,m,mits,mtemp
      double precision tol,relax,alpha

      common /idat/ n,m,mits,mtemp
      common /fdat/tol,alpha,relax

      double precision u(n,m),f(n,m),dx,dy
      call initialize (n,m,alpha,dx,dy,u,f)
      call jacobi (n,m,dx,dy,alpha,relax,u,f,tol,mits)
      return
      end

      subroutine initialize (n,m,alpha,dx,dy,u,f)
      implicit none
      integer n,m
      double precision u(n,m),f(n,m),dx,dy,alpha
      integer i,j, xx,yy
      double precision PI
      parameter (PI=3.1415926)

      dx = 2.0 / (n-1)
      dy = 2.0 / (m-1)
      do j = 1,m
        do i = 1,n
          xx = -1.0 + dx * dble(i-1)        ! -1 < x < 1
          yy = -1.0 + dy * dble(j-1)        ! -1 < y < 1
          u(i,j) = 0.0
          f(i,j) = -alpha *(1.0-xx*xx)*(1.0-yy*yy) -2.0*(1.0-xx*xx)-2.0
        enddo
      enddo
      return
      end

      subroutine jacobi (n,m,dx,dy,alpha,omega,u,f,tol,maxit)
      implicit none
      integer n,m,maxit
      double precision dx,dy,f(n,m),u(n,m),alpha, tol,omega
      integer i,j,k,l
      double precision error,resid,ax,ay,b
      double precision error_local, uold(n,m)

      ax = 1.0/(dx*dx) ! X-direction coef
      ay = 1.0/(dy*dy) ! Y-direction coef
      b  = -2.0/(dx*dx)-2.0/(dy*dy) - alpha ! Central coeff
      error = 10.0 * tol
      k = 1
      do while (k.le.maxit .and. error.gt. tol)
         error = 0.0
!$omp parallel
!$omp do
         do j=1,m
            do i=1,n
               uold(i,j) = u(i,j)
            enddo
         enddo
!$omp do private(resid) reduction(+:error)
         do l = 2,m-1
            do i = 2,n-1
      resid = (ax*(uold(i-1,l)+uold(i+1,l))+b*uold(i,l)-f(i,l))/b
               u(i,l) = uold(i,l) - omega * resid
               error = error + resid*resid
            end do
         enddo
!$omp enddo nowait
!$omp end parallel
         k = k + 1
         error = sqrt(error)/dble(n*m)
      enddo                     ! End iteration loop
      print *, 'Total Number of Iterations ', k
      print *, 'Residual                   ', error
      return
      end
|
Prior to starting the debugging session, set the number of CPUs to run:
% setenv MP_SET_NUMTHREADS 5 |
Compile the program and use the debugger on the resulting test file:
% f90 -g -mp -o test test.f90
% cvd ./test
At the cvd prompt in the Main View window, enter the following:
cvd> stop at 74
This stops the program in the parallel region.
Click the run button in the Main View window to run the program with the breakpoint.
At the cvd command prompt at the bottom of the Main View window, enter the following commands:
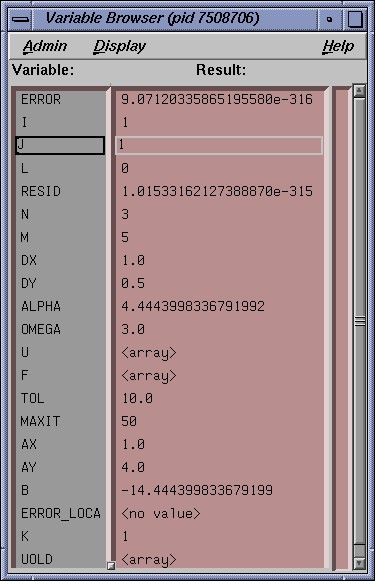
cvd> print f
cvd> print j
f is an atuomatic array with a default of shared. The bounds are dynamically set to 3x5. The value of j should be 1 because no stepping has been done yet.
Select Views -> Array Browser. Enter f for the array and you will see that the values displayed are identical to those shown via the command line commands used previously.
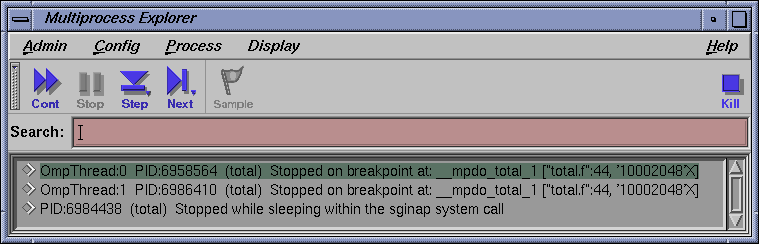
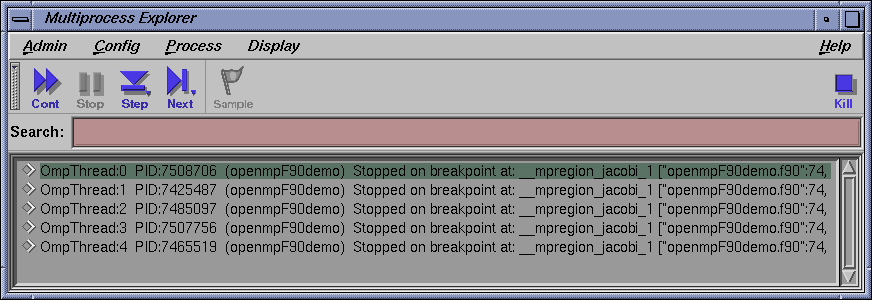
Select Admin -> Multiprocess Explorer. Notice that OmpThread0 is the 'master' and the other 'OmpThread' entries are the true 'slaves'. All threads should be stopped on the breakpoint. There should be 5 of these corresponding to the MP_SET_NUMTHREADS 5 command issued previously. Each iteration of the outer j loop has been allocated to a separate thread. The Variable Browser (used in the next step) confirms this.
Select Views -> Variable Browser. Notice that the value of j should be 1 because the OmpThread0 (master) thread gets the first iteration of the j loop.
Select Views -> Data Explorer and click on the variable j. Notice that the value agrees with that from both the Variable Browser and from the command line print command.
Note that the lists of variables for the Data Explorer and the Variable Browser windows agree in length, name, etc.
In the Main View window, make sure that the single and the lock are chosen on the lock icon to ensure that a single OpenMP thread will be affected. In the cvd command line of the Main View window, enter the following commands:
cvd> next 4 times
cvd> print i
The value returned should be 3 after the next 4 commands issued previously.
cvd> print uold
This is an automatic, stack-based array; the default is shared. The bounds are dynamically set to 3x5. Note that the previous next commands have initialized a portion of uold to zeroes from another automatic array u.
Using the Multiprocess Explorer, select one of the slave proceses (for example, OmpThread2) using the left mouse button to highlight the thread. The value of j (should be 3 for OmpThread2) shown in the Variable Browser should correspond to the iteration of the outer j loop assigned to this slave. The value of i should be 1 because this slave (OmpThread2) has not been stepped yet.
In the cvd command line portion of the Main View window, enter the following commands:
cvd> print B
This is an OpenMP shared variable whose value does not change when switching threads. Note its value.
Make sure that the single and the lock are chosen on the lock icon to ensure that a single OpenMP thread will be affected.
cvd >next 2 times
cvd >print i
The value returned should be 2 after the 2 next commands previously. This value of i is private, or unique, to the slave that is in focus (that is, OmpThread2).
Using the Multiprocess Explorer, click the right mouse button over the process entry to switch the MainView focus back to the master process (OmpThread0).
Note in the Variable Browser and Data Explorer that the values for i and j, private to each master/slave, now change to reflect the new OpenMP thread chosen (OmpThread0). and sum agree with those printed in the command line with the print command. Variables that are shared (for example, B) should not change value.
This concludes the Fortran example. To exit this example, select Admin -> Exit from any Debugger window.
This section contains some pointers on using the Debugger on code that contains OpenMP constructs.
It is best to select Group Trap Default for your Traps Preference. That way, if you delete a breakpoint, the deletion will occur in the master and all the slaves, not just the current master or slave. This saves having to delete the breakpoint for every slave.
The daemon process used by OpenMP to handle creation and annihilation of threads in support of OMP_DYNAMIC is problematic for the WorkShop Debugger. This daemon is present by default and unless you are using the schedule dynamic feature of the OpenMP specification, it is unnecessary. The daemon does not allow clean termination of a debugging session and will end with itself in a SIGTERM error and the master 'hung'.
No known actual functionality is lost with this circumstance but it can be unnerving to the user. So, unless you are using schedule dynamic in your OpenMP program, issue a setenv OMP_DYNAMIC false command at the beginning of your debugging session. This allows clean termination of the master and all slaves and eliminates the SIGTERM error for the daemon process itself.
Consider the following OpenMP C code snippet:
#pragma omp parallel .....
  {
     <1st section code - parallel>
  }
  ...
  ... intervening code
  ...
#pragma omp for
  for ( .... ) {
    <2nd section code - parallel??
} |
If a breakpoint is set in the first section of parallel code and another is set in the second section of parallel code, then only the master thread will reach the second breakpoint upon continue and deletion of all occurrences of the first breakpoint. All slaves will be put to 'sleep' after doing their work in the first section of parallel code. This occurs because the notion of 'dynamic extent of an enclosing parallel region' applies (see section 2.8 “Directive Nesting” in the OpenMP C/C++ 2.0 standard or section 2.9 “Directive Nesting” in the OpenMP Fortran 2.0 standard). There is a clause in these sections which states:
Any directive that is permitted when executed dynamically inside a parallel region is also permitted when executed outside a parallel region. When executed outside a user-specified parallel region, the directive is executed by a team composed of only the master thread.
Thus the second section of code above will only be run by the master. Note that a similar test case for Fortran could be built using !$omp do ( and not !$ omp parallel do). The second pragma as written is legal, but will not in fact be executed in parallel as it is not within the 'dynamic extent of an enclosing parallel region'; that is, it is not already in the middle of a parallel region that started somewhere up the call chain.
What probably occurred here is an error, but it is legal. The user probably assumed or wanted parallel execution (that is, . master and slaves) in the second section of code. The trouble here is that the second pragma should read as follows to ensure parallel execution:
#pragma omp parallel for |
Note the addition of parallel. This allows both master and slaves to reach the breakpoint in the second section of code.
On occasion the user might find the master or slave stopped (use MpView to see this) in internal routine nsproc. This is harmless and can be remedied immediately with a Continue All in the MpView. This occurs because, as noted in “Consecutive and/or Nested OpenMP regions”, the debugger causes slight timing variations that would not otherwise exist. The debugger also has internal breakpoints in the routine nsproc because it is this routine that creates new OpenMP threads, and important information needs to be captured by the debugger at the point of OpenMP thread creation.
Consider the following OpenMP code scenario:
There exists an OpenMP region (via #pragma omp parallel) in a routine called foobar. The main routine calls foobar(). Assume OMP_NUM_THREADS is set to 4 or so. Set a breakpoint at the CALL SITE for foobar and then run to the breakpoint.
At the breakpoint, do a stepOver of the call to foobar() Using MultiProcess View, observe that the slave threads are asleep and the master has actually done the stepOver'. Reasonably, the slaves should be gone because all parallel work is within foobar and that work is done.
However, that's not the case. Process creation/destruction is a comparatively expensive task, and thus slaves are not created/destroyed at each parallel region. They are created once, the first time they are needed, and then kept. Setting the environment variable MP_CREATE causes the slave processes to be created at startup, to exist prior to the call to foobar(), and to continue existing after the call.