This chapter provides an introduction to the X/Motif Analyzer as well as a tutorial to demonstrate most of the Analyzer functions. Motif is a library of routines that enable you to create user interfaces in an X-environment. The Motif libraries handle most of the low-level event handling tasks common to any GUI system. This way, you can create sophisticated interfaces without having to contend with all of the complexity of X.
The X/Motif Analyzer helps you debug code that calls Motif library routines. The X/Motif Analyzer is integrated with the Debugger so you can issue X/Motif Analyzer commands graphically. To access X/Motif analyzer subwindow select the following from the Main View window menu bar: Views -> X/Motif Analyzer.
The Analyzer contains X/Motif objects (for example, widgets and X graphics contexts) that can be difficult or impossible to inspect through ordinary debugging procedures. It also allows you to set widget-level breakpoints and collect X-event history information in the same manner as using . See the xscope(1) man page for more information.xscope(blank)
When the X/Motif Analyzer first displays, it is set to examine widgets. At this point, the window may be blank, or it may display a widget found in the call stack of a stopped process.
At the bottom of the X/Motif Analyzer window is a tab panel that shows the current set of examiners. In addition to this tab, the Widget Examiner, Breakpoints, Trace, and Tree Examiners tabs are at the bottom of the window. These four tabs are always present. Other examiners are available from the Examine menu of the X/Motif Analyzer window.
Some examiners cannot be manually selected. They appear only when appropriate to the call stack context. For example, the Callback Examiner appears only when a process is stopped somewhere in a widget callback.
If you select text in one examiner and then choose another examiner by using the Examine menu, the new examiner is brought up and the text is used as an expression for it. If you selected text that is an inappropriate object for the new examiner, an error is generated.
Alternatively, you can select text, pull down the Examine menu, and choose Selection. Here, the X/Motif Analyzer attempts to select an appropriate examiner for the text. If the type of text is unknown, the following message displays:
Couldn't examine selection in more detail |
Otherwise, the appropriate examiner is chosen and the text is evaluated.
You can also accomplish this by triple-clicking on a line of text. If the type of text is unknown, nothing happens. Otherwise, the appropriate examiner is chosen and the text is evaluated.
X/Motif applications consist of collections of objects (that is, Motif widgets) and make extensive use of X resources such as windows, graphics context, and so on. The construction model of an X window system hinders you from inspecting the internal structures of widgets and X resources because you are presented with ID values. The X/Motif Analyzer lets you to see the data structures behind the ID values.
The X/Motif Analyzer has the following restrictions and limitations:
The Breakpoints Examiner is active only after you have stopped a process and if you have changed $LD_LIBRARY_PATH. See “Launching the X/Motif Analyzer” for more information regarding the correct $LD_LIBRARY_PATH.
Sometimes, gadget names may be unavailable and are displayed as <object>. You can minimize this condition by first loading the widget tree.
editres requests (such as, widget selection and widget tree) work only if the process is running or if the process is stopped outside of a system call. This can be annoying when the process is stopped in select(), waiting for an X server event.
The process state and appearance of the Main View window flickers while the X/Motif Analyzer tries to complete an editres request when the process is stopped.
editres requests may be unreliable if the process is stopped.
This section illustrates several features of the X/Motif Analyzer. The demo files in the /usr/demos/WorkShop/bounce directory are used to demonstrate the debugging of a running X-application. These files contain the complete C++ source code for the bounce program.
This section includes the following subsections:
Perform the following to prepare for this session:
Enter the following commands:
% mkdir demos/bounce
% cd demos/bounce
% cp /usr/demos/WorkShop/bounce/* .
% make clean
% make bounce
% cvd bounce &
The Debugger is launched, from which you can use the X/Motif Analyzer. Upon invocation, you see the Execution View icon and the Main View window.
Double-click the Execution View icon to open the window. Then, tile your windows so you can clearly see all windows.
Click on the Run button in the Main View window to run the bounce program.
The Execution View window updates with the command that cvd is executing.
Click Run in the Bounce window. You see no action until you have finished the next steps.
Select Actors -> Add Red Ball from the menu bar of the Bounce program window.
Click on the Kill button in the Main View window to terminate the process that has been running.
The Execution View shows the program output.
Once the bounce fileset is built and the debugger is active, you need to launch the X/Motif Analyzer as follows:
Select Views -> X/Motif Analyzer from the menu bar of the Main View window.
Click OK when asked if you want to change your $LD_LIBRARY_PATH environment variables to include .../usr/lib/WorkShop/Motif. There are no instrumented MIPS/ABI versions of the libraries.
This includes instrumented versions of the SGI libraries Xlib, Xt, and Xm. These libraries provide debugging symbols and special support for the X/Motif Analyzer. You are now ready to begin the sample session.
| Note: Follow the steps in this tutorial precisely as written. |
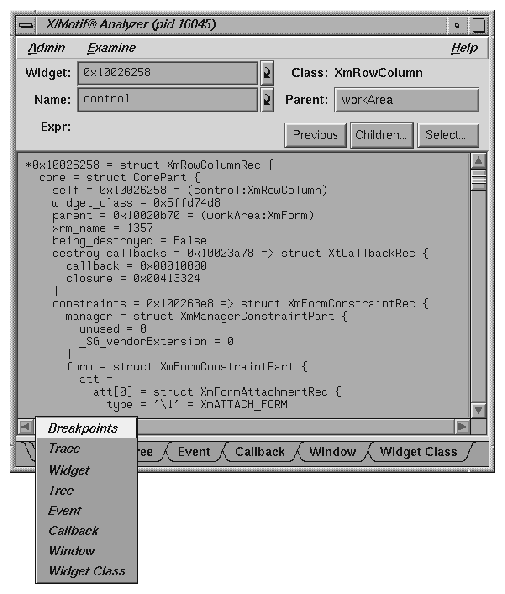
When the X/Motif Analyzer is launched, it brings up the X/Motif Analyzer window with an empty Widget Examiner tab panel. The tab panels also show the Breakpoints, Trace, and Tree Examiner tab panels (see Figure 11-1).
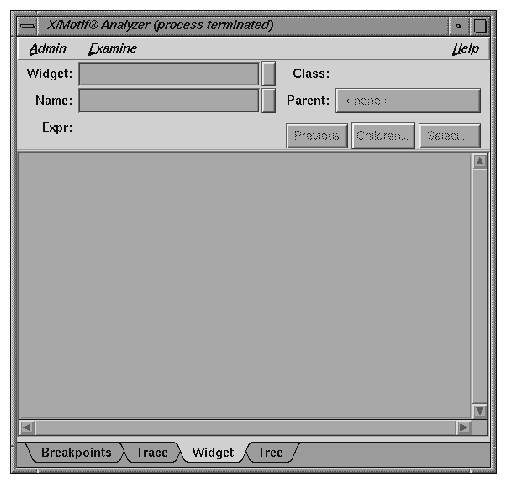
Widen the X/Motif Analyzer window shown in Figure 11-1. This makes it easier to understand what you are asked to do in this tutorial.
Click Run in the Main View window to re-run the bounce program.
The instrumented versions of the Motif libraries will now be used.
When the Bounce window appears, re-size it to make it taller.
Click Run in the Bounce window. You do not see any action until you perform the next steps.
Position the X/Motif Analyzer and Bounce windows side-by-side.
Click on the Select button in the X/Motif Analyzer window.
This brings up an information dialog and changes the cursor to a plus sign (+). Do not click on the OK button in this dialog.
Select the Step widget by clicking on the Step button in the Bounce window with the (+) cursor, as described in the cvmotif information dialog.
The Widget Examiner displays the Step widget structure.
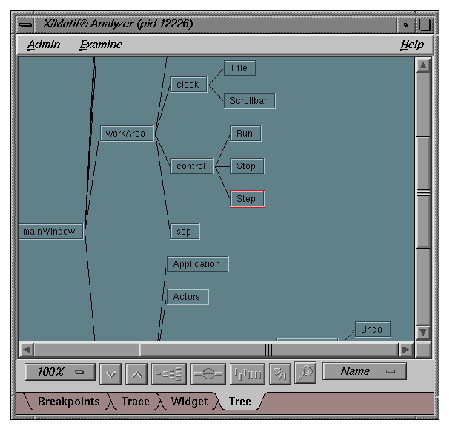
Click the Tree tab in the X/Motif window.
The Tree Examiner panel displays the widget hierarchy of the target object (see Figure 11-2).
Double-click the Run node in the tree. (Run is in the upper-right area of the window).
This brings up the Widget Examiner that displays the Run widget structure. Notice that the parent text area displays the name of the current widget's parent, which is control.
Click on the word control displayed on the Parent button at the top of the Widget Examiner in the X/Motif Analyzer window.
This switches the view to the Run widget's parent, the control object, as shown in the Name field. And, the Widget Examiner displays the Control widget structure.
You can now navigate through the widget hierarchy using either the Widget Examiner or the Tree Examiner.
In the Widget Examiner, click on the Children button to see the menu, and select Run from that menu.
Select Actors -> Add Red Ball from the Bounce window. You should see a bouncing red ball.
Enter stop in Clock::timeout at the cvd command line in the Main View window.
After you press Enter, the red ball stops bouncing.
Select Continue in the Main View window a few times to observe the behavior of bounce with this breakpoint added.
Select the Breakpoints tab in the X/Motif Analyzer window. This calls up the Breakpoints Examiner which allows you to set widget-level breakpoints.
In the Callback Name text field, enter activateCallback, then click on the Add button to add a breakpoint for the activateCallback object of the Run button widget. The result is displayed in Figure 11-3.
Click on the red breakpoint down arrow in the Annotation Column of the Main View window to remove the Clock::timeout breakpoint. If you click on the line, but not the down arrow, the breakpoint is deleted; but the source pane still displays the arrow.
Click on the Continue button in the Main View window.
Click on the Stop button in the Bounce window.
Click on the Run button in the Bounce window. The process stops in the Run button's registered activateCallback. This is the routine that was passed to XtAddCallback routine. Notice that the Callback tab (for the Callback Examiner) is added to the tab list.

Click on the Breakpoints list item (the Active box will be checked) to highlight the breakpoint in the X/Motif Analyzer Breakpoint Examiner window.
Delete the widget address in the Widget text field by backspacing over the text.
Click on the Modify button to change the activateCallback breakpoint to apply to all push-button gadgets XmPushButtonGadget (see in the Class text field) rather than just the Run button.
Click Stop in the Bounce window.
The process now stops in the Stop button's activateCallback routine.
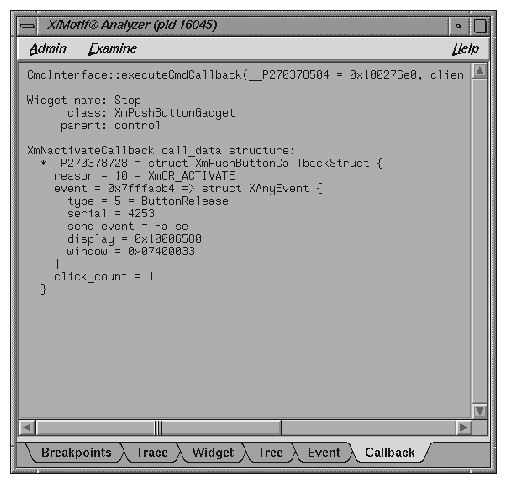
Click the Callback tab in the X/Motif Analyzer window to go to the Callback Examiner. This examiner displays the callback context and the appropriate call_data structure (see Figure 11-4).
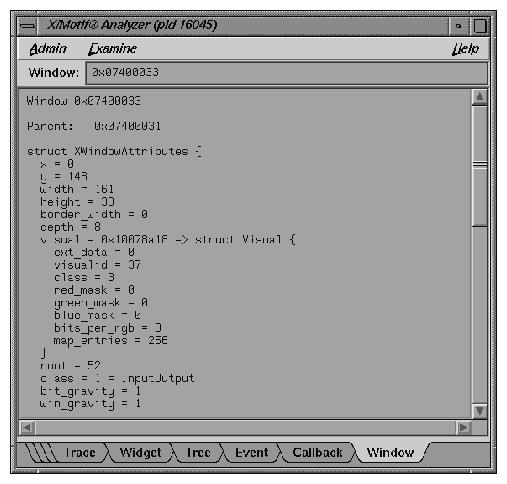
Double-click the window value in the callback structure, fourth line from bottom.
Select Examine -> Window in the Callback Examiner. The X/Motif Analyzer displays the window attributes for that window (the window of the Stop button). Notice that the Window tab (for the Window Examiner) is added to the tab list. See Figure 11-5.

Note: You can also accomplish the same action by triple-clicking the window value in the callback structure of the Callback Examiner (Step 7). In general, triple-clicking on an address brings you to that object in the appropriate examiner.
The following steps demonstrate additional Analyzer features.
Double-click the widget_class value (on the fourth line) to highlight it.
Pull down Examine -> Widget Class. The X/Motif Analyzer window displays the class record for the XmPushButtonGadget routine. Notice that the Widget Class tab (for the widget class examiner) is added to the tab list.
The same action can be accomplished by triple-clicking the widget_class value in the Widget Examiner.
Triple-click the superclass value on the third line. The X/Motif Analyzer window displays the class record for XmLabelGadget, the superclass of XmPushButtonGadget.
Triple-click the superclass value on the right side of the third line. The X/Motif Analyzer window displays the class record for XmGadget, the superclass of XmLabelGadget.
Select the Widget tab to change to the Widget Examiner.
Triple-click the parent value on the fifth line. The X/Motif Analyzer window displays the control widget, the parent of Run. This action produces the same results as selecting the control text in the Parent text box.
Right-click on the tab overflow area (the area where the tabs overlap, to the far left of the tab list) as labeled in Figure 11-6, and select the Breakpoints tab.
Click on the word Callback in the Breakpoint Type text field of the Breakpoints Examiner window to bring up a submenu, and select Resource-Change.
In the Class text field, enter: Any.
In the Resource Name text field, enter: sensitive.
Click Add. This adds a breakpoint. The Active: Breakpoints: list should now include the following text:
[Any] Resource-Change,name=sensitive
Click Continue. The status updates to Stopped in the SetValues routine, since the breakpoint set in the previous step was reached.
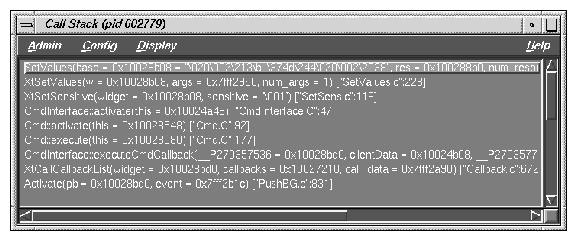
Select Views -> Call Stack in the Main View window. Notice the call to XtSetValues on the second line (see Figure 11-7).
In the Call Stack, double-click the Cmdinterface::activate line (just below XtSetSensitive). This is where the sensitive resource was changed.
In the Widget Examiner window, double-click the widget address in the Widget text field, press backspace, enter _w, and press Enter. The X/Motif Analyzer displays the Run widget, which is the widget currently being changed.
Click Continue in the Main View window. The status updates to Stopped in the SetValues routine, since the breakpoint set in the previous step was reached again.
In the Call Stack, double-click on the Cmdinterface::activate line (just below XtSetSensitive).
Perform the following sub-steps:
Double-click in Widget text field of the Widget Examiner.
Press backspace.
Enter _w.
Press Enter.
The X/Motif Analyzer window displays the Step widget, which is the widget currently being changed.
Select the following to close the X/Motif Analyzer: Admin -> Close.
Select the following to exit the Debugger (from the Main View window): Admin -> Exit. If you exit the Debugger first, you exit the X/Motif Analyzer as well.
For more information on the X/Motif Analyzer, see the ProDev WorkShop: Debugger Reference Manual.