The WorkShop Debugger can be used with the following compilers: C, C++, Ada, FORTRAN 77, and Fortran 90.
This chapter includes information regarding principles and procedures of the debugging process and how these are to be approached with the WorkShop Debugger.
Before starting a Debugger session from a remote workstation, you must first enter the following from a window:
% xhost + machine_name |
machine_name is the name or IP address of the machine where the program that you would like to debug will be run.
On the machine where your program will run, enter the following:
% echo $DISPLAY |
The machine_name of your workstation should appear, followed by :0.0. If it does not, enter the following on the machine where your program will run (if you are using the csh or tcsh shells):
% setenv DISPLAY machine_name:0.0 |
For other shells, see their respective man pages.
To provide debugging information to the Debugger, compile your program with the -g option (this disables optimization and produces information for symbolic debugging).
To begin a Debugger session enter:
% cvd executable & |
The Debugger Main View window automatically appears along with an icon for the Execution View window.
If your program requires data to be read from a file named input, for example, then type the following in the command ( cvd) pane of the Main View window:
cvd> run<input |
(See Figure 1-1.)
The Execution View window receives all the output from running your program that would normally go directly to your screen. The Main View window controls your Debugger session, displaying your source code in its center pane. If you want to see the line numbers for your program, select Display -> Show Line Numbers from the Main View window menu bar.
Context sensitive help is enabled by default. This pops up a help phrase or statement for some menu items, data entry fields, and buttons. It can be enabled and disabled by selecting Display -> Show Tooltips / Hide Tooltips from the Main View window menu bar.
At the bottom of the Main View window you can enter dbx-style commands to the Debugger. See the ProDev WorkShop: Debugger Reference Manual for details about which commands are supported.
The Debugger allows you to run your program and stop at selected places so you can view current values of program variables to help you find bugs in your program. To stop at a selected statement in your program, you may either set a breakpoint (also called a stop trap) at the desired statement or set a breakpoint prior to the desired statement and then use either the Step or Next buttons to reach the desired stopping point. The statement where your program has stopped is indicated in green. A statement highlighted in red indicates that a breakpoint has been set on this line. When the Debugger causes your program to stop at a breakpoint that you have set, the executable statement immediately prior to the breakpoint has been executed, and the executable statement on which the breakpoint has been set has yet to be executed.
Programs featured in this chapter are located in the /usr/demos/WorkShop/getstarted directory.
You can find short Debugger tutorials in “Fortran 90 Code Example and Short Tutorial” and “C Example and Short Tutorial”.
Also see the ProDev WorkShop: Debugger Reference Manual for a comprehensive description of Debugger functions.
Use the prog.f and dot.f files in /usr/demos/WorkShop/getstarted to demonstrate the Debugger features in the following tutorial.
Example 2-1. Fortran 90 Example
The Fortran 90 code in the file prog.f is as follows:
        program prog
        parameter ( n=3 )
        double precision A(n,n), x(n), y(,) sum xydot

!       initialize arrays
        x = 2.0d0
        do i = 1, n
           y(i) = i
           do j = 1, n
              A(i,j) = i*j - i
           enddo
        enddo

!       compute the dot product of x and y
        call dot(x,y,n,xydot)
        print *, 'dot product of x & y = ', xydot

!       compute y = Ax
        do i = 1, n
           sum = 0.0
           do j = 1, n
              sum = sum + A(i,j)*x(j)
           enddo
           y(i) = sum
        enddo
        print *, 'y = ', y
        stop
        end
It includes subroutine dot in file dot.f, as follows:
        subroutine dot(a,b,m,answer)
        double precision a(m), b(m), answer
        integer m
        answer = 0.0d0
        do i = 1, m
           answer = answer + a(i)*b(i)
        enddo
        end
Perform the following steps with these files to demonstrate Debugger features:
Enter the following command in the /usr/demos/WorkShop/getstarted directory to produce the executable program:
% f90 -g -o progf prog.f dot.f
This produces the executable progf.
Launch the WorkShop Debugger with your newly-compiled executable as follows:
% cvd progf &
The WorkShop Debugger Main View displays the source for your prog.f file (see Example 2-1).
Select Display -> Show Line Numbers from the Main View menu bar to turn on file line numbering.
The line numbers display to the left of the source code.
Enter a breakpoint at line 15 as follows at the cvd> prompt at the bottom of the Main View window. This enables you to execute through the end of the initialization of the y array for the sample code:
cvd> stop at 15
Line 15 is highlighted in red and a stop icon appears in the left column.
Run the program. There are two ways that you can do this:
Click on the Run button at the top of the Main View window.
OR
Enter the following at the cvd> prompt:
cvd> run
The program executes up to Line 15 and waits for further instruction.
Enter the following command at the cvd> prompt to print the y array for this example:
cvd> print y
The following displays in the cvd> command pane:
y =
    (1) = 1.0
    (2) = 2.0
    (3) = 3.0
cvd>
Note: You should expand this pane (or use the slider at the right side of the pane) if you do not see the printout.
At this point, you can experiment with other commands described in this chapter, notably the execution control buttons described in “Options for Controlling Program Execution”.
Select Admin -> Exit to end this tutorial for the Fortran 90 demo program.
Use the prog.c and dot.c files in /usr/demos/WorkShop/getstarted to demonstrate the Debugger features in the following tutorial.
The following is the same example as that in “Fortran 90 Code Example and Short Tutorial”, but it is written in C. Use this example to see how the Debugger can be used to view C structures.
The C code in the file prog.c is as follows:
      #include <stdio.h>
      #define  N  3
      double dot(double v[],double w[], int m);
      void main(){
        int i,j;
        double a[N][N],x[N],y[N],sum,xydot;
        struct node
        {
          int value;
          struct node *next;
        } *list,start;

        /* Initialize arrays */
        for(i=0;i<N;i++){
          x[i]=2;
          y[i]=i;
          for(j=0;j<N;j++){
            a[i][j]=i*j-i;
          }
        }

        /* Compute the dot product x and y */
        xydot=dot(x,y,N);
        printf("dot product of x & y: %f \n",xydot);

        /* Compute y=ax */
        for(i=0;i<N;i++){
          sum=0;
          for(j=0;j<N;j++){
            sum+=a[i][j]*x[j];
          }
          y[i]=sum;
        }
        printf("y = ");
        for(i=0;i<N;j++){
          printf("%f ",y[i]);
        }
        printf("\n");

        /* Built list*/
        start.value=1;
        list=&start
        for(i=1;i<N;i++){
        list->next=(struct node *) malloc(sizeof(struct node));
        list=list->next;
        list->value=i;
        }
        list->next=NULL;
        printf("list: ");
        list=&start;
        for(i=0;i<N;i++){
          printf("%d ",list->value);
          list=list->next;
        }
        printf("\n");
      }
It includes function dot in file dot.c, as follows:
double dot(double v[],double w[], int m){
        int i;
        double sum;
          for(i=0;i<m;i++){
          sum+=v[i]*w[i];
        }
        return(sum);
      }
Enter the following command in the /usr/demos/WorkShop/getstarted directory to produce the executable program:
% cc -g -o progc prog.c dot.c
This produces the executable progc.
Launch the WorkShop Debugger with your newly-compiled executable as follows:
% cvd progc &
The WorkShop Debugger Main View displays the source for your prog.c file (see Example 2-2).
Select Display -> Show Line Numbers from the Main View menu bar to turn on file line numbering.
The line numbers display to the left of the code source window.
Enter a breakpoint at line 23 as follows at the cvd> prompt at the bottom of the Main View window. This enables you to execute up to the end of the y array for the sample code:
cvd> stop at 23
Line 23 is highlighted in red and a stop icon appears in the left column.
Run the program. There are two ways that you can do this:
Click on the Run button at the top of the Main View window.
OR
Enter the following at the cvd> prompt:
cvd> run
The program executes up to Line 23 and waits for further instruction.
Enter the following command at the cvd> prompt to print the y array for this example:
cvd> print y
The following displays in the cvd command pane:
y = {
    [0] 0.00000000000000000e+00
    [1] 1.0
    [2] 2.0
}

cvd>
At this point, you can experiment with other commands described in this chapter, notably the execution control buttons described in “Options for Controlling Program Execution”.
Select Admin -> Exit to end this tutorial for the C demo program.
There are a number of buttons in the Main View window that allow you to control the execution of your program. The following summarizes their functions:
Run creates a new process to execute your program and starts execution. It can also be used to rerun your program.
Kill kills the active process that is executing your program.
Stop stops execution of your program. The first executable statement after the statement where your program has stopped is highlighted.
Cont continues program execution until a breakpoint or some other event stops execution, or program execution terminates. (See also “How to Continue a Single POSIX 6.5 Pthread” in Chapter 10.)
Step steps to the next executable statement and into function and subroutine calls. Thus, if you set a breakpoint at a subroutine call, click on the Run button so the call to the subroutine is highlighted in green, then click on the Step button to step into this subroutine -- source code for this subroutine is automatically displayed in the Main View window.
By clicking the right mouse button on the Step button you can select the number of steps the Debugger takes. Left-click on the Step button to take one step.
Next steps to the next executable statement and steps over function and subroutine calls. Thus, if you set a breakpoint at a subroutine call, click on the Run button so the call to the subroutine is highlighted in green, then click the Next button to step over this subroutine to the next executable statement displayed in the source pane of the Main View window.
Right-click on the Next button to select the number of steps the Debugger takes. Left-click on the Next button to take one step.
Return executes the remaining instructions in the current function or subroutine. Execution stops upon return from that function or subroutine.
All or Single applies control action to all processes or threads if the button is set to All. If set to Single, the actions apply only to this process or thread.
Lock causes the debugger to stay focused on this process or thread, no matter what the program does. If unlocked, the debugger follows the interesting process or thread (i.e., focuses on a process or thread that reaches a breakpoint/trap).
A trap (also called a breakpoint) can be set if you click your cursor in the area to the left of the statement in the area underneath the word Status in the Main View window. When you do this, the line in your program is highlighted in red. To remove the breakpoint, click on the red highlight in the left canvas and the breakpoint disappears. Clicking on the Run button causes your program to run and stop at the first breakpoint encountered. To continue program execution, click on the Continue button. Breakpoints can only be set at executable statements.
There are many ways to view current values of variables with the Debugger. Before you can do this, you must first run your program under the Debugger and stop execution at some point. The following sections list ways of viewing current values of variables with the Debugger. It is suggested that you try each of the following methods to determine which you would prefer to use.
Data diving is available in several debugger views and screens. Click the right mouse button over any item and a default action occurs (when appropriate). Depending on the cursor location, the result of a mouse action will vary. For example:
In the Source View window, a click of the right mouse button on a variable displays that variable in a Data View. Holding the mouse button down brings up a menu of available actions.
A right mouse button action on a user function in the Source View displays the source for that function.
Holding a mouse button down over a blank area in a view brings up a menu that allows you to Jump To the selected line or Continue To the selected line.
In the icon canvas area (to the left of the source code listing), a right mouse button action sets and unsets a breakpoint. Holding down the mouse button provides a list of actions that can be performed against the line of code (for example, set or delete a trap, enable or disable a trap).
At the bottom of the Main View window is the command/message pane. Here, you can give the Debugger various instructions at the cvd command line.
If you want to know the current value of array x, enter either of the following two commands in the command/message pane:
cvd> print x |
or
cvd> p x |
The current values for x are printed.
If your program is written in Fortran and you only want the value of x(2), enter:
cvd> print x(2) |
For a C program, enter:
cvd> print x[2] |
Example 2-5. Change value of x(2) to 3.1
To change the value of x(2) to 3.1 in a Fortran program, enter:
cvd> assign x(2) = 3.1 |
For a C program, enter:
cvd> assign x[2] = 3.1 |
The value of x(2) is now 3.1 when execution is resumed.
Such changes are only active during the current Debugger run of your program. In the preceding examples, if x is a large array, you may want to use the Array Browser window (see “Viewing Variables Using the Array Browser”).
To view the components of the structure start in the prog.c example, enter:
cvd> print start |
The current values of each component of start are printed.
To view what the pointer list points to in the prog.c example, enter:
cvd> print *list |
This pointer must be initialized before you can perform this function.
A complete list of the instructions that can be entered at the cvd command line can be found in the ProDev WorkShop: Debugger Reference Manual.
Perform the following to view variables with Click To Evaluate (available in the Display Menu):
Right-click in the window that contains your source code to bring up the menu.
Select Click To Evaluate from the menu. You can now click on any variable and its value appears. For example:
If you click on the x in x(i) , the address of x appears.
If you click-drag to highlight x(i), the current value of x(i) displays.
If you highlight an expression, the current value of the expression displays.
Perform the following to view variables with the Variable Browser :
Select Views -> Variable Browser from the Main View window to call up the Variable Browser.
The Variable Browser automatically displays values of all variables valid within the routine in which you have stopped as well as the address location for each array.
Values of variables can be changed by typing in their new value in the Result column and then hitting the ENTER key (or RETURN key, for some keyboards).
The Expression View window allows you to enter the variables and/or expressions for which you would like to know values.
Select Views -> Expression View from the Main View window menu bar to display the Expression View window.
To view, for example, the value component of the structure start in prog.c , enter the following in the Expression column:
start.value
As you step through your program, for example with Step Over, the values of all the entries in this window are updated to their current values.
Values of variables can be changed by typing in their new value in the Result column and then pressing ENTER.
To enter an expression from your source code into the Expression View window:
Left-click and drag on the expression in your source code. The expression is highlighted.
Left-click in a field in the Expression column. The cursor appear in the field.
Middle-click your mouse. The desired value appears in the field.
To view array values, select Views -> Array Browser from the Main View window menu bar to call up the Array Browser.
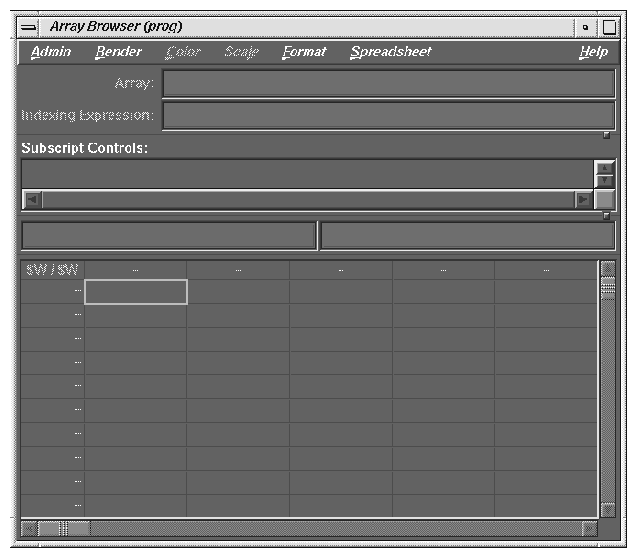
To view the values of an array in the Array Browser:
Enter the name of the array in the Array field
Press ENTER
If the array is large or has more than two dimensions, the Subscript Controls panel in the middle of the Array Browser window allows you to specify portions of the array for viewing. You may also use the slide bars at the bottom and right of the window to view hidden portions of an array.
Procedure 2-1. Changing values of array elements
Perform the following to change values of array elements:
You can now enter the name of the second array you would like to view.
Click on the box with the array value in the lower portion of the Array Browser window. After the element is selected, the array index and value appear in the two fields below the Subscript Controls panel in the center of the Array Browser window.
For example, if you click on the value for array element A(2,3), then A(2,3) appears in the box above the display of the array values, and its value appears in the box to the right of A(2,3). Simply click in this box, and enter a new value for A(2,3). (Press ENTER to change the value of A(2,3) to the new value.)
Enter your change into the Value field described in the note above.
If you would like to view a second array at the same time, select Admin -> Clone in the Array Browser window that you have already opened. This brings up a second Array Browser window.
Select Admin -> Active from this new window.
Procedure 2-2. Viewing values of a C structure
Perform the following to view values of a C structure:
Select Views -> Data Explorer from the Main View window menu bar to call up the Data Explorer window.
Enter the name of the structure in the Expression field. This brings up a window listing the name of the structure, the names of its components in the left column, and their values in the right column.
If one of these components is a pointer, you can see what is being pointed to by double-clicking on its value to the right of the pointer name. This brings up a new window showing what is being pointed at and an arrow appears showing this relationship. This can aid in debugging linked lists, for example.
There is another way to do this without using the Data Explorer. If the user performs a mouse click on the variable name (“dives” on the variable name) in the source view, a Data View is dislayed, showing the structure. Click the right mouse button to access the menu and to have the variable displayed or added to the Data Explorer.
Often it is useful to search for the occurrences of a variable or some character string in your program so you can set breakpoints. Perform a search as follows:
Call up the search utility from the Main View window menu bar using Source -> Search.
Enter the character string for which you would like to search in the search utility window, then click on the Apply button. All occurrences of this string are highlighted.
Click on Cancel to remove highlighting.
As the Debugger executes, it may stop during a program function or subroutine, or in a system routine. When this happens, you can locate where the Debugger is in your program by examining the call stack.
There are two ways to examine the call stack:
You can enter the following in the command/message pane:
cvd> where
This lists the functions and subroutines that were called to bring the Debugger to this place. This call list includes not only your program functions/subroutines but may also include system routines that have been used. You can now move up or down the call tree by issuing, for example:
cvd> up [n]
In this case, the source code for a function or subroutine that is `up' n items in the call stack appears in the Main View window. If you omit [n] you move up one item in the call stack.
You can select Views -> Call Stack from the Main View window menu bar. This brings up the Call Stack window.
If you double-click on an item here, the source code for the function or subroutine, if available, displays in the Main View window.
You can also “dive” on the Call Stack. A dive on the function name performs the same function as a double-click. Diving on the arguments brings up a Data View window with that argument displayed. Additionally, a Dive Menu is displayed if a right-mouse button action is performed.
In the debugging process, it is sometimes useful to stop at each occurrence of a function or subroutine. The Debugger permits you to do this in either of these ways:
Use the “data diving” method described in “Using the Mouse for Data Diving” in Chapter 1, to dive on the function name in the Source View and then click the mouse to select a breakpoint. You can also use a right-mouse button action over the function name to bring up a menu and then select Stop In Function from the menu.
Using the cvd command/message pane.
Enter the following in the command/message pane of the Main Window:
cvd> stop in name
For name, specify the name of the function or subroutine in your program where you would like the Debugger to stop.
Click on the Run button and the Debugger stops each time it encounters this function or subroutine.
To remove this stopping condition enter the following in the command/message pane:
cvd> status
For the Stop in command above, the trap in the list would appear as:
[n] Stop entry name...
Here, the value of n is a positive integer and name is the name of the function or subroutine where the stop has been set.
To delete this stop, enter:
cvd> delete n
Using the Trap Manager.
Select Views -> Trap Manager from the Main View window menu bar to use the trap manager. This calls the Trap Manager window.
In the text field to the right of the word Trap enter:
stop in name
Click on the Add button or press Enter. This adds your breakpoint at your desired function or subroutine.
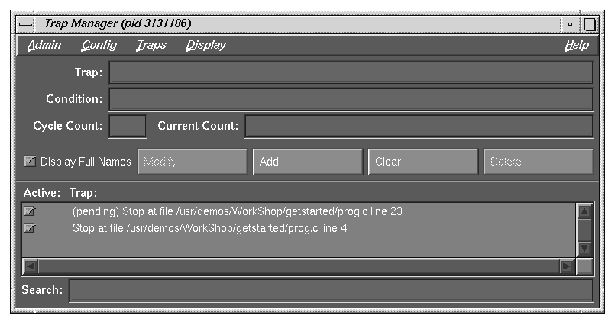
To remove the stopping condition so the Debugger does not stop at each occurrence of name, click on the Delete button in the Trap Manager window.
If you have multiple traps displayed, click on the trap that you wish to delete before you click on the Delete button.
This section offers tips and suggestions for debugging programs written for scientific applications; but many of the suggestions apply to debugging other types of applications as well.
| Note: This section deals only with debugging programs that are running serially and not in parallel. |
Programs can sometimes appear to have no bugs with some sets of data because all paths through the program may not be executed. To debug your program, therefore, it is important to test it with a variety of different data sets so that, one would hope, all paths in your program can be tested for errors.
Now, assume that your program compiles and produces an executable, but the program execution either does not complete, or it completes but produces wrong answers. In this case, go through the following steps to find many of the commonly occurring bugs:
All compiler options mentioned in the following sections are valid for FORTRAN 77, Fortran 90, C and C++ compilers unless indicated otherwise.
If your program is written in C, you should use the lint utility. This helps you identify problems with your code at the compile step. For example, if your C program is in a file named prog.c, invoke lint with:
> lint prog.c |
The output from this command is directed to your screen.
There is a public domain version of lint for FORTRAN 77 called ftnchek. You can get ftnchek from the /pub directory at the anonymous ftp site ftp.dsm.fordham.edu at Fordham University.
A common programming error is the use of array indices outside their declared limits. For help finding these errors, compile your program as follows:
> -g -DEBUG:subscript_check=ON |
Then run the generated executable under cvd and click on the RUN button. (See the DEBUG_group(5) man page for more information on this option.)
The following list explains compiling dependencies when working with out-of-bounds array accesses:
If you are running a C or C++ program, your program stops at the first occurrence of an array index going out of bounds. You can now examine the value of the index that caused the problem by using any of the methods described in “Options for Viewing Variables”. If you compile with the -g option, the compiler generates symbolic debugging information so your program executes under cvd. It also disables optimization. Sometimes, disabling optimization causes the bug to disappear. If this happens, you should still carefully go through each of these steps as best as you can.
If you are using the Fortran 90 compiler, after compiling with the preceding options and after running the generated executable under cvd, enter the following in the cvd pane:
cvd> stop in __f90_bounds_check
Note: __f90 in this command has two lead “_” characters.
Now, click on the RUN button. Next select Views -> Call Stack from the Main View window menu bar.
Next, double click on the function or subroutine immediately below __f90_bounds_check. This causes the source code for this function or subroutine to display in the Main View window, and the line where cvd stops is highlighted. You can now find the value of the index that caused the out-of-bounds problem.
If you are using the FORTRAN 77 compiler, after compiling with the preceding options and after running the generated executable under cvd, enter the following in the cvd> pane:
cvd> stop in s_rnge
Click on the RUN button. Next, select Views -> Call Stack from the Main View menu bar.
Double-click on the function or subroutine immediately below s_rnge. This causes the source code for this function or subroutine to display in the Main View window and the line where the Debugger stopped is highlighted. You can now find the value of the index that caused the out-of-bounds problem.
| Note: For Fortran programs, bounds checking cannot be performed in subprograms if arrays passed to a subprogram are declared with extents of 1 or * instead of passing in their sizes and using this information in their declarations. An example of how the declarations should be written to allow for bounds checking is: SUBROUTINE SUB(A,LDA,N, ...) INTEGER LDA,N REAL A(LDA,N) |
To find uninitialized REAL variables being used in floating-point calculations, compile your program with the following:
-g -DEBUG:trap_uninitialized=ON |
This forces all uninitialized stack, automatic, and dynamically allocated variables to be initialized with 0xFFFA5A5A. When this value is used as a floating-point variable involving a floating-point calculation, it is treated as a floating-point NaN and it causes a floating-point trap. When it is used as a pointer or as an address a segmentation violation may occur. For example, if x and y are real variables and the program is compiled as described previously, x = y is not detected when y is uninitialized since no floating point calculations are being done. However, the following are detected:
x = y + 1.0 |
After you compile your program with the preceding options, enter the following:
% cvd executable |
Then click the RUN button. To find out where your program has stopped, select Views -> Call Stack from the Main View window menu bar.
Here, you see that many routines have been called. Double-click on the routine closest to the top of the displayed list that is not a system routine. (You will probably recognize the name of this source file.) This brings up the source code for this routine and the line where the first uninitialized variable (subject to the above-mentioned conditions) was used. You can now examine the values of the indices which caused the problem using any of the methods described in “Options for Viewing Variables”. You cannot use cvd to detect the use of uninitialized INTEGER variables.
If you are using a csh or tsch shell, perform the following to find floating-point divisions by zero and overflows (for other shells, see their man pages for the correct command).
Enter the following:
% setenv TRAP_FPE ON
Compile your program using the following options:
compiler command -g -lfpe
Enter the following:
% cvd executable
In the cvd command/message pane enter:
cvd> stop in _catch
Click on the RUN button.
Select Views -> Call Stack from the Main View window.
Double-click on the routine closest to the top of the displayed list that is not a system routine. (You will probably recognize the name of this source file.)
The line where execution stopped is highlighted in the source code display area of the Main View window.
You may now use any of the methods to find variable values, described in “Options for Viewing Variables”, to discover why the divide-by-zero or overflow occurred.
For more information on handling floating-point exceptions, see the handle_sigfpes(3) and fsigfpe (3f) man pages.
Perform the following to find integer divisions by zero:
Compile your program using the following options:
-g -DEBUG:div_check=1
Enter the following:
% cvd executable
Click the Run button.
The program automatically stops at the first line where an integer divide-by-zero occurred. You may now use any of the methods to find variable values, described in “Options for Viewing Variables”, to discover why the divide-by-zero occurred.
Sometimes during program execution a core file is produced and the program does not complete execution. The file is placed in your working directory and named core.
Some machines are configured to not produce a core file. To find out if this is the case on the machine you are using, enter the following:
% limit |
If the limit on coredumpsize is zero, no corefile is produced. If the limit on coredumpsize is not large enough to hold the program's memory image, the core file produced will not be usable.
To change the configuration to allow core files to be produced enter the following:
% unlimit coredumpsize |
After you have a core file, you can perform the following analysis:
You can find the place in your program where the execution stopped and the core file was produced by entering:
% cvd executable core
Here, executable is the executable that you were running.
The Main View window comes up and the source line where execution stopped may be highlighted in green.
If the source line is not highlighted in green, select Views -> Call Stack from the Main View window menu bar.
Double-click on the routine closest to the top of the displayed list that is not a system routine. (You will probably recognize the name of this source file.) This brings up the source code for this routine, and the last line executed is highlighted in green.
If the executable was formed by compiling with the -g option, then you can view values of program variables when program execution stopped.
To find the assembly instruction where execution stopped, select Views -> Disassembly View from the Main View window menu bar.
Remember that this is the last statement executed before the core file was produced. It therefore does not necessarily mean that the bug in your program is in this line of code. For example, a program variable may have been initialized incorrectly; but the core was not produced until the variable was used later in the program.
Assume that the preceding steps have been taken and that all detected problems have been corrected. Your program now completes execution, but obtains incorrect answers. What you do at this point will likely depend on special circumstances. The following is a list of some commonly used debugging tips that may or may not apply to your situation.
Try running your program on a very small size problem where you can easily obtain intermediate results. Run your program under cvd on this small problem and compare with the known correct results.
If you know that a certain answer being calculated is not correct, set breakpoints in your program so you can monitor the value of the answer at various points in your program.
You may want to set breakpoints on each call to a selected function or subroutine where you suspect there may be problems. (See“Options for Viewing Variables” for suggested methods.)
Debug COMMON blocks and EQUIVALENCE statements in Fortran. Variables used in these statements must have the same type and dimension everywhere they appear and they must occur in the same order. Normally ftnchek, for FORTRAN 77 programs, and cflint, for Fortran 90 programs, can find these errors. However, for FORTRAN 77 programs it is best to use an include statement for each COMMON block. For Fortran 90 programs, it is best to use a module for each COMMON block. It is best not to use EQUIVALENCE statements.
Save local data that is otherwise not saved. In Fortran, values of local variables are not guaranteed to be saved from one execution of the subprogram to the next unless they are either initialized in their declarations or they are declared to have the SAVE attribute. Some compilers and machines automatically give all local variables the SAVE attribute, so moving a working program from one compiler or machine to a compiler or machine that does not do this may cause this bug to manifest. The Fortran standards require that you give all uninitialized local variables the SAVE attribute if you would like their values saved.