This section includes:
Objects in the 3D viewer can be programmed to move and rotate in any direction and to increase or decrease in size. For example, you can program objects to move forward or backward, to rotate in place, or to flip diagonally across the screen. It is important to understand that in FX Builder, even a movie frame is a 3D object (represented by the A or B placeholders), so you can animate the movie frame itself. You can think of the A and B placeholders as very flattened cube objects.
Animating with FX Builder is easier than you might think because you can program an object to move by manipulating it with the cursor, and because keyframes (see “What Are Keyframes?”) are set automatically. Note that you also have the option of numerically setting keyframe location, scale, and rotation values.
Here is an overview of how interactive animation with FX Builder works:
set the time indicator (the red line) at the place you want the object to first appear—always move the time indicator before the object
import the object—the first keyframe automatically appears at the time indicator
drag the time indicator along the timeline until it reaches the place that you want the object to move to
manipulate the object to the position you want it to be in at the new point in time (explained in “Editing and Manipulating Objects”)—a second keyframe is automatically set at this point
click the play button to see how the object has been animated (the movement between the two keyframes is interpolated by FX Builder)
The following items, which can appear in the 3D viewer, are objects that can be edited and manipulated:
Source Clip Placeholders (A and B)
3D Models—some models are included with your software see: /usr/share/data/models
Images
Movies
One of the first things to understand about the FX Builder interface is how it displays time. This section includes “Understanding the Timelines,” “Moving an Object Timeline,” “Zooming In On an Object Timeline” and “Using the Time Indicator.”
As shown in Figure 1-14, there are two timelines:
The global timeline is directly beneath the 3D viewer. This is the line that represents the entire time of the effect you are creating.
The object timelines are in the lower half of the window. Each object has its own timeline, which contains the keyframes that correspond to that object.
Time is measured from %0 to %100, so that you are observing the relative time of the occurrences within the timeline. The actual time length of the effect itself depends on what you have selected in the movie editing application you are using.
You can move an object timeline by selecting it, holding down the left mouse button, and dragging it to the left or right. This function is described in more detail under “Changing the Start Point, End Point, or Duration of an Object.”
There are zoom buttons (shown in Figure 1-14) you can use to see a close up of a certain section of object timelines, which is particularly useful if you are building a complex effect. To use the zoom buttons:
Move the time indicator to the area you want to zoom in on, then click the Zoom Up (+) button. Use the Zoom Down ( - ) button to incrementally return the timeline to its original display.
The time indicator is the red line pointed out in Figure 1-14. It corresponds to the current time showing in the 3D viewer and appears in the global and object timelines. Things to know about this line:
The time indicator is always where a new keyframe will occur when you manipulate an object.
The time indicator is always where an imported object starts appearing.
To move the time indicator, click and drag it over the global or object timelines
As you move the time indicator, the objects in the 3D viewer move with it, showing you what position the objects are in at the given time. For example, when the indicator is in the middle of the global timeline, the position of the objects in the 3D viewer represent the position they will be in when the filter or transition has been played half-way through.
This section includes “What Are Keyframes?” and “Things to Know About FX Builder Keyframes” and “The Difference Between Linear and Smooth Interpolation.”
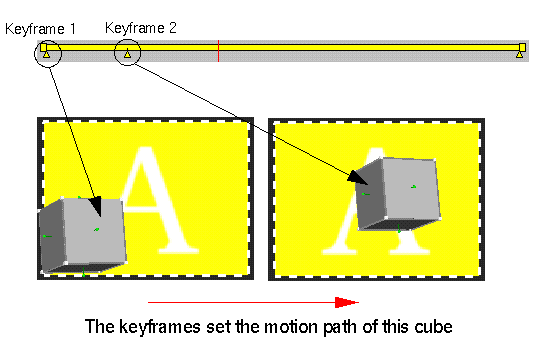
In the animation world, keyframe is a term used to describe the points in time that you set to define a specific motion. For example, the cube in Figure 1-5 is programmed to move from keyframe 1 to keyframe 2. The way you program this movement is by defining certain values of keyframe 1 and keyframe 2. Any object movement requires at least two keyframes on that object's timeline.
What happens in between those two keyframes is called interpolation. Essentially, interpolation means that the computer creates the movement for you, as long as you have provided the points between which the movement is to take place (see also “The Difference Between Linear and Smooth Interpolation”). Think of a series of keyframes as the motion path of an object that appears in your transition or filter.
In FX Builder, keyframes contain the following information about the 3D object they correspond to:
The location, which is the position of the object in relation to the other objects.
The rotation position of the object.
The object's scale (size).
The point in time that the keyframe's location, position, and size occur during the effect.
The first three values are automatically created when you manipulate the objects in the 3D viewer. The fourth value, time, is set (and can be edited) on the object's timeline.
An object's keyframes exist on its timeline.
Clip placeholders A and B automatically have default keyframes at the end point of their timelines, which can be deleted, moved, and edited.
Linear interpolation results in straight-line movement between keyframes, and can produced a more mechanical effect than smooth interpolation, which takes object acceleration into account and results in movements that are more curved than straight.
To select an object in the 3D viewer, place the cursor over the object in the display area and click the left mouse button. Or, select the object's timeline.
When you select an object, it becomes surrounded by a bounding box. The bounding box contains little white cubes and green knobs that you can use to move, resize, or rotate the object within the scene. See “Editing and Manipulating Objects” for details.
To deselect an object, click outside the bounding box. Also, selecting another object automatically deselects the currently selected object.
To select more than one object at once, hold down the <Shift> key while selecting additional objects. You can also “sweep select” more than one object by clicking and dragging out an area of selection.
This section includes “Creating Keyframes,” and “Deleting Keyframes.”
Keyframes control object movement—see also “Things to Know About FX Builder Keyframes.”
To create a new keyframe:
Make sure that the time indicator is positioned at the time you want the new keyframe to occur (see “Using the Time Indicator” for more information).
Once you have placed the time indicator, you can create a new keyframe in two different ways:
to create a keyframe for an object that is already in the 3D viewer, manipulate the object to the desired position and size—a new keyframe is automatically created on the object's timeline
to create a keyframe for an object you are going to import, simply import the object—the initial keyframe is automatically created at the beginning of the imported object's timeline
When the keyframe is created, you can edit it: see “Editing Keyframes.”
There are four specific values you can edit for a keyframe in FX Builder, as follows:
to edit the location, rotation position of the object, or the object's size, see “Interactive Keyframe Editing”
to edit the point in time that the keyframe's location, rotation, and size occur during the effect, see “Moving Keyframes on Object Timelines”
To numerically set and edit keyframe parameters with a dialog box, see “Using a Dialog to Numerically Edit Keyframes.” This section also covers: “Cutting, Copying, and Pasting Keyframes”
See also “Things to Know About FX Builder Keyframes.”
Select a keyframe.
Move the cursor over the keyframe, then click once to select it (it highlights).
Manipulate the object that corresponds to that keyframe until it is in the position that you want. (See “Editing and Manipulating Objects.” for details)
Deselect the keyframe.
The position the object is in when it is deselected is the position programmed into the keyframe.
| Tip: You can use the transport controls to jump the time indicator from one keyframe to the next (see Figure 1-13). |
You can paste keyframes to other locations on the same object timeline, and to other object timelines.
Select the keyframe.
Move the cursor over the keyframe, then click once to select it (it highlights).
Choose Edit > Cut or Edit > Copy.
Position the time indicator at the time you want the pasted keyframe to occur, and click to select the object timeline where you want the keyframe to be pasted.

Note: When you paste the keyframe, it pastes onto any object timeline that is selected or has a selection. Choose Edit > Paste.
| Tip: You can use the Keyframe Forward button on the transport controls to jump the time indicator from one keyframe to the next (see Figure 1-13). |
| Tip: You can also paste one keyframe onto another keyframe (thus replacing it). |
| Tip: Instead of using menus, use: Ctrl + X for Cut, Ctrl + C to Copy, and Ctrl + V to Paste. |
Moving a keyframe changes the time that the keyframe occurs, but does not change any other values in the keyframe. To move a keyframe, place the cursor over the top of the keyframe icon, then click (it highlights), and drag the icon to desired location.
To move more than one keyframe simultaneously, select additional keyframes (while holding down the <Shift> key), then drag one of them. All selected keyframes will move at the same time.
| Note: When you move a keyframe to within seven pixels of another keyframe, start point, or end point the keyframe “snaps” to other keyframe, start point, or end point. The keyframe snaps to points located on the same timeline or on a different timeline. To turn this behavior off, hold down the <Ctrl> key while moving the keyframe. |
To numerically edit keyframes values in a dialog box, double-click the keyframe you want to edit and the object animation dialog box appears.
The object animation dialog allows you to enter x, y, and z values for object location, scale, and rotation. For example, under “Scale Keyframe,” the first field is the x field, which corresponds to object height, the second field is the y field, corresponding the object width, and the third field is the z field, corresponding to object depth.
This dialog also lets you select Smooth Interpolation for specific keyframes (see “The Difference Between Linear and Smooth Interpolation”). You can also use it set object alignment.
| Note: Another way to access the dialog is to select the keyframe, and then select Options > Object Animation. |
This section includes:
You can move an object timeline by selecting it, holding down the left mouse button, and dragging it to the left or right. Because the timeline represents the object's occurrence in the effect, moving the timeline changes the object's starting and ending point.
You can also move the start or end points individually by clicking directly on the beginning or end of the object's timeline and dragging. This way, you can make the object appear or disappear earlier or later in the effect. By default, this does not move any keyframes. If you want the keyframe locations to scale to the new length, hold down the <Alt> key while repositioning the start or end point.
After you select an object, you can manipulate it. An object, when selected, appears surrounded by a bounding box. Figure 1-6 shows an object with its bounding box.
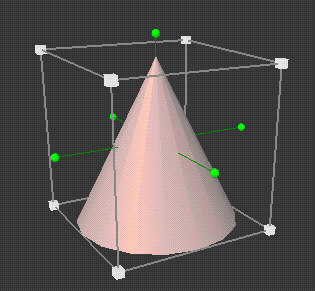
You can click on the white cubes, green knobs, or plane surfaces of the bounding box to control movement, rotation, and resizing of the object.
| Tip: When manipulating smaller objects, it is sometimes hard to see the manipulation controls. See “Viewing Objects More Closely” for techniques on addressing this problem. |
Select the object you want to move (see “Selecting and Deselecting Objects”).
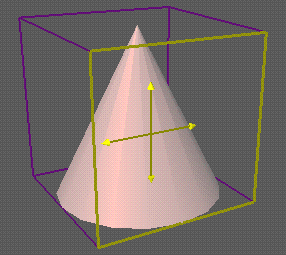
A bounding box appears. Each side of the bounding box defines a different plane in which you can move the object.
Place the cursor over one side of the bounding box.
Press the left mouse button, then drag the cursor.
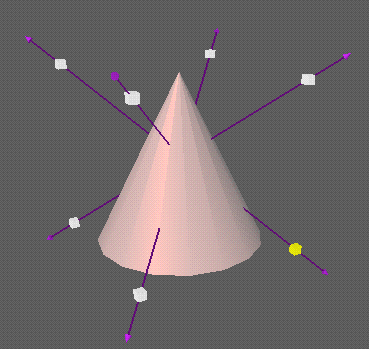
When you press the left mouse button, arrows appear. They show you the directions in which you can move the object. Figure 1-7 shows an example.
Hold down the <Shift> key and the left mouse button to constrain movement to one direction. The direction in which you move depends on your initial gesture with the mouse.
Hold down the <Ctrl> key to move the object in a perpendicular direction. For instance, if the selected plane lets you move the object to the left and right and up and down, press the <Ctrl> key to move the object forward of backward.
Release the mouse button when the object is positioned where you want it.
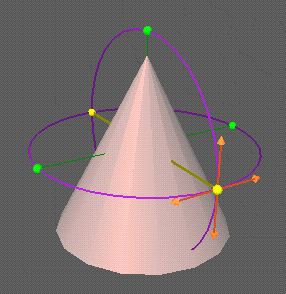
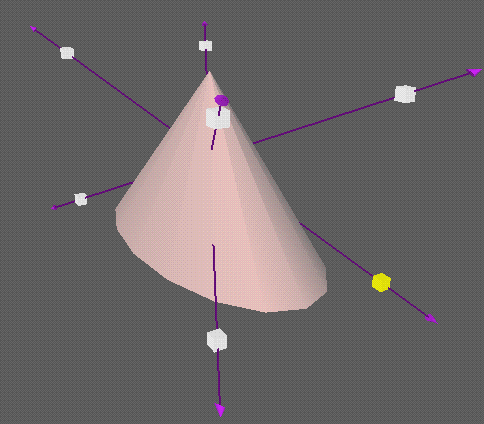
You can use the green knobs to rotate a selected object.
Select the object you want to rotate (see “Selecting and Deselecting Objects”).
Place the cursor over one of the small green knobs, then press the left mouse button.
The purple circles indicate the axes upon which you can rotate the object. See Figure 1-8.
Drag the cursor to rotate the object around one of the circles.
Each rotation knob lets you rotate the object in two directions—left or right and up or down, for example. You rotate the object in whichever direction you first move the cursor. For instance, if you begin by moving the cursor to the left, the rotation is horizontal.
Release the mouse button when the object is positioned the way you want it.
| Note: To rotate the object freely in all directions, press the <Shift> key while dragging the cursor. |
Select the object you want to resize (See “Selecting and Deselecting Objects”).
Place the cursor over one of the white cubes that appear on the corners of the box and press the left mouse button.
Purple arrows appear to show the directions in which you can drag the cursor. See Figure 1-9.
Holding down the left mouse button, drag the cursor slowly along a purple arrow.
The object becomes larger as you move the cursor away from the object and smaller as you move toward the object.
Release the mouse button when the object is the desired size.
| Tip: The resizing technique described lets you scale an object uniformly. To resize an object in one dimension, thus distorting the original shape, press the <Shift> key when you click the white box. Hold down the <Shift> key and drag the cursor in the direction of one of the orange arrows. Once you start dragging the cursor, the object stretches in that direction and you see a single yellow arrow. See Figure 1-10. |
Select the object.
Move the cursor over the object, then click once to select it.
Choose Edit > Cut or Edit > Copy.
Position the time indicator at the time you want the pasted object to appear.
Choose Edit > Paste.
| Tip: You can use the transport controls to jump the time indicator from one keyframe to the next (see Figure 1-13). |
| Tip: Instead of using menus, use: Ctrl + X for Cut, Ctrl + C to Copy, and Ctrl + V to Paste. |