This chapter tells you how to set up your Octane workstation. The following topics are covered
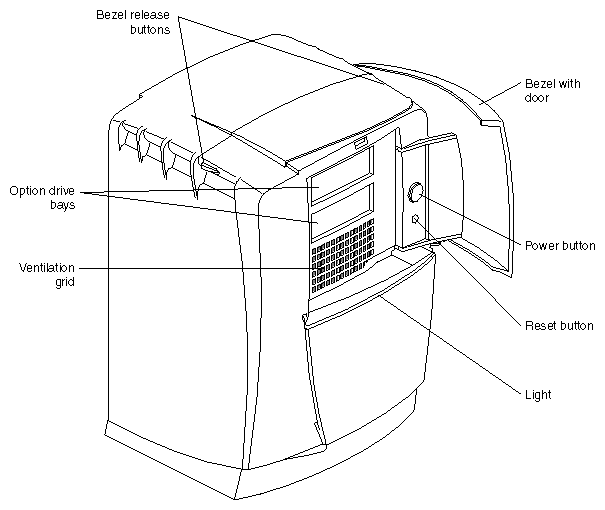
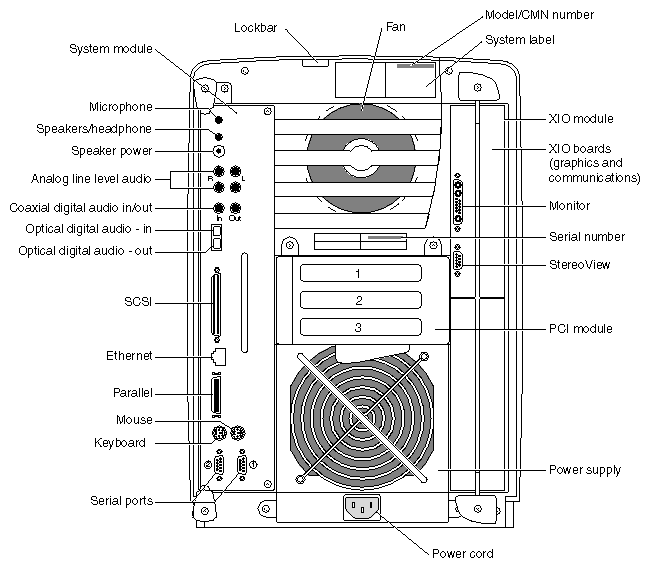
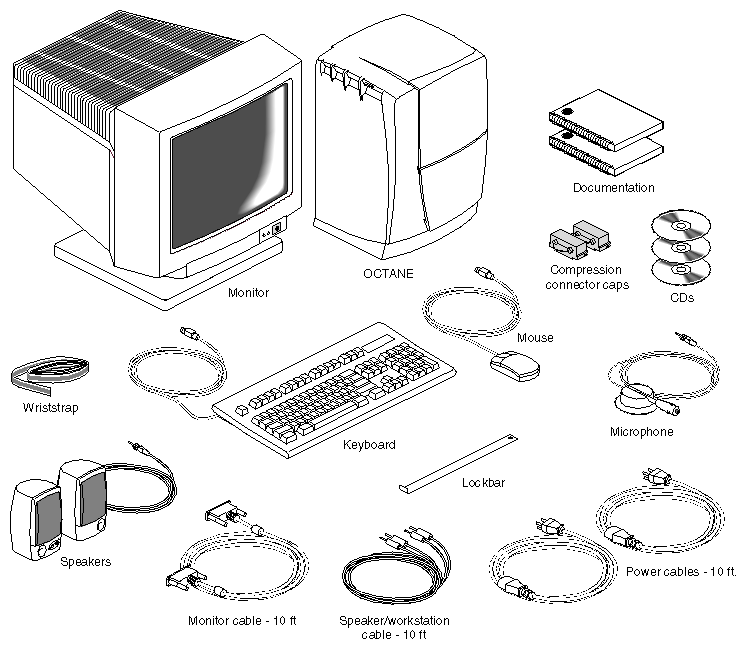
To become familiar with the Octane workstation, see
Octane Hardware Central is an online information resource containing movies, user tips, technical information, cable pinouts, human factors guidelines, and so on. Access Octane Hardware Central:
Through Netscape: In the location window enter file:/usr/share/Insight/library/SGI_bookshelves/SGI_EndUser/books/Octane_HWCntl/index.html
IRIX 6.5 users. From the Toolchest > Help >InfoSearch, type OCTANE Hardware Central. (Do not choose “Online Books”; this book is not accessible from the Online Books path.)
IRIX 6.4 users: From the Toolchest > Help > Online Books > SGI End User, choose Octane Hardware Central.
If this reference guide is no longer installed on your system disk, follow these instructions to install it:
Go to the Toolchest > System > Software Manager. Place the IRIX Foundation CD in a CD-ROM or access it over the network. From the Toolchest > System choose Software Manager. Press and hold the Lookup button and select IRIX Foundation CD. Click Custom Installation. Select “IRIX Executive Foundation 6.4 for Origin, Onyx2 and Octane.” Click on the arrow icon beside the word Product to access this subdirectory. When you locate Octane Hardware Central, click on the box to the left of the arrow icon. A red check mark appears. Click the Software Manager Start button. When the installation is complete, a window appears “Installation and removals were successful. You may continue with installation or quit now.” Click the OK button in this window. Go to the File menu > Exit, and exit Software Manager.
Use either of the paths described earlier in this section to access Octane Hardware Central.
“About This System,” found in the Toolchest > System > System Manager for your system serial number, IP address, operating system, and so on.
System Manager > Toolchest > System > System Manager for information on software and hardware installed on the Octane workstation.
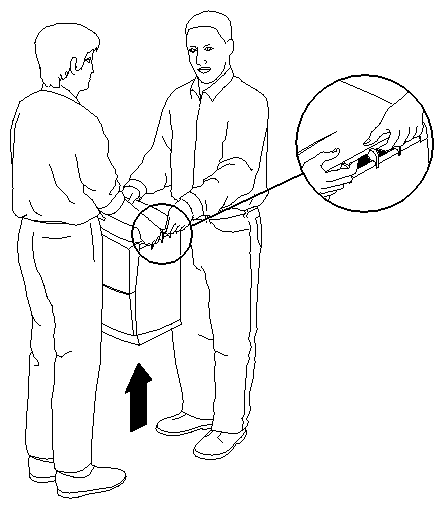
Lifting the Octane workstation is a two-person job. Lift the workstation by the air vents at the top of the chassis, as shown in figure Figure 1-4.
If you have no additional parts, memory, or peripherals to install, use the setup poster or the setup steps in this chapter to set up the Octane workstation.
Install optional parts or peripherals before you follow the setup steps so that you will not have to remove and reinstall cables.
To install additional memory, see Chapter 2, “Installing and Removing the CPU and Memory.”
To install PCI Boards and the PCI module, see Chapter 4, “Installing and Removing PCI Boards.”
To install XIO Option Boards, see the option board installation manual that ships with the XIO option board, or Chapter 5, “Installing and Removing XIO Graphics and Option Boards.”
To install external Peripherals or devices, see Chapter 6, “Installing and Removing External Devices,” which includes
SCSI devices
serial devices
audio devices
To install drives (internal peripherals), see Chapter 7, “Installing and Removing Drives and Front Module Parts.”
Use the setup poster or go to “Setting Up the Octane Workstation” after you have finished installing optional parts.
Human factors guidelines for setting up your Octane workstation are in Octane Hardware Central, found online through the Toolchest > Help > Online Books > SGI End User.
To set up the Octane workstation, follow these steps:
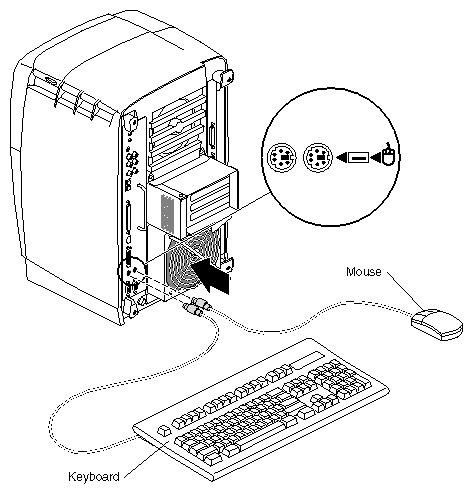
Attach the keyboard and mouse to the Octane workstation.
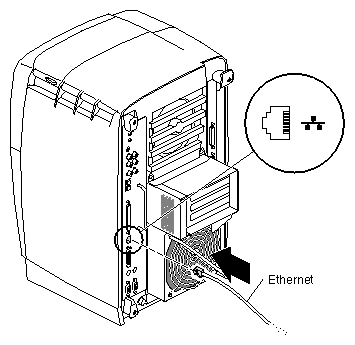
Attach the Ethernet cable to the Ethernet port on the Octane workstation.
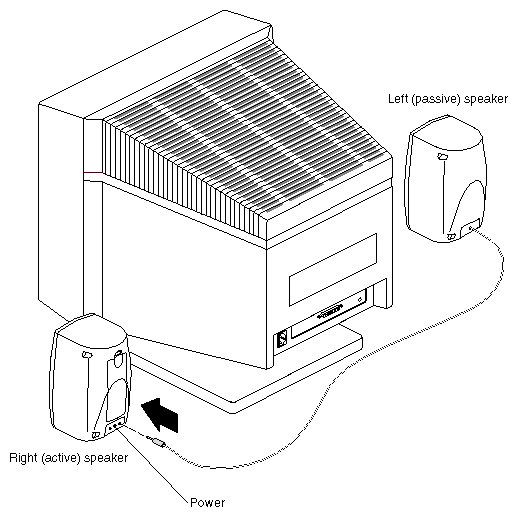
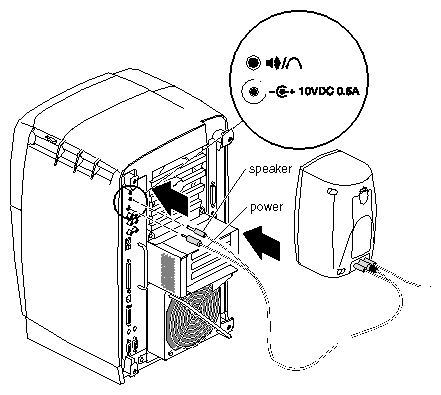
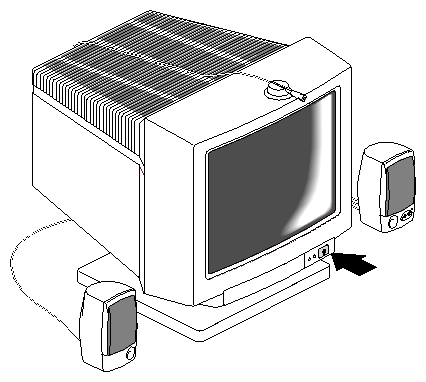
Place the speakers on either side of the monitor as shown in Figure 1-7.
Connect the left (passive) speaker to the right (active) speaker. Use the port labeled L.
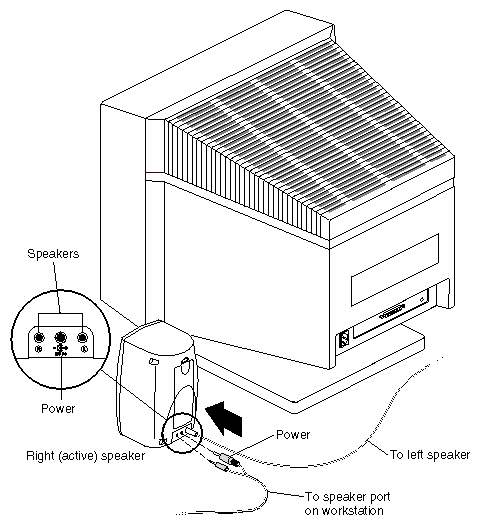
Connect the speaker/workstation cables (the cable with two connectors on each end) to the active speaker. The connectors cannot be installed incorrectly because they are different sizes; male/male on one end, female/male on the other.
Connect the active speaker to the Octane workstation, using the cable with two male connectors on the end.
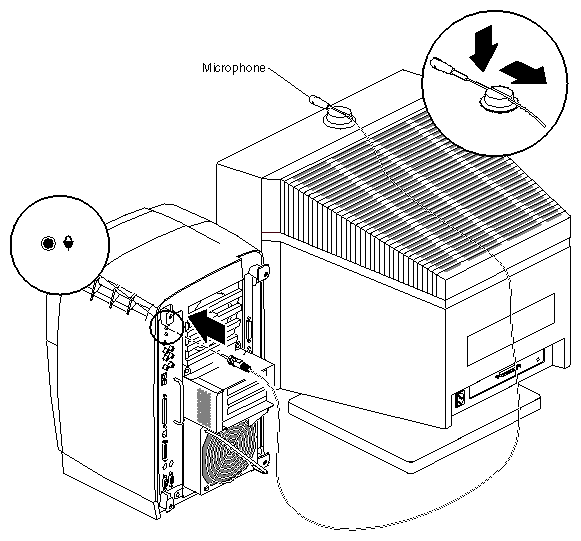
Set up the microphone.
Place the microphone cord through the slot in the base.
Slide the microphone back until it is firmly connected to the base.
Place the microphone in the center of the top of the monitor.
Place the cable over the back of the monitor.
Attach the cable to the microphone port on the Octane workstation.
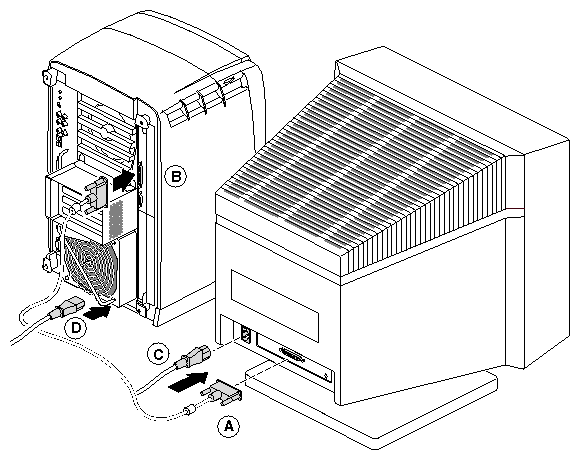
Connect the monitor and power cables.
Connect the monitor-to-graphics cable to the monitor. (Step A)
Connect the monitor-to-graphics cable to the I/O connector on the back of the Octane workstation. (Step B)
Connect the monitor power cord to the monitor. (Step C)
Connect the Octane power cord to the back of the Octane workstation. (Step D)
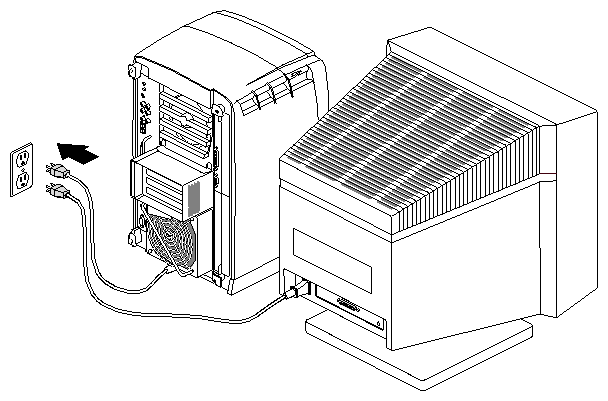
Connect the power cords from the Octane workstation and the monitor to an electrical outlet.
Press the power button on the monitor.
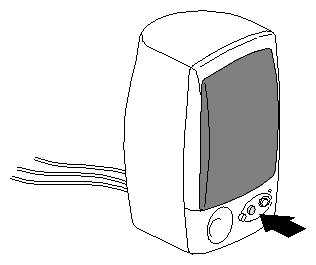
Press the power button on the active speaker.
If you are installing the lockbar, go to “Locking the Octane Workstation”.
If you are not installing the lockbar, go to step 12.
You have just finished setting up the Octane workstation and are ready to login. See “Logging Into the Octane Workstation”.
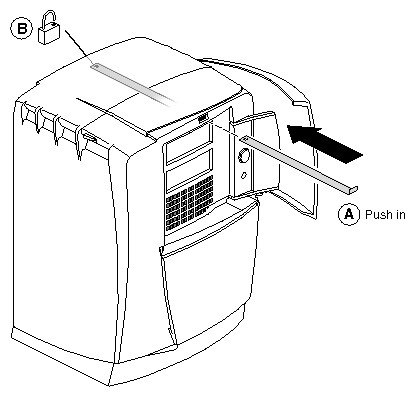
Using the lockbar locks the bezel and system module to the chassis. Locking the bezel prevents the option and system drives from being removed. Locking the system module prevents the memory (DIMMs) and processor (CPU) from being removed.
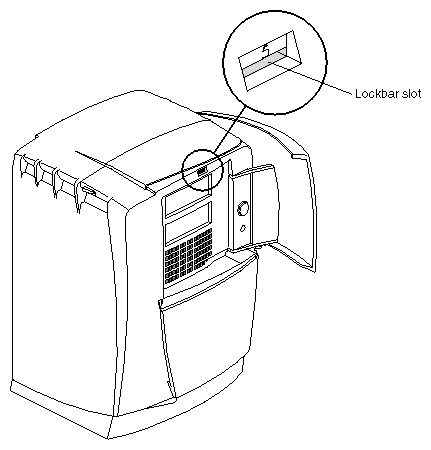
The lockbar slot is found behind the door on the front of the Octane workstation.
Open the door of the Octane workstation.
Locate the lockbar slot as shown in Figure 1-16.
Slide in the lockbar. (Step A)
Secure it with a lock. (Step B)
Close the door.
Power on the Octane workstation.
You have finished setting up the Octane workstation and are ready to log in.
Once you create a user login account for yourself and set up networking software, your system is ready to create a personal work area for you and let you communicate with other systems and people on your network.
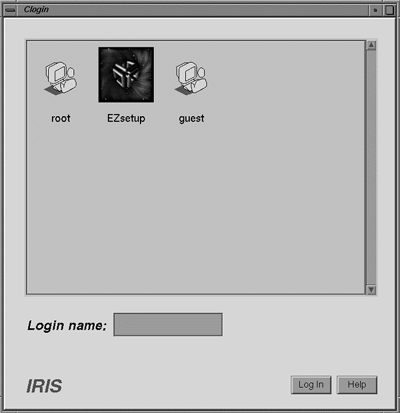
If this is the first time your system is being booted, you see a login screen similar to the one shown in Figure 1-19.
If you already have a login account, you see an icon with your login name. Double-click the icon.
If you do not have a login account, double-click EZsetup and follow the instructions for setting up your account and networking software.
Now you are ready to use the desktop management system called the IRIX Interactive Desktop.
By default, several icons appear on the desktop: a folder icon representing your home directory, a dumpster icon, and icons for peripherals you have installed. See Figure 1-20.
The peripheral icons show the current state of the devices they represent. For example, if you place a music CD into the compact disc player, the icon changes. When you double-click the icon, it opens CD Player, a utility that lets you play from a compact disc.
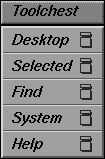
The toolchest in the top left-hand corner of the screen (shown in Figure 1-21) provides access to system functions, applications, and documentation.
Under the Toolchest > System is the System Manager, which provides hardware and software information about your workstation.
From the Toolchest > Help, you can access the library of online documentation.
For more information on the Toolchest, see the online Desktop User's Guide, found in the Toolchest > Help
IRIX 6.5 users: InfoSearch, and type Desktop Users Guide.
IRIX 6.4 users: Online Books > SGI End User > Desktop User's Guide.
This printed owner's guide contains all the information you need when your workstation is turned off and you cannot access online documentation. It is also found on the Web in the Technical Publications Library.
Octane Hardware Central, an online hardware reference guide, is found online (for IRIX 6.5 users) through the Toolchest > Help > InfoSearch, by typing Octane Hardware Central.
For IRIX 6.4 users, it is also found online through the Toolchest > Selected > File QuickFind. Type insight in the window that appears. When the InSight bookshelf appears, choose SGI End User > Octane Hardware Central, or you can open Netscape and enter the following URL in the location window:
file:/usr/share/Insight/library/SGI_bookshelves/SGI_EndUser/books/ Octane_HWCntl/index.html |
Octane Hardware Central is also found in the Technical Publications Library through Search and Catalog. If it is no longer installed on your system disk, follow these instructions to install it:
Go to the Toolchest > System > Software Manager. Place the IRIX Foundation CD in a CD-ROM or access it over the network.
From the Toolchest > System, choose Software Manager.
Press and hold the Lookup button and select IRIX Foundation CD.
Click Custom Installation.
Select “IRIX Executive Foundation 6.4 for Origin, Onyx2 and Octane.”
Click on the arrow icon beside the word Product to access this subdirectory.
When you locate Octane Hardware Central, click on the box to the left of the arrow icon. A red check mark appears.
Click the Software Manager Start button. When the installation is complete, a window appearswith the message Installation and removals were successful. You may continue with installation or quit now.
Click the OK button in this window.
Go to the File menu > Exit, and exit Software Manager.
Use either of the paths described earlier in this section to access Octane Hardware Central.
From the Toolchest > Selected, choose File QuickFind and type InSight in the window. Also from the Toolchest > Help, choose Online Books for Desktop Help, SGI End User, and SGI Administrator documentation. From the Toolchest > Help, choose InfoSearch to search online books, man (reference) pages, product release notes, and “How Do I?” (task-based help).
From the Toolchest > Help > InfoSearch, type the name of the book or topic for which you need information. InfoSearch searches online books, man pages, and release notes covering end user, developer, and system administrator information.
The small box next to the toolchest is the console window; see Figure 1-22. It looks like a small box because it has been minimized. You can open it to its full size by clicking on it with the left mouse button. Many of the error messages that the system generates appear in this window.
Clicking on the console brings up the IRIX shell in which you can type IRIX commands. For information on IRIX commands, choose the Toolchest > Help > Online Books > SGI_End User. Open the Desktop Users Guide and look for “Using IRIX Commands.”
There are two ways to shut down and power off your Octane workstation:
Use the power button to shut down the system software and power off.
Use the Toolchest > System > Shut Down System to shut down the system software and return to the System Maintenance menu or power off.
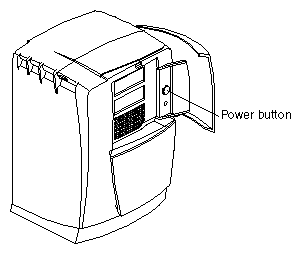
To use the power button to power off the Octane workstation, follow the instructions below.
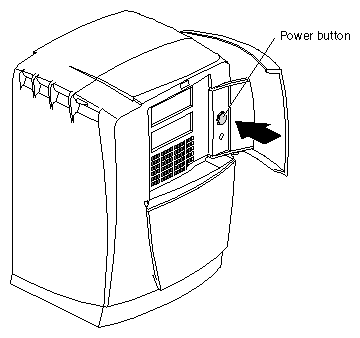
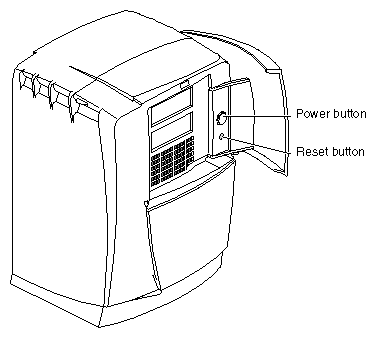
Open the door on the front of the Octane workstation.
Press the power button.
The notifier shown in Figure 1-24 appears on your screen within a few seconds. Then the system powers off automatically within the next minute.
Turn off the monitor by pressing the monitor power button.
If the system does not power off, either it never came up all the way or the operating system is hung. If you do not see any activity for several minutes, follow the steps below.
Press the power button again.

Note: If you press the power button a second time, the system powers off immediately, but it is not a clean shutdown. Avoid using this method unless the system does not respond for several minutes after you press the power button the first time.
If pressing the power button a second time does not work, use a pencil or pen to press the reset button.
If the system still fails to power off, unplug the power cord from the back of the workstation and contact your service provider.
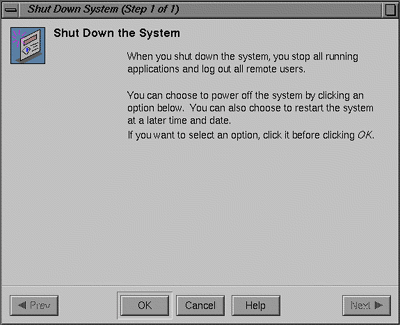
You can use the System menu in the Toolchest to shut down the system. You can also choose to power off the system by pressing the power button.
From the Toolchest > System, choose System Shutdown.
After a few seconds you see the notifier shown in Figure 1-27. At this point you can either power off the system or shut it down and get the System Maintenance Menu, allowing you to restart your system.
To power off the system, click Power Off the System and then click OK. The screen clears and you see the notifier shown in Figure 1-28. After a few seconds, the system powers off.
You can also shut down and restart the system.
To shut down the system and get the System Maintenance Menu (allowing you to restart your system), from Toolchest > System, choose System Shutdown.
After a few seconds you see the notifier shown in Figure 1-29.
Click OK at the notifier shown in Figure 1-29. The screen clears and you see the notifier shown in Figure 1-30.
Next you see the message shown in Figure 1-31.
Click Restart. You see the system startup message shown in Figure 1-32.
You are finished shutting down, powering off, or restarting your system.
