This chapter provides basic information about SCSI bus bandwidths and rates, information about SCSI and serial device cabling, rules for daisy-chaining peripherals, pointers to configuration documentation, and instructions for installing and removing external devices. (For information on internal SCSI devices, see Chapter 7, “Installing and Removing Drives and Front Module Parts.”)
To install a peripheral, first install the external device, power it on, and then power on the Octane workstation so that the system software can recognize the peripheral.
The following topics are covered in this chapter:
SCSI devices continue to evolve with higher bus bandwidths, faster data transfer rates, and channels with longer cables and more devices. The Octane workstation contains two wide buses, one for internal devices and one for external devices.
Table 6-1 compares Ultra and Fast, wide and narrow SCSI rates.
Table 6-1. Comparison of Ultra and Fast, Wide and Narrow SCSI Rates
| Wide (16 bit) Bus | Narrow (8 bit) Bus |
|---|---|---|
Ultra SCSI (Fast-20) | 40 MB/s (peak theoretical rate) | 40 MB/s (peak theoretical rate) |
Fast SCSI | 20 MB/s (peak theoretical rate) | 10 MB/s (peak theoretical rate) |
Ultra SCSI is also referred to as Fast-20.
The data transfer rate is also affected by the media speed of the SCSI peripheral. Fast-20 SCSI is not merely “fast SCSI.” The “-20” in the term signifies the maximum number of megatransfers (millions of 8-bit or 16-bit data transfers per second) that can occur during an I/O operation.
Data transfer rates are either slow or fast, and are measured in megabytes per second. An operation is either 8 or 16 bit in size; thus, data transfer rates are dependent on bus width.
By default the Ultra SCSI controller tries to negotiate for wide (16 bit) and for ultra speed. Table 6-2 provides data burst rate information.
Table 6-2. Bus Rate + Operating Mode = Data Burst Rates
Existing Bus | Operating Mode | Data Burst Rate |
|---|---|---|
8-bit | Fast | 10 MB second |
8-bit | Ultra | 20 MB second |
16-bit | Fast | 20 MB second |
16-bit | Ultra | 40 MB second |
Here are some tips to keep in mind when attaching SCSI devices to the Octane workstation.
You can mix Ultra and Fast devices on the same bus. You can also mix 16-bit and 8-bit devices on the same bus. The overall performance of a mixed bus can vary widely.
To daisy-chain a mix of wide and narrow devices, place the wide devices (as a group) closest to the Octane workstation where the bus is wide, and place the narrow devices (as a group) at the end of the daisy chain.

Note: Be sure to use an adapter or other special cable that terminates the upper half of the SCSI bus when converting from the final wide device to the first narrow device. Silicon Graphics supplied cables have this integrated into the cable, but not all third-party cables have the terminator integrated into the cable. Unsupported devices may not work with the Octane workstation, and may cause problems with supported devices.
The length of combined SCSI cables determines how many devices can be daisy- chained.
Set addresses manually only on external SCSI devices. See the device manual for setting the address on the device. Each device needs to have a unique address.
Drives can be easily damaged. Handle your drive carefully; do not drop it or handle it roughly.
If you use your DAT or DLT drive frequently, magnetic dust or debris can collect on the heads of the drive. This can make your DAT or DLT tapes unreadable or unwriteable.
If the green LED on the front of the DAT drive flashes at about 5-second intervals, clean the DAT drive heads. Clean the drive after about every 30 hours of use. Clean DLT drives more frequently.
Follow these steps to clean your DAT or DLT drive:
Insert a DAT or DLT cleaning cassette tape.
Note: Be sure to use a cleaning tape authorized by the DAT drive manufacturer. The drive loads the tape and cleans the heads automatically.
The DAT or DLT drive ejects the cleaning tape when the cleaning is complete.
If the green LED on the front of the DAT drive continues to flash at about 5-second intervals after you have cleaned the drive, you may have a problem with your cleaning-tape, or your drive may need cleaning by an authorized service provider.
First, try cleaning your drive again with a new DAT or DLT cleaning cassette tape.
If the LED continues to flash, take your drive to an authorized service provider for professional cleaning.
This section explains how to connect external SCSI devices to the Octane workstation. External devices include
DAT or DLT tape drives
CD-ROM drives
floppy drives
other external SCSI devices
See “About SCSI Buses and Devices” for information about SCSI bus and device speeds.
Follow the steps in the next few sections to connect an external SCSI device to the Octane workstation.
You must shut down your system to install an external device, but before doing so you must assign an address to the device.
| Note: Set addresses manually only on external SCSI devices. Bus 1 (the external bus) has addresses such as 1-1, 1-2, 1-3. The second number is the number the user sets. |
If you currently do not have any external devices attached to your system, you can assign any number between 1 and 15 (for wide SCSI devices) or 1 and 7 (for narrow devices) to the new device. Do not use address 0, as this is the system SCSI ID. Skip to “Setting the SCSI Address on the External Device.”
If you have at least one external device attached to your system and you are adding another device, you must check which addresses are assigned to the existing external devices and then choose a number between 1 and 15 (for wide SCSI devices) or between 1 and 7 (for narrow SCSI devices) that has not already been assigned.
Note: Although the Octane workstation allows up to 15 addresses for SCSI devices, the devices themselves may have dials that allow you to set a number only between 1 and 9.
To check available addresses for external devices, follow these steps:
If the Octane workstation is powered off, turn on the system power.
Open the door on the front of the Octane workstation.
Press and release the power button to power on the system.
Log in to your account. For more information on logging in, refer to “Logging Into the Octane Workstation”.
When the system comes up, from the Toolchest > System > System Manager > Hardware and Devices, choose “Removable Media Manager.”
You see a listing of your system's hardware devices and their address numbers.
Choose a number between 1 and 15 (for a wide SCSI device) or between 1 and 7 (for a narrow SCSI device) that is not assigned to your current devices and then go to the next section, “Setting the SCSI Address on the External Device.”
To set the SCSI address on the external device, locate a switch, button, dial, or jumpers and manually set the address. Use the address you chose in step 4 of the previous section.
If the device has a push button, switch, or dial on the back, follow the steps below. If there is no switch or dial on the device, see the instructions included with the device.
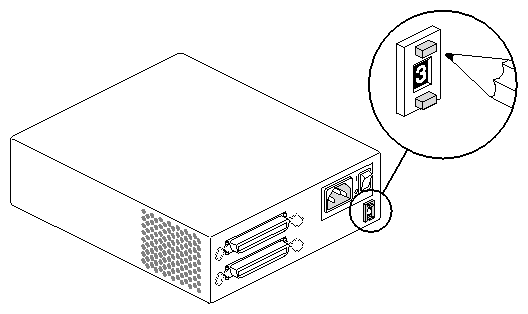
Take the device out of its box and locate the push-button, switch, or address dial. It may be on the rear or bottom of the device. An example is shown in Figure 6-1.
Use a small screwdriver or pencil tip to set the dial or push the buttons to assign the address number you chose in step 5 of the previous section.

Caution: Do not assign number 0. This number is reserved for the SCSI controller.
You can attach one or more external devices to the SCSI port on the back of your workstation. Connecting more than one device is called daisy-chaining. The devices are connected in a chain, with the first device attached to the SCSI port on the workstation.
The combined length of SCSI cables determines the number of devices that can be daisy-chained. See Table 6-3 for information on the types of devices and combined cable lengths you may use.
Table 6-3. Maximum Combined SCSI Cable Length For Daisy-Chaining Devices
SCSI type | |
|---|---|
Ultra SCSI | 1.5 meters |
Fast SCSI 2 | 3 meters |
Ultra SCSI and Fast SCSI 2 | 1.5 meters |
Use the cables and active terminator that came with the wide device, or purchase an active terminator, if necessary. Use only an active terminator.
| Caution: Using other types of cables or terminators can result in your system malfunctioning. |
If you have a device that you want to attach to your system, but you do not have the appropriate cables, you can order them by contacting your authorized service provider.
To attach an external device, power off the Octane workstation and prepare the device for installation. Instructions begin in the next section.
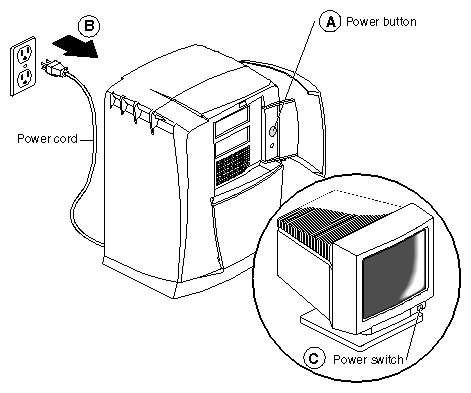
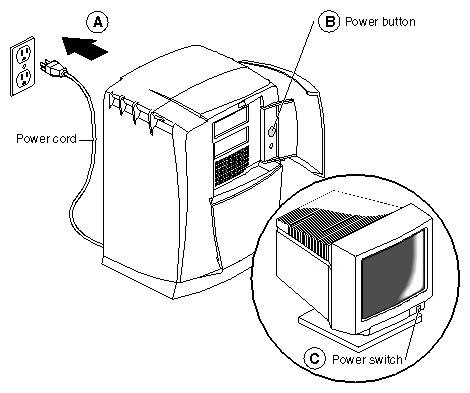
Shut down and power off the system.
Open the door on the front of the Octane workstation. (Step A)
Press and release the power button to shut down the software and power off the system. (Step B)
The system powers off automatically.
Press the monitor power switch to turn off your monitor. (Step C)
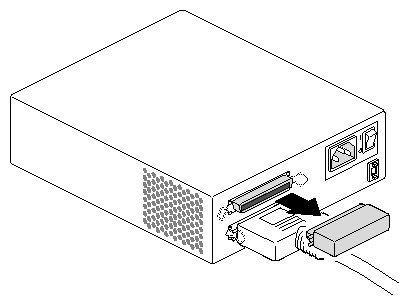
If you are daisy-chaining a new device to a connected device, remove the terminator from the connector on the last device in the current chain by squeezing the clips on both sides of the terminator and pulling it off. See Figure 6-3.
If this is the only device to be attached to the Octane workstation, leave its terminator in place.
If no SCSI devices are attached to the Octane workstation, no terminator is needed on the workstation's SCSI port.
| Caution: Ultra and Fast SCSI devices require higher quality cables than earlier SCSI devices. Use the cable and active terminator that came with the device. Using other types of cables or terminators can result in your system malfunctioning. |
Choose the appropriate SCSI cable to connect the external SCSI device.
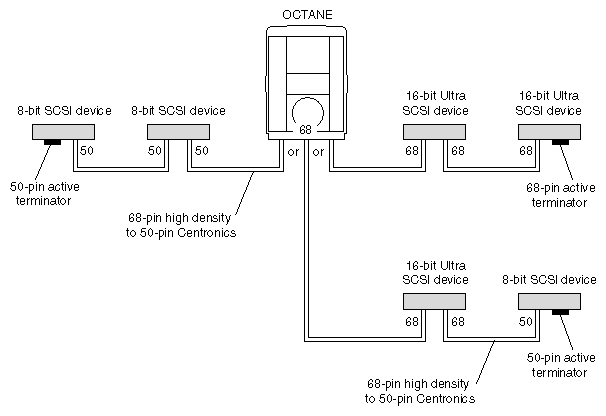
Caution: Exceeding the maximum 1.5 or 3 meters combined cable length recommended for your SCSI type can cause your external SCSI devices to operate unreliably. (See Table 6-3 for maximum cable length for each type of device or combination of devices.) Connect the fastest SCSI device or devices to the Octane workstation and each other, then connect slower devices at the end of the chain. See Figure 6-4.
Use the following cables between the Octane workstation and the device, or between devices:
If you are attaching the device to the workstation, use the high-density 68-pin to Centronics® 50-pin Fast SCSI cable. See Figure 6-4.
To daisy-chain an Ultra SCSI device to another Ultra SCSI device, use a 68-pin to 68-pin cable.
To daisy-chain an Ultra SCSI device to a Fast SCSI device, use a 68-pin to 50-pin Centronics Fast SCSI cable.
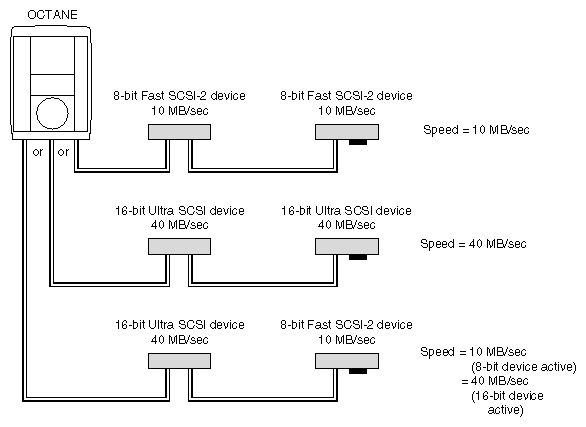
The speed of the devices in the daisy chain is determined by the speed of the active device. If a slow device is active, the bus runs at a slow speed; if a high-speed device is active, the bus runs at a high speed.
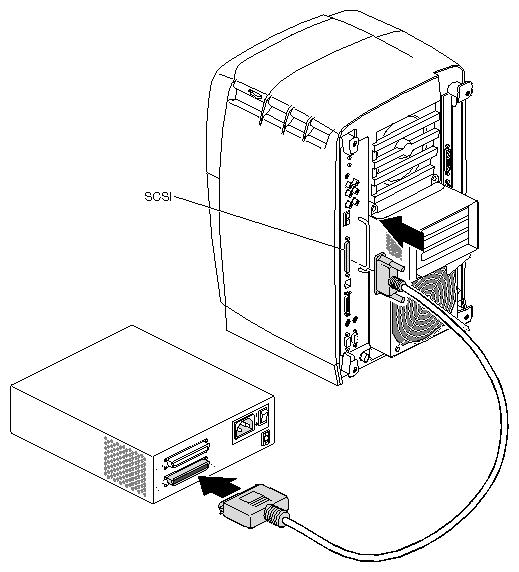
Connect the single device, or first of several devices.
Connect one end of the cable to the Octane workstation or the back of another device.
Connect the other end of the SCSI cable to one of the SCSI connectors on the back of the device and secure the clips on each side of the connector.
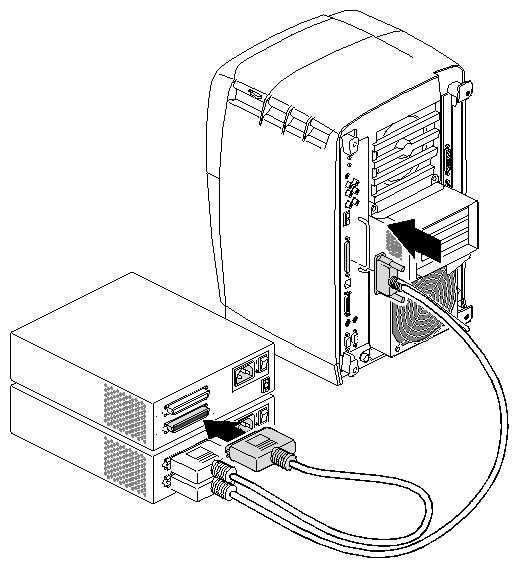
Connect one end of the cable to the open connector on the first device, as shown in Figure 6-7.
Attach the other end to one of the connectors on the device you are adding.
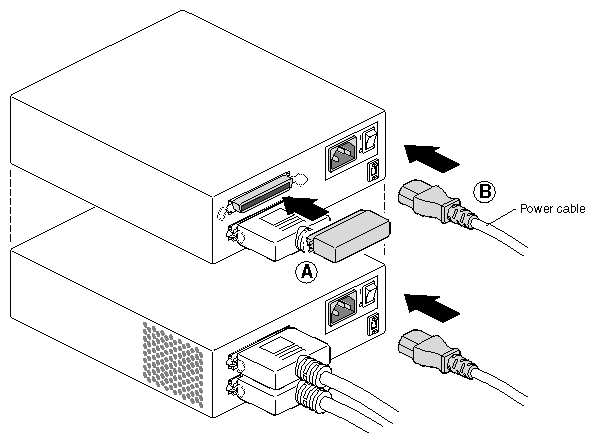
Connect the terminator to the last device in the daisy chain. (Step A) Be sure to secure the clips on each side of the terminator. The terminator is designed to fit only one way.
Connect power cables to each device and to an electrical outlet.(Step B)
Note: Remember to turn on the external devices first and then your workstation to make sure the devices are recognized.
You are now ready to power on your system and check to make sure that the device is recognized.
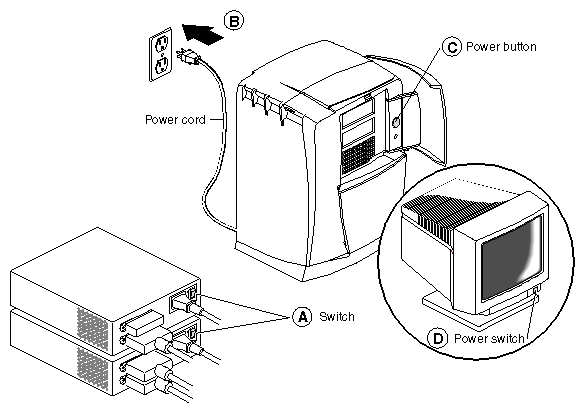
Plug in the power cord. (Step A)
Replace the lockbar (if one was removed).
Open the cover on the front of the Octane workstation.
Slide the lockbar into the lockbar slot.
Insert the lock through the lockbar at the back of the workstation.
Push the power button on the workstation. (Step B)
Press the power switch on the monitor. (Step C)
After you've attached the device to your workstation, check to make sure your system recognizes the device.
The system automatically sets up the system software for most external devices you install and places an icon on the desktop.
To check the system configuration, follow these steps:
Turn on the external device first. External devices can be turned on in any order. (Step A)

Tip: Always turn on the external device before turning on the workstation; otherwise, the system does not recognize the device. If your workstation is powered off, turn on the system power. (Step B)
Open the door on the front of the Octane workstation.
Press and release the power button to turn on the system. (Step C)
Press and release the power switch on your monitor. (Step D)
After a few moments, the system starts up.
When you see the login screen, log in to your account. For more information on logging in, go to Chapter 1, “Logging Into the Octane Workstation”.
If the device is installed correctly, you see an icon for it on the desktop. Figure 6-11 shows the icon for a CD-ROM drive.

You can also use the System Manager to check that the external device is shown correctly.
From the Toolchest > System > System Manager > Hardware and Devices > choose Removable Media Manager. You see a window showing the installed external devices.
Look for the device you installed under Shared Resources. This information is also available by opening an IRIX shell and typing hinv.
If the device you installed does not appear:
Power off the system.
Check that you've connected the correct SCSI cable to the device or between devices.
To daisy-chain a mix of wide and narrow devices, place the wide devices (as a group) closest to the Octane workstation where the bus is wide, and place the narrow devices (as a group) at the end of the daisy chain.
If the device is the last SCSI device on the daisy chain, make sure it has a terminator installed on it.
Restart the system and check the System Manager listing or hinv listing again.
The software automatically recognizes any device you install. Use Table 6-4 for more information on various SCSI external devices.
Table 6-4. Additional Information on External SCSI Devices
Installed device: | For Information on: | Go to: |
|---|---|---|
Floppy drive | Formatting and | |
CD-ROM drive | Special instructions for setting up a CD-ROM others can access
Additional information | Toolchest > Help > Online Books> End User bookshelf > Personal System Administration Guide, “Setting Up SCSI Peripherals”
Toolchest > Help > Online Books > End User bookshelf IRIX Admin: Peripheral Devices, and search for “CD-ROM, Floptical, and Floppy Disk Drives” |
Tape drive | Backing up data onto a tape | Toolchest > Help > Online Books > End User bookshelf > Personal System Administration Guide > ”Backing Up and Restoring Files” |
Printer | Setting up a printer | Toolchest > System > System Manager > Hardware and Devices > Printer Manager
For general information, go to Toolchest > Help > Online Books > End User bookshelf > Personal System Administration Guide >“Setting Up Network, Peripheral, and Printer Connections” |
If you are using the drive as an IRIX device, follow these steps to format a floppy disk, if necessary:
From the Toolchest choose System > System Manager > Hardware and Devices > Removable Media Manager.
A window appears with icons of the recognized devices.
Select your device by clicking on it.
Click the Format button.
Floppy disks take about 2 minutes to format.
For more information on formatting disks, choose Online Books from the Help toolchest and search for “Formatting Floppy and Floptical Disks” in IRIX Admin: Peripheral Devices.
You are finished formatting the floppy disk.
To eject a floppy disk from an external floppy drive, press the eject button on the floppy device.
This section tells you how to install serial devices. Serial devices include
The Octane workstation has two PC-compatible serial ports. Each port can also be configured to operate in other modes and adapter cables are available to simplify interconnection for those modes. For more information, see Appendix C or Octane Hardware Central.
To install a serial device, follow these steps:
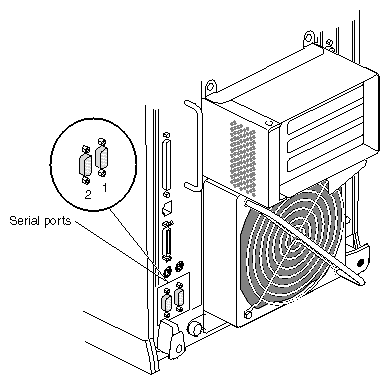
Locate the serial ports on the back of the Octane workstation, as shown in Figure 6-12.
Serial ports are labeled 1 and 2 and are DB9 connectors.
Unpack the serial device and cables.
Table 6-5. Serial Port Assignment
If you are installing:
Use:
A console terminal
Serial port 1
Any other serial device
Either serial port
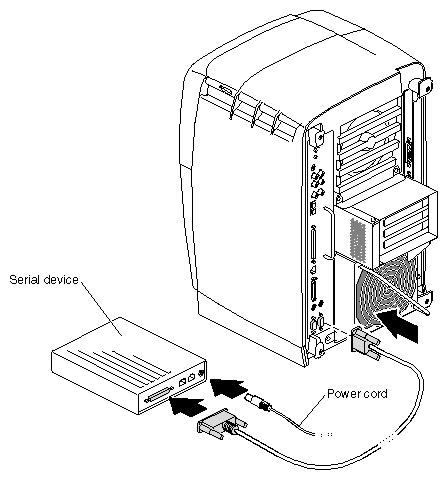
Attach the serial device cable.
Plug in the serial device's power cable (if any).
Plug the socket end of the power cable into the power connector on the back of the serial device.
Plug the other end into a grounded three-pronged wall outlet or power strip.
All audio ports are located on the upper portion of the system module and include
Microphone (in)
Speakers/headphone (out)
Speaker power (out)
Analog Line level I/O
Coaxial Digital I/O
Optical Digital I/O

To connect an audio device, plug the device cable into the appropriate port.
Use the Audio Panel found in the Toolchest > Desktop > Control Audio to make adjustments to audio.
For other audio information, from the Toolchest > Help, choose either:
Online Books > End User > Media Tools User's Guide.
“How Do I,” if you have a specific audio task you wish to perform.
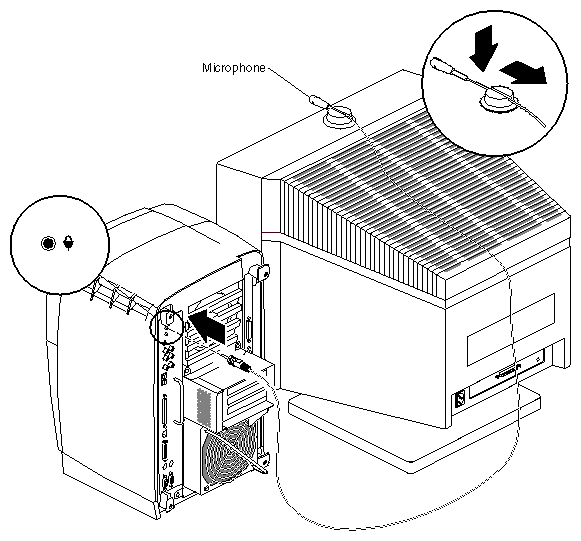
Attach the microphone to the Octane workstation.
Place the microphone cord through the slot in the microphone base.
Slide the microphone into the base. See Figure 6-15.
Place the microphone on the monitor in the center and to the front.
Drape the cord over the back of the monitor. Draping the cord over the side of the monitor causes the microphone to point away from the user, reducing the quality of the sound.
Attach the microphone cable to the microphone port on the Octane workstation.
For pinout and technical specification information, see Appendix C.
The speakers connect to the Octane workstation on the system module. If you choose to use the headphones without the speakers, plug the headphones directly into the speaker port. Otherwise, insert the headphones into the jack on the front of the right (active) speaker.
Before connecting the speakers to the Octane workstation, power it off. For instructions on shutting down and powering off the Octane workstation, turn to “Shutting Down and Powering Off the System”. Then return here for instructions on attaching the speakers.
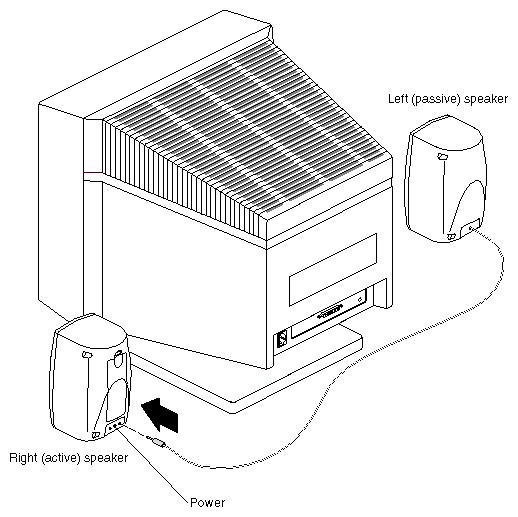
Place the left (passive) speaker on the left side of the monitor and the right (active) speaker on the right side of the monitor. (The left [passive] speaker has a cord permanently attached to it.)
Run the cord from the left (passive) speaker behind the monitor.
Attach the left (passive) speaker cord to the right (active) speaker. Use the port marked L. See Figure 6-16.
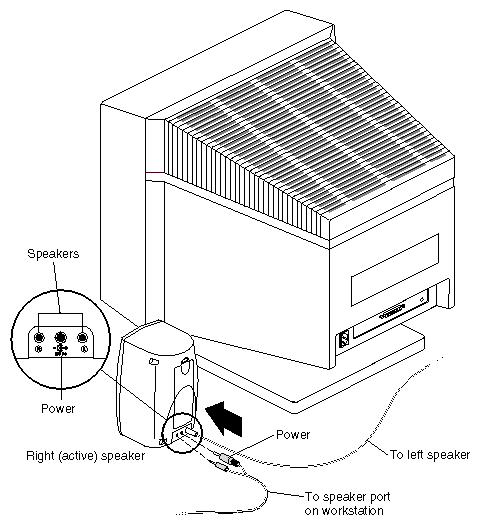
On the cable with double connectors on each end, locate the end with one female connector and one male connector.
Attach the female power connector to the middle port on the right (active) speaker.
Attach the male connector to the port labeled R on the right (active) speaker.
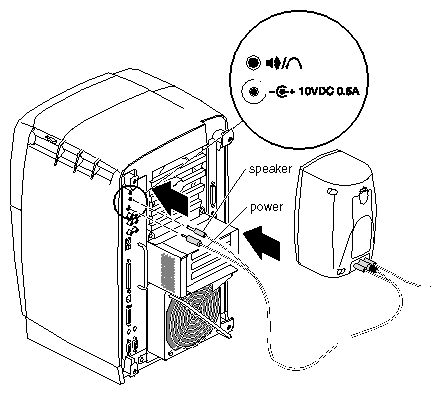
Attach the other end of the speaker power and audio cable to the Octane workstation.
Attach the smaller tipped power connector to the Octane speaker power port.
Attach the larger tipped connector to the Octane speaker port.
Press the power button on the front of the active speaker.
Power on the Octane workstation. Go to “Powering On the Octane Workstation”.
For pinout and technical information, see Appendix C, “Technical Specifications,” or Octane Hardware Central.
The analog line level audio ports are color-coded. Red is right. White is left. Input is upper. Output is lower. These ports are compatible with consumer devices such as stereo receivers and VCRs, as well as with professional audio equipment.
For more pinout and technical information, see Appendix C, “Technical Specifications.”
The coaxial digital audio ports are color-coded. Output is white. Input is red. These ports are compatible with consumer devices with coaxial digital interfaces, CD players, as well as professional audio equipment.
This port is in accordance with AES-3id recommendations for 75 ohm 1 V peak-to-peak coaxial connection of AES3-1992 interfaces.
For pinout and technical information, see Appendix C, “Technical Specifications.”
A red LED is visible in the optical digital Out port or cable tip when audio is activated. Optical digital In is the upper port. Optical digital Out is the lower port.
These ports are compatible with other equipment displaying the ADAT® optical logo, as well as consumer devices such as CD players with digital optical interfaces.
Cover the optical digital port with a cap when is not in use to keep out dust and debris.
| Note: Do not touch the tip of the fiber optic cable, or performance may be reduced. |
Optical digital cable should be three meters or less. Using a longer cable may cause performance to be reduced.
For pinout and technical information, see Appendix C, “Technical Specifications” or Octane Hardware Central.
See “Shutting Down and Powering Off the System” to shut down the system.
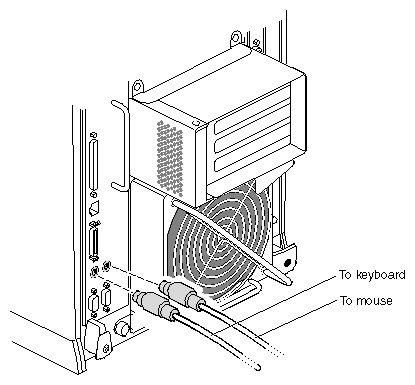
It is recommended that you connect the keyboard to the keyboard port, and the mouse to the mouse port. However, both work in the either port. You must power off the workstation to switch the ports.
Note: While you can disconnect and reconnect it to its port while the system is on, you cannot switch ports while the Octane workstation is on. For pinout and technical information, see Appendix C, “Technical Specifications.”
When the workstation is shut down, disconnect the mouse or keyboard from its port on the back of the workstation.
Connect the new mouse or keyboard cable to the workstation.
Power on the workstation.