Since both memory and the processor reside in the same area of the workstation, this chapter provides information on installing and removing a processor (CPU) or memory (DIMMs).
The following topics are covered in this chapter:
To prepare the workstation to install or remove a CPU or memory, follow these steps:
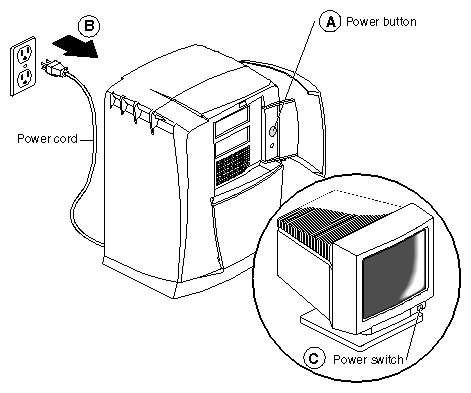
Open the cover and push the power button to power off the Octane workstation. (Step A)
Unplug the power cord from the electrical outlet and from the Octane workstation. (Step B)
Press the power switch on the monitor. (Step C)
Wait 5 minutes before removing the system module.

Warning: The heat sinks on the CPU and system module become very hot. Wait 5 minutes after powering off the Octane workstation before you remove the system module. Test before touching the CPU or heat sinks.
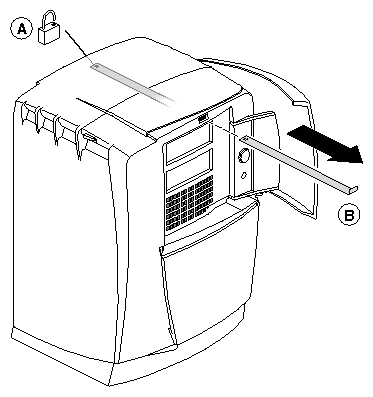
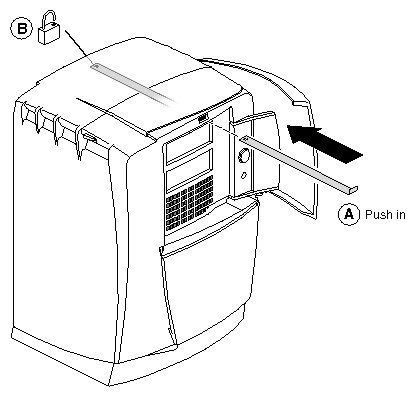
Remove the lockbar which locks the system module and bezel to the chassis.
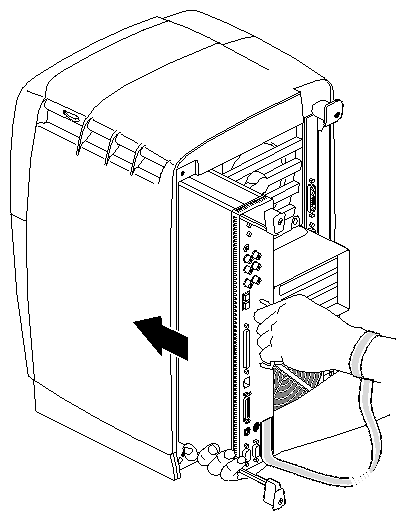
Unlock the lock at the back of the Octane workstation. (Step A)
Pull the lockbar out of the Octane workstation. (Step B)
Face the rear of the workstation.
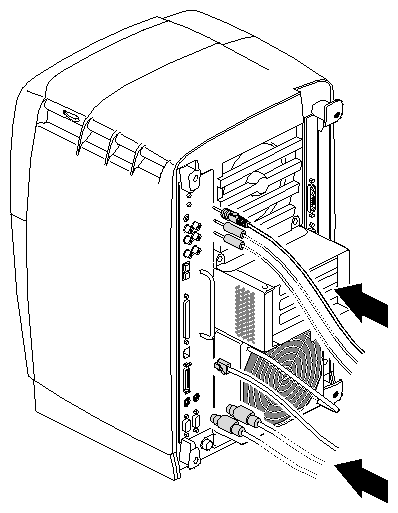
Remove the cables attached to the system module.

| Caution: The components inside the Octane workstation are extremely sensitive to static electricity; you must wear the wrist strap while replacing parts inside the workstation. |
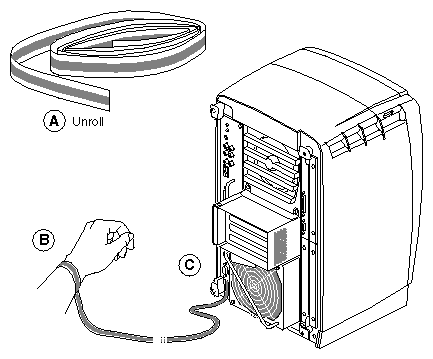
Unwrap the first two folds of the band and wrap the exposed adhesive side firmly around your wrist. (Step A)
Unroll the rest of the band and peel the liner from the copper foil at the opposite end. (Step B)
Attach the copper foil to the module you are removing: system module, XIO module, frontplane, PCI module. Otherwise, use any convenient and exposed electrical ground, such as a metal part of the Octane workstation. (Step C)
Warning: The heat sinks on the CPU and system module become very hot. Wait 5 minutes after powering off the Octane workstation before you remove the system module. Test before touching the CPU or heat sinks.
To remove the system module, you need to power off the system, wait 5 minutes after powering off the workstation to allow the heat sinks to cool, and attach the wrist strap. If you have not already done so, go to “Preparing the Workstation to Remove and Install a CPU and Memory” and follow the instructions through attaching the wrist strap. Then return here and follow the instructions.
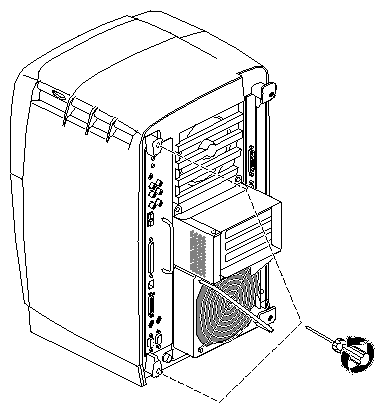
For illustration purposes, the optional PCI module is shown installed.
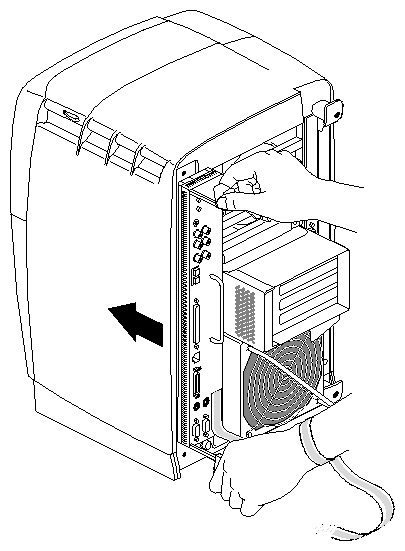
Loosen the captive screws that hold the sliding handles to the Octane workstation. See Figure 2-5.
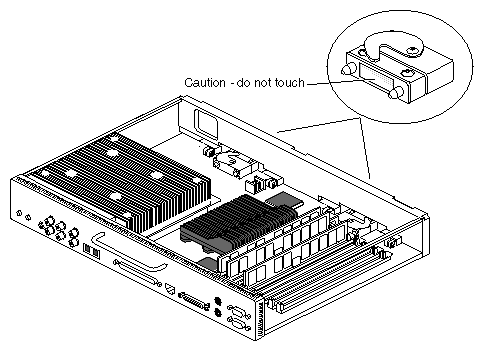
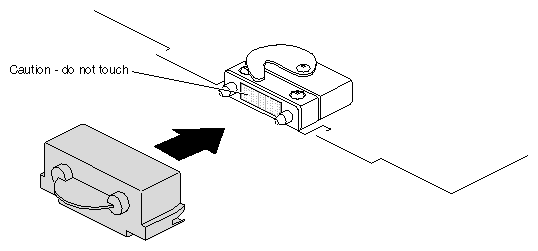
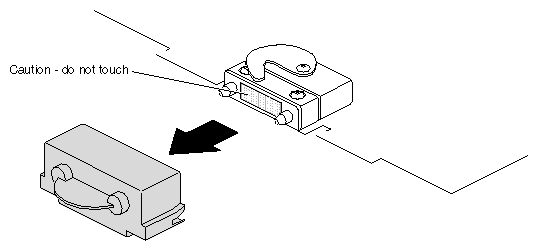
Look for the two compression connectors when you take the system module out of the chassis, and do not touch them. They are on the back of the system module, and connect to the chassis when the system module is installed in the workstation.

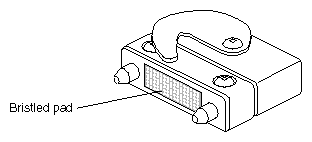
Caution: The gold bristled pad on the compression connectors on the back of the system module is very delicate and easily damaged. Before you remove the system module, read Appendix B, “Care and Cleaning of the Compression Connector.”
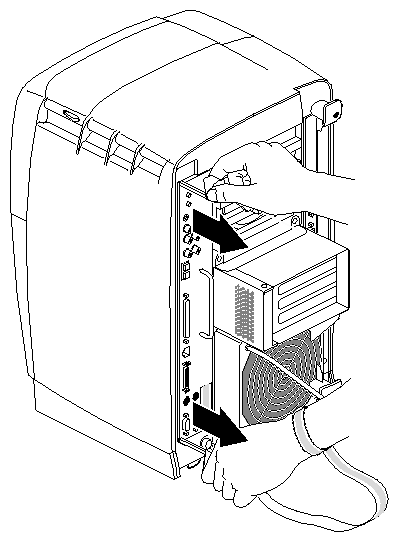
Pull both sliding handles simultaneously until they are completely extended. This action releases the system module from the workstation.
Caution: To avoid damaging the module, do not attempt to remove the module by pulling the sliding handles.
Pull the system module from the chassis by grasping the module handle with your left hand and bracing your right hand against the top of the workstation.
Support the bottom of the module as you pull it out.
Place it on a dry, antistatic surface with the CPU and DIMMs facing up. Your desktop works well.
Caution: Do not touch the compression connectors as you remove the system module. The side of the compression connector that connects to the workstation is extremely delicate. See Appendix B for information and care of the compression connectors.
Place a cap on each compression connector on the back of the system module. (Compression connector caps come with the workstation.)
Warning: The heat sinks on the CPU and system module become very hot. Wait 5 minutes before touching them, and then test before touching them.
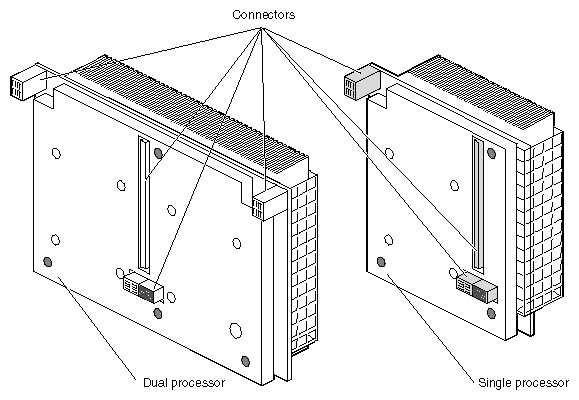
Your Octane workstation uses either a single or a dual CPU (processor). The installation procedure is the same for a single or dual processor of any speed.
To remove a CPU, you must first power off the workstation, wait 5 minutes to allow the heat sinks to cool, attach the wriststrap, and remove the system module. If you have not already done so, go to “Preparing the Workstation to Remove and Install a CPU and Memory” and follow the instructions through removing the system module. Then return to this section and follow these instructions:
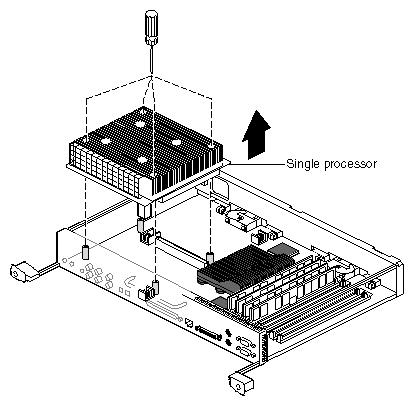
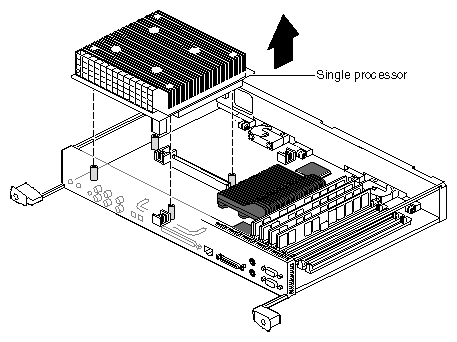
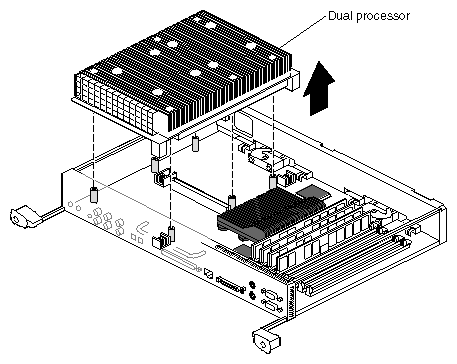
Loosen the four captive Phillips screws holding the CPU in place. The dual processor has six screws.
Caution: Do not remove the four inner screws (not Phillips) holding the heatsink to the CPU. Slide your fingers under the edge of the single processor closest to the back of the module, and push up to release it. You may need to use two hands to lift it out.
Go to step 4 for instructions on lifting the dual processor from the system module.
Slide your fingers under the side bar of the system module and under the dual processor and push up to release it. After releasing it, lift it out of the system module.
To install a CPU, you must first power off the workstation, wait 5 minutes after powering off the workstation to allow the heat sinks to cool, attach the wriststrap, remove the system module, and remove a CPU. If you have not already done so, go to “Preparing the Workstation to Remove and Install a CPU and Memory” and follow the instructions through removing the CPU. Then return to this section and follow these instructions:
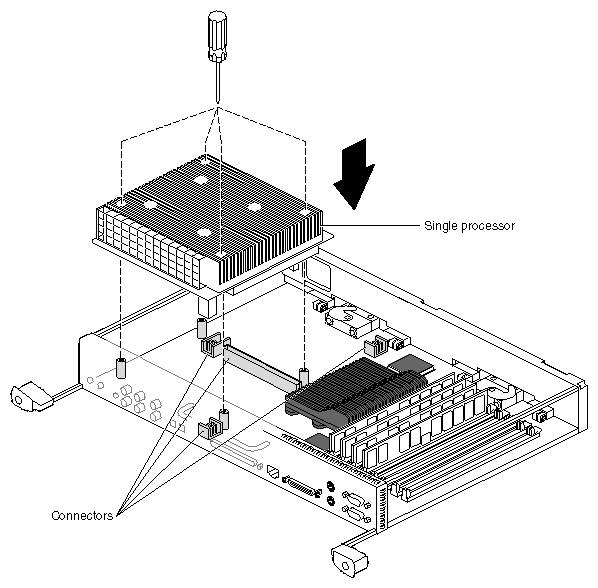
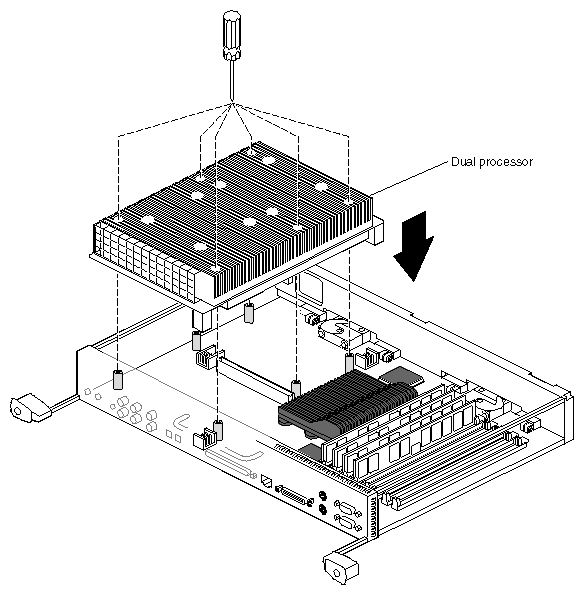
Turn over the CPU to determine where the connectors are located. Align the connectors on the base of the CPU with the connectors on the system board.
If you are installing a single processor, place it on the side of the system module closest to the panel of connectors. See Figure 2-15.
Lower the CPU onto the standoffs and connectors as shown in Figure 2-15. (See Figure 2-16 for an illustration of the dual processor installation.)
Tighten the four captive screws to the standoffs. (The dual processor has six captive screws.)
You have finished installing the CPU and are ready to replace the system module.
To install or remove memory, you must power off the workstation, wait 5 minutes after powering off the workstation to allow the heat sinks to cool, attach the wriststrap, and remove the system module. Follow the instructions for preparing the workstation and removing the system module, “Preparing the Workstation to Remove and Install a CPU and Memory” through, “Removing the System Module.” Then return to this section.
| Caution: Dual inline memory modules (DIMMs) are extremely sensitive to static electricity. Handle the DIMMs carefully and wear the wrist strap to avoid the flow of static electricity. |
Before you install DIMMs in your Octane workstation, read the following information.
Bank 1 (sockets 1 and 2) must always be filled.
Minimum memory configuration is 64 MB in a bank. (2 x 32 MB DIMM)
Maximum configuration is 512 MB in a bank. (2 x 256 MB DIMM)
Banks are filled sequentially; when Bank 1 is full, fill Bank 2. Do not skip banks.
Each bank is either empty, or contains two DIMMs, one in each of the two sockets.
Each banks of DIMMS must contain two DIMMs of the same capacity or density and of the same type.
Capacity refers to the number of megabytes in a DIMM: 32, 64, 128, and so on.
Type refers to the construction of the DIMM. Because DIMM construction cannot be determined visually, it is important to know that two DIMMs are the same type before you begin installation. If you insert two DIMMs of different types, the system does not work. Banked DIMMs and stacked DIMMs are two examples of many different types of memory.
SGI DIMMs have color coded labels with a part number in the middle of the label:
the 32 MB DIMM has a yellow label
the 64 MB stacked DIMM has a blue label
the 64 MB DIMM (not stacked) has a green label
the 128 MB DIMM has a brown label
the 256 MB stacked DIMM has a red label
Minimum memory capacity in the Octane workstation is 64 MB. (2 x 32 MB DIMMs)
Maximum memory capacity in the Octane workstation is 2 GB. (8 x 256 MB DIMMs)
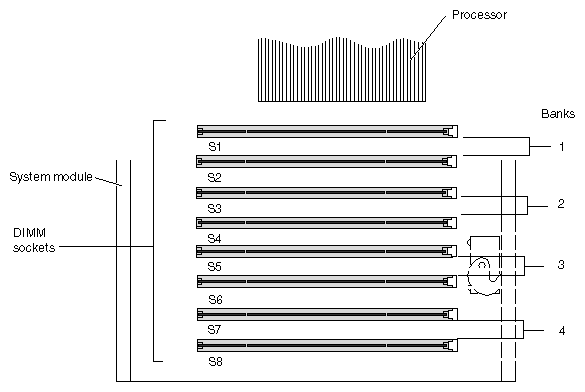
DIMM sockets are labeled between sockets, as shown in Figure 2-17.
If you have not already done so, power off the workstation, wait 5 minutes after powering off the workstation to allow the heat sinks to cool, attach the wriststrap, and remove the system module from the chassis. See “Preparing the Workstation to Remove and Install a CPU and Memory” and follow the instructions through removing the system module. Then return to this page.
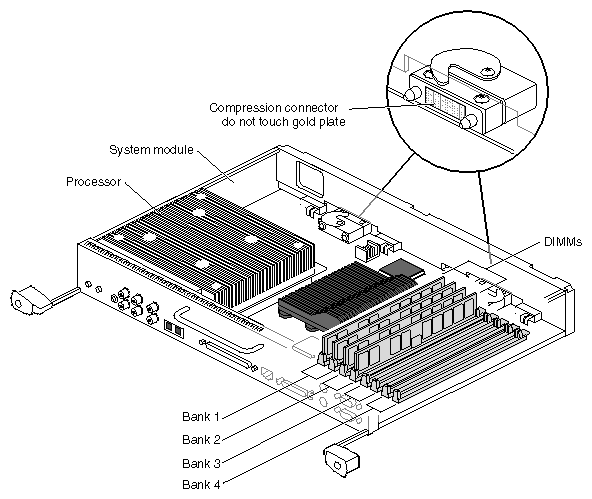
With the system module lying on a flat, dry, antistatic surface, locate the DIMM banks and sockets as shown in Figure 2-17 and Figure 2-18.
Locate the DIMMs you want to remove.
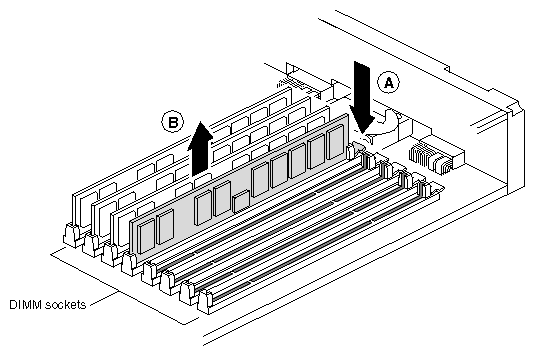
Caution: Do not touch the connector near the DIMM removal levers.
Remove the DIMMs.
Press down on the latch at the end of the DIMM socket. The DIMM partially ejects from the socket. (Step A)
Remove the DIMM. (Step B)

Note: Both sockets in a DIMM bank must be either empty or populated. If you are removing one DIMM and not replacing it immediately, also remove the other DIMM in the bank and replace it when you install a new DIMM.
Before installing memory, see “About Memory”. If you have not already done so, power off the workstation, wait 5 minutes after powering off the workstation to allow the heat sinks to cool, attach the wriststrap, and remove the system module to install memory. See “Preparing the Workstation to Remove and Install a CPU and Memory” and follow the instructions through removing the system module. Then return to this page.
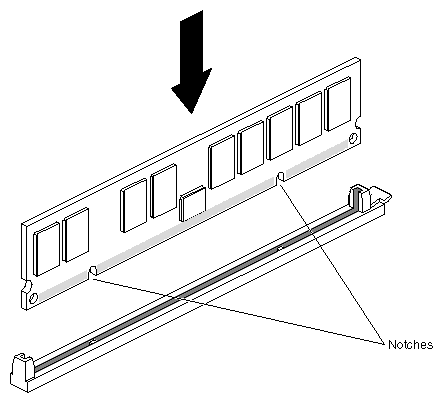
DIMMs are notched on the bottom so that they cannot be inserted incorrectly.
Insert the DIMM into the socket, gently but firmly. You hear a click as it is seated, and the latch on the end of the socket moves up.
Check to be sure both sockets in the bank are full. DIMMs must be installed in pairs.
You have finished installing memory and are ready to replace the system module.
Remove the caps on the compression connectors on the back of the system module. Do not touch the system module compression connectors as you lift the module into the workstation.
Caution: Do not insert the system module into the workstation unless the power cord is unplugged from the electrical socket. Inserting the system module into an Octane workstation with the power cord connected to an electrical socket causes damage to the Octane workstation.
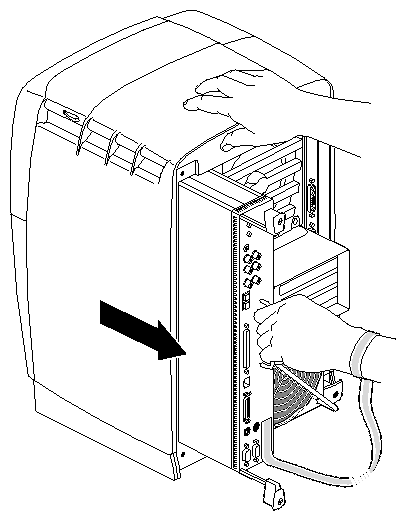
Grasp the system module by its immovable handle and support it with one hand as you slide it into the chassis.
Push the module completely into the chassis using the immovable handle. (Both sliding handles protrude.) The system module stops when it is slightly out of the chassis.
Push the sliding handles simultaneously to connect the system module to the workstation.
Push firmly on the handles to completely lock the system module to the workstation.
The handles are completely recessed and the system module is flush with the chassis when it is fully seated and locked to the workstation.
Tighten the captive screws in the sliding handles until the system module is attached to the chassis.
Remove the wrist strap.
Replace any cables you removed.

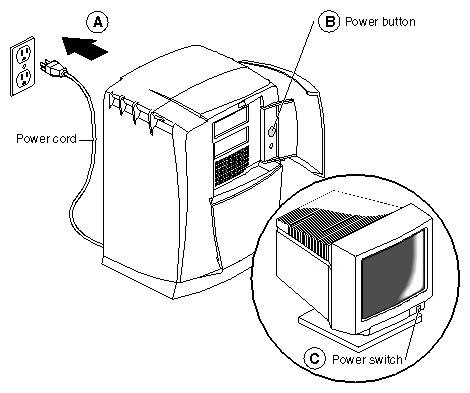
Plug in the power cord. (Step A)
Push the power button on the workstation. (Step B)
Press the power switch on the monitor. (Step C)
| Note: If the workstation does not boot, reseat the system module. |
Replace the lockbar.
Open the cover on the front of the Octane workstation.
Slide the lockbar into the lockbar slot. (Step A)
Insert the lock through the lockbar at the back of the workstation. (Step B)
After you have powered on your system, go to the Toolchest > System Manager > Hardware and Devices > “About This System” and check the amount of memory listed after the “Main Memory” heading.
The amount of memory shown should equal the amount of memory you removed or installed. For example, if you originally had 256 MB, then removed two 32 MB DIMMs, the System Manager should show that you have 192 MB of memory.
If the amount of memory is incorrect, follow the directions at the beginning of this chapter to power off your system and check the installation or removal procedure.
Check the angle of the DIMMs. They should be upright and completely seated.
Check that each bank is populated with two DIMMS, and that they are the same type. You must have an even number of DIMMS installed.
Check the color of the label on the DIMM. Both DIMMs in a bank must be the same with the same colored label.
Complete the installation or removal procedure. If, after you have powered on the Octane workstation, checked the amount of memory in “About This System,” and found that the amount of memory that is registered is still incorrect, see Chapter 8, “Troubleshooting.”