This chapter contains these topics
This section includes:
Movie Maker is an application for composing and editing multi-track movie files with video, image, and audio. Movie Maker has an intuitive interface, similar to a basic text editor—so you do not need any specific knowledge of professional or digital audio/ video editing techniques to yield polished results. It also includes filters for adding special audio and video effects, as well as a title palette for adding graphics and text to your movies.
Movie Maker enables you to put together content for:
a Web page
a presentation
a stand-alone movie, to play over a workstation or copy to another medium, such as videotape
The following images offer a visual introduction for the new Movie Maker user. Click any image to display an enlarged view of the image in a separate window. It may be helpful to first see “Clips and Tracks Explained.”
| Note: For a general introduction to desktop movie production, see The Big Picture page (this is a link to a Web page that is installed with the Digital Media Tools Guide.) |
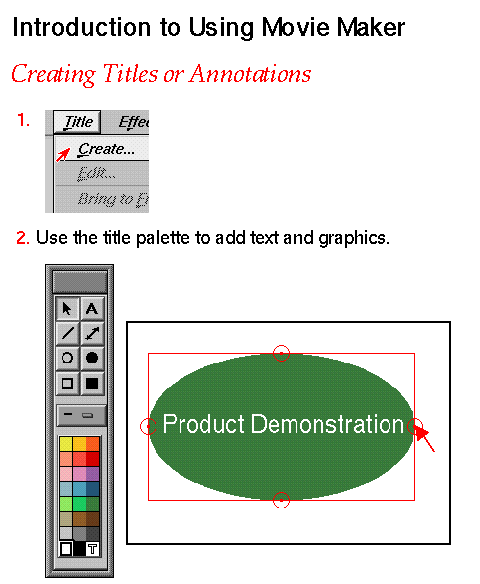
Figure 3-4. Visual Introduction: Creating Titles or Annotations (Click Image to Display Enlarged View)
 |
This document follows these conventions:
Links in italics launch a term definition. For example, click: frame rate.
Red words indicate “launch links,” meaning that if you click them, they launch the tool that they name, for example, Media Recorder .
The symbol “>” between a menu name and menu item indicates a path to a menu choice. For example, “File > Open” means “Open the File menu and choose Open.”
This section contains:
Related Topic: “How to Use Movie Maker: A Visual Introduction”
You can access the Movie Maker tool three ways:
To launch it immediately, click Movie Maker
To launch it by clicking on an icon:
From the desktop Toolchest, choose Find > Media Tools.
Double-click the Movie Maker icon.
To launch it from the command line (in a UNIX shell), type: moviemaker
| Tip: You can open a movie file in Movie Maker by dragging and dropping the file directly onto the Movie Maker icon. |
If you don't already have the media files that you would like to use for your movie, you'll need to start by creating your own movie, audio, or image files. This section gives an overview of how you can do this using software tools that are included with your basic system software. If you already have media file(s) that you would like to start working with, go directly to “Editing.”
Media Recorder lets you record movies from your computer screen. For example, you can use this feature to capture a demonstration of a software program. Also, if you have a camera or VCR connected to your workstation (such as the IndyCam), you can record video, still images, or audio.
See Chapter 1, “Media Recorder,” for information on using Media Recorder.
You can use any of the following tools to create audio for your movie:
To record audio directly into a movie, choose Control > Record Audio... . This opens a synchronized audio capture tool. See “Recording Audio Into a Movie.”
Use Media Recorder to record sound from a microphone or equipment connected to the Line In port on your workstation.
To capture audio from a CD in your CD-ROM drive use CD Player . To capture from a tape in your DAT drive, use DAT Player .
Use Sound Track to compose and edit multi-track audio compositions.
You can use the File > Movie Setup... dialog to accomplish the following tasks:
You can set the movie frame dimensions and frame rate to be appropriate for the type of movie you want to create.
Choose File > Movie Setup... .
Use the Production Task menu button to choose the movie type.
The dimensions provided are based on industry standards. If you want to specify the frame rate and frame dimensions, choose Custom..., then enter new numbers in the fields provided by the dialog that appears.
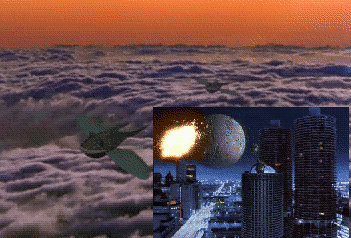
Your movie can include clips with dimensions smaller than those you set with the MovieMaker: Setup dialog. The smaller clips appear inside the larger frame (see Figure 3-6 for an example). You can reposition where smaller clips appear in a frame by using the Picture in Picture dialog (see “Using the Picture in Picture Tool”).
| Note: Setting the frame rate higher than the original frame rate creates replicated frames; it does not increase the frame rate of the original frames. For example, if one clip of a movie has a 15 frames per second (fps) frame rate, and another clip has 30 fps, Movie Maker programs the movie to play back at the higher frame rate, but the 15 fps clip will have two of each frame. This does not significantly affect the visual quality of the movie. |
Any spaces in the movie that do not contain a video or title clip appear as “blank” frames with solid background color. By default, this color is black, but you can change it. The background color is also applicable if, as mentioned above, you have chosen movie frame dimensions that are larger than some or all of the clip frame dimensions in your movie. See Figure 3-6 for an example use of this. To change the color:
Choose File > Movie Setup... .
Double-click the small square next to the words “Background Color.”
There is a dark-to-light scale under the hexagon. Click the small triangle on the scale and drag it to the right to see more colors. Adjust the dark-to-light scale as desired.
There is a very small circle inside the hexagon. Click it and drag it around the hexagon to select a new color. The “Current Color” square reflects the color that the circle is on.
To apply the color, click the downward-pointing arrow under Current Color. The Stored Color updates. Then click the Apply button to see what it looks like in your movie.
Click OK to apply the color and close the color dialog.
You can set the default length of time you want imported images to appear in your movie. To set this:
Choose File > Movie Setup... .
Edit the Default Image Duration Field in the Movie Setup dialog.
To add a title bar title and internal comments to a movie file:
Choose File > Movie Setup... .
Enter text in the Movie Title and Movie Comment fields of the MovieMaker: Setup dialog.
Assigning a title bar title means that the title appears in the title bar of the window (Media Player) that plays the movie. For example, if someone launches your movie from a web page or presentation, the movie title bar might display something like “The President's Speech” instead of a filename like president.mv.
The Movie Comments field is there in case you want to add information that can be accessed during the editing of your movie file. For example, you may want to give a short description of the movie clip and how you plan to use it, or a note for someone else that edits the movie. Once the notes are made, they are accessed the same way that they are created—by looking at the MovieMaker: Setup dialog.
| Note: The title can be different from the filename you give the movie when saving it. |
This section describes “Opening a Movie File” and “Bringing Additional Clips Into a Movie.”
To edit your movie, you must first bring it into Movie Maker. Here are two ways to open a file in Movie Maker:
If Movie Maker is not already launched, drop the movie file icon directly onto the Movie Maker icon. Movie Maker immediately launches with the movie file.
If Movie Maker is already launched:
Choose File > Open...
Use the file browser to select the file you want to bring into Movie Maker.
This section includes:
See also “Editing Clip Names” and “Including Clip Notes.”
Place the time indicator at the point you want to insert the clip.
The clip will be placed after the time indicator. For details, see “Setting the Insertion Point.”
Choose File > Import... .
Use the file browser to select the movie, then press the Enter key.
| Tip: Once a clip is imported, you can resize its frame dimensions with the Picture in Picture tool—see “Using the Picture in Picture Tool.” |
| Tip: If you import movie clip that has a different sample rate than the current movie, Movie Maker uses a simple low-quality conversion to match sample rates. To maintain the best possible audio quality, use a conversion tool such as Media Convert to match the sample rate of clip to the current movie before importing it. |
| Tip: You can copy frames from Media Player to Movie Maker by using the tools' standard copy and paste commands. |
Place the time indicator where you want to insert the image.
The new image will be inserted after the time indicator. See “Setting the Insertion Point.” for details.
Choose File > Import... .
Use the file browser to select the image, then press the Enter key.
The default length of time an imported image appears in your movie is one second. Once the image is imported, you can extend or decrease this length by editing the image clip's Duration field in the Clip Bin.
| Note: Once an image is imported, you can resize its frame dimensions with the Picture in Picture tool—see “Using the Picture in Picture Tool.” |
| Tip: You can copy an image from Image Works or ImgView , the InPerson whiteboard, or Media Player and paste it into Movie Maker, by using the tools' standard copy and paste commands. |
With Movie Maker, you can add a soundtrack or a series of different sound clips to a movie, or selectively add sounds to certain areas of a movie.
Place the time indicator where you want to insert the sound.
The new audio track will placed after the time indicator. See “Setting the Insertion Point.” for details.
Choose File > Import... .
Use the file browser to select the movie, then press the Enter key.
| Tip: If you import an audio clip that has a different sample rate than the current movie, Movie Maker uses a simple low-quality conversion to match sample rates. To maintain the best possible audio quality, use a conversion tool such as Media Convert to match the sample rate of clip to the current movie before importing it. |
| Tip: You can copy and paste audio tracks from Sound Track to Movie Maker. To do this, simply use the standard copy and paste commands in each of the tools. |
To record audio directly into a movie with a capture tool that is synchronized to the playing of the movie:
Place the time indicator where you want the audio to begin.
This is also where the movie begins to play when you click the Record button.
Choose Control > Record Audio... .
This opens a synchronized audio capture tool. When you click the Record button, the movie begins playing at the exact moment that audio capture begins (there is a 3-2-1 countdown before recording begins). The audio input that is captured is controlled by the Audio Panel .
Click the Record button (the button with a circle) when you are ready to record.
Click the Stop button (the button with a square) to stop recording. The audio appears as a new clip.
This section provides instructions on editing with Movie Maker. It contains:
Related Topic: “Using Movie Setup Options”
Use the time indicator to set the insertion point for imported or pasted clips. You can also use it to scroll through the movie—see “Scrolling Through a Movie.”
Two ways to set the insertion point:
For the highest visual control, see “Setting the Insertion Point in Filmstrip Mode.”
For a quicker way, see “Setting the Insertion Point in Preview Mode.”
The clip you are importing or pasting will appear directly after the time indicator. To position the time indicator:
View the movie in Filmstrip mode.
See “Changing the View Mode” for details.
By default, imported clips create a new, top layer track. If, instead, you wish to insert the imported clip inside an existing clip, selected the existing clip now.
See “Selecting and Deselecting Clips” for details.
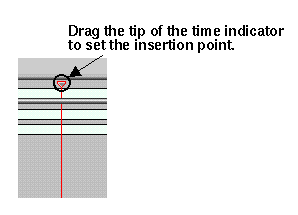
Click and drag the triangle (shown in Figure 3-7) at the top of the time indicator to position the time indicator at the place you want the clip to appear.
The inserted clip appears directly after the time indicator. It is important to use the triangle tip if you are importing a clip into another clip, otherwise you'll lose the current clip selection.
A few visual cues mark the time indicator:
The time indicator appears as a red vertical line in the viewing area as well as the timeline area.
The lower left corner of the window displays the time at which the clip will be inserted.
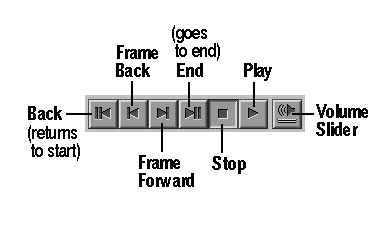
To move the time indicator in small increments, click the Frame Forward or Frame Back buttons, as shown in Figure 3-26. To reposition the time indicator, simply click on a new point in the video or audio track.
| Tip: Use the -> and <- arrow keys on your keyboard to move one frame forward or one frame back. |
The clip you are importing or pasting will appear directly after the time indicator. To position the time indicator:
View the movie in Preview mode.
If necessary, see “Changing the View Mode” for instructions.
By default, imported clips create a new, top layer track. If, instead, you wish to insert the imported clip inside an existing clip, selected the existing clip now.
See “Selecting and Deselecting Clips” for details.
Click and drag the triangle (shown in Figure 3-8) at the top of the time indicator to position the time indicator at the place you want the clip to appear.
It is important to use the triangle tip if you are importing a clip into another clip, otherwise you'll lose the current clip selection.
The clip is inserted after the frame that is currently displayed. For example, if frame 17 is displayed in the viewing area, and you then import a clip, the clip that you import begins directly after frame 17.
To move the time indicator in small increments, click the Frame Forward or Frame Back buttons, as shown in Figure 3-26. To reposition the time indicator, simply click on a new point in the video or audio track.
| Tip: Use the -> and <- arrow keys on your keyboard to move one frame forward or one frame back. |
To begin an edit or to reposition a clip, you need to make a selection. This section covers:
See also “Clips and Tracks Explained.”
To specify a time that you want to move the time indicator to, you can edit the time display (in the lower left corner of the window). Click once to make the field editable, then enter a new time and press Enter.
Selecting:
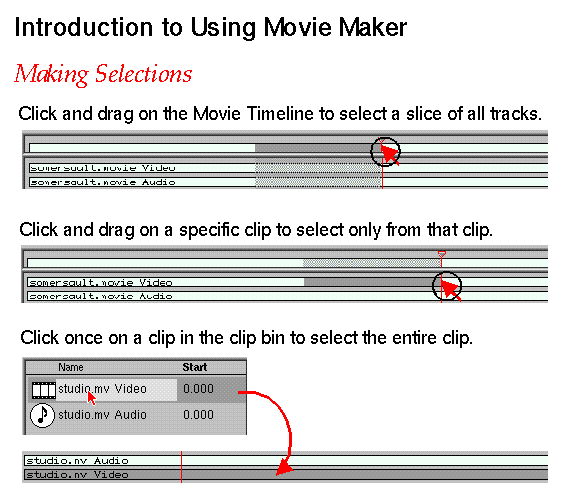
To select an entire clip, move the cursor to the Clip Bin and click once on the name of the clip you want to select.
Alternatively, you can double-click on the clip in the track area.
To select multiple clips, hold down the Shift key as you select additional clips.
To select all clips at once, choose Edit > Select All.
Deselecting:
To deselect any clip, select it while pressing the Shift key.
To deselect all clips at once, choose Edit > Select None.
If you want to select a slice from all layers of the movie, click and drag the time indicator in the movie timeline. Figure 3-8 illustrates this. As you move the cursor, watch the display area to see what part of the movie you are selecting.
You can alter the selection range by editing the selection time display (in the lower left corner of the window). Click once on the selection time to make it editable, then enter new times and press Enter.
To select a region of a clip, place your cursor on the track that contains the clip region you want to select; then click and drag the cursor to select an area. See Figure 3-9 for an example. As you move the cursor, watch the display area to see what part of the movie you are selecting.
You can alter the selection range by editing the selection time display (in the lower left corner of the window). Click once on the selection time display to make it editable, then enter new times and press Enter.
| Tip: Viewing the movie in Filmstrip mode can make selection easier—it provides more visual cues. See “Changing the View Mode” for details. |
Some visual cues that indicate the area you have selected.
The region of the track you selected is a darker shade.
The lower left corner of the window displays the seconds, frames, or time codes of the first and last selection points.
| Note: Deleting a section of a movie is different from clearing it. If you wish to clear a section so that it is replaced with blank frames, see “Replacing a Section of a Movie With Blank Frames or Silence” instead. |
Select the section of the movie that you would like to delete.
See “Selecting Sections of a Movie” for instructions.
Choose Edit > Delete.

Tip: Press the Backspace key instead of using the Edit menu.
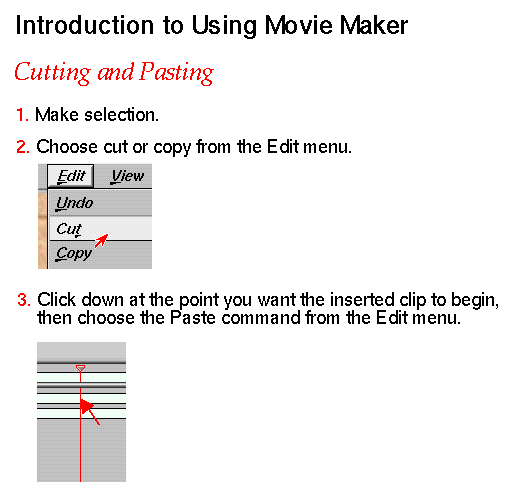
The copy, cut, and paste commands allow you to rearrange your video, image, and audio clips in any way you desire.
Select the section of the movie that you would like to copy or cut.
See “Selecting Sections of a Movie” for details.
Open the Edit menu:
To remove the section so that you can paste it somewhere else, choose “Cut.”
To copy the section so that you can paste a copy somewhere else, choose “Copy.”
To paste the cut or copied section elsewhere within the movie, place the time indicator (see “Setting the Insertion Point”) and then choose “Paste” from the Edit menu.
The section you cut or copied is added directly after the time indicator.
| Tip: Instead of using the Edit menu commands, use the keyboard shortcuts: |
Press Ctrl+C to copy
Press Ctrl+X to cut
Press Ctrl+V to paste
| Tip: You can copy and paste from Media Player or Sound Track to Movie Maker. You can also copy and paste between Movie Maker, Image Works, and the InPerson whiteboard. With these three applications, you can copy only one frame at a time, as opposed to a selection of frames. To copy and paste, use each application's standard copy and paste commands. |
You can replace selected frames with blank frames, or audio with silence:
Select the portion of the movie you want to replace.
See “Selecting Sections of a Movie” for detailed instructions.
Choose Edit > Clear.
The selected portion of the movie is cleared. In the viewing area (when using Filmstrip mode), the cleared frames appear black; audio waveforms become a straight line.
You can select a section of your movie to keep, then have Movie Maker trim the rest of the movie away. To do this:
Select the portion of the movie you want to keep.
See for detailed instructions.
Choose Edit > Trim to Selection.
The frames that you did not select are deleted from the movie.
The clip names appear in the Clip Bin, as shown in Figure 3-27. All clips are initially given the standard default name of “filename Video,” or “filename Audio,” and so on—where filename is the original filename of the imported clip or opened movie. For organizational purposes, you'll want to distinguish similar clips by name.
Click the clip name (in the Clip Bin).
The Name field becomes editable when selected.
Edit the name in the Name field, then press the Enter key.
For editing and organizational purposes, you may want to include comments on clips in the Clip Bin.
Use the horizontal Clip Bin scroll to scroll to the right until you see the Comment field.
Click once in the Comment field (of the clip you want to comment on), then enter text.
Press Enter key when done.
This section covers:
Related Topics: “Using the Picture in Picture Tool,” “Adding Filters for Effect,” and “Creating Titles and Annotations”
Figure 3-10 points out clips and tracks in the Movie Maker window. Clips represent parts of a movie, such as imported files, and you edit your movie by editing the clips. You can also use them for organizational purposes, such as dividing different scenes into clips, and naming them for your own reference.
All audio or video files imported into a movie become clips, which appear in the Clip Bin. Also, if a movie contains audio and you import it or open it in Movie Maker, it is displayed as two clips: an audio clip and a video clip. In addition, any titles or images, are also displayed as clips.
Tracks represent the timelines of each layer of the movie, and contain all the movie clips. The track at the top of all the layers is the one that will appear in front. For example, if you created a title clip and moved it to the bottom layer, the title would be obscured by the video clips that cover the same time period and are positioned in a higher layer. Thus, the title would not be visible when you play the movie. When layers of audio clips overlap, the sounds mix together.
When you reopen a saved or exported file, all the tracks and clips will be intact as in the original project, unless you compressed or converted the file. However, even when a movie file is compressed or converted, there will still be a separate audio and video track when you reopen it in Movie Maker (unless the movie does not include audio).
Select the clip you want to move—see “Selecting and Deselecting Clips” for details.
Once a clip is selected, it changes to a darker shade in the timeline area, and when you position the cursor over the clip, the cursor resembles a small hand, indicating that you can move the clip by dragging.
Drag the clip to a new location in the timeline area.
Select the clip(s) (see “Selecting and Deselecting Clips” for details).
Choose Edit > Bring to Front Layer to move the clip to the front layer of the movie, or Edit > Send to Back Layer to push it to the back layer.
Alternatively, you can select the clip and drag it to the top track to bring it to the front layer, or to the bottom track to push it to the back layer.
Select the clip (see “Selecting and Deselecting Clips” for details).
Click and drag on the small triangle (shown in Figure 3-8) at the top of the time indicator, scrolling through the movie until the time indicator is positioned at the point where you want to set the break.

Note: It is important that you grab only the very top of the time indicator; otherwise, you lose the clip selection and have to select the clip again. Choose Clip > Break.
If the clips you want to join are not already on the same track, position them on the same track.
Select the first clip, then hold down the Shift key while you select subsequent clip(s) to join with the first clip (see “Selecting and Deselecting Clips” for details).
Choose Clip > Join.
“Moving Clips by Dragging” describes one way to reposition a clip. You can also use the Clip Bin to edit the starting point of a clip: click in the clip's Start field to make it editable, then enter a new time. You can also change the length of a title or image clip by editing the Duration field.
| Note: Editing the Start field does not change the length of a clip. |
The Picture in Picture tool allows you to create an effect like the one shown in Figure 3-11, in which two or more different clips are displaying at the same time within the same movie. You do this by scaling and repositioning a clip frame relative to the overall movie frame:
Select the clip that you would like to scale and/or reposition.
See “Selecting Sections of a Movie” for details.
Choose Effects > Picture in Picture... .
The Picture in Picture dialog appears. The box in the dialog represents the frame boundaries of the selected clip.
With the cursor, click to grab a corner of the box, and drag it to desired size.
By default, the aspect ratio (width-to-height ratio) is maintained. To resize without maintaining the aspect ratio, hold down the Shift key.

Note: To enter specific parameters instead of editing the box interactively, click the More button. To reposition the frame, click in the middle of it and drag it to a new location.
Click Apply to see what the new size and position will look like in the movie view area.
Click OK to apply and exit the dialog.
| Note: In order for the effect to be seen, clips with smaller dimensions should be in front of clips that have larger dimensions. See “Moving a Clip to the Front or Back Layer of a Movie” for instructions. |
This section includes:
Movie Maker includes a Title palette that you can use to create a, as shown in Figure 3-12, or to annotate a movie using graphics and text, as shown in Figure 3-13.
The basic steps are:
Select the area in one of two ways:
Select the range of frames to which you want to apply the title or annotations (see “Selecting Sections of a Movie” for details). Then, choose Title > Create... and specify how long you want the title to appear. The Title palette appears.
Click to position the time indicator at the point you want the title to begin appearing. Choose Title > Create... and specify how long you want the title to appear. The Title palette appears.

Note: You can reposition the place a title occurs in a movie by moving the title clip on the timeline (as described in “Moving Clips by Dragging.”) or by editing the clip's Start field in the Clip bin. You can also change the length of the title by editing the Duration field in the Clip bin. Use the Title palette to create annotations and/or titles on the movie frame.
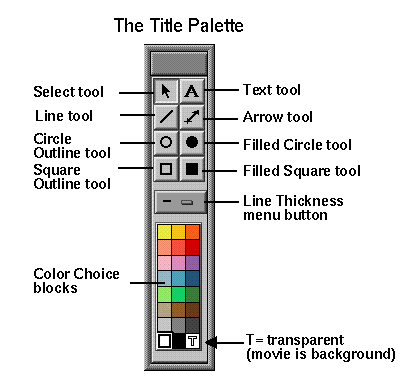
The Title palette is diagrammed in Figure 3-14:
Choose to use the movie as the background of the title or to have a solid background.
By default, Title > Movie as Background is selected (there is a check in the check box). To use a solid background instead, select it again to disable Movie as Background mode. You can change the background color, too—see “Editing Colors.”
To leave Title mode, just click in the track area or the Clip Bin.
Using the Title palette is similar to using most simple text and graphics programs.
Any text or graphics placed on the movie frame is called an “object.”
Once an object is on the movie display frame, you can manipulate it in various ways: move it, resize it, position it on top of other objects, change its color, or cut, copy, and paste it. To do this, you must first select the object.
To move an object, you need to select it with the Select tool (see Figure 3-14), then drag it to a new position.
To move more than one object at the same time, select the first object, then hold down the Shift key and select other objects.
You can also move objects to the front or background of a title. This changes the way overlapping objects stack on top of each other:
to bring an object to the front, choose Title > Bring to Front
to send an object to the back, choose Title > Send to Back
When creating or editing a title, you can cut, copy, and paste in the standard way:
Select the object with the Select tool (shown in Figure 3-14).
Choose File > Cut or File > Copy.
Reposition the cursor for pasting, then choose File > Paste.
| Tip: Use these keyboard shortcuts: Ctrl+C to copy, Ctrl+X to cut, and Ctrl+V to paste. |
This section includes “Adding Text,” “Editing Text,” “Changing the Font or Text Color,” and “About Typing Symbols.”
Select the text tool (shown in Figure 3-14).
Click to position the cursor in the movie frame and start typing.
You can choose and change the color of the text by selecting a color block on the Title Palette.
| Note: You cannot use the Enter key to start a new line of text—instead, re-position the cursor to start a new line. |
Select the text tool (shown in Figure 3-14).
Position the cursor over the text, click to select, and begin editing.
Press Enter when done editing.
To change the font, use the Title menu, which contains menus for changing the font family, style, or size of selected text.
To change the color of a text object:
Select the select tool (as shown in Figure 3-14).
Position the cursor over the text, click once to select, then click a new color block in the Title palette.
| Note: Annotations can be resized and moved like other objects—see “Moving Objects” and “Resizing Objects.” |
To draw a line or arrow, choose the line or arrow tool (shown in Figure 3-14), then position and drag the cursor on the movie frame.
To draw a circle or square outline, click on the circle or square outline tool, (shown in Figure 3-14), then position and drag out the object on the movie frame.
To draw a filled circle or square, click on the filled circle or square tool (shown in Figure 3-14), then position and drag the out the object on the movie frame.
To change the line thickness or color of a drawn object:
Select the select tool (as shown in Figure 3-14).
Position the cursor over the object, click once to select, then return to the Title palette to choose a new line style or color.
You can change the background color of a title clip (it is white by default), and you can alter colors in the Title palette.
Open the color editing dialog.
To open the dialog for altering colors in the Title palette, double-click the color you want to edit in the Title palette.
To open the dialog for changing the title background color, choose Title > Title Background Color... .
On the dark-to-light color scale under the hexagon, click the small triangle and drag it to the right to see more colors. Adjust the dark-to-light scale as desired.
There is a tiny circle inside the hexagon. Click it and drag it around the hexagon to select a new color. The “Current Color” square reflects the color that the circle is on.
To apply the color, click the downward-pointing arrow under Current Color. The Stored Color updates. Then click the Apply button to see what it looks like in your movie.
Click OK to apply the color and close the color dialog.
The new color you've created remains in the color palette until you choose Title > Restore Default Color Palette.
Select the object(s) with the select tool (shown in Figure 3-14).
Click and drag any of the circular points on the selection outline to resize the object. You can drag out to enlarge an object, or drag inward to shrink it. You can also manipulate the shape in the process.
In some cases, you may not want titles to appear on top of clips in your movie—you may want the title to appear on blank frames. Any period of time in a movie that does not contain an actual clip becomes a series of blank frames. For example, you can create blank frames by moving the start point of the audio and video clips forward (see “Editing the Starting Point and Length of a Clip”). Then, you can use the Title palette to create an opening title on the blank frames.
Once you've created a title, you can go back and edit it by double-clicking the title's icon in the Clip Bin, as shown in Figure 3-27.
Alternatively, you can select the title clip, then choose Title > Edit... .
This section includes:
This section contains a list of the available filters with examples or descriptions of each filter. Some filters have dialogs and built-in preview images—these filters are documented under “Filters With Dialogs.”
| Note: These filters are plug-ins, pulled from the /usr/lib/dmedia/plugins/premiere directory. Movie Maker supports Adobe Premiere™ plug-ins. This means that if you have any additional Premiere plug-ins installed in this directory, they will also appear in the Effects menu. |
These two filters operate in a similar way: they create images that gradually fade to or from transparent. Some examples:
If the movie background color is set to black, and you select a range of frames that do not overlap frames on another video track, and then choose “Dissolve In,” the frames you selected will begin black and gradually get lighter until they reach the normal image.
If you select a title track that does not overlap frames on another video track, and choose “Dissolve Out,” the title will gradually fade into the movie background color. If you choose “Dissolve In,” the title begins as the movie background color and gradually appears out of the opaqueness.
If you select a range of frames that overlaps other frames on another video track, and then choose “Dissolve Out,” the frames you selected will appear to gradually fade into the frames they overlap.
The luminance key sets the alpha channel to be the luminance of the image. This has the affect of making the lightest parts of the image transparent, so that what shows through instead is the movie background color or overlapping frames from another video track.
The following video filters have dialogs, and may require some instruction.
This filter lets you adjust the red, green, and blue levels of color in the images. Drag the sliders to make colors more or less prominent. As you make adjustments, the preview image in the dialog changes to reflect your adjustments.
As you alter brightness and contrast by dragging the sliders, the preview image in the dialog changes to reflect your adjustments.
This filter changes the brightness values of each pixel in the image according to a mathematical operation called convolution. The dialog displays a grid that represents a pattern of pixel brightness multipliers. To use this dialog:
Edit the center numeric field, which represents the pixel being evaluated. The value that you enter indicates how much to multiply that pixel's brightness. You can enter a value between -999 and +999.
As desired, edit any adjacent pixel values to adjust their brightness. The adjacent pixels are represented by the seven fields surrounding the center field.
In the Scale field, edit the value by which to divide the sum of the brightness values of the pixels included in the calculation.
In the Offset text box, enter the value to be added to the result of the scale calculation.
Click OK. The filter is applied to each individual pixel in the image.
The fade filter creates a fade to an opaque color over the range of frames selected. By default this is a fade to black, but if you want to fade to a different color, manipulate the red, green, and blue dialog to set the fade to a different color.
This filter creates the effect of a gradient “wipe” transition over range of frames. The wipe effect is accomplished by using a gradient image and making the appropriate areas of each frame transparent. You can specify the direction of the wipe along the gradient and the softness of the wipe edge.
When you select this filter, a dialog pops up. Click Load Image to choose a gradient image. The file browser opens a directory with sample gradient images, but you can choose one of your own images. (The filter can automatically convert most images to the appropriate file type and resolution.) Once you choose the image, you can:
Choose “Black to White” or “White to Black” to specify which direction the wipe should follow along the gradient.
Use the Wipe Softness slider, which ranges from 0 to 100, where 0 creates a sharp edge and 100 creates a very soft gradient.
The following audio filters are included in the Effects > Audio Filters menu:
| Echo | Creates a repeating echo effect in the selected section. | |
| Fade In | Causes sound at the beginning of the selected section to start out from silence and gradually increase to its normal volume. | |
| Fade Out | Causes sound at the end of a selected section to gradually decrease in volume to silence. | |
| Normalize | Choose “Normalize” to increase the sound level of the selected section to its full dynamic range. | |
| Parametric Equalizer |
| |
| Remove DC Offset |
| |
| Reverse | Reverses a selected section of sound so that it plays in reverse. | |
| Set Volume... | Opens a dialog that you can use to set the gain on a decibel scale. |
| Note: These filters are plug-ins, pulled from the /usr/lib/dmedia/plugins/premiere directory. Movie Maker supports Adobe Premiere™ plug-ins. This means that if you have any additional Premiere plug-ins installed in this directory, they will also appear in the Effects menu. |
Most of the commands on the Effects menu are actually plug-ins, pulled from the /usr/lib/dmedia/plugins/premiere directory. Movie Maker supports Adobe Premiere™ plug-ins. This means that if you have any additional Premiere plug-ins installed in this directory, they also appear in the Effects menu.
If there are other plug-ins you want to use with Movie Maker, you can store them in the directory of your choice, but you need to tell Movie Maker to load them, as follows:
Choose File > Set Plug-In Path.
Enter the pathname of the additional plug-in directories.
Use this dialog to set or edit additional plug-in paths.
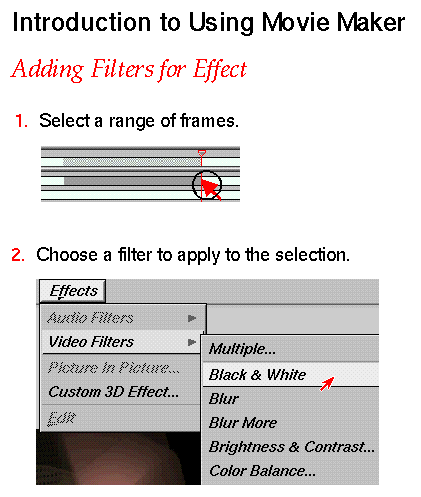
Select the range of audio or video frames to which you want to apply a filter (see “Selecting Sections of a Movie” if necessary).

Note: Do not select on the global movie timeline—filters cannot be applied to both video and audio at once. Choose Effects > Video Filters or Effects > Audio Filters, depending on whether you've selected video or audio, and choose a filter from the cascading menu.
See also “Examples of Included Video Filters” and “Filters With Dialogs.” For instructions on using the “Multiple...” dialog, see “Setting Up a Sequence of Video Filters.” For instructions on applying or creating 3D filters, see “Adding 3D Filters to a Movie.”
This section includes “Editing Currently Applied Filters” and “Deleting Filters.”
Filters that have setup dialogs, and 3D filters, have parameters that can be edited.
Select the filter by clicking once on the filter in the Clip Bin.
Choose Effects > Edit.
Depending on what kind of filter you've selected, the filter's setup dialog appears or the FX Builder plug-in appears so that you can edit the filter. See “Using the FX Builder Tool” for instructions on using FX Builder to edit a 3D filter.
| Note: Filters that do not have setup dialogs cannot be edited, as there are no parameters to edit. Also, you cannot cut, copy, paste, or alter the start or end point of a filter. |
There is a dialog that allows you to set up a sequence of filters to apply the currently selected range of frames. To use it:
Select the range of frames to which you want to apply the filters.
See “Selecting Sections of a Movie” for details.
Choose Effects > Video Filters > Multiple... .
Use the Multiple dialog to choose the filters and the sequence you desire.
Select the range of video to which you want to apply a 3D filter.
See “Selecting Sections of a Movie” for details.
Choose Effects > Custom 3D Effect... .
The dialog offers four different choices:
To create a completely new 3D filter, click New.
FX Builder appears. Refer to the FX Builder Help menu for instructions on using FX Builder to create a custom 3D filter.
To apply an included sample 3D filter, select one from the Templates list in the dialog and click Apply.
To edit an included sample 3D filter, select one from the Templates list in the dialog and click Edit... .
FX Builder appears. Refer to the FX Builder Help menu for instructions on using FX Builder to edit a 3D template.
If you have previously created and stored 3D templates in another directory on your system, you can access them by clicking the Choose More Templates... button.
Once you select one from the file browser, click Apply to apply it to the current selection of frames, or Edit... to edit the template.
When you are editing a movie, there are three ways you can display the movie's time: by seconds, by frames, or by timecode.
This section contains:
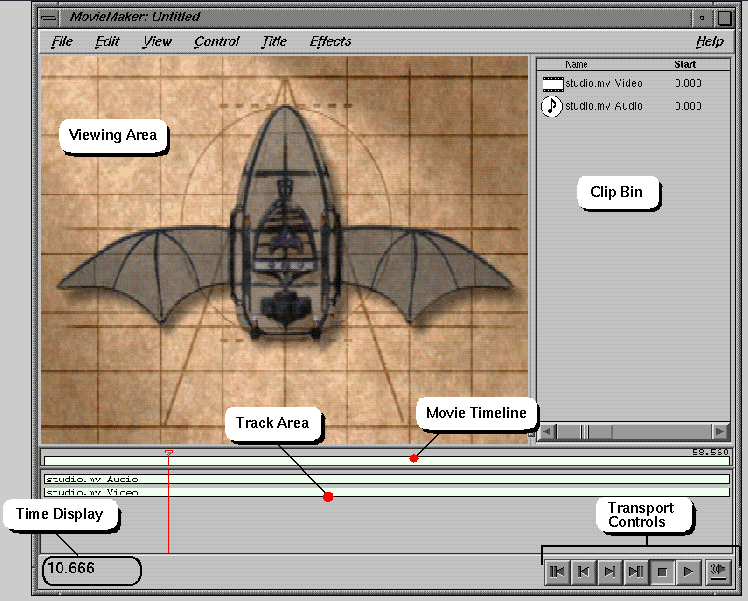
Figure 3-27 points out the time display in the Movie Maker window. The top number represents the current position of the time indicator. If a range of frames has been selected, the beginning and ending points of the selection appear under the current time.
To move the time indicator or specify a new selection range, you can edit the times in the Time Display. To do this, click once on a time field to make it editable, then enter a new time and press the Enter key.
The numbers displayed depend on the chosen time unit. For example, if you choose to display:
| Seconds | The numbers displayed represent the selection, measured by numbered of seconds into the movie. | |||
| Frames | The numbers displayed represent the selection, measured by frames into the movie. For example, the number might be 42, representing the forty-second frame in the movie. | |||
| Timecode | The numbers displayed represent the selection, measured in SMPTE (Society of Motion Picture and Television Engineers) time code. SMPTE time code is a standard for determining the location of individual frames on video, a time stamp that is used by professional equipment. It numbers frames in this way: hours:minutes:seconds:frames.
|
| Note: You can also edit the time display in order to move the time indicator or selection range. To do this, click once on the time(s)—the field becomes editable. |
This section contains:
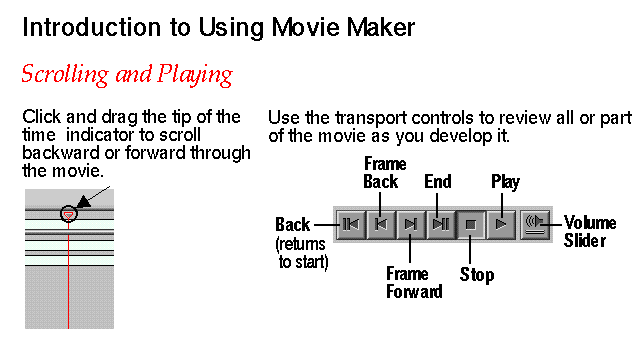
You can manually scroll backward and forward through a movie by grabbing and dragging the small triangle at the top of the time indicator.
When you position the cursor directly on this triangle, you can scroll without altering the current selection.
Use the Transport controls to play your movie in Movie Maker. Figure 3-26 shows the Transport controls and identifies what each control does. Note that playing always begins from the position of the time indicator.
There are two different view modes: Filmstrip (see “About Filmstrip Mode”) and Preview (see “About Preview Mode”). Preview is the mode shown by default, and you can turn Filmstrip mode on and off by choosing View > Filmstrip.
| Tip: Instead of using the View menu, you can turn Filmstrip mode on and off by positioning the cursor in the Movie Maker window and pressing Ctrl+F on your keyboard. |
Preview mode is the default viewing mode. Preview displays one frame of the movie at a time, in the viewing area. It also allows you to preview your movie as you develop it, by clicking the Play button.
When you view the movie in Filmstrip mode, the movie is displayed like a filmstrip: you see the strip of frames in the viewing area and, if the movie contains audio, a waveform appears in the lower portion of the Movie Maker editing window. Filmstrip mode allows you to do precision editing.
| Tip: You can control the range of frames shown in filmstrip mode—see “Setting the Number of Frames to Display.” |
When you view a movie in Filmstrip mode, you can control how many frames at a time are displayed in the viewing area.
Choose View > Number of Frames.
Enter the number of frames you want displayed at one time in the viewing area.
Click OK.
You can zoom the viewing area up or down in size, thus increasing or decreasing the size of the frame or frames displayed, respectively. Zoom settings are applied until you change them or exit Movie Maker.
To zoom the movie viewing area up or down:
Choose View > Zoom Up or View > Zoom Down.
The viewing area reflects the zoom command. You can continue to zoom up or zoom down by choosing either command repeatedly.
| Tip: Instead of using the View menu, place the cursor over the Movie Maker window, then press Ctrl+U to zoom up or Ctrl+D to zoom down. |
While you are editing a movie in Movie Maker, the video is, by default, displayed through Movie Maker (this output is called “graphics screen”) and the audio is played through the workstation speaker. To change this, choose Control > Output Video To, or Control > Output Audio To.
The options available under each of these menus depend on the type of workstation you have and whether you have certain video or audio options installed. For example, say you had an O2 with Video Option. In this case, you could choose between outputting video to “Graphics Screen” (the default), which displays the video only on your computer screen, or “Video Out and On Screen.” If you had a video monitor connected to the O2 Video Out port, “Video Out and On Screen” would display the movie on your computer screen and also on the video monitor.
Most movie playback options are described in “Using Movie Setup Options.” Also, many options can be set when you export a movie—see “Exporting a Movie.” If you want Movie Maker to display the currently opened movie on an external monitor, or use a particular video option board that you have installed, see “Changing the Video or Audio Output.”
By default, movie files are set to play once through. This is called the playback mode. To change this:
Choose Control > Playback Mode, then choose one of the following:
“Stop at End,” to program a movie to play through once
“Loop,” to program a movie to play over and over continuously
“Swing,” to program a movie to play from beginning to end, then end to beginning continuously
The File > Export As... command allows you to export a new movie file from the currently opened movie. The MovieMaker: Export dialog offers you many options, including:
exporting to a new file format and/or compression scheme
setting movie parameters such as sample rate and frame rate
exporting a collection of images
exporting just the audio of a movie
| Note: When you apply the Export command, the resulting movie will be compressed into a single video track and a single audio track (if the movie contains audio). |
To export:
Choose File > Export As...
Enter a new filename in the pathname field.
If you choose to export as “Collection of Images, “ some special instructions are necessary. In the pathname field, type a directory name (this becomes the directory in which the images will be stored). For example, say you type the directory pathname /usr/people/bob/Images. After the export process is complete, the movie frames appear as image files in the directory /usr/people/bob/Images. The images are named sequentially: 001.rgb, 002.rgb, 003.rgb, and so on, with the suffix depending on the type of format (for example, .rgb, .jpg).
If desired, use the Format menu button to select a new format.

Note: To export only the audio in a movie, choose one of the audio file formats. (optional) Click the Options... button to access other parameters.
If you are exporting a movie that contains audio, Image and Audio tabs appear in the lower portion of the dialog; you can toggle between the two controls. For example, click the Audio tab to display the Audio Settings.
The Image Settings panel contains the following options, which apply to the video track in the movie:
Compression
This menu button lets you select a compression scheme. Click Finer Compression Control to access any special compression controls that are available for the format you have chosen.

Tip: In general, higher compression rates create smaller files, but lower quality; lower compression rates create larger files with higher quality. A higher key frame occurrence translates to a higher level of compression and playback speed. A higher bit rate translates to higher video quality, but lower degree of compression. Frame Size
Choose a NTSC or PAL size, or choose Specify Custom Size... and enter a new size (measured in pixels).
Frame Rate
Choose a frame rate with this menu button. Also, if you choose PAL or NTSC, the frame rate should be set to the PAL or NTSC standards (25 fps for PAL and 29.97 fps for NTSC). Note that converting to a higher frame rate cannot improve the video quality, it only duplicates frames.
The Audio Settings panel contains the following options:
Channels
Use this menu button to set the channels for the audio.
Sample Rate
Use this menu button to select the sample rate (measured in kHz).
Sample Width
Use this menu button to select the sample width.
When finished, click OK.
Movie Maker accepts the following formats as input files:
Movie formats: SGI, QuickTime™, Microsoft AVI, MPEG-1 Systems, DIFF
Audio formats: AIFF, AIFF-C, WAVE, NeXt/Sun, MPEG-1 Audio
Image formats: SGI (rgb), TIFF, GIF, JFIF (JPEG), Photo CD
Movie Maker can convert files to the following formats:
Movie formats: SGI, QuickTime, Microsoft AVI, MPEG-1 Systems, DIFF
Image formats: TIFF, JFIF (JPEG), and Uncompressed
Audio formats: AIFF, WAVE
When you want to record your digital movie onto a VHS tape, Movie Maker helps make it an easy process. This section contains:
Secure the proper cables for connecting the video recording device to your workstation.
If you are using a typical consumer VCR, you'll probably need RCA cables, which you can purchase at most consumer electronics and computer stores.

Note: If you are using an O2 with a stereo VCR, you need two cables with male RCA jacks on both ends. If you are using a Super-VHS or Hi-8 deck, use an S-video cable to connect the deck to your workstation. If you still aren't sure what kind of cables you need, see “About Choosing a Cable.”
Make the cable connections.
In most cases, you will connect the Video In port on the VCR to the Video Out port on the workstation, and connect the Audio In port on the VCR to the Audio Line Out port on your workstation. If you need instructions for connecting the video recording device to your workstation, refer to your workstation owner's guide.
Owners guides can also be found on the Web at:
Make sure that the video device is on and the VHS tape is in place.
See “Using Movie Maker to Record to Videotape” to begin recording.
Once the video recording device is connected and the tape is ready (see “Preparing to Record to Videotape”), choose File > Print to Videotape... .
A progress meter appears as Movie Maker prepares the movie for recording. During this time, the software is determining what type of video device you are recording to, and making conversions and adjustments as needed for smooth, real-time playback.
When the movie is ready, a dialog prompts you to press the Record button on the video recording device and then click the Print button in the dialog.
As the movie is being printed to videotape, it is simultaneously played in a Media Player window.
| Note: After the movie is done recording, the external monitor output turns off. If you want to turn it back on, use the “Control > Output Video to” menu. You need to reset the video output because it changes during the “Print to Videotape” process. |
The following sections contain overviews of interface features:
The viewing area (shown in Figure 3-27) allows you to:
View a movie in the Movie Maker window; see “Viewing a Movie” for more information
View a movie in Filmstrip mode; see “Changing the View Mode” for more information
Create titles and annotation, when using the Title palette; see “Creating Titles and Annotations” for more information
The track area (shown in Figure 3-27) contains timelines representing each layer of video, audio, and titling, depending on what the movie contains. Click and drag along these tracks to select specific sections of the movie, or just click once to place an insertion point.
See “Selecting Sections of a Movie” and “Setting the Insertion Point” for more information about using the tracks. See also “Clips and Tracks Explained.”
The movie timeline (shown in Figure 3-27) represents the timeline for the entire movie, including all tracks. Use the movie timeline to:
scroll through a movie—see “Scrolling Through a Movie”
select slices of the entire movie, instead of sections of specific clips—see “Selecting a Region of the Entire Movie”
Use the Movie Maker Clip Bin (shown in Figure 3-27) for the following:
See also “Clips and Tracks Explained.”
The transport controls are the controls for viewing a movie. See “Viewing a Movie” for details.
| New | Closes currently opened movie so that you can choose a new movie to edit. | |
| Open... | Brings up a file browser dialog so that you can select a media file to open in Movie Maker. | |
| Import... | Brings up a file browser dialog so that you can select a media file to add to the currently open media file(s). The clips you insert appear at the time indicator (see “Setting the Insertion Point”). | |
| Save | Saves the file you are working on. | |
| Save and Remove Unused Data |
| |
| Save As... | Brings up a Save As dialog box so that you can save the current file under a new name and/or location. | |
| Save Selection As... |
| |
| Export As... | Allows you to create a new movie from the current one: you can choose another filename and several parameters such as format and compression. See “Exporting a Movie.” | |
| Print to Videotape... | ||
| Movie Setup... | ||
| Set Plug-In Path... | ||
| Exit | Exits Movie Maker. |
| Undo | Reverses last edit. | |
| Cut | Cuts out the current selection, saving it in a buffer so that you can paste it somewhere else. | |
| Copy | Copies the current selection so that you can paste it somewhere else. | |
| Paste | Pastes the cut or copied material at the time indicator. See also “Setting the Insertion Point.” | |
| Clear | Replaces the current selection with blank frames or silence. | |
| Delete | Removes currently clip selection. | |
| Trim to Selection | Trims away all material except the current selection. See also “Trimming a Section of Movie.” | |
| Break | Inserts a break between clips at time indicator. See “Breaking a Clip Into Two Clips.” | |
| Join | Joins selected clips together. See “Joining Clips.” | |
| Bring Clip to Front Layer |
| |
| Send Clip to Back Layer |
| |
| Select All | Selects all clips. | |
| Select None | Deselects all clips. | |
| Extend Selection Right |
| |
| Extend Selection Left |
|
| Note: The View menu is a “tear off” menu, which means that once it is open, you can display it as separate window. To do this, open the View menu and select the dashed (- - - - - -) line that appears at the top of the menu. |
| Clip Bin | Opens and closes the clip bin. | |
| Filmstrip | Turns filmstrip mode on and off. See “About Filmstrip Mode.” | |
| Number of Frames... | ||
| Set Number of Timeline Layers... |
| |
| Set Timeline Duration... |
| |
| Time Unit for Display |
| |
| Playback Statistics |
| |
| Zoom Up; Zoom Down |
| |
| Zoom | This rollover menu allows you to choose a zoom percentage. |
| Play | Same function as Play button—plays current movie, beginning at current position of time indicator. | |
| Stop | Same function as Stop button—stops playing of movie. | |
| Forward One Frame |
| |
| Back One Frame |
| |
| Go to Beginning |
| |
| Go to End | Same function as the End button—moves the time indicator to the end of the movie. | |
| Playback Mode |
| |
| Play Selection Only |
| |
| Record Audio... | Opens a synchronized audio capture tool. When you click the Record button, the movie begins playing at the exact moment that this audio capture tool begins recording (there is a 3-2-1 countdown before recording begins). See “Recording Audio Into a Movie.” | |
| Launch Media Recorder | ... | |
| Output Video To | | |
| Output Audio To |
|
| Create... | Brings up title creation dialog and Title palette. See “Creating Titles and Annotations.” | |
| Edit... | When a title clip has been selected, this command turns on title mode so that you can edit the clip. The Title palette appears. | |
| Bring Item to Front |
| |
| Send Item to Back |
| |
| Align Items Left |
| |
| Align Items Center |
| |
| Align Items Right |
| |
| Font Family | Provides menu of fonts for title text. | |
| Font Size | Provides menu of font sizes for title text. | |
| Font Style | Provides menu of font styles for title text. | |
| Restore Default Color Palette |
| |
| Movie As Background |
| |
| Title Background Color | ... |
| Audio Filters | Provides a selection of audio filters to apply to your movie. See “Adding Filters for Effect.” | |
| Video Filters | Provides a selection of video filters to apply to your movie. See “Adding Filters for Effect.” | |
| Picture in Picture... |
| |
| Custom 3D Effect... |
| |
| Edit | Allows you to edit selected filter. |
The Time Display (shown in Figure 3-27) area displays a time unit representing the current position of the time indicator. In addition, if a group of frames are currently selected, this area also displays the time units that represent that selection. For example, if frames 3 through 17 were selected, it might read “3-17.”
To move the time indicator or specify a new selection range, you can edit the times in the Time Display. To do this, click once on a time field to make it editable, then enter a new time and press the Enter key.
You can set Movie Maker to display seconds, frames, or time code. See “Setting and Reading the Time Display” for more information.
