Media Recorder lets you save live video input, screen recordings, audio, and still images to your system disk. This chapter is your guide to using this tool and the main sections are as follows:
This section includes:
Media Recorder records movies, images, and sounds—it is designed to let you create media files as quickly and as easily as possible. It includes smart controls that can automatically set options like frame size, image quality, sample rate, and compression scheme, according to the medium in which you want to use the media file (so all you need to know is how you plan to use it). And whenever you want to, you can also manually specify recording settings.
Some things you can do with Media Recorder:
Use Media Recorder's screen recording capabilities to create movies of manipulation of a 3D model or a demonstration of a software program.
Use a VCR or a video camera to view video and save clips of it as movie files. Or record music, voice, or any other sound from a microphone or VCR connected to your workstation. Then, drag and drop these media files into Movie Maker to edit and compose them into a movie, which you can drop into Web Magic™ or CosmoCreate™ to add to a Web page or into IRIS Showcase™ to add to an online presentation.
Create an image by taking a snapshot of an area on your screen or capture an image from a video device you have connected to your workstation.
| Note: To capture audio from a CD in your CD-ROM drive use CD Player instead of Media Recorder. To capture from a tape in your DAT drive, use DAT Player instead of Media Recorder. |
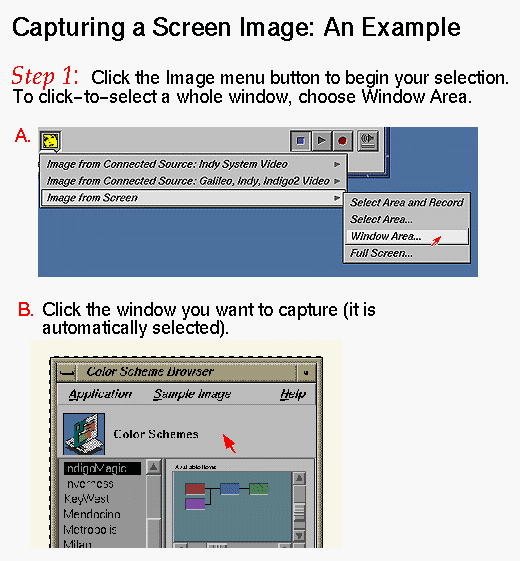
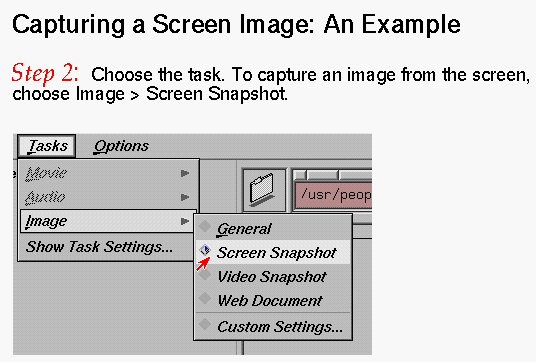
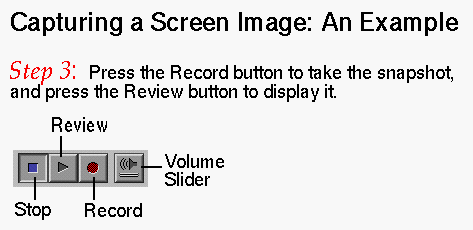
The following images offer a visual example of how to use Media Recorder. Click any image to display an enlarged view of it in a separate window.
This document follows these conventions:
Links in italics launch a term definition. For example, click: frame rate.
Red words indicate “launch links,” meaning that if you click them, they launch the tool that they name, for example: Media Recorder .
The symbol “>” between a menu names menu items indicates a path to a menu choice. For example, “File > Open” means “Open the File menu and choose Open”; “Network > Control > Stop” means “Open the Network menu, choose Control and then choose Stop from the Control rollover menu.”
You can access Media Recorder in three ways:
To open it immediately, click Media Recorder
To open it by clicking an icon:
From the desktop Toolchest, choose Find > Media Tools
Double-click the Media Recorder icon.
To open it from the command line, type mediarecorder
This section includes:
This section includes:
You can use Media Recorder to record video and save it as a movie file. This section describes the basic procedure. If you are going to record from an external device, you might want to see “Preparing to Record From an External Video Device” first.
| Note: Because movie files tend to be very large, you may want to see “What About Disk Space?” before recording a movie. |
Click the Movie menu button (shown in Figure 1-9) to reveal a menu, then follow these steps:
Choose “Movie from Connected Source: <video hardware>,” where <video hardware> is the video hardware you want to use for the recording. Depending on the configuration of your system, you may have more than one video hardware choice.
Select the type of video source you are using from the “Movie from <video hardware>” rollover menu. For example, “Composite Source.”
If you are using a typical consumer VCR or camcorder, the source is usually composite. If you are using a Super VHS or Hi-8 device, the source is probably S-video.

Tip: If you are recording from an external device, but you aren't sure what type of signal it uses, just press Play on the device and watch the Media Recorder viewing area as you select different sources from the rollover menu. When you can clearly see and hear the movie, you'll know you've selected the right source.
If you are using the Indy Video or Galileo Video Option, use the Video Panel to adjust signals:
Open Options > Video Panel, then:
If “Lock to VTR” and/or “Synchronize Mode” are visible on the Video Panel, make sure they are enabled (a check mark indicates they are enabled).
(Optional) You can also use the Video Panel for other adjustments, such as white balance. Refer to the Video Panel Help menu for more information.
Open Tasks > Movie, and choose a task from the Movie menu.
For example, if you are recording a clip for a Web page, choose “Web Document.” Media Recorder then adjusts its recording settings that are typically ideal for the chosen task. See “The Movie Tasks Menu” for a description of each item in the Movie menu.

Note: If you would like to specify recording settings instead of using the task defaults, you can use the Custom Settings dialog box. See “Customizing Record Settings” for details. Make sure that the subject is ready for recording.
What you see in the Media Recorder viewing area is what will be recorded. If you are recording from an external device, use the controls on that device to find the place you want to begin recording and to start playing the video.
To begin recording, click the Record button (shown in Figure 1-7).

Tip: If you want a time delay before recording begins, first choose Set Delay to Record from the Edit menu. See “Setting a Recording Time Delay” for details. To stop recording, click the Stop button (shown in Figure 1-7).
Your movie is given a default name and saved in your home directory, unless you launched Media Recorder from the command line, in which case recorded clips are put in the directory from which you launched Media Recorder. Similarly, if you launch Media Recorder from an icon view shelf, the file is placed in the directory associated with the shelf. See also “Renaming Clips” and “Changing Where Files Are Stored” for more information.
To watch the movie, click the Review button (shown in Figure 1-7).
You may want to use Media Recorder to capture material on videotape (VCR, video camera, or VTR). This section provides a step-by-step overview of the process.
Secure the proper cables for connecting the video device to your workstation.
If you are using a typical consumer VCR or camcorder, you need RCA cables, which you can purchase at most consumer electronics and computer stores. See Figure 1-4 for a picture of the kind of RCA cable to use (both cable ends are the same).

Note: If you are using an O2 with a stereo VCR, you need two cables with male RCA jacks on both ends. If you are using an Indy and a stereo VCR, you need a cable with two male RCA jacks on one end (to plug into the VCR left and right Audio Out ports) and a ministereo jack (to plug into your workstation Line In port) on the other end. If you are using a Super-VHS or Hi-8 deck, use an S-video cable to connect the deck to your workstation. If you still aren't sure what kind of cables you need, see “About Choosing a Cable.”
Make the cable connections.
Refer to your workstation owner's guide for instructions on connecting video equipment.
Owners guides can also be found on the Web at:
http://techpubs.sgi.com/library/

Tip: In most cases, you will connect the Video Out on the VCR to the Video In port on the workstation, and connect the Audio Out on the VCR to the Line In port on your workstation. Make sure that the video device is on and the tape is in place.
See “Recording Video” to begin the recording process.
There are three different types of audio input control:
To record a movie without recording any audio:
Choose Tasks > Audio > Custom Settings... .
Click the Audio tab to go to the audio settings panel.
Check “Do not record audio track.” Click OK to close the dialog and apply the settings.
If you have other audio hardware, you may want to change the default audio input. If you are recording from the IndyCam or the O2Cam, Media Recorder captures audio from the microphone input by default. If you are recording from an external video device, Media Recorder captures the audio coming through the Line In port. Before you begin recording, you can change the default audio input with the Audio Panel.

Note: If another application, such as Sound Track, is currently, actively using audio input, you cannot choose an audio input other than the one already in use. To set the input with the Audio Panel, choose Options > Audio Panel. Follow the instructions in “Setting the Default Input and Output Signal Path,” in Appendix B, The Audio Panel.
To control other audio-specific parameters, including channels, sample rate, and sample width:
Choose Tasks > Custom Movie Settings... .
Click the Audio tab to go to the audio settings panel.
Use the menu buttons to choose a different number of channels, sample rate, or sample width. Click OK to close the dialog and apply the settings.
| Note: The Media Recorder volume slider (next the Record button) does not affect the volume level of the recorded movie file. |
You can use Media Recorder to create a recording of your computer screen and save it as a movie file. A screen recording is useful for creating movies of manipulation of 3D models or a demonstration of a software program. This section describes the basic procedure.
Click the Movie menu button (shown in Figure 1-9) and choose “Movie from Screen using Software” or “Movie from Screen Using <video hardware>.”(If you are using a system that has an optional video board, there may be an additional menu item so that you can use that board for recording).
For example, “Movie from Screen Using O2 Video Hardware” uses the O2 Video Hardware.
If you chose “Movie from Screen,” you have the following choices.
Select Area...: Allows you to hold down the left mouse button and drag out a selection outline to mark the area you wish to record.
Window Area...: Allows you to select a particular window on the screen to record. When this menu item is chosen, the cursor changes to resemble a camera. To choose a window to record, simply click inside of it.
If you chose “Movie from Screen Using <video hardware>,” your choices will vary, depending on the type of video board you are using. The “Full Screen” options record the entire screen, but resize the dimensions to fit a NTSC or PAL frame.
A dashed outline appears on the screen. The space inside the outline is what will be captured.
You can resize this outline—see “Adjusting the Screen Selection Outline” for detailed instructions.
To cancel any selection, position the cursor over an edge of the selection outline and click the right mouse button.
To bring the selection back once it is canceled, choose Edit > Show Selection Frame.

Note: If you use the optional board for recording, you cannot resize the selection outline, although you can cancel it or move it. Open Tasks > Movie, and choose a task from the Movie rollover menu.
Media Recorder adjusts its recording settings to settings that are typically ideal for the chosen task. See “Selecting Record Settings by Task” for details.
If you would like to specify recording settings instead of using the task defaults, you can use the Custom movie settings dialog box. See “Customizing Record Settings” for details.
Click the Record button (shown in Figure 1-7) when you are ready to begin recording.
Click the Stop button (shown in Figure 1-7) to stop recording.
Your movie is given a default name and saved in your home directory, unless you launched Media Recorder from the command line, in which case recorded clips are put in the directory from which you launched Media Recorder. Similarly, if you launch Media Recorder from an icon view shelf, the file is placed in the directory associated with the shelf.
See also “Renaming Clips” and “Changing Where Files Are Stored” for more information.
To watch your movie, click the Review button (shown in Figure 1-7).
| Tip: When recording from the screen, a time delay before recording begins can be helpful. To set this, choose Set Delay to Record from the Edit menu before you click Record. See “Setting a Recording Time Delay” for details. |
Media Recorder lets you record audio files, which you can play back on your workstation, add to a movie, or include in an online presentation or Web page.
| Note: To capture audio from a CD in your CD-ROM drive use CD Player instead of Media Recorder. To capture from a tape in your DAT drive, use DAT Player instead of Media Recorder. |
Click the Audio menu button in the lower left corner of the Media Recorder window (shown in Figure 1-9).
From the Audio menu, choose the audio source. For example:
If you are using an O2, choose “Camera Mic” to record from the microphone built into the O2Cam.
Choose Audio from Line Input if you want to record from a device, such as a tape deck or VCR, connected to the Line In port on your system.

Note: See your workstation owner's guide for instructions on connecting audio devices to your workstation. Alternatively, if your system has an audio option board, see the owner's guide that came with the option board for information on how to connect audio devices to the option board. Owners guides can also be found on the Web at: If desired, use the Audio Panel to adjust the input level. Open the Audio Panel by choosing Options > Audio Panel... .

Tip: The best audio input level is set when the waveform occupies most, but not all, of the height of the waveform strip in the Viewing Area. 
Note: If you are using Digital In, you cannot adjust the input level. Open the Tasks > Audio, and choose a task from the Audio rollover menu.
For example, if you are capturing an audio clip for a Web page, choose Web Document. Media Recorder then adjusts its capturing settings to settings that are typically best for the chosen task. See “The Audio Tasks Menu” for a description of each item in the menu.
If you would like to specify recording settings instead of using the task defaults, see “Customizing Record Settings” for details.
To begin recording, click the Record button (shown in Figure 1-7).
The display area shows a waveform that represents the sound you are recording.
To stop recording, click the Stop button.
Your file is given a default name and saved in your home directory, unless you launched Media Recorder from the command line, in which case recorded clips are put in the directory from which you launched Media Recorder. Similarly, if you launch Media Recorder from an icon view shelf, the file is placed in the directory associated with the shelf.
See also “Renaming Clips” and “Changing Where Files Are Stored” for more information.
To listen to the recording, click the Review button.
| Note: The volume slider next to the Record button does not affect the recorded audio file. |
This section includes:
If you have a video device (such as the IndyCam or O2Cam) attached to your system, you can use Media Recorder and your video device to create a new image file by taking a live video snapshot.
| Note: See your workstation owner's guide for instructions on connecting video devices to your workstation. Alternatively, if your system has an optional video board, see the owner's guide that came with the option board for information on how to connect video devices to the option board. |
To take a live video snapshot:
Click the Image menu button (shown in Figure 1-9) to reveal a menu, then follow these steps:
Choose “Image from Connected Source: <video hardware>,” where the <video hardware> is the video hardware you want to use for taking the picture.
Select the type of video source you are using from the “Image from Connected Source: <video hardware>” rollover menu. For example, “Composite Source.”
If you are using a typical consumer VCR or camcorder, the source is usually composite. If you are using a Super VHS or Hi-8 device, the source is probably Y/C (S-video).

Tip: If you are capturing an image from an external device, but you aren't sure what type of signal it uses, just press Play on the external device and watch the Media Recorder viewing area as you select different sources from the rollover menu. When you can clearly see and hear the movie, you'll know you've selected the right source.
Open Tasks > Image, and choose a task from the Image rollover menu.
For example, if you are capturing an image for a Web page, choose Web Document. Media Recorder adjusts its capturing settings to settings that are typically best for the chosen task. See “The Image Tasks Menu” for a description of each item in the menu.
If you would like to specify recording settings instead of using the task defaults, see “Customizing Record Settings” for details.
Make sure that the subject is positioned correctly in the Media Recorder viewing area.
The viewing area reflects the image that will be captured.
Click the Record button (shown in Figure 1-7) to take the picture.
The image filename appears in the Clip Bin as soon as the snapshot has been taken.
Your file is given a default name and saved in your home directory, unless you launched Media Recorder from the command line, in which case recorded clips are put in the directory from which you launched Media Recorder. Similarly, if you launch Media Recorder from an icon view shelf, the file is placed in the directory associated with the shelf.
See also “Renaming Clips” and “Changing Where Files Are Stored” for more information.
To view the image, click the Review button.
You can create a new image file by taking a snapshot of all or part of the screen.
Click the Image menu button (shown in Figure 1-9) and choose Image from Screen.
Choose one of the following from the Image from Screen rollover menu:
Select Area...: Allows you to hold down the left mouse button and drag out a selection outline to mark the area you wish to record.
Select Area and Record: This option is just like “Select Area” except that the snapshot is taken as soon as you let go of the mouse button.
Window Area...: Allows you to select a particular window on the screen to record. When this menu item is chosen, the cursor changes to resemble a camera. To choose a window to record, simply click inside of it.
Full Screen...: This option automatically selects the entire screen for recording.
A dashed outline appears on the screen: the space inside the outline is what will be captured. You can resize this outline—see “Adjusting the Screen Selection Outline” for detailed instructions.

Note: To cancel any selection, position the cursor over an edge of the selection outline and click the right mouse button. To bring the selection outline back once it is cancelled, select Edit > Show Selection Frame. Open the Tasks > Image, and choose a task from the Image rollover menu.
For example, if you are capturing an image for a Web page, choose “Web Document.” Media Recorder adjusts its capturing settings to settings that are typically ideal for the chosen task. See “The Image Tasks Menu” for a description of each item in the menu.
If you would like to specify settings instead of using the task defaults, see “Customizing Record Settings” for details.
When the area has been selected, click the Record button (shown in Figure 1-7).
The image filename appears in the clip bin as soon as the snapshot has been taken.
Your file is given a default name and saved in your home directory, unless you launched Media Recorder from the command line, in which case recorded clips are put in the directory from which you launched Media Recorder. Similarly, if you launch Media Recorder from an icon view shelf, the file is placed in the directory associated with the shelf.
See also “Renaming Clips” and “Changing Where Files Are Stored” for more information.
To see the image, click the Review button (shown in Figure 1-7).
| Tip: When recording from the screen, a time delay before recording begins can be helpful. To set this, choose Edit > Set Delay to Record before you click the Record button. See “Setting a Recording Time Delay” for details. |
This section includes:
Although files that you record are accessible through the Media Recorder Clip Bin, they are literally saved in your home directory by default.
The exceptions:
If you launch Media Recorder from the command line, files are put in the directory from which you launched Media Recorder.
If you launch Media Recorder from an icon view shelf, the file is placed in the directory associated with the shelf.
To play or view a clip in the Clip Bin, select the clip by clicking it once (it highlights), then click the Review button (shown in Figure 1-7).
To play the clip with the Media Player tool, select the clip, then choose Edit > Launch Player... .
| Tip: Select the clip, hold down the right mouse button, then choose Launch Player... . |
To specify a different name for the media file you've created, press the left mouse button and drag to select the default filename of the clip in the Clip Bin, then type a new name.
By default, Media Recorder names files with incremental numbers, as follows:
Movies
The default filename given is movie1.<extension>, where <extension> is the filename extension that represents the file format, such as mov or mv. So when you record another movie file, its name might be movie2.mov, and so on.
Images
The default filename is image1.<extension>, where <extension> is the filename extension that represents the file format, such as rgb or jpg. So when you record another image, it might be named image2.rgb, and so on.
Audio files
The default filename is audio1.<extension>, where <extension> is the filename extension that represents the file format, such as aifc or wav. So when you record another audio file, it might be named audio2.aifc, and so on.
To edit the clip with Movie Maker or convert it to a new format with Media Convert, select the clip, then choose Edit > Launch Movie Maker..., or Edit > Launch Media Convert... .
| Tip: Select the clip, hold down the right mouse button, then choose Launch Movie Maker... or Launch Media Convert... . |
Most of the time, you will probably want to take the media you capture with Media Recorder and put it into another application so that you can edit it or use it in a composition of other clips (you can do this with Movie Maker), or add it to a Web page (you can do this with Cosmo Create) or presentation (you can do this with Showcase).
The two techniques are categorized here by the situation in which they are most useful:
Media Recorder lets you copy and paste a clip into another application (such as Movie Maker ), which is useful when you have just recorded a file and want to put it directly into another application. Select the clip in the Clip Bin (click it once—it highlights), then choose Edit > Copy. In the other application, position the time indicator, then choose Edit > Paste. The clip appears at the time indicator.
You can copy clips in the Clip Bin to other directories by the standard drag-and-drop procedure: Select the clip, then drag it to another open icon view on your desktop.
To delete a clip, select it, then choose Edit > Delete File.
| Tip: Select the clip, then press the Delete key. |
| Tip: Select the clip, hold down the right mouse button, and choose Delete File. |
There are two ways to choose your recording settings:
Described in this section is the fastest way to adjust the settings, which involves simply selecting the recording task you want to perform from the appropriate Tasks menu. For example, if you were recording a movie clip for a Web page, you would choose “Web Document” from the Movie menu. Media Recorder then automatically adjusts the movie frame size, file format, image quality, and compression scheme so that it is ideally suited for Web content.
There is also a longer, more detailed way to adjust the settings, which is to choose Custom Settings... from the relevant rollover menu under the Tasks menu. This opens a dialog box that allows you to choose each individual setting instead of using task defaults. See “Customizing Record Settings” for details on this method.
This section describes the quicker option—choosing by task:
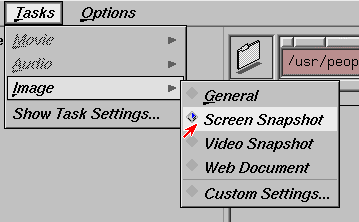
Open the Tasks menu and choose the menu relevant to the type of material you want to capture (e.g., Image), as shown in Figure 1-5.
From the task menu you have chosen in Step 1, choose the name that best describes the way you intend to use the media file (for example, Web Document, Presentation, Email Message).
The appropriate settings are automatically established. See “The Tasks Menu” for a description of each item in the Tasks menu.
(optional) To see the settings Media Recorder has chosen, choose Tasks > Show Task Settings.
There are two different paths for choosing your recording settings:
Described in this section is the longer, more detailed way to adjust the settings, which is to select “Custom Settings...” from the appropriate rollover menu under the Tasks menu. This opens a window that allows you to choose each individual setting instead of using the task defaults.
There is also a faster way to adjust the settings, which involves simply selecting the recording task you want to perform from the relevant rollover menu under the Tasks menu. For example, if you are recording a movie clip for a Web page, you would choose “Web Document” from the Movie menu. Media Recorder then automatically adjusts the movie frame size, file format, image quality, and compression scheme so that it is ideally suited for Web content. See “Selecting Record Settings by Task” for more instruction on this option.
This section includes:
This section includes:
By default, movies are compressed using the QuickTime Video compression scheme. To select a different compression scheme before you begin recording:
Open Tasks > Movie > Custom Settings...
Choose a file format from the File Format menu button.
Choose a compression scheme from the Compression menu button.
The button displays only the compression the choices currently available to you. Table 1-1 describes most of the available compression schemes and their characteristics. To bring up a separate, printable window of this table, click the blue title.
Click Finer Compression Control to access any compression controls that are available for the conversion you have chosen—see “Adjusting the Image Quality With Compression Control.”
Table 1-1. Informational Chart of Movie Compression Schemes
Compression Scheme Available Through Media Recorder
Best Used For...
Approximate Level of Compression
Decompression Speed (processing time per movie frame)
Compression Speed (how long it takes to compress)
Visual Quality of Movie After Compression
RLE24
Animation and screen recording (SGI format)
Animation & screen: about 8 times smaller. Live video: 1.4 times smaller.
Fast
Fast
Very high (lossless)
RLE8
Animation and screen recording (SGI format)
Animation & screen: about 8 times smaller
Fast
Fast
Very high (lossless)
Apple Compact Video (CinePak)
Web and CD-ROM content
File is 17 to 30 times smaller, depending on user's quality choice.
Very fast
Slow
Medium to high (adjustable); Higher results in larger file
MVC1
Video (SGI format)
File is about 5 times smaller.
Fast
Fast
High
MVC2
Video (SGI format)
File is about 20 times smaller.
Fast
Average
Average
Software JPEG
Still images
16 to 75 times smaller, depending on quality choice
Slow
Slow
Medium to high (adjustable)
(lossy)
Hardware JPEG
Full-sized, full-motion video
16 to 75 times smaller, depending on quality choice
Fast
Fast
Medium to high (Adjustable)
Cross-Platform JPEG (“JPEG-A”)
Full-sized, full-motion video; compatibility with QuickTime on non-UNIX platforms
16 to 75 times smaller, depending on quality choice
Fast
Fast
Medium to high (Adjustable)
Apple QuickTime Video
Video
5 to 25 times smaller, depending on quality choice
Fast
Fast
Medium
Apple QuickTime Animation
Animation and screen recording
Animation & screen: about 8 times smaller. Live video: 1.4 times smaller.
Fast
Fast
Very high (lossless)
Indeo
Web content
25 to 30 times smaller, depending on quality choice
Fast
Average
High (adjustable)
Additional Notes:
Choose “Uncompressed Video” if you do not want the movie you are recording to be initially compressed.
If you are using an Indy™ or Indigo2™ workstation, hardware JPEG is available only if your system has the optional Cosmo Compress™ video board from Silicon Graphics.
If you are using an Octane™ workstation, hardware JPEG is available only if your system has the optional Octane Compression board from Silicon Graphics.
Click OK to apply the new settings and exit the dialog.
| Tip: Once a movie file is recorded and saved, you can use Media Convert to convert it to different formats and compression schemes, and also for other editing such as cropping or lowering the frame rate. However, it is ideal to record material in the form you will use it in, because quality can be lost during format conversions and compression. |
| Note: The compression scheme affects the playback rate of the movie. Some compression schemes require more processing power than others. Consequently, the movies may play back at a lower frame rate. |
You may want to record your movie at a lower image quality in order to create a file that takes up less disk space, or you may want to record at a higher image quality if quality is a higher priority than disk space.
Before recording your movie, open Tasks > Movie > Custom Settings... .
Click the small button next to the words “Finer Compression Control.”
Use the Quality Slider(s) and/or edit the keyframe field.

Note: The compression controls that are available depend on what type of compression scheme you are using. In general, higher compression rates create smaller files, but lower quality; lower compression rates create larger files with higher quality. A higher key frame occurrence translates to a higher level of compression and playback speed.
Click OK to apply the new settings and exit the dialog.
By default, Media Recorder creates video recording movies that are one-half the size of a standard NTSC video window. You can choose a different size:
Before recording, open Tasks > Movie > Custom Settings... .
Using the Size menu buttons, choose NTSC or PAL then choose the size (measured in pixels). Or, if you are recording from the screen, you can choose Specify Custom Size... and enter a new size.
Click OK to apply the new settings and exit the dialog.
The frame rate specifies how many frames (images) display per second— that is, it determines the speed at which the movie plays. For example, a frame rate of 30 means that 30 frames display per second. You can choose to record the video at a lower or higher frame rate.
Before recording your movie, open Tasks > Movie > Custom Settings...
Select a frame rate with the Frame Rate menu button.
A higher frame rate produces a more fluid image and a larger movie file. A lower frame rate takes up less disk space. The maximum rate for NTSC movies is 30 frames per second and for PAL, the maximum rate is 25 frames per second. For screen recording, the maximum is the refresh rate of the workstation display—usually 72 or 76.
Click OK to apply the new settings and exit the dialog.
If the frame rate is set higher than the workstation can actually generate frames, Media Recorder will extend the duration of each frame to occupy the time that would have been occupied by the dropped frames. To turn off this behavior, click the “Abort recording if video frames are dropped” checkbox. When there is a check mark in this checkbox, Media Recorder stops recording if any frames are dropped.
| Tip: Different systems may be configured to allow different maximum software-only playback rates. If you choose a frame rate that is beyond the playback capacity of your workstation, it could result in flutter and dropped frames when you play your movie. To test this on your system, try recording a 5-second test movie. Recording a short test movie lets you see if your system can capture frames at the rate you requested. |
| Tip: To capture frames at a higher rate, consider choosing a smaller frame size and stopping other processes that may be running on your system. |
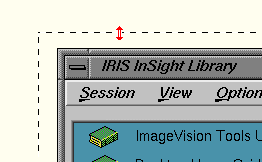
The area to be captured by Media Recorder (either for a screen recording or screen snapshot) is determined by the dashed outline on the screen. See Figure 1-6.
There are three different adjustments you can make, as follows:
To resize a selection:
Position the cursor over an edge or corner of the outline.
The cursor changes, as shown in Figure 1-6.
Holding down the left mouse button, drag a corner or edge of the outline to resize.
To move a selection without resizing:
Position the cursor over the area you have outlined, hold down the middle mouse button and drag.
For fine detail resizing:
Position the cursor over an edge or corner, hold down the left mouse button, and use the arrow keys to move the corner or edge out in tiny increments.
Also...
To cancel any selection, position the cursor over an edge of the selection outline and click the right mouse button.
To bring the selection outline back once it is canceled, choose Edit > Show Selection Frame.
If you choose Tasks > Movie > Custom Settings..., you will see the “Use X advisor to optimize screen recording” check box. When Media Recorder records from the screen, it can obtain information from the X server about what is actually changing on the screen. This feature is called the X advisor—it conserves disk space by avoiding the recording of unnecessary data, which is ideal when you record windows, buttons, and menus. However, when you record graphics and you want the highest possible frame rate you can get, you might not want to use the X advisor because it could slow down the frame rate capturing capacity. Media Recorder turns the X advisor on for windows, buttons, and menu recording and off for graphics and rendering recording. However, you can turn it on and off as you wish by clicking the check box.
To customize image capture settings, open Tasks > Image > Custom Settings... . In this dialog you can use the File Format menu button to choose a file format, and the Frame Size button to choose a Whole, Half, or Quarter size frame (measured in pixels).
To customize audio record settings, open Tasks > Audio > Custom Settings... . The audio settings dialog appears. Use the menu buttons to adjust any of the following:
| Channels | Set the number of audio channels with this menu button. | |
| Sample Rate | Set the audio sample rate with this menu button. | |
| Sample Size | Set the sample size with this menu button. The sample size is the number of bits used to represent a single sample of audio data, typically expressed in multiples of 8 bits (8, 16, or 24). Larger sizes allow for greater dynamic range and precision, both of which influence audio quality. |
Media Recorder has a time delay feature that is similar to a “self-timer” on a typical consumer camera. It allows you to set a delay between the time the Record button is clicked and the time recording begins. This is helpful if, for example, you want to minimize the Media Recorder window before the screen recording begins. Or, perhaps you are capturing images of a software program and you want to show opened menus.
To set a recording time delay:
Open Edit > Set Delay to Record
Select the amount of time delay you desire.
The delay is now set. For example, if you selected “10 seconds,” Media Recorder begins recording ten seconds after you click the Record button. Media Recorder “beeps” one second before recording begins.
| Note: The recording time delay you have chosen remains in effect until you exit the current Media Recorder session or until you choose a different delay setting. |
Movie files can be very large. Depending on frame rate and other settings, just a few seconds of movie can occupy a significant portion of your disk. For example, a CinePak-compressed QuickTime movie recorded at 15 fps, lasting one minute, can take up approximately 3 megabytes of disk space.
The good news is that while you are recording, Media Recorder tells you how much recording time is available on your system, based on the disk space left. So while recording, monitor the running “Available:” time display, located above the Media Buttons. This display tells you how much recording time you have left until the disk that you are recording to is full.
Explore Compression Control
Compression is all about reducing file size. See Table 1-1 for information to help you choose a compression scheme. Before you click the record button, open Tasks > Movie > Custom Settings..., then click the “Finer Compression Control” button. Use the Quality Slider(s) and/or edit the keyframe field (the controls available depend on the type of compression you are using). The higher the compression rate, the smaller the file. Also, the higher the keyframe occurrence, the smaller the file size.
Choose a Smaller Frame Size and/or Frame Rate
The smaller the frame size and/or frame rate, the smaller the file size.
Use the X Advisor for Screen Recordings
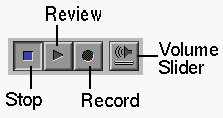
This section provides a diagram of the review (also known as play), record, stop, and volume controls. The Review button displays the file currently selected in the Media Recorder clip bin.
Use the volume slider button (shown in Figure 1-7) to adjust the volume of the movie or audio file you are reviewing. Click on the button and hold down the mouse button as you drag the slider up to raise the volume, or down to lower it.
| Note: The volume button does not affect the input “volume” level while you are recording, therefore it does not affect the recorded movie file. The input level is controlled with Audio Panel, as explained in “Controlling the Audio Input in a Movie Recording.” |
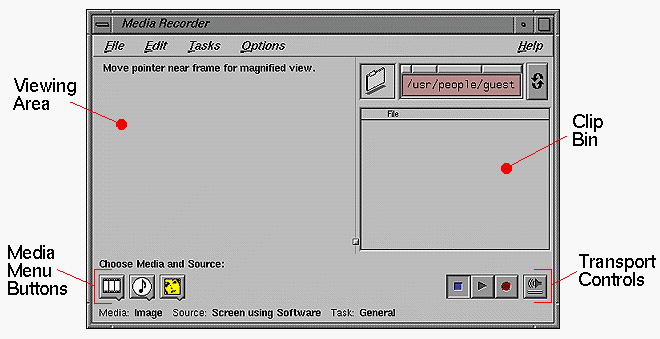
A diagram of the Media Recorder interface is shown in Figure 1-8.
Each feature is briefly described as follows:
The viewing area serves two purposes:
Indicates what will be, or is being, recorded.
If you are capturing from the screen, the viewing area displays a magnified view of the edge of the selection outline so that you can make fine adjustments—move the cursor around and the viewing area updates to display the area closest to the position of the cursor. When you are recording audio, the viewing area displays the waveforms being recorded. When you record a movie from a camera or external video device, the video shown in the viewing area is what is recorded when you click the Record button.
Lets you view media files after you have recorded them.
The Clip Bin displays the media files that exist in the current directory. By default, the current directory is your home directory. However, if you launch Media Recorder from the command line, the current directory is the directory from which you launched Media Recorder. Similarly, if you launch Media Recorder from an icon view shelf, the file is placed in the directory associated with the shelf. See “Working With Captured Clips” for more information, including how to play clips in the Clip Bin.
The Edit menu contains the following commands:
| Copy | Copies the currently selected clip, so that you can paste it into another application. | |
| Delete File | Deletes selected clip(s). | |
| Show/Hide Selection Frame |
| |
| Set Delay to Record | ||
| Record | Starts recording (same function as the Record button). | |
| Play | Displays the currently selected file (same function as the Review button). | |
| Stop | Stops recording (same function as the Stop button). | |
| Launch Player... |
| |
| Launch Editor... |
| |
| Launch Media Convert... | | |
| Get Media Info... |
|
See “Selecting Record Settings by Task” for instructions. The Tasks menu includes “The Movie Tasks Menu,” “The Image Tasks Menu,” “The Audio Tasks Menu” and “Show Task Settings.”
The Movie rollover menu includes the following choices:
| General | The default movie-capturing settings for Media Recorder. | |
| Annotation | Adjusts the capturing frame size, file format, image quality, and compression scheme so that they are ideally suited for a movie to use as an annotation to another document. | |
| Email Message | Adjusts the capturing frame size, file format, image quality, and compression scheme so that they are ideally suited for a movie to attach to an e-mail message. | |
| Presentation | Adjusts the capturing frame size, file format, image quality, and compression scheme so that they are ideally suited for a movie to import into in a presentation program. | |
| Video Production (JPEG) |
| |
| Video Production (Cross-platform JPEG) |
| |
| Web Document |
| |
| Screen Recording (Windows, Buttons, Menus) |
| |
| Screen Recording (Graphics, Rendering) |
| |
| Custom Settings... |
|
The Image rollover menu includes the following choices:
| General | The default image capturing settings for Media Recorder. | |
| Screen Snapshot |
| |
| Video Snapshot |
| |
| Web Document |
| |
| Custom Settings... |
|
The Audio rollover menu includes the following choices:
| General | The default audio capturing settings for Media Recorder. | |
| Annotation | Adjusts the capturing file format, channels, sample rate, and sample width so that they are ideally suited for use as an annotation to another document. | |
| Email Message | Adjusts the capturing file format, channels, sample rate, and sample width so that they are ideally suited for use as an attachment to an e-mail message. | |
| Music | Adjusts the capturing file format, channels, sample rate, and sample width so that they are ideally suited for capturing music. | |
| Presentation | Adjusts the capturing file format, channels, sample rate, and sample width so that they are ideally suited to create an audio file to import into a presentation program. | |
| Audio Production |
| |
| Speech | Adjusts the capturing file format, channels, sample rate, and sample width so that they are ideally suited for capturing speech. | |
| Web Document | Adjusts the capturing file format, channels, sample rate, and sample width so that they are ideally suited for adding to a Web page. | |
| Custom Settings... |
|
The Options menu contains the following commands:
Save All Clips mode is enabled by default, which means that every clip is saved—clips are named incrementally as they are captured. For example, movie1.mov, movie2.mov, and so on. If Save All Clips mode is disabled, clips are not named incrementally, and each new clip overwrites the last one. For example, image.rgb is overwritten with a new image.rgb. A check mark indicates that Save All Clips mode is on.
The scratch directory is the place where recorded media data is deposited temporarily—before it is saved as a new file. By default, this material is automatically put in your /usr/tmp directory. Because video data tends to take up a lot of disk space, you may have an entire additional system disk dedicated to the video material you work with. In this case, you probably want to set the scratch directory to that disk, so that “interim” video data is stored there instead of in the /usr/tmp directory. In fact, if you have more than one system disk to devote to the task of recording video, you can use “Set Scratch Directory...” to record to both disks at once, which can greatly improve the frame rate recording capacity of your system.
To use the Set Scratch Directory dialog:
Enter a new directory (or disk) pathname in the New Scratch Directory field (or drag the directory icon into the drop pocket).
Click Add to add the directory to the list.
To remove any directory from the list, select it and then click Remove.
It is important to note if you are recording uncompressed video or using hardware JPEG compression, you should choose Tasks > Movie > Custom Settings... and make sure that the “Record directly to movie file when possible” checkbox is unchecked. You need to do this because Media Recorder, by default, does not use scratch directories when recording uncompressed video or when using hardware JPEG compression.
| Note: You can use more than one directory or disk as a scratch directory. |
Opens the Audio Panel. For information about the Audio Panel, use the Audio Panel Help menu or see Appendix B, “The Audio Panel.”
Opens the Video Control Panel. For information about the Video Control Panel, use the Video Control Panel Help menu, or see Appendix A, “The Video Panel.”
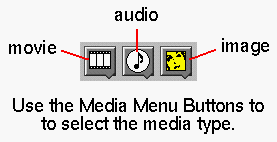
The first step in recording is to use a media menu button to select the type of media you want to capture, as well as the source from which you are going to capture it. Figure 1-9 points out which button serves which purpose. For more information, see:
While you are recording movie or audio, two types of time displays appear above the media menu buttons:
The time elapsed during recording, so that you can keep track of how long your recording is.
The remaining amount of recording time available on the disk. See “What About Disk Space?”
Use the volume slider button to adjust the volume of the movie or audio file you are reviewing. Click the button and hold down the mouse button as you drag the slider up to raise the volume, or down to lower it. Note that the volume slider does not affect the volume of any new movie files you are creating with Media Recorder.
This section provides help on some potential problems you may encounter while using Media Recorder:
You are trying to record a movie, but the Media Recorder display area is blank.
If you are trying to record live video, but Media Recorder appears without an image, check to make sure the lens cap on the camera is off. Also, look at the words on the bottom of the Media Recorder window. Next to the word “Source:” it should display the source, which should either be the name of your workstation camera, the name of an attached video device's signal, or “Screen,” depending on what you have chosen to record from. If the source is not correct, use the appropriate media menu button (see “The Media Menu Buttons”) to select the right source. If you are recording from an external source, such as a camera or VCR, you should check to make sure that the source is connected the appropriate port on your system (see your workstation owner's guide).
You can't capture from a CD or DAT.
To capture audio from a CD in your CD-ROM drive use CD Player instead of Media Recorder. To capture from a tape in your DAT drive, use DAT Player instead of Media Recorder.
Audio files you create have no sound.
Check to make sure the microphone or other audio source is connected correctly (see your workstation owner's guide). Also check the words on the bottom of the Media Recorder window. Next to the word “Source:” it should display the source, which should be “Microphone,” “Camera Mic,” “Line Input,” or “Digital Input,” depending on what you have chosen to record from. If the source is not correct, use the appropriate media menu button (see “The Media Menu Buttons”) to select the right source. See also “Recording Audio.” Finally, make sure that the volume on your system is at an appropriate level—select “Audio Panel” from the Media Recorder Options menu. Audio Panel controls the default volume level for your system.
Movie files you create have no sound.
See “Controlling the Audio Input in a Movie Recording.” Also, make sure that the volume on your system is at an appropriate level—select “Audio Panel” from the Media Recorder Options menu. Audio Panel controls the default volume level for your system.
You can't select a Task menu item.
You need to use a media menu button (shown in Figure 1-9) to select the appropriate media type before you select the task.
Many Media Recorder commands have a keyboard shortcut. Table 1-2 lists the shortcuts.
To use a standard keyboard shortcut, press the keys listed next to the command on the menu. For example, to quit Media Recorder, press the Ctrl and Q keys simultaneously.
The following table lists the keyboard shortcuts. To bring up a printable, separate window of this table, click the blue title.
Table 1-2. Media Recorder Keyboard Shortcuts
Command | Keyboard Shortcut |
|---|---|
Record | Ctrl + R |
Copy | Ctrl + C |
Quit | Ctrl + Q |
Delete | Delete |
