Media Convert is a tool that enables you to change the formats and compression schemes of media (audio, image, or movie) files.
This chapter contains these main sections:
This section contains:
Media Convert offers many conversion possibilities (see “Supported Formats”). Some of the conversions you can make with Media Convert are:
convert a movie file from one format and/or compression scheme to another
convert an audio file from one format and/or compression scheme to another
convert a movie file into a numbered sequence of images
convert a numbered sequence of images to a movie file
You can also:
extract an audio or video file from a movie file
customize compression settings
specify video or audio parameters, such as the frame rate or sample rate
add soundtracks to video-only movie files
| Tip: To run multiple conversions at once, you can use the command line tool dmconvert in a shell script. For details on this command line tool, see the dmconvert(1) man page. |
This document follows these conventions:
Links in italics launch a term definition. For example, click: compression.
Red words indicate “launch links,” meaning that if you click them, they launch the tool that they name, for example: Media Recorder .
The symbol “>” between a menu names menu items indicates a path to a menu choice. For example, “File > Open” means “Open the File menu and choose Open.”
To open Media Convert immediately, double-click these red launch words: Media Convert .
At anytime, you can also open Media Convert by:
Double-clicking the Media Convert icon on the Media Tools page of the Icon Catalog. Open the Media Tools page by choosing Find > Media Tools from your desktop Toolchest menu.
To launch it from the command line, type: mediaconvert
This section contains:
Media Convert can perform the following MPEG conversion operations:
sound file to MPEG-1 audio file
movie file to MPEG-1 video file
image sequence to MPEG-1 video file
sound file and movie file to MPEG-1 systems file
sound file and image sequence to MPEG-1 systems file
movie file (audio/video) to MPEG-1 systems file
MPEG-1 audio or systems file to sound file
MPEG-1 video or systems file to movie file
MPEG-1 video or systems file to image sequence
See the dmconvert(1) man page for a list of the formats supported by Media Convert. (Media Convert is a user interface to the dmconvert command).
| Note: Although JPEG is listed as compression standard for images, it can be used on movies. For example, QuickTime, SGI Movie, and OMFI file formats are capable of storing JPEG-compressed video data inside movie files. |
| Tip: If you are not sure what the file format and compression scheme of your media file is, you can find out by using the desktop icon menu: |
Highlight your media file icon by clicking on it once (do not open the icon, just select it with your cursor).
With the icon highlighted, hold down the right mouse button. A Desktop menu appears.
Select “Get Sound Info,” “Get Movie Info,” or “Get Image Info” (depending on what type of media file it is) from the Desktop menu. A window appears with a description of that file, including the format and compression scheme.
You can use Media Convert to change a QuickTime, SGI, or MPEG movie file to a different format. You can also convert a movie into a numbered sequence of image files. This section contains:
Media Convert lets you change the format of SGI, QuickTime, or MPEG movie files, which can include compressing or decompressing a movie. For example, you can create an MPEG-1 movie from an SGI movie, or you could take an uncompressed SGI movie, and convert it into a JPEG-compressed SGI movie. Media Convert offers many choices (see “Summary of Media Convert Conversions”).
To change movie formats using Media Convert:
In the Video to Convert pathname field (see Note below), specify the file that contains the movie you want to convert.
Find the file icon and place it in the drop pocket.
Or, type the file pathname in the pathname field, then press <Enter>.
Now the pathname field displays the full name of the movie. For example, if you're going to convert a file named eddie.mv in the /usr/tmp directory, the pathname field shows /usr/tmp/eddie.mv. If your movie has a sound track, it will also be displayed in the Audio to Convert drop pocket and pathname field.
Select the output media type.
The Output Media section, in the upper right side of the window, shows your output file media options (some choices may not be available, depending on your input file selections). Click on the media type you want. A small triangle indicates your selection.
Choose an output file format from the File Format menu button.
This button may only have one option on it: it changes, depending on your current input choices.
If desired, you can specify new audio and/or video parameters for the output file.
See “Specifying Video Output Parameters” and “Specifying Audio Parameters” for details.
If you want to specify the output movie size, see “Changing Image Size.” By default, Media Convert chooses the ideal playback size (SIF size).
In the Output File Name or Template field, enter the pathname (directory and filename) of the movie you are creating.
Enter a new filename if you wish to create a new movie, or enter the same name if you wish to overwrite your original file.
Press the Start button to convert the movie.
A window appears, displaying the amount of time remaining to complete the conversion. When this window disappears, the conversion is complete. Some types of compression, such as MPEG and CinePak, take longer than others.
You can now view your new movie file with the Media Player tool. To open Media Player now, click on these red launch words:Media Player .
Media Convert lets you transform a movie file into a numbered sequence of image files.
To convert a movie into a numbered sequence of images using a Media Convert:
In the Video to Convert pathname field, specify the movie you want to convert by doing one of the following:
Find the movie file's icon and place it in the drop pocket.
Or, type the pathname of the movie in the pathname field, then press <Enter>.
Now the pathname field displays the full name of the movie. For example, if you're going to convert a file named jam.mv in the /usr/tmp directory, the pathname field shows /usr/tmp/jam.mv.
Make sure Images is selected as the output media.
The Output Media section, in the upper right side of the window, shows your output options. Click Images if it is not already selected (a small triangle indicates it is selected).
If desired, specify new video parameters for the output file.
If you want to resize the frames for output, see “Changing Image Size.” By default, Media Convert creates an output that is the same frame size as the input.
In the Output File Name or Template field, specify the pathname for the images you're creating. Add # to the end of the filename.
Enter a new filename if you wish to create a new file, or enter the same name if you wish to overwrite your original file.
By default, the field displays the name outfile. You must add a # sign to this name or you will end up with one file named outfile. For example, type outfile# if you want the images to be named outfile0, outfile1, outfile2, etc....
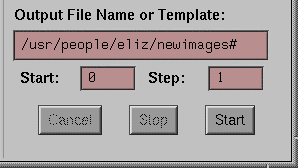
Press <Enter>. In the fields labeled Start and Step, choose the numbering scheme you want to use. By default, Media Convert starts numbering files with 0 and adds 1 for each new file name. See Figure 2-2.
Click the Start button to convert the file to a numbered sequence of images.
A window appears, diplaying the amount of time remaining to complete the conversion. When this window disappears, the conversion is complete.
Media Convert enables you to change the format of audio files.
To convert an audio file:
In the Audio to Convert pathname field, specify the audio file you want to convert:
Type the name of the audio file in the Audio to Convert pathname field, then press <Enter>.
Or, find the audio file's icon and place it in the drop pocket.
Now the Audio to Convert pathname field displays the full name of the file. For example, if you're going to convert a file named jam.aiff in the /usr/tmp directory, the pathname field shows /usr/tmp/jam.aiff.

Note: If you are converting a raw audio data file, see “Specifying Raw Audio Data Input Parameters.” Click on the File Format menu button to select the output file format.
If you want to specify new audio parameters for the output file, see “Specifying Audio Parameters” for instructions.
In the Output File Name or Template field, enter a pathname (directory and filename) for the audio file you are creating.
Enter a new filename if you wish to create a new file, or enter the same name if you wish to overwrite the original file.
Click the Start button to convert the file.
A window appears, displaying the amount of time remaining to complete the conversion. When this window disappears, the conversion is complete.
You can listen to your new sound file with the Sound Player tool. To open this tool now, click on these red launch words: Sound Player .
Choose from:
You can use Media Convert to change the format of a single image file.
To do so:
In the Video to Convert pathname field, specify the video file you want to convert.
Type the name of the image file in the Video to Convert pathname field, then press <Enter>.
Or, find the image file's icon and place it in the drop pocket.
Now the Video to Convert pathname field displays the full name of the file. For example, if you're going to convert a file named eddie.rgb in the /usr/tmp directory, the pathname field shows /usr/tmp/eddie.rgb.
Leave Single Image selected. A small triangle indicates it is selected.
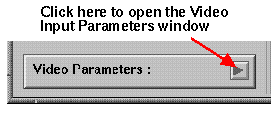
On the Input side, click the small square button next to Video Parameters, as shown in Figure 2-3.
This brings up the Video Input Parameters window. Check that these input parameters are accurate. See “Specifying Video Input Parameters” for more information.
Select the output media type.
The Output Media section, in the upper right side of the window, shows your output media options (some choices may not be available, depending on your input file selections). Click on the media type you want. A small triangle indicates your selection.
Choose a file format from the File Format menu button.
If you want to specify new parameters, open the Video Parameters window. See “Specifying Video Output Parameters” for details.
If you want to resize the image file, see “Changing Image Size.” By default, Media Convert creates an output that is the same size as the input.
In the Output File Name or Template field, enter a pathname (directory and filename) for the image file you are creating.
Enter a new filename if you wish to create a new file, or enter the same name if you wish to overwrite your original file.
Click the Start button to convert the file.
A window appears, displaying the amount of time remaining to complete the conversion. When this window disappears, the conversion is complete.
You can use Media Convert to create a movie from a directory of a numbered sequence of images.
To convert a numbered sequence of image files:
In the Video to Convert pathname field, specify the directory that contains the numbered images you want to convert.
Find the folder icon for that directory and place it in the drop pocket.
Or, type the pathname of the directory in the pathname field, then press <Enter>.
Now the pathname field displays the directory name. For example, if you're going to convert images in a directory named eddie.dir in the /usr/tmp directory, the pathname field shows /usr/tmp/eddie.dir.
Select Numbered Images. A small triangle indicates it's selected.
In the field labeled File Template, type the name of the files you want to convert.
For example, if you have files named img1.rgb through img20.rgb, type the following in the field: img#.rgb. If you have files named img000.rgb through img100.rgb, type: img###.rgb.
Use the Start, End, and Step fields to specify which numbered images to grab.
For example, suppose you have numbered images ranging from img1.rgb to img30.rgb and you want to convert the first five images. In this case, you type 1 in the Start field, 5 in the end field, and 1 in the step field. If you have 30 images and want to convert every other one, type 1 in the Start field, 30 in the end field, and 2 in the step field. You must press <Enter> after each field entry.
Place your cursor in File Template field again and hit <Enter> to confirm your input. This updates the Output Media section.
On the Input side, click the small square button next to Video Parameters, as shown in Figure 2-4.
This brings up the Video Input Parameters window. Check that the input parameters are accurate. See “Specifying Video Input Parameters” for more information.
Make sure Movie File (Video Only) is selected as the output media.
The Output Media section, in the upper right side of the window, shows your output options. Click Movie File (Video Only) if it is not already selected. A small triangle indicates your selection.
Choose a file format from the File Format menu button.
If you want to specify new parameters, open the Video Parameters window. See “Specifying Video Output Parameters” for details.
If you want to resize the frames in the output movie, see “Changing Image Size.” By default, Media Convert creates an output that is an ideal size (SIF size) for playback.
In the Output File Name or Template field, enter the pathname (directory and filename) of the movie you are creating.
Enter a new filename if you wish to create a new movie, or enter the same name if you wish to overwrite your original file.
Click the Start button to convert the file.
A window appears, displaying the amount of time remaining to complete the conversion. When this window disappears, the conversion is complete. Some types of compression, such as MPEG and CinePak, take longer than others.
Media Convert enables you to combine media files (called multiplexing) in order to do either of the following:
add a soundtrack to a video-only file
create a movie file from an audio file and a numbered sequence of images
| Note: You cannot combine non-MPEG files with MPEG files. |
To do this:
Select one audio file for your input.
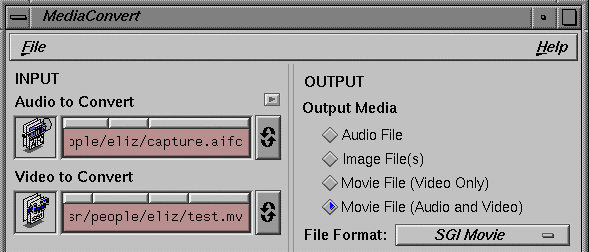
Select one video-only movie file or numbered sequence of images. See Figure 2-5 for an example.
Proceed with the conversion process by following the instructions under “Converting Image Files,” making sure to select Movie File (Audio and Video) as the Output Media.
Media Convert allows you to extract the audio or video from a movie file (if it contains both audio and video). This is called demultiplexing. You can also choose to convert your new file to another format in the process. You accomplish this by simply selecting your desired output choices.
For example, you can extract an SGI (Video-only) file from an MPEG (Audio and Video) Movie by making sure to:
select Movie File (Video Only) under Output Media
select “SGI Movie” from the File Format menu button
There are two different aspects of changing an image size. First, you may want to crop an edge off of the input image. Secondly, you may want to scale the entire image up or down. Click on either of the following topics:
If desired, you can crop an edge off input images (or frames). To do so:
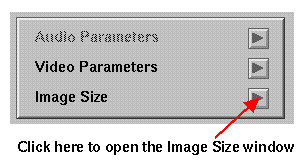
Open the Image Size window by clicking the small, square Image Size button. See Figure 2-6.
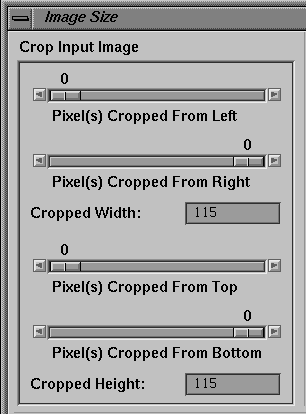
Move the slider bars to select the number of pixels to crop off from the left, right, top, and/or bottom of the input image or frames. The Cropped Width and Cropped Height fields reflect what the width and height will be after cropping. See Figure 2-7.
Choose “Cropped Input” from the Match Input rollover menu on the Frame Size menu button. Otherwise, the output image will be distorted. See “Resizing Images” for details.
| Tip: If you want to visually choose the crop area for a single image, and your image is in the SGI, TIFF, or FIT file format, use the tool Image Works to crop your image before using Media Convert. Open it by clicking the words Image Works now. |
If you want to change the image (or frame) size of your output file, you can do so with Media Convert.
| Note: Keep in mind that the image quality tends to decline as you enlarge the output image. |
To resize output:
Open the Image Size window by clicking the small, square Image Size button. See Figure 2-8.
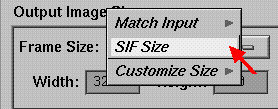
Click on the Frame Size menu button. See Figure 2-9.
Choose one of the following menu options:
Match Input (rollover submenu)
Choose “Original Input” to produce an output frame that is the same size as the input frame. If you have cropped the input image (see “Cropping Input Images”), you should choose “Cropped Input” to produce an output frame that matches the size of the cropped image. Otherwise, the cropped image be distorted because it is “spread out” to fit the original size.
SIF Size
SIF stands for Source Input Format; choose this to set the output dimensions for best possible playback size. Media Convert makes the choice, based on the SIF standard.
Custom Size (rollover submenu)
Choose this if you want to enter new numbers in the Frame Width and Frame Height fields. Select “Maintain Input Aspect” or “Free Aspect.” It is suggested that you use “Maintain Input Aspect”—this keeps the same the height/width ratio, which ensures that the output image is not distorted. If you choose “Maintain Input Aspect”, you'll notice that changing the value in one field automatically causes the other field to update.
If you want to change width or height in a manner that ignores the original ratio, choose “Free Aspect”.

Note: When you are using MPEG compression, Media Convert requires the images or frames to have dimensions that are multiples of sixteen. If you try to enter new sizes that are not multiples of sixteen, Media Convert will automatically round them off to the nearest acceptable dimensions.
This section contains:
When you are converting images, you need to check the video input parameters. This is because image files are lacking certain information that is important in the conversion process. You must use the Video Input Parameters window to give this information to Media Convert. Click on the Video Parameters button to bring up the Video Input Parameters window. See Figure 2-10.
| Note: The Video Input Parameters window contains different parameters, depending on the input file: |
If you are converting a single image, the window displays Pixel Aspect and Interlacing menu buttons.
If you are converting numbered images, the window displays a Frame Rate field, and Pixel Aspect and Interlacing menu buttons.
If you are converting Interlaced images, the Image Layout menu button appears.
What follows is information that can be helpful when you are converting images, including:
If you know the source of your material, you will probably know how to use the Video Input Parameters window. However, if you aren't sure, some suggestions follow for determining the input frame rate, pixel aspect, and whether to select non-interlaced, interlaced even, or interlaced odd (click on the underlined words to see definitions):
If the images where originally captured from an NTSC video device (such as a VCR) or hard disk recorder, then the frame rate should probably be entered as 29.97, the pixel aspect square (or CCIR 601/525, if the video source was a CCIR 601 video device), and the interlacing odd.
If the images where originally captured from a PAL video device or hard disk recorder, then the frame rate should probably be entered as 25, the pixel aspect square (or CCIR 601/625, if the video source was a CCIR 601 video device), and the interlacing even.
If the images were rendered from a graphics program, then the frame rate should probably be entered as 30, the pixel aspect square, and the interlacing non-interlaced.
If you do not know where the images came from, you can (in some cases) guess the frame rate, pixel aspect, and interlacing by observing the height and width (measured in pixels):
If the height is 486 and width is 640, then the frame rate should probably be entered as 29.97 or 30, the pixel aspect square, the interlacing odd or non-interlaced.
If the height is 486 and the width is 720, then the frame rate should probably be 29.97, the pixel aspect CCIR 601/525, the interlacing odd.
If the height is 576 and the width is 768, the frame rate should probably be 25, the pixel aspect square, the interlacing even.
If the height is 576 and the width is 720, the frame rate should probably be 25, the pixel aspect CCIR 601/625, the interlacing even.
This menu button appears if you are converting interlaced images. In this situation, Media Convert cannot read the input frame layout, so you need to select “Split Fields” or “Full Frame.” (Click: split fields and full frame for definitions.)
If you are unsure about your input image layout, you can tell by looking at the image. If the image is a single picture with correct dimensions, then choose “Full Frame.” If it is displayed as two squashed-looking pictures, one on top of the other, choose “Split Fields.”
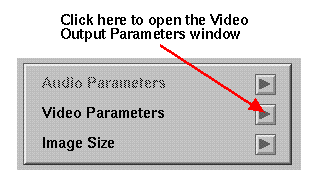
When you are using Media Convert to create a movie or image file, you have the option of specifying certain output video parameters. Click on the Video Parameters button to bring up the Video Input Parameters window. See Figure 2-11.
The Video Output Parameters window changes, depending on your input choices. Any parameters that do not apply to the conversion you are making are faded and uneditable. For information on setting specific parameters, go to the sections that do apply to the conversion you are making:
Use this field to specify the playback frame rate for your movie. The frame rate specifies how many frames (images) display per second— that is, it determines the speed at which the movie plays. For example, a frame rate of 15 means that 15 frames display per second.
If you are creating an SGI or QuickTime movie, any frame rate can be typed in, but you can use the small menu button to the right of the entry field to select the most commonly used frame rates. If you are creating an MPEG file, you can only use the menu button to select an MPEG-specific frame rate.
Some other important information about setting the frame rate:
If your movie has a soundtrack, avoid changing the frame rate as this will alter the sound.
Different workstations may be configured to allow different maximum software-only playback rates. If you choose a frame rate that is beyond the playback capacity of your workstation, it could result in flutter and dropped frames when you play your movie.
Setting the frame rate higher than the original input frame rate will replicate frames; it does not increase the frame rate of the original frames.
Inverse 3:2 pulldown is available when converting 30 to 24 frames per second (fps), or 29.97 to 23.976 fps. Click on the small box to turn the Inverse 3:2 pulldown on or off (a check mark indicates that it is on). In the film and video industry, a “3:2 pulldown” converts 24 frames per second film material to 30 fps video. This results in some duplication of data. Inverse 3:2 pulldown refers to the opposite conversion, going from the 30 fps video back to a 24 fps rate. Media Convert's Inverse 3:2 Pulldown feature does this preprocessing so that 30fps video may be encoded as 24fps.
Selection of the Orientation and Interlacing is based on how you want to play back the movie you are creating. Software typically uses bottom-to-top orientation to store image data, while video devices (such as a VCR or camera) use top-to-bottom.
If you are going to play back your movie with...
Software, such as Media Player, select:
Bottom-to-top orientation | ||
Non-interlaced |
An NTSC video device, such as a VCR, select:
Top-to-bottom orientation | ||
Interlaced Odd |
A PAL video device, select:
Top-to-bottom orientation | ||
Interlaced Even |
A CCIR 601/525 video device, select:
Top-to-bottom orientation | ||
Interlaced Odd |
A CCIR 601/625 video device, select:
Top-to-bottom orientation | ||
Interlaced Even |
The Image Layout menu button appears when your output file will be interlaced. Choose full frame or split fields for your image layout.
Click the box next to the label Flicker Filter to turn it on or off. A check mark indicates that the flicker filter is on. The flicker filter improves the image quality of your output if you are compressing interlaced frames of high-resolution graphics on a low-resolution monitor. It reduces flicker of single pixel-wide lines in interlaced outputs.
The schemes that appear on this menu button will vary, depending on what you have chosen as your output file format. For example, if you have chosen MPEG-1 systems as your output file format, JPEG will not be an option on the compression Scheme menu button. Depending on your input choices, one or more of the following compression schemes will be available to you: (click on underlined words for definitions) JPEG, RLE, RLE24, MVC1, MVC2, QuickTime Animation, QuickTime Video, CinePak, MPEG-1.
Once you choose a compression scheme, see “Customizing Compression Settings” if you would like to customize the compression settings instead of leaving the default settings.
Click the Close button when you are satisfied with the Video Output Parameters.
This section contains:
If you wish to convert a raw audio data file, you need to use the input Audio Parameters window to give Media Convert the raw audio data parameters. If you bring into Media Convert an audio file that it does not recognize, a dialog pops up asking you whether the file is raw audio data. If you indicate that it is, then the input Audio Parameters window pops up.
The following settings are in this window:
| Channels | Set the number of audio channels with this menu button. | |
| Sample Rate | Set the audio sample rate with this menu button. | |
| Sample Format | Set the sample format with this menu button. The sample format is a numerical format used to represent an audio sample. The choices are Unsigned, Twos-complement, Float, and Double. | |
| Sample Width | Set the sample width with this menu button. The sample width is the number of bits used to represent a single sample of audio data, typically expressed in multiples of 8-bits (8, 16 or 24). Larger widths allow for greater dynamic range and precision, both of which influence audio quality. | |
| Byte Order | Use the menu button to select big or little endian byte order. | |
| Data Offset | Some audio files have header information that precede the actual audio data. Data offset indicates the length of the header (“non-data”) bytes. If applicable, type in a new data offset. | |
| Convert all data to end of file |
| |
| Compression Scheme |
|
To specify the output file audio parameters, you must first open the Audio Output Parameters window by clicking the small square button next to Audio Parameters in the Media Convert window. The Audio Output Parameters window changes depending on the file format you have chosen.
| Note: Converting from a lower sample rate to a higher one will not generate new audio data and will not improve sound quality. |
Depending on the file format, you will have a three or more of the following options:
| Channels | Change the number of audio channels with this menu button. | |
| Sample Rate | Change the audio sample rate with this menu button. | |
| Sample Format | Change the sample format with this menu button. The sample format is a numerical format used to represent an audio sample. The choices are Unsigned integer and Twos-complement!FS. | |
| Sample Width | Change the sample width with this menu button. The sample width is the number of bits used to represent a single sample of audio data, typically expressed in multiples of 8-bits (8, 16 or 24). Larger widths allow for greater dynamic range and precision, both of which influence audio quality. | |
| Byte Order | If you are converting to raw audio data, choose Big or Little Endian for the byte order. | |
| Compression Scheme |
|
Click the Close button when you are satisfied with the Audio Output Parameters.
When you choose a compression scheme from the Scheme menu button in the Video or Audio Output Parameters window, the Compression region of the window may change to reflect custom compression choices. Your choices depend on what type of compression you are using. Click on the section that applies:
If you are creating a or QuickTime or JPEG-compressed SGI movie, one or more of the following compression customizations will be available:
| Note: If a setting or field is faded out in the Video Output Parameters window, then it is not editable for the type of conversion you have chosen. |
Choose one:
Set Constant Quality
Sets a constant level of quality, which you choose by moving the slider bar up to increase quality or down to decrease it. Creates a movie with varying bit rates (to maintain quality).Set Controlled Data Rate
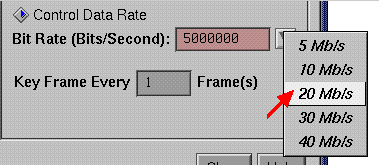
Allows you to choose a specific bit rate from the small square menu button (see Figure 2-12), or in some cases, to type a specific bit rate into the field. The bit rate will be controlled, so that it stays at this level throughout the movie.
Note: A higher bit rate translates to higher video quality, but lower degree of compression.
Set frequency of key frame occurrence.
Enter a new number in the Key Frame field. For example, if you set the Key Frame option to 10, every 10th frame will be a key frame. This translates to a higher level of compression and playback speed than a movie compressed with the Key Frame option set at a lower number. However, if you want to stop a movie in different places, in order to view different frames, a lower Key Frame option will provide better stop and start viewing.
Choose a compression engine (only applicable if you have the Cosmo Compress™ option board).
To use your Cosmo Compress board, select Hardware Accelerate. To use software compression only, select Software Codec.
Click the Close button when you are satisfied with the Video Output Parameters.
When you are converting a media file to the MPEG format, the following custom compression settings are available to you in the Video or Audio Output Parameters window:
Bit Rate (appears in Video Parameters window only).
Choose Low, CD (ideal bit rate for CD-ROM material), or High. Generally, lower bit rate settings create smaller files, but lower quality; higher settings create larger files with higher quality.
Key Frame (appears in Video Parameters window only)
Enter a new number in the Key Frame field to set the frequency of key frame occurrence. For example, if you set the Key Frame option to 10, every 10th frame will be a key frame. This translates to a higher level of compression and playback speed than a movie compressed with the Key Frame option set at a lower number. However, if you want to stop a movie in different places, in order to view different frames, a lower Key Frame option will provide better stop and start viewing.
MPEG-1 Settings Panel (appears in Video and/or Audio Parameters window)
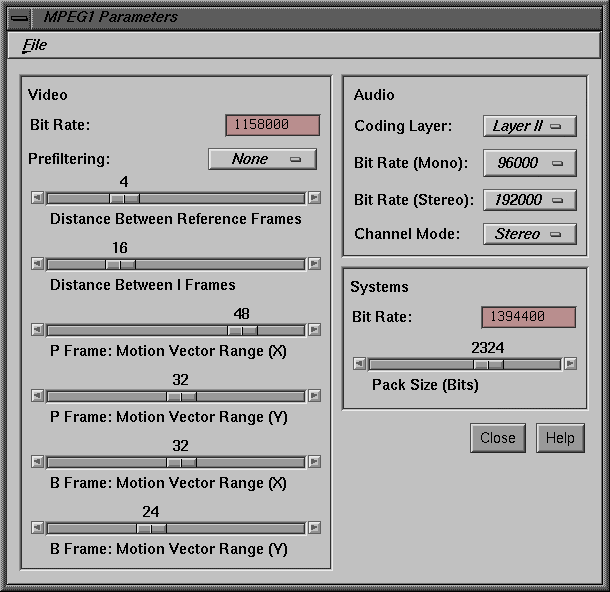
The MPEG-1 Settings Panel button appears at the bottom of the Video or Audio Output Parameters window. Click on the small square button to open the MPEG-1 Parameters window. The window for customizing MPEG compression parameters appears. See Figure 2-13.
The MPEG Parameters window offers the option to control more technical MPEG compression settings. What follows is a summary of these settings. When you are satisified with the settings in this window, simply click Close and the settings will be applied to the current conversion.
Video Bit Rate Allows you to type in a specific video compression bit rate, anywhere from 100Kb (100,000) per second to 4.5Mb (4,500,000) per second. A higher bit rate translates to higher image quality, but lower degree of compression.
Prefiltering Use the menu button to select “none,” “medium,” or “maximum” prefiltering. Prefiltering smooths your input picture, expediting the compression process (at the possible expense of the image quality). You might want to use prefiltering if your input picture has a lot of noise (extraneous video data) or if you want to create a file with a very low bit rate.
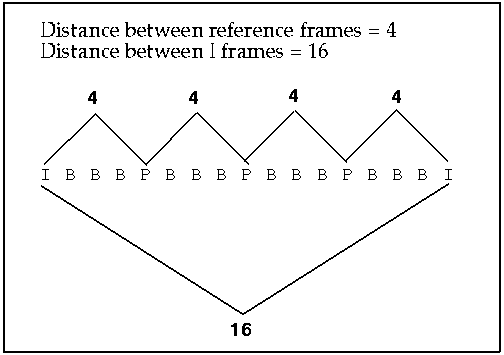
Distance Between Reference Frames
Move the slider bar to alter the distance between reference frames. This helps you to set the I (intra), B (bidirectional), and P (predicted) frame pattern that you want. MPEG compression typically does not compress each frame separately. Instead, it compresses groups of frames, where each frame can only be decompressed if all previous frames in the group have been decompressed. The I and the P frames are the reference frames. See Figure 2-14 for a visual example. For finer control, clicking one of the small arrow buttons on either side of the scale will move the distance by one frame.
Distance Between I Frames
Move the slider bar to alter the distance between the I (also known as key) frames. This helps you to set the I (intra), B (bidirectional), and P (predicted) frame pattern that you want. MPEG compression typically does not compress each frame separately. Instead, it compresses groups of frames, where each frame can only be decompressed if all previous frames in the group have been decompressed. The frame at the beginning of the group is called a key frame. The I frame is the key frame. See Figure 2-14 for a visual example. For finer control, clicking one the small arrow buttons on either side of the scale will move the distance by one frame.P frame: Motion Vector Range (X)
Move this slider bar to alter the P frame motion vector horizontal search range. Generally, higher search ranges improve video quality, but slow down the compression process. For finer control, clicking one the small arrow buttons on either side of the scale will move the search range by one.P frame: Motion Vector Range (Y)
Move this slider bar to alter the P frame motion vector vertical search range. Generally, higher search ranges improve video quality, but slow down the compression process. For finer control, clicking one the small arrow buttons on either side of the scale will move the search range by one.B frame: Motion Vector Range (X)
Move this slider bar to alter the B frame motion vector horizontal search range. Generally, higher search ranges improve video quality, but slow down the compression process. For finer control, clicking one the small arrow buttons on either side of the scale will move the search range by one.B frame: Motion Vector Range (Y)
Move this slider bar to alter the B frame motion vector vertical search range. Generally, higher search ranges improve video quality, but slow down the compression process. For finer control, clicking one the small arrow buttons on either side of the scale will move the search range by one.Coding Layer A menu button allows you to choose the first or second encoding layer. The second layer gives you better audio quality, but will probably slow down compression.
Audio Bit Rate (mono)
Allows you to select a audio compression bit rate (when converting mono audio files) from a menu button. A higher bit rate translates to higher sound quality, but lower degree of compression.Audio Bit Rate (stereo)
Allows you to select a audio compression bit rate (for when converting stereo audio files) from a menu button. A higher bit rate translates to higher sound quality, but lower degree of compression.Channel Mode
Only used when you are converting stereo audio files. Allows you to choose a “stereo,” “dual,” or “joint” channel encoding mode from the menu button.Systems Bit Rate
Allows you to type in a specific systems (MPEG audio/video) file compression bit rate, anywhere from 150 Kb (150,000) per second to 5 Mb (5,000,000) per second. A higher bit rate translates to higher quality, but lower degree of compression. Remember that the systems bit rate cannot be smaller than the combined bit rate of the audio and video files you are combining to create it.Pack Size (bits)
The default is set at the ideal bit pack size for single-speed CD-ROM authoring. Move the slider bar to alter the pack size.The MPEG Parameters window has a File menu with the following selections:
Restore Default Settings
Returns the MPEG Parameters settings to the Media Convert default settings—which are set for single-speed CD-ROM authoring.Save User Settings
Allows you to save your own settings for the MPEG Parameters panel.Retrieve User Settings
Retrieves the MPEG Parameter settings that you saved when you last chose “Save User Settings.”
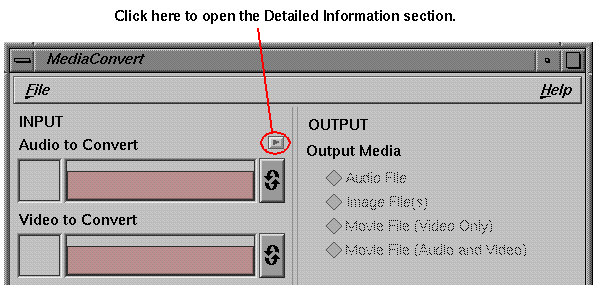
To see a detailed description of input and output parameters:
Click the on the small button in the upper middle of the Media Convert window. See Figure 2-15. This expands Media Convert to show a middle section labeled Detailed Information. See “The Detailed Information Section” for further explanation of this section.
The Media Convert interface includes:
The following choices are available in the Media Convert File menu:
Allows you to select or name your output file. The name you choose will appear in the Output File Name or Template field. If you select an existing file, that file will be overwritten by the output file you create when you press the Start button.
The Input Controls are all located on the left side of the Media Convert window. They are listed here in the order that they appear on the window. Some features appear conditionally. For example, the Input Start, End, Step, and Total fields only appear if you are converting a numbered sequence of images.
The drop pockets are a place for you to put icons of the image, audio, or movie files you want to convert. Put audio files in the Audio to Convert drop pocket and any other media files in the Video to Convert drop pocket. If you put a movie (containing audio and video) icon in the Video drop pocket, you will also see it displayed in the Audio drop pocket, indicating that your movie contains audio.
The pathname field is a place for you to specify the name of the file you want to convert. By default, it displays the pathname of your home directory. If you place an icon in the drop pocket, the pathname field automatically updates and shows the pathname for that icon.
The Input Type controls let you specify what you want to convert—a single image file or a group of numbered images. Click Numbered images if you've used the drop pocket or pathname field to specify the name of a directory that contains numbered images (img1.rgb, img2.rgb, img3.rgb, for example).
This field is appears if you're converting a numbered sequence of images. Use it to specify the names of the files you want to convert. Most importantly, use this to specify where the numeral appears in the file name. For example, if the directory contains files named img1.rgb, img2.rgb, and img3.rgb, you type: img#.rgb.
This field is appears if you're converting a numbered sequence of images. Type the number of the image that you want to use as the starting point for the sequence. For example, if you have image files ranging from img1.rgb to img20.rgb, and you want to start with img2.rgb, type 2 in the Start field. You must press <Enter> after you type in the number.
This field appears if you're converting a numbered sequence of images. Type the number of the image that you want to mark the end of the sequence. For example, if you have image files ranging from img1.rgb to img20.rgb, and you want to end with img15.rgb, type 15 in the End field. You must press <Enter> after you type in the number.
This field appears if you're converting a numbered sequence of images. Use it to specify which images in the sequence you want to convert—every one, every other one, or every third one, for example. You must press <Enter> after you type in the number.
This field appears if you're converting a numbered sequence of images. It shows you how many images you have chosen for conversion. Media Convert looks at the Start, End, and Step fields and calculates the number of images you're going to convert. You must press <Enter> after you type in the number.
This button appears if you are converting images. See “Specifying Video Input Parameters.”
The Detailed Information section is hidden by default. You can open and close this middle section of Media Convert by clicking on the tiny button (see Figure 2-15) in the upper middle of the Media Convert window. This section is not editable; it exists so that you can see certain details about your input and output file. What follows is a brief explanation of the fields, in the order that they appear in the Media Convert window.
If your input file contains audio, these fields show you the number of channels. Channels are independent streams of audio. The options are 1 or 2. For example, monophonic recordings contain a single channel of audio, and stereo recordings contain two channels: left and right. The number of channels affects the file size; stereo files are twice as large as mono files.
If your input file contains audio, these fields show your input and output sample rates. Sample rate is the speed at which audio samples are recorded and played back. They are measured in hertz (Hz). A sample rate of 1 Hz is equal to one sample per second. For example, when a mono analog audio signal is digitized at a 48 kilohertz (kHz) sample rate, 48,000 digital samples are generated for every second of the signal. Higher sample rates yield higher fidelity, but also create, larger files.
If your input file contains audio, these fields show your input and output sample types. The sample type is a numerical format used to represent an audio sample.
If your input file contains audio, these fields show the file sample widths. The sample width is the number of bits used to represent a single sample of audio data, typically expressed in multiples of 8-bits (8, 16 or 24). Larger widths allow for greater dynamic range and precision, both of which influence audio quality.
The track length field indicates the length of your audio track, which is measured in sample frames.
These fields indicate the size of the input and output frames in pixels.
When applicable, these fields show the frame rate of your input and output files. The frame rate is the number of images captured or displayed per second. A lower frame rate produces a less fluid motion and saves disk space. A higher setting results in a fluid image and a larger movie file.
This field indicates whether your files are interlaced odd, interlaced even, or non-interlaced. Interlaced is an analog video signal consisting of alternating odd and even fields; the two fields are superimposed to create a single frame. Non-interlaced is the standard form of images rendered from a graphics program, where each frame contains a single field of lines.
This field indicates whether the image orientation is bottom-to-top or top-to-bottom. Software typically uses bottom-to-top orientation to store image data, while video devices (such as a VCR or camera) use top-to-bottom.
The pixel aspect describes the shape of each pixel. Most images are made of square pixels. Another possible pixel aspect is “CCIR 601/525,” if the video source for your images was a CCIR 601video device (with NTSC timing).
This field indicates the pixel format of your video track. The pixel format describes the pixel depth (number of bits per component) and the color space (that is, the form of color signals—such as RGB or YUV—used in generating the video track).
The basic output controls are located on the right side of the Media Convert window, and are listed here in the order that they appear. Some features appear conditionally. For example, the Output Start and Step fields only appear if you are converting to numbered sequence of images.
Under the label Output Media, you choose whether you want to create image, audio, video-only movie, or (audio and video) movie files, depending on what is displayed. For example, if you want to convert an audio file and video file into a movie with a soundtrack, select Movie File (Audio and Video). Media Convert will only the display the choices that are available, based on your input file(s).
The File Format menu button lets you choose which kind of file you want to create. This button changes in relation to your input selections: it will only contain the choices that are available. For example, it will not display MPEG-1 Audio if your input was an SGI image file.
If you are converting an audio file or a movie with a sound track, clicking on this small, square button brings up the Audio Output Parameters window. See “Specifying Audio Parameters.”
If you are converting a movie or image file, clicking on this small, square button brings up the Video Output Parameters window. See “Specifying Video Output Parameters.”
If you are converting a single image or a directory of images, clicking on this small, square button brings up the Image Size window. See “Changing Image Size.”
Use the Output File Name or Template field to specify the pathname of the file you're creating. By default, this field names the new file outfile. If you're converting a series of numbered images, add a # to the file name. The # is replaced with a number. For example, if you type outfile# if you want the images to be named outfile0, outfile1, outfile2, etc....
This field only appears if you are converting to a numbered sequence of images. The Start field works in conjunction with the Output File Name or Template field. You must press <Enter> after typing in the output template name, in order to make the Start and Step fields appear. The number you enter in this field determines how the file names are numbered. For example, if the Output File Name or Template field contains outfile# and the Start field contains 5, you end up with files named outfile5, outfile6, etc...
The Step field works in conjunction with the Output File Name or Template and Start fields. You must press <Enter> after typing in the output template name, in order to make the Start and Step fields appear. The number you enter in this field determines how the file names are numbered. For example, if the File Name field contains outfile#, the Start field contains 5, and the Step field contains 2, you end up with files named outfile5, outfile7, outfile9, etc...
Media Convert has mnenomic keyboard shortcuts for the File menu and its submenus.
The main menu keyboard shortcuts are:
| “File” | <Alt>-f |
The File menu keyboard shortcuts are:
| i | “Open Input Files” | |
| o | “Open Output Files” | |
| a | “Clear Audio Input File” | |
| v | “Clear Video Input File” | |
| c | “Clear Both Input Files” | |
| q | “Quit” |
On the MPEG Parameters menu, the shortcuts are:
| d | “Restore Default Settings” | |
| s | “Save User Settings” | |
| t | “Retrieve User Settings” |
This section addresses some of the problems you might encounter while using Media Convert.
You are trying to convert a numbered sequence of images, but there are no Output Media buttons available for selection.
After entering the File Template and numbering scheme, you need to put your cursor back in the File Template field and press <Enter> to update the Output Media section.
You typed a new file or directory name in the pathname field but the drop pocket displays the wrong icon.
Make sure that the cursor is still in the pathname field, press the <Enter> key after typing a new name in the pathname field. This updates the drop pocket.
In trying to create an MPEG file, you receive an error message that includes the words like: “bad video bit rate... Only 100Kbps - 4.5Mbps supported” or “systems bit rate... too small; total data bit rate is already...”
With Media Convert, there are bit rate limitations. For instance, you can't create a systems file that has a smaller bit rate than the video and audio files you are using to create it. In this situation, you need to change the systems bit rate to number that is higher than the audio and video file bit rates combined (higher than the “total data bit rate” mentioned in the error message). If the bit rate you chose is below 100 Kbps or above 4.5 Mbps, choose a new one within this acceptable range. See “Customizing Compression Settings” for details.
You expect to create multiple image files but you end up with one image file instead.
Look in the field labeled Output File Name or Template. By default, this field contains the name outfile. If you input several image files, and don't change the name, you end up with one file named outfile. To create multiple image files, you must include a # sign in the name. For example, you could enter the name outfile#. The # sign is replaced with a number during the conversion.
Media Convert says it's going to convert more images than you expect it to convert.
Media Convert looks at the Start, Stop, and Step fields to determine how many images you're going to convert. For example, if you start with 1, end with 30, and have a step count of 1, Media Convert thinks you're going to convert 30 images. It does not check to see if you actually have 30 files that match the file name template you specify.

