This chapter includes the following main sections:
This section contains “What Audio Panel Does,” “How to Use It: An Example,” “Audio Panel at a Glance,” and “Help Conventions.”
The Audio Panel lets you adjust the audio parameters—such as the volume and sample rates—of audio coming into, or going out of, your system. You can use it to set and control communication with microphones, CD players, and other external audio equipment connected to your workstation.
Audio Panel is particularly useful for managing multiple audio settings, inputs, and outputs (see “Displaying Controls for Additional Devices” and “Synchronizing Audio Devices”).
| Note: To mute or enable Desktop or keyboard sounds, choose Desktop > Customize > Sounds from your desktop Toolchest. |
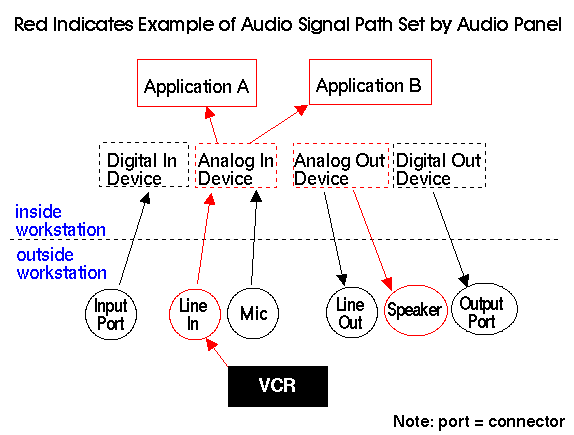
By default, Audio Panel is set up to receive (input) audio from the microphone connector and to play (output) audio over the workstation speaker. If you wanted to receive audio from a VCR connected to the Line In connector on your system, you would:
Connect the VCR to the Line In connector on your workstation.
Use Audio Panel to select the Analog In device as the default input.
Choose Default > Input > Analog In.

Note: This is called the default device because it is the internal audio device that your system will use for input unless otherwise specified by other applications running on your system. Use Audio Panel to select the input connector.
Click the Analog In device panel to select it. An outline appears around the Analog In device panel, indicating it is selected.
Choose Selected > Input Source > Line In.
Figure B-1 illustrates an example of this audio signal path.
Note: Some audio input devices in your system can communicate with more than one connector, but only with one connector at a time. This is why it is necessary to first select the default internal input device and then select the connector. Once this signal path is established, you may want to adjust some of the Analog In settings, such as one of the following:
Input level (volume)—see “Monitoring and Adjusting Input and Output Levels”
Sample rate—see “Selecting a Sample Rate”
Note: More advanced settings are available under Selected > Preferences... . Use it if you if you need to record audio with more than one channel, or if you want to synchronize the timing of two or more sources. Figure B-1. Example of Audio Signal Path Set With Audio Panel (Click Image to Display Enlarged View)
This document follows these conventions:
Links in italics launch a term definition. For example, sample rate.
Red words indicate “launch links,” meaning that if you click them, they launch the tool that they name, for example: Media Recorder .
The symbol “>” between a menu names menu items indicates a path to a menu choice. For example, “File > Open” means “Open the File menu and choose Open.
Audio Panel is accessible from your desktop Toolchest menu: select Desktop > Control Audio.
| Note: To start Audio Panel from the command line, type apanel. |
This section describes “Adjusting Volume,” “Setting the Start Up and Shut Down Tune Volume,” and “Muting.”
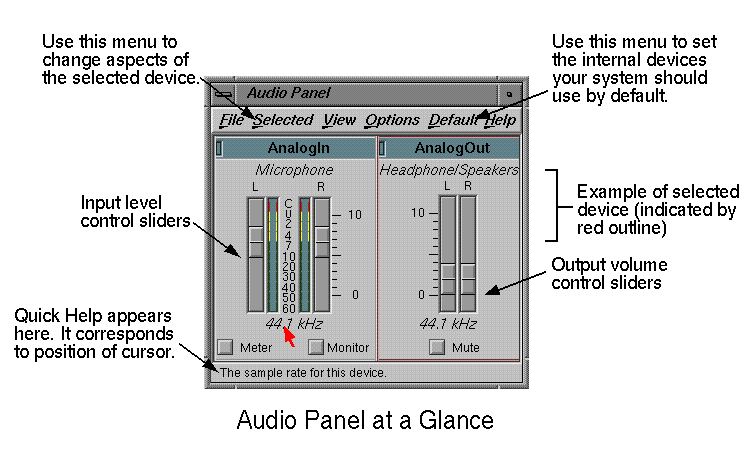
By default, the workstation speaker output sliders are on the right side of the Audio Panel window (as shown in Figure B-2), on the Analog Out device panel. Drag the speaker output sliders up to raise the level, and move them down to lower it.
| Note: Sliders are marked L and R to indicate control of the left and right channels. The left and right sliders are grouped by default—see also “Ungrouping Left and Right Volume Sliders.” |
| Note: Some output device controls panels, such as Digital Out, do not have volume sliders because you cannot control the output volume of digital devices with Audio Panel. |
From the command line, become super-user and launch Audio Panel:
In a Unix shell, type: su
Press <Enter>, then type: apanel
Click the Analog Out device panel to select it.
A red outline around the device panel indicates that it is selected.
Adjust the Analog Out level sliders to the volume you prefer.
Choose Selected > Preferences.
There is a Snap button next to “Boot Volume” on the Preferences dialog. Click that button to apply the current volume to the start up and shut down tunes.
Click OK.
For clarification of the concept of a signal path, see Figure B-1 for an example of an input signal path set with Audio Panel. A default device is an internal audio device that your system uses unless otherwise specified by other applications.
To set the default input and/or output signal path:
Use the Default menu to select the device you want to use as the default input or output.
If applicable (if you are setting a default input and if the Input Source menu item is not grayed out), choose the input source (e.g., Line In) that you want the device to use by default:
Click the input device panel in the Audio Panel window to select it.
Choose Selected > Input Source, and then choose an input from the Input Source rollover menu.
Explanation: Some audio input devices in your system can communicate with more than one source, but only with one source at a time. This is why it is necessary to first select the default input device and then select the source.
In most cases, it is not necessary to select an output destination because output devices send output to all of their connectors, all of the time. However, some workstations with special audio hardware allow you to specify the output destination. In this case, the Output Destination choice is activated (not grayed out) on the Selected menu.
| Tip: You can use the right mouse button to set the default input or output and to choose the input connector. Position the cursor over the device panel of the device you want to set, then hold down the right mouse button to reveal a menu that lets you make these settings. |
| Note: If you have more than one optional audio board installed, an incremental prefix naming scheme occurs. For example, if you have two PCI Audio Option Boards installed in your system, one ADAT input will be displayed as “RAD 1.ADAT In” and the other “RAD 2. ADAT In.” |
This section includes:
The sample rate determines the rate at which samples are taken from the analog signal when it is converted (or vice versa), and sets the upper limit on the high frequency content of your recording.
Choosing the appropriate sample rate for the audio you are recording helps prevent distortion in your recording. Telephones use an 8 kHz (kilohertz) sample rate, which is adequate for voice-quality audio. Compact discs use a 44.1 kHz sample rate, which is necessary for music-quality sound. Audio DAT players typically use a 48 kHz sample rate, although some use 32 kHz or 44.1 kHz.
When the device's sample rate is derived from a variable-rate sync source, such as an AES or ADAT master clock, sample rates are expressed as rational fractions of the sync signal. A value of 1/1 is most often used, although other useful fractions are provided on the menu. For instance, 1000/1001 is commonly used with digital audio signals in the video world, 147/160 derives a 44.1 kHz sample rate from a sync source rated at 48 kHz, 320/441 derives a 32 kHz sample rate from a sync source rated at 44.1 kHz, 2/3 derives a 32 kHz sample rate from a sync source rated at 48 kHz.
| Note: The highest frequency in your recording will be half the sample rate. For example, the highest frequency in a telephone signal can be 4 kHz because the sample rate is 8 kHz. |
To adjust a sample rate for a specific device:
Select the device by clicking on its device panel.
An outline around the device panel indicates that it is selected.
Choose Selected > Rate, and use the rollover menu to select the input or output sample rate.
Input Rate Choose the sample rate for audio you are recording. Choose the same sample rate as that of the source media. If you are recording from a digital input device, the input sample rate is set automatically to the rate of the incoming digital data.
Output Rate Choose the rate that most closely matches the sample rate of the input.
See “Considerations in Selecting a Sample Rate” for more information.
| Tip: You can use the right mouse button to adjust the sample rate. Position the cursor over the device panel of the device, then hold down the right mouse button to reveal a menu. Choose “Sample Rate.” |
| Note: Sample rate is a global setting for each audio device. Changing it affects all other audio processes that are using the audio device. For example, changing the sample rate on the Default device affects all applications currently using the Default device. |
Match Input to Output Rates as Closely as Possible
When the input and output sample rates are different, the output sound may become distorted.
Digital Sources Have Locked Sample Rates
When recording digital input, the sample rate is determined by the source of the sound. For example, a CD player with a digital output jack sends information at 44.1 kHz. The workstation automatically locks to that rate.
You Can't Go Back
Once you have recorded at a lower sample rate, you cannot recover the original signal. If the quality of your recording is important, record at the same sample rate as the source media and adjust the sample rate down incrementally with Sound Track , or convert the file with Media Convert, to save storage space.
Disk Space
Higher sample rates yield better recordings but require more disk space.

Tip: Compression is a better way to save disk space than recording audio at low sample rates. You can use Media Convert to compress audio files.
This section contains:
When you record from a microphone or other equipment connected to the Line In connector, the workstation converts the audio signal from analog to digital. To convert the signal into the best possible digital data, adjust the input levels for the cleanest sound.
| Note: The input levels affect only those signals that are converted from analog to digital, so adjusting the input sliders won't have any effect on digital input. |
Follow these steps to adjust the input levels for hardware connected to the Line In or Microphone connector of an Analog In device.
Click the Meter checkbox to display the signal range.
If you are setting the microphone input levels, click the Monitor checkbox to hear the audio as you adjust it.
Note: Monitor sends sound to the default output. See “Setting the Default Input and Output Signal Path” for details on selecting the default output.
Audition your audio.
If you are recording from a microphone, utter a test message such as, “I will speak at this level consistently at this distance from the microphone.”
Adjust the Input sliders until the meter displays green and often yellow without reaching into the range of red. See “Ungrouping Left and Right Volume Sliders” to separate sliders so you can adjust them independently.
If the meter displays only green, the levels are too low.
If the meter displays any red, the levels are too high.
If the meter displays green into yellow, the levels are correct.
If your recordings contain too much environment noise, move the microphone closer to your mouth and readjust the input levels. If your recordings contain too much breath noise on words that begin with P and B, move the microphone further from your mouth and speak over the microphone, rather than into it.
| Tip: If your Line In audio contains a wide dynamic range (loud and soft parts), adjust the Input level for the loudest part. |
Locate the device panel for the output you want to adjust, such as the Analog Out device panel.
Move the L and R sliders up to raise volume or down to lower it.
| Note: Some output controls panels, such as Digital Out, do not have volume sliders because you cannot control the output volume with Audio Panel. |
By default, the Audio Panel displays controls for two devices:
The input side (on the left) displays the Analog In device control panel. This device controls the microphone on your workstation.
The output side (on the right) displays the Analog Out device control panel. This device controls your workstation speaker.
If you have additional audio hardware, you can also access the device panel for those devices (the choices available depend on your hardware):
Select View > Show Device List.
The device list appears. It lists only devices available on your system.
Under “Audio Devices,” select the devices you want to view. All selected devices are displayed in Audio Panel.
Alternatively, you can individually select a devices to display by using the View menu.
| Note: If you have more than one optional audio board installed, an incremental prefix naming scheme occurs. For example, if you have two PCI Audio Option Boards installed in your system, one ADAT input will be displayed as “RAD 1.ADAT In” and the other “RAD 2. ADAT In.” |
Audio Panel resizes and changes dynamically as you select different devices from the list. Note that if you change the default input or output, the display updates immediately. Also, if (for example) Default Input is already checked on the Device list and you select the current default input (such as Analog In) from the device list, nothing changes because the Analog In is already displayed.
| Note: Some output controls panels, such as Digital Out, do not have volume sliders because you cannot control the output volume of digital devices with Audio Panel. |
See also “Setting the Default Input and Output Signal Path.”
The Audio Panel is set so that dragging a single slider adjusts the right and left levels simultaneously.
To separate the sliders so that you can adjust the left and right levels independently, click to select the device panel, then choose Selected > Group Sliders. A check mark indicates that the sliders are grouped. If there is no check mark, then the sliders can be moved independently.
| Tip: You can use the right mouse button to group or ungroup the sliders. Position the cursor over the device panel, then hold down the right mouse button to reveal a menu. Choose “Group Sliders.” |
If your workstation supports four independent channels of input and output, you can enable four channel mode with Audio Panel. Also, if your workstation supports stereo microphones, you can enable stereo mode.
Position the cursor over the relevant device control panel. For example, position the cursor over Analog In if you are using a stereo microphone.
Hold down the right mouse button to reveal a menu and choose “Preferences... .”
On the Preferences panel that appears, click “Stereo Microphone” or “Four Channel Mode.”
A check mark indicates that the mode is on for that device. Audio Panel resizes automatically to accommodate any additional level sliders.
| Note: Enabling four channel mode simultaneously affects the Analog Input and Analog Output devices. See also the audio(1M) man page for more information on four channel mode. |
| Note: The microphone that ships standard with Indy and Indigo workstations is a monophonic microphone. |
If you are recording from more than one device at a time, you can use the “Sync Sources” feature to set the master timing, which will prevent long term time drifts (between audio and video in a movie, for example) in your recordings.
Click to select the device control panel.
Choose Selected > Preferences.
On the Preferences panel that appears, use the Sync Source menu button to choose a master timing.
The choices available on this menu button depend on what is available in your workstation hardware. Some devices only have one choice for sync source. In this case, a label is displayed instead of a menu.
If you have more than one optional audio board installed, an incremental prefix naming scheme occurs. For example, if you have two PCI Audio Option Boards installed in your system, one ADAT input will be displayed as “RAD 1.ADAT In” and the other “RAD 2. ADAT In.”
| Note: If you want the sync source timing to appear on the device control panel, choose Options > Professional Mode. A check mark indicates professional mode is enabled. |
This section includes “The File Menu,” “The Selected Menu,” “The View Menu,” “The Options Menu,” and “The Default Menu.”
The File menu contains:
| Open... | Allows you to select previously saved settings of Audio Panel from a file browser. | |
| Save | Saves the current Audio Panel settings. | |
| Save As... | Allows you to save the current Audio Panel settings under a specified name, which you can open later with the “Open...” command. | |
| Revert | Restores Audio Panel to the standard factory settings. | |
| Exit | Closes Audio Panel. |
The Selected menu contains the following commands, which apply to the device panel that is currently selected in Audio Panel. To select a device panel, click on it—an outline appears around the selected panel.
| Sample Rate | Allows you to choose a sample rate. | |
| Inputs | When applicable, allows you to select the input connector to use with the selected device. | |
| Group Sliders | Turns “group slider mode” on and off. A check mark indicates that the sliders are grouped. When disabled, the sliders are independent so that you can adjust the left and right levels independently. | |
| Make Default Input/Output |
| |
| Preferences... | Opens the preferences dialog for the selected device. See “Synchronizing Audio Devices.” |
The View menu contains commands that toggle on and off. Select a command to turn it on or off. A check mark indicates that it is “on.“
This menu includes “Default Input,” which displays or hides the default input device control panel and “Default Output,” which displays or hides the default output device control panel. In addition, the available devices appear on this menu—the devices available depend on your system hardware and therefore vary from system to system. Finally, the View menu includes “Show Device List,” which opens and closes the Device List. See “Displaying Controls for Additional Devices.”
The Options menu contains commands that alter the Audio Panel display. Select a command to turn it on or off. A check mark indicates that it is “on.“
| Audio Queue Monitor |
| |
| Professional Mode |
| |
| Decibel Scale | Displays the decibel scale on the level sliders. | |
| Show Scrollbar |
| |
| Show Quick Help |
|
The Default menu contains:
| Input | Use this to choose the audio input device you want to use. | |
| Output | Use this to choose the audio output device you want to use. |
| Note: These are called the default devices because they are the internal audio device that your system will use unless otherwise specified by other applications running on your system. |
The Presenter LCD flat panel display product features additional audio output control, which appears if you have Presenter installed on your workstation.
The dual output sliders are collectively grouped with the primary Audio Panel output sliders. The Treble command adjusts the brightness of the sound.
This section provides a list of problems you might encounter and offers possible solutions.
No audio is coming out of the workstation speaker or headphones.
Try the following:
Make sure that you've selected Default > Output > Analog Out.
Make sure that the correct input is selected from Default > Input.
Trying clicking Monitor on the input device panel (a check in the checkbox indicates it is on). Monitor sends sound to the default output.
Check the volume on the Analog Out controls, and make sure that the Mute check box is not checked.
You want to select Digital Input, but can't find it.
Choose Default > Input > Digital In. (This is a different method than that used in previous versions of Audio Panel). Also, it is important to note that if you have an O2™, you will not have Digital In unless you have installed an optional digital audio board. The O2 CD Player works without using Audio Panel to specify the input.
Monitor output sounds “crackly” or broken up.
Make sure both sample rate and sync source (see “Synchronizing Audio Devices”) of the input device you are monitoring match those of the default output device.
Audio display demos don't respond to output.
Audio demos such as “snowflake” and “amesh” rely on a special hardware loopback circuit that may not be supported on all machines.