This chapter describes how to install and configure peripherals, including 5.25-inch and 3.5-inch drives and serial devices:
This chapter also directs you to additional documentation about using peripherals with your Origin200 system.
The following sections describe how to configure, install, and remove peripherals from the 5.25-inch drive bay:
The 5.25-inch drive bay is located at the top of the Origin200 in a tower configuration, or on the left-hand side in a rackmount configuration. Figure 6-1 shows the location of the 5.25-inch drive bay.
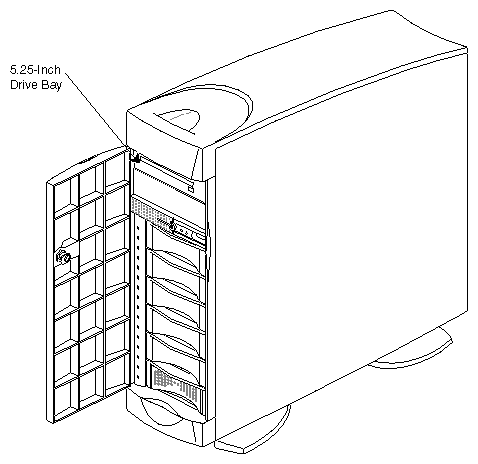
The 5.25-inch drive bay holds a peripheral carrier (mounting frame) to which you attach peripherals. The carrier is open at the front to accept peripherals, and has blind-mating connectors at the rear for power and SCSI data.
Drives in the 5.25-inch bay are connected to SCSI channel 1, which is single-ended, fast and narrow, running at 10 MHz, and capable of transferring 10 MB per second.
The next sections describe how to configure drives, install them in the 5.25-inch drive bay, remove them from the drive bay, and test that drives are installed correctly:
Peripherals obtained from SGI are preconfigured. You can install them in the 5.25-inch drive bay with no additional configuration. However, if you are installing third-party peripherals, or wish to change the configuration of an SGI-supplied drive, follow these guidelines:
Set the SCSI ID between 1 and 7. Do not use SCSI ID 0, because that is reserved for the controller.
Set the drive (motor) start jumper to start on command from the controller. Do not configure the drive to start as soon as power is applied, because this may draw too much current when the system is first turned on.
Set the drive termination jumper to “off” or remove the drive terminators.
Configure the drive to supply termination power.
SCSI drives are typically formatted by the manufacturer, so no further formatting is necessary. All SGI supplied SCSI drives are preformatted.
Follow these steps to install a 5.25-inch peripheral:
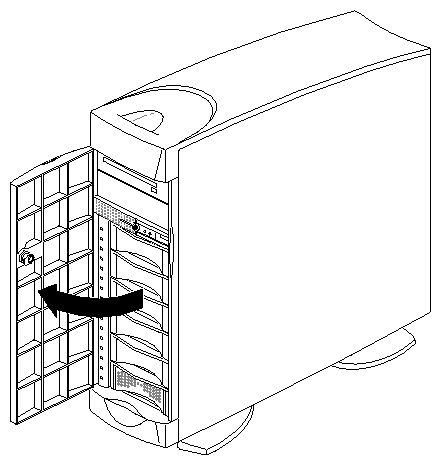
Remove the front door. See “Removing the Front Door of an Origin200 CPU Module”.
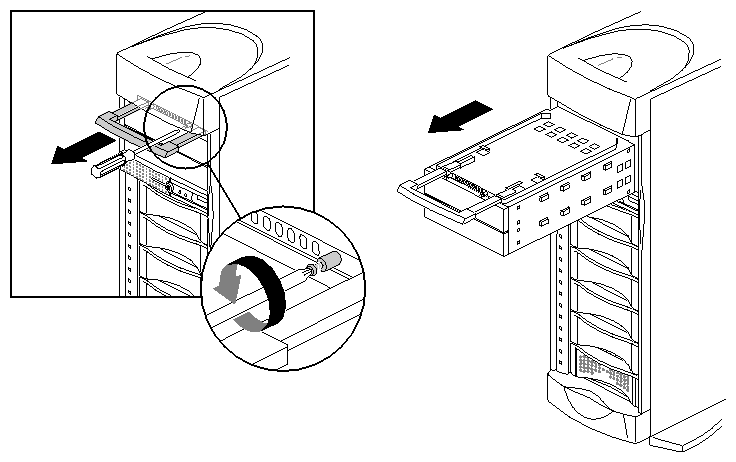
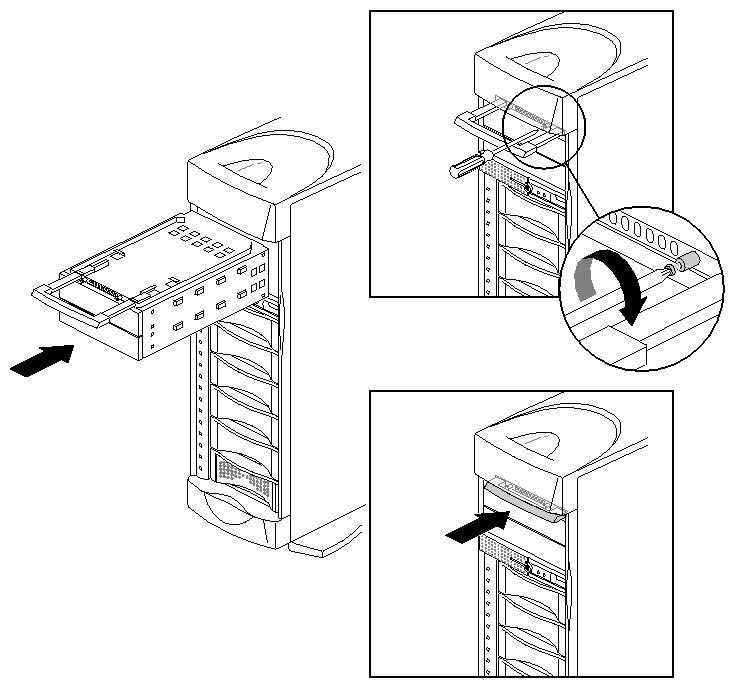
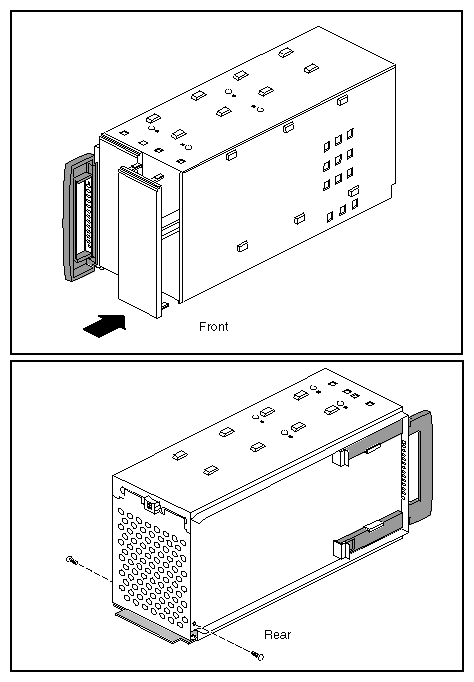
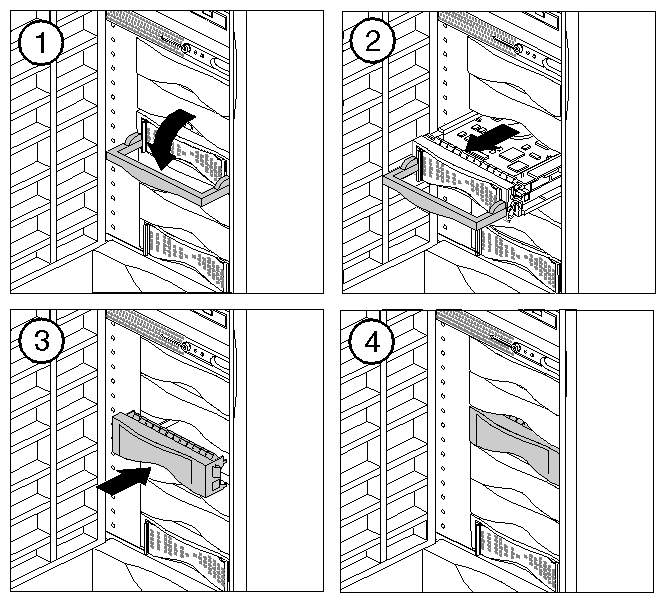
Remove the peripheral carrier, as shown in Figure 6-2.
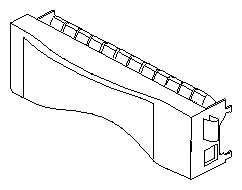
Pull out the peripheral carrier handle. The handle flexes downward, allowing access to two captive screws.
Using a #2 Phillips screwdriver, undo the two captive screws that secure the peripheral carrier to the Origin200 chassis.
Grasp the handle of the peripheral carrier and pull the carrier out of the 5.25-inch drive bay.
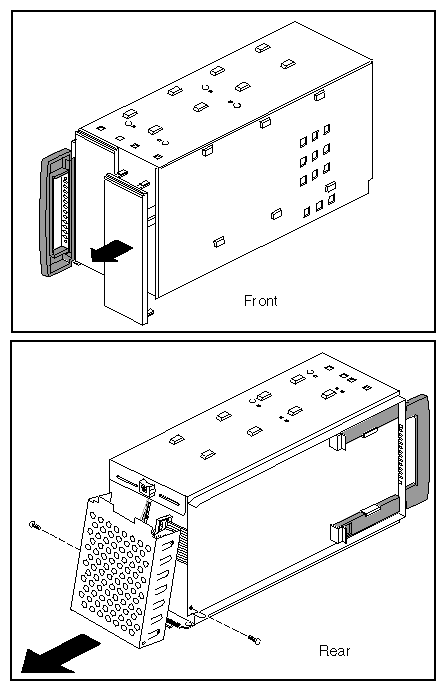
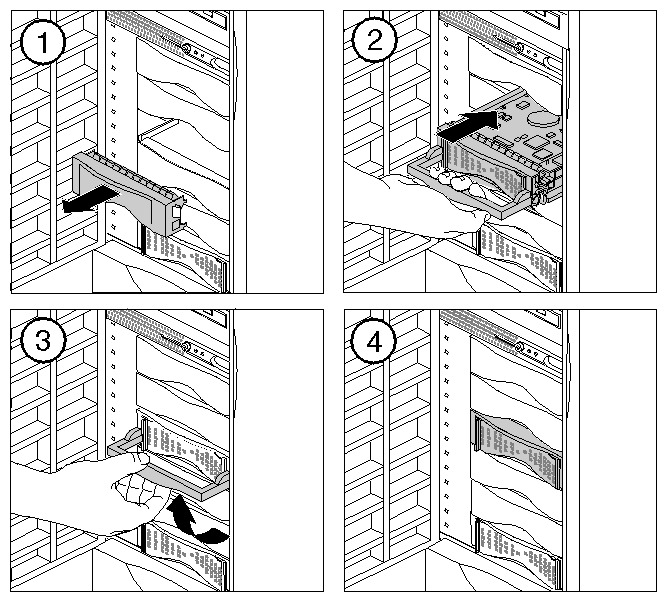
Prepare the peripheral carrier, as shown in Figure 6-3.
Remove one or two of the blanking plates from the front of the carrier, depending upon the height of the drive you are installing.
Using a #2 Phillips screwdriver, remove the screws that hold the access plate to the rear of the carrier, then remove the access plate.
Slide the drive into the peripheral carrier and attach it with four screws through the side of the carrier, as shown in Figure 6-4.
Attach the power and SCSI connectors at the rear of the carrier to the drive. Use whichever connectors fit conveniently for the position of the drive in the carrier.
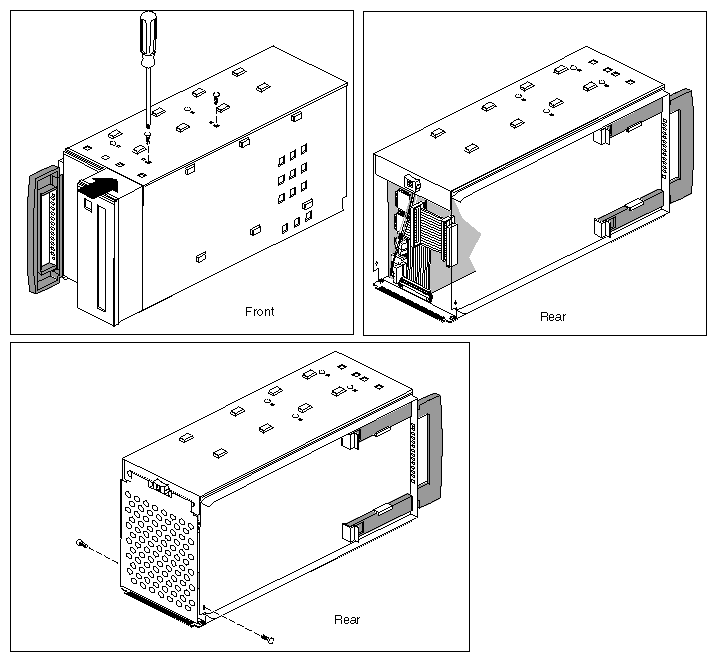
Replace the access plate. See Figure 6-4.

Note: Be sure to reinstall the access plate on the rear of the carrier. The plate protects the power and SCSI cables from damage when you slide the carrier into the system.
Slide the carrier into the system and secure it with the two captive screws. See Figure 6-5.
Replace the front door.
You are finished installing the 5.25-inch peripheral.
Follow these steps to remove a 5.25-inch peripheral:
Remove the front door. See “Removing the Front Door of an Origin200 CPU Module”.
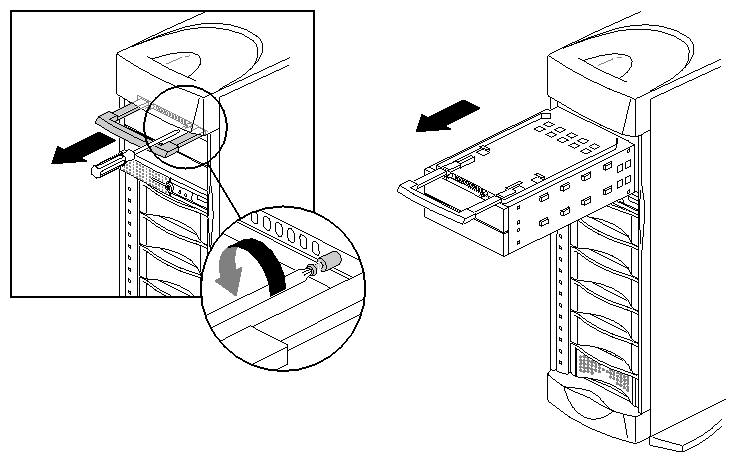
Remove the peripheral carrier, as shown in Figure 6-6.
Pull out the peripheral carrier handle. The handle flexes downward, allowing access to two captive screws.
Using a #2 Phillips screwdriver, undo the two captive screws that secure the peripheral carrier to the Origin200 chassis.
Grasp the handle of the peripheral carrier and pull the carrier out of the 5.25-inch drive bay.
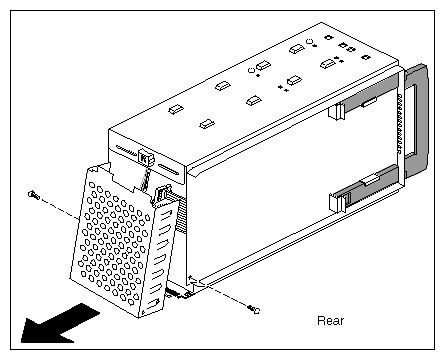
Remove the rear access plate from the peripheral carrier, as shown in Figure 6-7.
Using a #2 Phillips screwdriver, remove the screws that hold the access plate to the rear of the carrier, then remove the access plate.
Disconnect the power and SCSI cables from the drive.
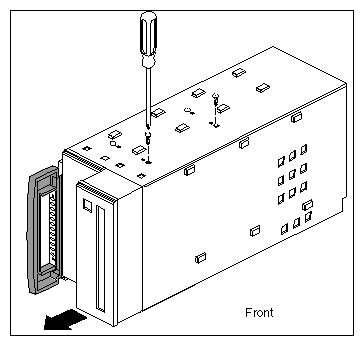
Remove the screws that hold the drive to the peripheral carrier and remove the drive from the carrier, as shown in Figure 6-8.
Replace the blanking and access plates on the peripheral carrier. See Figure 6-9.
The front blanking plate ensures proper airflow through the system.
The rear access plate protects the cables in the peripheral carrier from damage when installing and removing the carrier.
Slide the carrier into the system and secure it with the two captive screws. See Figure 6-10.
Replace the front door.
You are finished removing the 5.25-inch peripheral.
The Origin200 chassis has room for six 3.5-inch peripherals. Each peripheral is mounted on a sled to make it convenient to install and remove, and set their SCSI ID numbers.
The next sections describe how to configure, install, and remove 3.5-inch peripherals.
The 3.5-inch peripheral bay holds up to six drives mounted on sleds. The SCSI ID of each drive is determined by the slot into which it is installed. The system (boot) disk must be installed in slot 1. Figure 6-11 shows how the slots correspond to SCSI IDs.

Drive bays that do not contain peripherals are covered by blanking plates. Figure 6-12 shows a blanking plate for the 3.5-inch drive bay. These plates provide for proper airflow through the system as well as EMI shielding.
3.5-inch peripherals obtained from SGI are preconfigured and installed on drive sleds. You can install them in the 3.5-inch drive bay with no additional configuration.
Follow these steps to install a 3.5-inch peripheral:
Open the front door of the chassis as shown in Figure 6-13.
Locate an available slot for the peripheral. Figure 6-14 shows how the drives are numbered.
-
If there is a plastic blanking plate covering the slot, remove it as shown in Figure 6-15.
Line up the drive on the sled and slide the drive forward until it is almost flush with the edge of the drive bay.
Fold the locking lever up to latch the drive in place, as shown in Figure 6-15.
| Note: Save the blanking plates you remove. If you ever remove a peripheral and do not replace it with another one, you should reinstall the blanking plate to ensure proper cooling air flow and electromagnetic interference (EMI) shielding in the Origin200 chassis. |
Follow these steps to remove a 3.5-inch peripheral:
Open the front door of the chassis, as shown in Figure 6-16.
Locate the drive you want to remove. The drives are numbered as shown in Figure 6-17.
Remove the drive, as shown in Figure 6-18.
If you are not replacing the drive with another peripheral, cover the open slot with a plastic blanking plate, as shown in Figure 6-18.
Note: Always cover an open peripheral slot with a plastic blanking plate to ensure proper cooling air flow and electromagnetic interference (EMI) shielding in the Origin200 chassis.
Use the following checklist to determine if a drive is installed correctly:
Power on the system and watch drive lights. Drives should blink as they are accessed sequentially from drive 1 at the bottom of the 3.5-inch drive bay (right-hand side in a rack-mounted server) up to the top drive in the 5.25-inch peripheral carrier.
Check the system console; malfunctioning drives cause the operating system to print an error message on the system console as the system boots.
When the system boots (either single-user mode, or multiuser mode), use hinv to see what drives the system recognizes. Log in to the system using any account (root, guest, and so on) and at a shell prompt enter:
hinv -c disk
You should see messages similar to this:
Integral SCSI controller 0: Version QL1040B
  Disk drive: unit 1 on SCSI controller 0
  Disk drive: unit 3 on SCSI controller 0
Integral SCSI controller 1: Version QL1040B
Integral SCSI controller 4: Version QL1040B
  Disk drive: unit 1 on SCSI controller 4
  Disk drive: unit 2 on SCSI controller 4
Integral SCSI controller 5: Version QL1040B
This indicates that the system recognizes two disk drives on SCSI channel 0 (the insystem drive in slot 1 and a second drive installed in slot 3) and no drives on channel 1. The second module of this system also has two drives installed on channel 0 (in slots 1 and 2) and no drives installed in channel 1.
Once installed, peripherals from SGI are all recognized by the operating system (IRIX) and are ready to be configured for use with the system. Table 6-1 indicates where to turn for more information about configuring drives, depending upon how you want to use the drives in your system (for example, as mounted filesystems, logical volumes spanning multiple disks, striped across multiple disks, EFS filesystems, or XFS filesystems).
In addition to the reference pages described in Table 6-1, refer to IRIX Admin: Disks and Filesystems. See “About This Guide” at the beginning of this manual for information about obtaining additional manuals and documentation.
Table 6-1. Sources of Information for Drive Configuration
Type of Configuration/Operation | Man Pages or Tools |
|---|---|
Changing controller numbers | ioconfig(1M) |
Device files, creating | MAKEDEV(1M) |
Disks, formatting and initializing
| fx(1M) |
Disks, files in the volume header, adding and removing | dvhtool(1M) |
Disks, displaying partitions | prtvtoc(1M)fx(1M) |
Disks, repartitioning
| fx(1M)The xdkm graphical tool |
Disks, creating a system (boot) disk | PROM monitor (from the System Maintenance Menu) fx(1M), mkfs(1M), MAKEDEV(1M) dump(1M), xfsdump(1M) |
Disks, adding as a mounted filesystem | Add_disk(1) |
Disks, use quotas
| quota(1) |
Filesystem, creating an EFS or XFS
| mkfs(1M) |
Filesystem, spanning across multiple disks | xlv(7M) |
Filesystems, mounting and unmounting
| mount(1M), umount(1M)fstab(4) |
Filesystems, automatically mounting (automount) | automount(1M)exports(4)chkconfig(1M) |
Guaranteed-rate I/O
| grio(5) |
Each Origin200 module provides connectors for two serial ports at the rear of the chassis. Figure 6-19 shows the locations of the connectors for these ports.
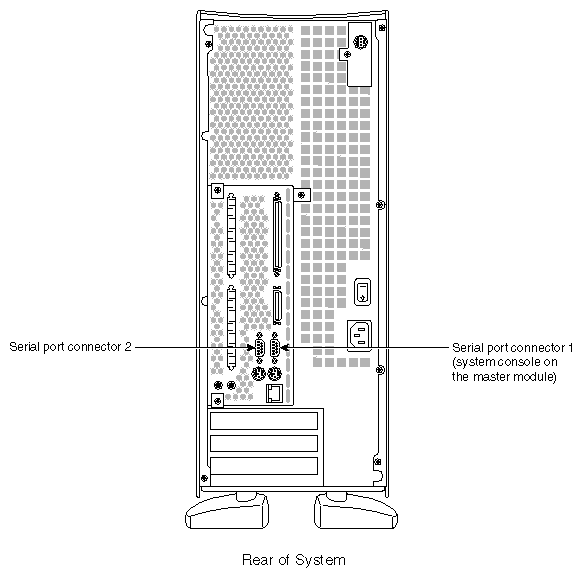
In a one-module system, the ports are numbered 1 and 2. In a two-module system, the ports on the first module are numbered 1 and 2, and the ports on the second module are numbered 3 and 4. See “How Devices Are Detected and Numbered” in Chapter 4.
These are the common types of serial devices that you can attach to these ports:
serial (ASCII) terminals
modems
printers
other computers (using terminal emulation or other serial protocols)
The serial ports are capable of transferring data at speeds ranging from 50 baud to
460 Kbaud in RS-232 mode. The default serial port configuration is RS-232, but the serial ports can be opened programmatically in RS-422 mode. The serial ports can also be used to send and receive MIDI information.
Like those found on the O2 and the rest of the Origin product line, the serial port connectors are DB9, male, and are designed to be IBM compatible. Because of this, they do not use the same pinouts as DB9 serial ports on older SGI systems.
Table 6-2 shows the correspondence of ports to IRIX device files and protocols.
Table 6-2. Serial Port Numbers and Correspondence to IRIX Device Files
Module | Serial Port Number | IRIX Device File | IRIX Device File | IRIX Device File |
|---|---|---|---|---|
First | 1 (system console) | /dev/tty[c,d,f,m]1 | /dev/tty4[d,f,m]1 | /dev/ttymidi1 |
Second | 3 | /dev/tty[c,d,f,m]3 | /dev/tty4[d,f,m]3 | /dev/ttymidi3 |
| Note: For more information on how devices are detected and configured, see “Determining the Devices Installed on Your Server” in Chapter 4. |
For serial port pinouts, see Appendix A, “Connector Pinout Assignments.” For information on specific serial cables, see Appendix B, “Cable Descriptions.”
The serial port connectors are D-shell 9-pin male. Use a a cable with a DB9 female connector to attach serial devices to the Origin200 server. The Origin200 serial port connectors provide threaded hex-nuts so that you can fasten the cable connector to the port.
You can connect an optional ASCII terminal to your Origin200 by using the serial cable shipped with your server. It has a DB9 connector on one end and a 25-pin serial connector on the other. See Appendix B, “Cable Descriptions,” for information on this cable.
Be sure to read the documentation that comes with the terminal. Always connect your system console terminal to serial port 1. You can connect an additional terminal to ports 2, 3, and 4. Set the terminal with the following operational characteristics:
9600 baud
8 bits
1 stop bit
no parity
Use the following steps to connect a terminal properly:
Attach the keyboard (if applicable) and power connectors to the terminal.

Caution: Before plugging the terminal into either a 110 VAC or 220 VAC outlet, be sure that the electrical rating on the UL-CSA label is in either the 100–120 VAC or 200–240 VAC range, whichever applies. Connect the end of the serial cable that has the 25-pin connector to the back of the terminal. (Some terminals have more than this connector on the back; if this is the case, choose the connector marked Modem or COMM. Consult your terminal's documentation if you are not sure which connector to use.)
Attach the end of the serial cable that has the DB9 connector to either port 1 (if the terminal will be the system console) or one of the other ports.
Power on the terminal.
Restart the system or continue with other peripheral connections as needed.
In some cases the terminal may need special recognition from the system software. You can check or set up the system software to work under specific parameters by following these steps:
Log in to the system as root.
Edit the file /etc/gettydefs to choose the proper baud rate, prompt, and line conditioning.
vi /etc/gettydefs
Modify the file /etc/inittab, if necessary, to enable getty on the appropriate port at the desired baud rate:
vi /etc/inittab
The following lines are for the system console and the second serial port:
t1:23:respawn:/etc/getty ttyd1 co_9600          # alt console
t2:23:off:/sbin/getty -N ttyd2 co_9600          # port 2
These lines are for ports 3 and 4 on a second module:
t5:23:off:/sbin/getty -N ttyd3 co_9600          # port 3
t6:23:off:/sbin/getty -N ttyd4 co_9600          # port 4
Notice that ports 2, 3, and 4 are marked “off.” This means that you cannot log in on those ports. To allow logging in on, for example, port 3, change the line for port 3 to the following:
t5:23:respawn:/sbin/getty -N ttyd3 co_9600 # port 3
To use a higher baud rate, for example, 38400, change the line to the following:
t5:23:respawn:/sbin/getty -N ttyd3 dx_38400 # port 3
After modifying the /etc/inittab file, inform init of any changes by entering
telinit q
Look in /etc/ttytype for the listed console port information. You should see lines similar to this:
?iris-tp console
iris-tp tport
?vt100 ttyd1
?vt100 ttym1
?vt100 ttyf1
?vt100 ttyd2
?vt100 ttym2
?vt100 ttyf2
?vt100 ttyd3
?vt100 ttym3
?vt100 ttyf3
...
The default terminal type for all terminals is VT100, and the system prompts you to confirm this. To keep the system from asking you what type of terminal you are using when you log in, remove the question marks from all lines in the file that correspond to the serial port 1, 2, 3, and 4. For example, to prevent the system from prompting for a terminal type on port 3, change these lines in /etc/ttytype:
...
vt100 ttyd3
vt100 ttym3
vt100 ttyf3
...
You can also change the terminal type designated for the particular serial port by changing vt100 to another shorthand terminal name. See Appendix C, “Supported Terminals” for a list of some terminals and shorthand names.
Add the following line to your ~/.login or ~/.profile file. This sets the terminal type, syntax, erase, and kill parameters automatically when you log in:
eval `tset -s -Q'
Check terminal connection and function using the following commands:
echo Hello, this is a test > /dev/ttyd3
This command should cause the sentence Hello, this is a test to appear on the terminal attached to port 3. If nothing appears on the terminal, check that you are using the correct serial port and that the terminal is configured correctly. If gibberish appears on the terminal screen, it probably means the terminal is not set to the same baud rate as the serial port.
If the test sentence appears on the terminal screen, but you do not see a login: prompt when you press the terminal's Enter key, verify that there is a getty process running on the serial port.
ps -def | grep getty
You should see output similar to this:
root  844  1  0 23:16:27 ttyd3 0:00 /sbin/getty -N ttyd3 dx_38400
root  843  1  0 23:16:27 ttyd1   0:00 /sbin/getty ttyd1 co_9600
This indicates that a getty process is running on both the system console (port 1) and on port 3. If you do not see a getty process running on the desired serial port, verify the serial port settings in /etc/inittab and rerun telinit.
To attach a modem to your server, connect it to ports 2, 3, or 4 using a serial modem cable. The serial cable must be appropriate for data communications equipment (DCE): The data transmit and data receive pins are opposite those in a DTE cable. Also, the cable must provide full flow control. See Appendix B, “Cable Descriptions,” for information about this type of cable.
See the /etc/uucp/fix-hayes or /etc/uucp/fix-telebit files for information on specific modems supported (see step 5, below).
The following general procedures are used when connecting a modem:
Make sure that the power switch on the modem is turned off.
Attach the serial cable to the modem.
Attach the connector on the other end of the cable to the desired serial connector on the server's I/O panel (port 2 in a single-module system, or ports 2, 3, or 4 in a dual-module system).
Attach the modem power cord and turn on the modem.
Install the UUCP subsystem (eoe.sw.uucp), if it is not already installed.
Note: The UUCP subsystem is shipped with the IRIX operating system, but is not installed by default. Confirm that the UUCP subsystem is installed by using the versions command. If it is not installed, see IRIX Admin: Software Installation and Licensing for instructions. Read the documentation that comes with your modem to determine model-specific connection and configuration procedures.
For additional information about configuring modems, see IRIX Admin: Peripheral Devices. You may need to modify entries in the files /etc/inittab and /etc/uucp/Devices.
Additional useful information on modem operation and configuration is available on the cu(1) reference page.
To show the standard settings on a particular serial port, become superuser and enter
stty < /dev/ttydx |
x is the number of the tty port on which you want information (for example, 1, 2, 3, or 4).
To show the various settings on a particular serial port, enter
stty -a < /dev/ttydx |
To change the baud rate (the example is 2400) on a particular serial port, enter
stty 2400 < /dev/ttydx |
For additional useful information on serial ports and configuration, see the man pages for information on the following commands:
cu
inittab
gettydefs
ttytype
terminfo
stty
termio
The following files are commonly used to configure serial port operation for the Origin200 server:
/etc/inittab
/etc/gettydefs
/etc/ttytype
/usr/lib/terminfo
/etc/uucp/Devices
/etc/uucp/Systems