This chapter presents a short tutorial with the demonstration program jello, provided with your software. This tutorial walks you through commonly encountered debugging situations.
The chapter is divided into several parts:
Before you begin this tutorial, you should be aware of the following:
This tutorial must be run on an SGI workstation.
WorkShop identifies files with the path names in which they were compiled. The path names in the tutorial may not match the ones on your system.
Use the following syntax to start the Debugger:
cvd [-pid pid] [-host host] [executable_file [corefile]] [-args arg1 arg2 arg3 ...][&] |
The cvd command should be invoked in the same directory as your program source code.
The -pid option lets you attach the Debugger to a running process. You can use this to determine why a live process is in a loop.
The -host option lets you specify a remote host on which to run your program while the Debugger runs locally. This option is seldom used, except under the following circumstances:
You do not want the Debugger windows to interfere with the execution of your program on the remote host.
You are supporting an application remotely.
You do not want to use the Debugger on the target machine for any other reason.

Note: The host and local machines must be running the same version of WorkShop. Also, the .rhost files on the machines must allow rsh commands to operate between them.
The executable_file argument is the name of the executable file for the process or processes you want to run. This file is produced when you compile with the -g option, which disables optimization and produces the symbolic information necessary to debug with WorkShop. The -g option is most commonly used, but it is optional; if you wish, you can invoke the Debugger first and specify the name of the executable file later.
Sometimes when a file is being executed, a core file is produced (its default name is core). Use the following command to determine why a program crashed and produced the core file:
cvd executable_file core
The -args option passes program arguments to the executable to be debugged.
See “Run the jello Program”, for more information.
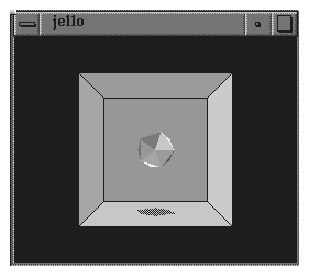
In this part of the tutorial, you invoke the Debugger and start a typical process running. The jello program simulates an elastic polyhedron bouncing around inside of a revolving cube. The program's functionality is mainly contained in a single loop that calculates the acceleration, velocity, and position of the polyhedron's vertices.
Enter the following commands to run the jello program:
Go to the directory with the jello demo program:
> cd /usr/demos/WorkShop/jello
List the contents of this directory:
>ls
Enter the following to make the program if jello is not listed (from Step 2):
> make jello
Invoke the Debugger with the jello program:
> cvd jello &
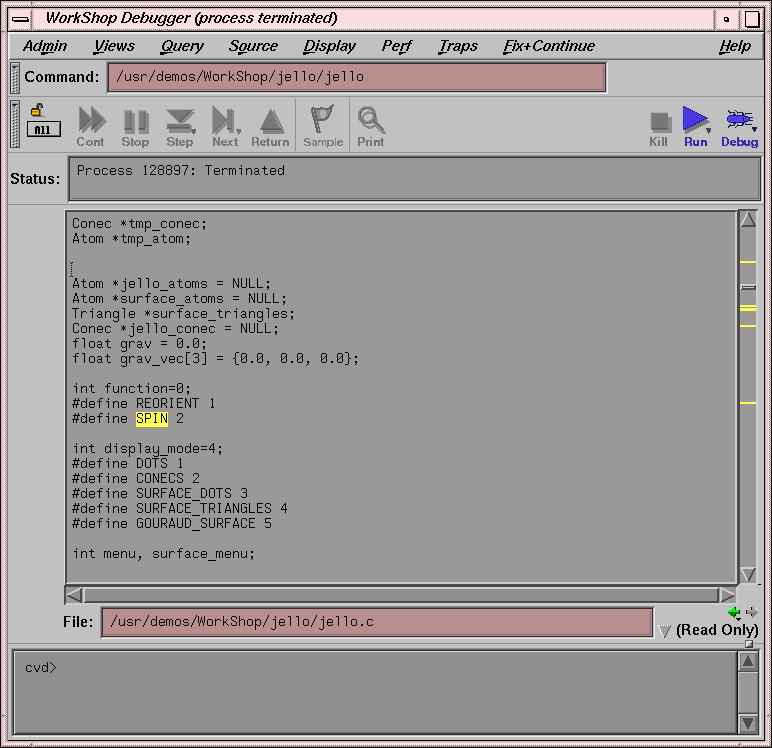
The Main View window appears and scrolls automatically to the main function.
In addition to the Main View window, the Execution View icon also appears. When you run the jello program, the command you used to invoke jello is displayed in this window.
The Execution View window is the interface between the program and the user for programs that use standard input/output or generate stderr messages.
The Main View window brings up the source file in read-only mode. You can change this to read/write mode if you select Source -> Make Editable from the Main View window menu bar (provided you have the proper file access permissions).
Click the Run button in the upper-right corner of the Main View window to run the jello program.
The jello window opens on your display (see Figure 4-1). Enlarge this window to watch the program execute. The polyhedron is initially suspended in the center of the cube.
If you wish, you can perform the following with the jello program:
Click the left mouse button anywhere inside the jello window.
The polyhedron drops to the floor of the cube.
Hold down the right mouse button to display the pop-up menu and select spin.
The cube rotates and the polyhedron bounces inside the cube.
Hold down the right mouse button to display the pop-up menu and select the display option.
This opens a submenu that allows you to change the appearance of the jello polyhedron.
Feel free to select (right-click) from this menu to see how the jello display changes.You may encounter flashing colors inside windows while running jello. This is normal.
Right-click and select exit from the pop-up menu to exit this demonstration executable.
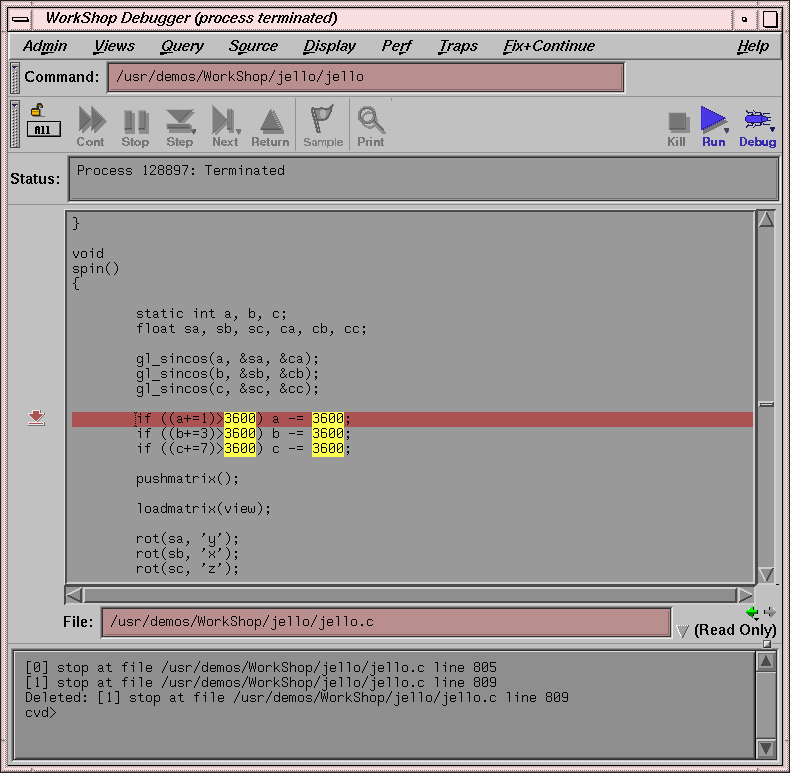
This part of the tutorial covers the search facility in the Debugger. You will search through the jello source file for a function called spin. The spin function recalculates the position of the cube.
Select Source -> Search from the Main View menu bar.
The Search dialog box appears.
Type spin in the Search field in the dialog box.
Click the Apply button.
The search takes place on the displayed source files. Each instance of spin is highlighted in the source code and flagged with target indicators in the scroll bar to the right of the display area. (See the search target indicators on the right side of the screen in Figure 4-2.) The Next and Prev buttons in the Search dialog box let you move from one occurrence to the next in the order indicated.
For more information on Search, see information about the Source menu in the ProDev WorkShop: Debugger Reference Manual.
Click the Close button and the dialog box disappears.
Click the middle mouse button on the last search target indicator at the right side of the source code pane (see the figure below). This scrolls the source code down to the last occurrence of spin, the location of the spin function.
Proceed to “Edit Your Source Code” to edit your code.
To edit and recompile your source code, follow these steps:
Select Source -> Fork Editor from the Main View menu bar. A text editor appears. (In this case, if you are proceeding from “Perform a Search”, notice that the spin function is displayed.)
If you use source control, you can check out the source code through the configuration management shell by selecting Source -> Versioning -> CheckOut from the menu bar.
Edit the source code as follows:
Change all occurrences of 3600 to 3000 in the following code:
if ((a+=1)>3600) a -= 3600;
if ((b+=3)>3600) b -= 3600;
if ((c+=7)>3600) c -= 3600;
Save your changes.
Select Source -> Recompile from the menu bar to recompile your code.
The Build View window displays and starts the compile. Your makefile determines which files need to be recompiled and linked to form a new executable.
Any compile errors are listed in the window, and you can access the related source code by clicking the errors. This does not apply to warnings generated by the compiler.
For more information on compiling, see Appendix A, “Using the Build Manager”.
When the code is successfully rebuilt, the new executable file reattaches automatically to the Debugger and the Static Analyzer. Previously set traps are intact unless you have traps triggered at line numbers and have changed the line count.
Stop traps (also called breakpoints and watchpoints) stop program execution at a specified line in the code. This allows you to track the progress of your program and to check the values of variables at that point. Typically, you set breakpoints in your program prior to running it under the Debugger. For more information on traps, see to Chapter 5, “Setting Traps (Breakpoints)”.
In this part of the tutorial, you set a breakpoint at the spin function.
Click the Run button to run the jello executable.
The demo window displays.
Click the left mouse button in the Main View source code annotation column next to the line containing if ((a+=1)>3600) a -= 3600;, or if ((a+=1)>3000) a -= 3000; , if you are proceeding from the previous section).
A stop trap indicator appears in the annotation column as shown in Figure 4-3.
Right-click on the jello window and select spin from the pop-up menu.
The program runs up to your stop trap and halts at the beginning of the next call to the spin function. When the process stops, an icon appears and the line is highlighted. Note that the Status field indicates the line at which the stop occurs.
Click the Continue button at the upper-left corner of the Main View window several times. Observe that the jello window goes through a spin increment with each click.
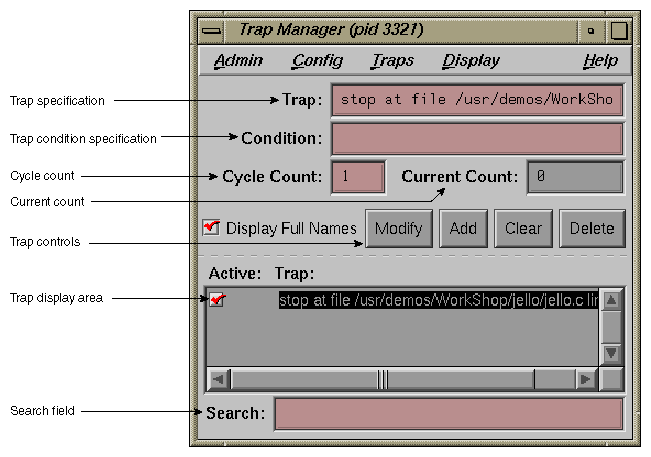
Select Views -> Trap Manager from the Main View window menu bar.
The Trap Manager window appears as shown in Figure 4-4.
The Trap Manager window lets you list, add, edit, disable, or remove traps in a process. In Step 2, you set a breakpoint in the spin function by clicking in the source code annotation column. The trap now displays in the trap display area of the Trap Manager window.
The Trap Manager window also lets you to do the following:
Define other traps.
Set conditional traps in the Condition field near the top of the window.
Specify the number of times a trap should be encountered before it activates by using the Cycle Count field.
Manipulate traps by using trap controls (Modify , Add, Clear, Delete).
View all traps (active and inactive) in the trap display area.
Click the button to the left of the stop trap in the trap display area.
The trap is temporarily disabled. (If you click again in this box, the trap is re-enabled.)
Click the Clear button, move the cursor to the Trap field, then type:
watch display_mode
Click the Add button.
This sets a watchpoint for the display_mode variable. A watchpoint is a trap that causes an interrupt when a specified variable or address is read, written, or executed.
Click the Cont button in the Main View window to restart the process.
The process now runs somewhat slower but still at a reasonable speed for debugging.
Hold down the right mouse button in the jello window to display the pop-up menu. From this menu, select display and then select the conecs option with the right mouse button.
This triggers the watchpoint and stops the process.
Go to the Trap Manager window and click the button next to the display_mode watchpoint to deactivate it. Then, click the button next to the spin stop trap to reactivate it.
Enter 100 in the Cycle Count field and click the Modify button. Notice how the trap description changes in the Trap Manager window.
Click the Continue button in the Main View window.
This takes the process through the stop trap for the specified number of times (100), provided no other interruptions occur.
The Current Count field keeps track of the actual number of iterations since the last stop, which is useful if an interrupt occurs. Note that it updates at interrupts only.
Select Close from the Admin menu to close the Trap Manager window.
This part of the tutorial describes how to examine data after the process stops. Note that you can also examine data using the data diving techniques described in “Using the Mouse for Data Diving” in Chapter 1.
Select Views -> Call Stack from the Main View window menu bar.
The Call Stack window appears. The Call Stack window shows each frame in the call stack at the time of the breakpoint, with the calling parameters and their values. Through the Call Stack -> Display menu, you can also display the calling parameters' types and locations, as well as the program counter (PC) . The program counter is the address at which the program has stopped. For more information about the program counter, see “Traceback Through the Call Stack Window” in Chapter 7.
In this example, the spin and main stack frames are displayed in the Call Stack window, and the spin stack frame is highlighted, indicating that it is the current stack frame.
Select Admin -> Active from the Call Stack window menu bar.
Notice that the Active toggle button is turned on. Active views are those that have been specified to change their contents at stops or at call stack context changes. If the toggle is on, the call stack is updated automatically whenever the process stops.
Double-click the main stack frame.
This shifts the stack frame to the main function, scrolls the source code in the Main View window (or Source View) to the place in main where spin was called, and highlights the call. Any active views are updated according to the new stack frame.
Double-click the spin stack frame.
This returns the stack frame to the spin function.
Select Variable Browser from the Views menu in the Main View window.
The Variable Browser window appears. This window shows you the value of local variables at the breakpoint. The variables appear in the left column (read-only), and the corresponding values appear in the right column (editable).
The jello program uses variables a, b, and c as angles (in tenths); ca, cb, cc as their corresponding cosines; and sa, sb, sc as their sines. Whenever you stop at spin , these values change.
Double-click some different frames in Call Stack and observe the changes to Variable Browser and the Main View window.
These views update appropriately whenever you change frames in Call Stack. Notice also the change indicators in the upper-right corners of the Result fields. These appear if the value has changed. If you click the folded corner, the previous value displays (and the indicator appears unfolded). You can then toggle back to the current value.
Select Close from the Admin menu in Variable Browser and Close from the Admin menu in Call Stack to close them.
Select Expression View from the Views menu in the Main View window.
The Expression View window appears. It lets you evaluate an expression involving data from the process. The expression can be typed in, or more simply, cut and pasted from your source code. You can view the value of variables (or expressions involving variables) any time the process stops. Enter the expression in the left column, and the corresponding value appears in the right column. For more information, see “Evaluating Expressions” in Chapter 7.
Hold down the right mouse button in the Expression column to bring up the Language menu. Then hold down the right mouse button in the Result column to display the Format menu.
The Language menu lets you apply the language semantics to the expression.
The Format menu (shown on the right side of the Expression View window) lets you view the value, type, address, or size of the result. You can further specify the display format for the value and address.
Click on the first Expression field in the Expression View window. Then enter (a+1)>3600 in the field and press Enter .
This is a test performed in jello to ensure that the value of a is less than 3600. This uses the variable a that was displayed previously in Variable Browser. After you press Enter, the result is displayed in the right column; 0 signifies FALSE.
Select Admin -> Close from the Expression View window menu bar to close that window.
Select Views -> Data Explorer from the Main View window to open the Data Explorer.
Enter jello_conec in the Expression field and press Enter.
The Data Explorer window displays the structure for the given expression; field names are displayed in the left column, and values in the right column. If only pointers are available, the Data Explorer de-references the pointers automatically until actual values are encountered. You can then perform any further de-referencing by double-clicking pointer addresses in the right column of the data structure objects. A window now appears.
Click once to focus, then double-click the address of the next field (in the right column of the jello_conec structure).
Double-clicking the address corresponding to a pointer field de-references it. Double-clicking the field name displays the complete name of the field in the Expression field at the top of the Data Explorer window.
Select Close from the Admin menu of Data Explorer window to close it.
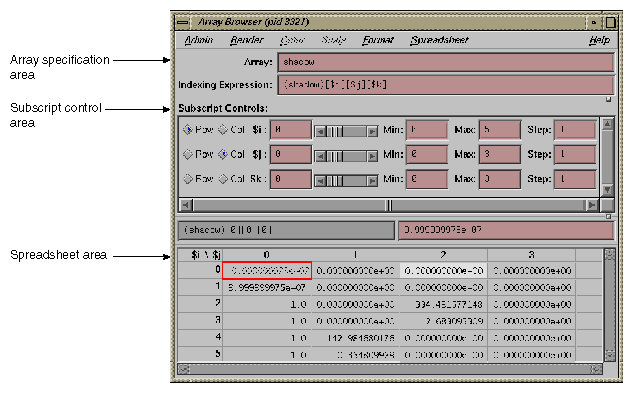
Select Views -> Array Browser from the Main View window menu bar.
The Array Browser lets you see or change values in an array variable. It is particularly valuable for finding bad data in an array or for testing the effects of values you enter.
Type shadow in the Array field and press Enter.
You can now see the values of the shadow matrix, which displays the polyhedron's shadow on the cube. The Array Browser template should resemble Figure 4-5, but with different data values. If any areas are hidden, hold down the left mouse button and drag the sash buttons at the lower right of the array specification and subscript control areas to expose the area.
Select the Col button next to the $k index in the Subscript Controls pane (you may need to scroll down to it).
The Array Browser can handle matrices containing up to six dimensions but displays only two dimensions at a time. Selecting the Col button for $k has the effect of switching from a display of $i by $j to a display of $i by $k.
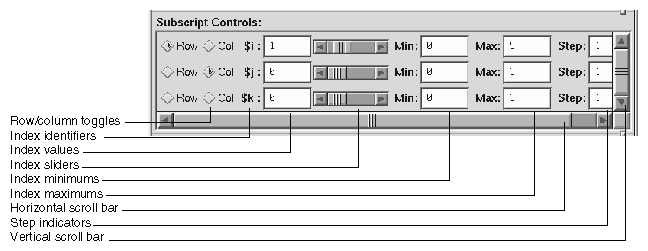
Figure 4-6, shows a close-up view of the subscript control area.
The row and column toggles indicate whether a particular dimension of the array appears as a row, column, or not at all in the spreadsheet area. Although an array may be of 1 to 6 dimensions, you can view only one or two dimensions at a time. The index values shown as Min and Max initially exhibit the lower and upper bounds of the dimension indicated. The values may be changed to allow the user to display a subset of the available index range in that dimension. The index sliders let you move the focus cell along the particular dimension. The focus cell may also be changed by selecting a cell with the left mouse button. The index slider for a dimension whose row and column toggles are both off may be used to select a different two-dimensional plane of a multidimensional array. Use the horizontal and vertical scroll bars to expose hidden portions of the Array Browser window.
Select Surface from the Render menu.
The Render menu displays the data from the selected array variable graphically, in this case as a three-dimensional surface. The selected cell is highlighted by a rectangular prism. The selected subscripts correspond to the x- and y-axes in the rendering with the corresponding value plotted on the z-axis. The data can be rendered as a surface, bar chart, multiple lines, or points.