The following sections describe the other available xlvm dialogs. There are also error message dialogs and other notifiers that are not documented. The following dialogs appear with xlvm:
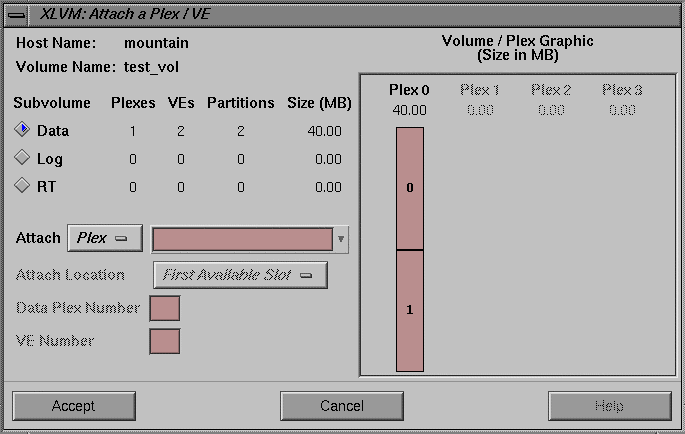
The Attach dialog is available from the Selected menu in the main xlvm window. This dialog allows you to attach an existing standalone plex or VE to an existing logical volume, or to attach a standalone VE to an existing plex. The Attach dialog for attaching plexes or VEs to logical volumes is shown in Figure 4-17:
If you click on the bar labeled 0 in the Volume/Plex graphic, the data plex number field is set to 0 and the VE Number field is cleared. If you click on the bar labeled 1, the data plex number field is set to 1 and the VE number field is set to 1. In this way, you can select the plexes and VEs you wish to work with through the graphic.
The Attach dialog buttons are shown in Figure 4-17, and have the following meanings:
| Accept | Collects the data from the dialog and performs the attachment. The dialog is removed. | |
| Cancel | Closes the dialog. No action is taken and any changes to the dialog are discarded. | |
| Help | Brings up this help card. |
When you have a volume selected in the display area of the xlvm main window and you bring up the Attach dialog, you are attaching free-standing plexes and volume elements to that volume. The following fields apply in this case:
| Host Name | A field that displays the name of the current host. | |
| Volume Name | A field that displays the name of the volume to which new plexes and volume elements are attached. | |
| Volume Summary |
| |
| Attach | This specifies whether a plex or VE is being attached. When pressed, the button immediately to the right of this field brings up a list of the available plexes or VEs. If the Attach option is set to plex, then the list contains the names of all standalone plexes on the current host. If the option is set to VE, then the list contains the names of all standalone volume elements on the current host. | |
| Attach Location |
| |
| Plex Number | This field is available only if the “Attach Object” option menu is set to VE. This field displays the number of the plex and whether the plex is a data, log, or RT plex. | |
| VE Number | If you selected Before Specified VE in the Attach Location field, in this field, enter the number of the VE (the number indicates the position of the VE within the plex) before which to attach the new VE. This field is available only if the Attach option is set to VE and the Attach Location option is set to Before Specified VE. |
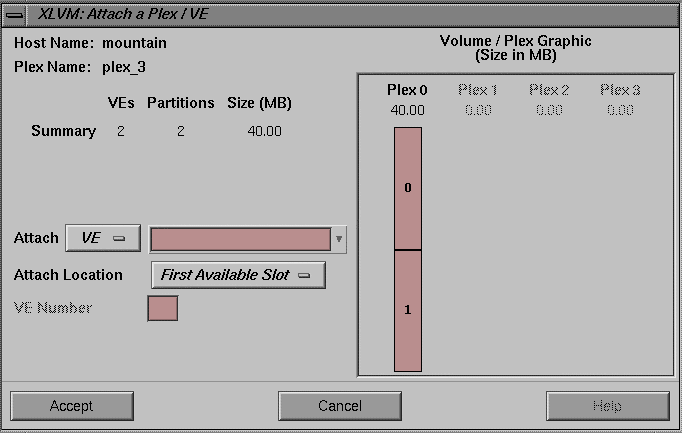
When you bring up the Attach dialog with a plex selected in the display area of the xlvm main window, you see a slightly different Attach dialog, shown in Figure 4-18:
| Host Name | A field that displays the name of the current host. | |
| Plex Name | A field that displays the name of the plex to which new VEs are to be attached. | |
| Plex Summary | This is a summary of all the VEs in the current plex. A detailed description of this section of the dialog can be found in “Create Plex Summary”. | |
| Attach | This specifies which type of object you want to attach. The possible values for this field are plex and VE. When pressed, the button immediately to the right of this field displays a list of the available standalone plexes or VEs. The value of this option determines the contents of the list. Note that when the Attach dialog has been invoked on a plex, it is not possible to set this value to plex. | |
| Attach Location |
| |
| VE Number | This field is available only if the Attach Location option is set to Before Specified VE. Specify the number of the VE within the plex before which you would like to attach the new VE. |
The graphic shown in Figure 4-18 is similar to that described in “Create Volume Dialog Graphic”.
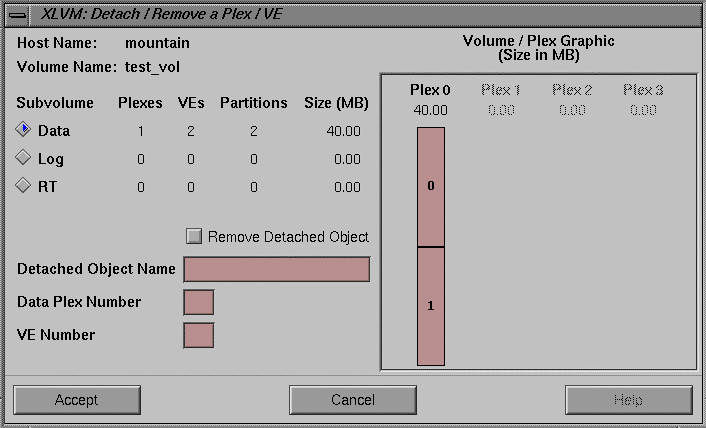
The Detach dialog is available from the Selected menu, and detaches a volume element or plex from a logical volume. As with the Attach dialog, there are two slightly different versions of this dialog, depending on whether a volume or plex was selected when the dialog was invoked. The Detach dialog is shown in Figure 4-19:
If you click on the bar labeled 0 in the Volume/Plex graphic, the data plex number field is set to 0 and the VE Number field is cleared. If you click on the bar labeled 1, the data plex number field is set to 1 and the VE Number field is set to 1. In this way, you can select the plexes and VEs you wish to work with through the graphic.
The Detach dialog buttons are shown in Figure 4-19, and have the following meanings:
| Accept | Collects the data from the dialog and performs the detachment. The dialog is removed. | |
| Cancel | Closes the dialog. No action is taken and any changes to the dialog are discarded. | |
| Help | Brings up this help card. |
When you have a volume selected in the display area of the xlvm main window and you bring up the Detach dialog, you are detaching plexes and volume elements from that volume. The following fields apply in this case:
| Host Name | A field that displays the name of the current host. | |
| Volume Name | A field that displays the name of the volume from which plexes and volume elements are to be detached. | |
| Volume Summary |
| |
| Remove Detached Object |
| |
| Detached Object Name |
| |
| Plex Number | This field displays the number of the plex from which the VE is to be detached. If the VE Number field is empty, the entire plex is detached. | |
| VE Number | This is a text field in which you enter the number of the VE to be detached from the plex specified by the plex number field. Leaving this field is empty indicates that the entire plex is to be detached. |
When the Detach dialog is invoked on a plex, the following fields apply:
| Host Name | A field that displays the name of the current host. | |
| Plex Name | A field that displays the name of the plex from which VEs are to be detached. | |
| Plex Summary | This is a summary of all the VEs in the current plex. A detailed description of this section of the dialog can be found in “Create Plex Summary”. | |
| Remove Detached Object |
| |
| Detached Object Name |
| |
| VE Number | This is a text field in which you enter the number of the VE to be detached from the current plex. |
The graphic shown in Figure 4-19 is similar to that described in “Create Volume Dialog Graphic”.
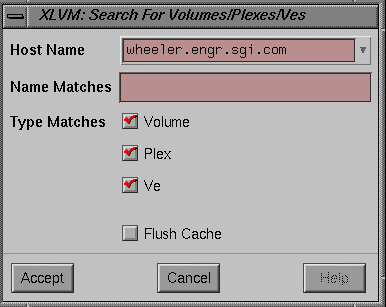
The Host Search dialog allows you to select the host system whose resources are displayed in the display area. The dialog is similar to that shown in Figure 4-20:
The button on the right side of the Host Name field, when pressed, displays a list of the available hosts you can select. By default, this section of the window lists all hosts in the /etc/hosts database of the system that launched this instance of xlvm. You can select an alternate host list by setting the X11 resource hostsFile to point to an alternate file that contains entries of the same format as the /etc/hosts file. An alternate host list is a useful feature if you have a long /etc/hosts file and only a few systems running the XFS Manager software. You can set this resource with any of the following actions:
Specify the resource on the command line. For example:
xlvm -xrm “*hostsFile: /usr/tmp/my_hosts_file”
Place the following entry in your ~/.Xdefaults file:
Xlvm*hostsFile: /usr/tmp/my_hosts_file
Create a personal resource file in your home directory. For xlvm, the file should be called Xlvm, and it should contain the line:
Xlvm*hostsFile: /usr/tmp/my_hosts_file
When you see the host list in the dialog window, you can use the slider on the right to scroll through the list. The Selection field allows you to enter the name of the desired host, or you can fill the field by clicking a hostname from the host list.
At the bottom of the window are three buttons:
| Accept | This button selects the host in the Selection field. | |
| Cancel | This button dismisses the window without selecting a new host. | |
| Help | This button displays this help topic. |
The following fields are used. If no criteria are selected, the Accept and Apply buttons are greyed-out and not usable:
| Host Name | This is a text entry field for you to enter the selected hostname, and a button with a down-arrow immediately to the right of the text entry field. If you click the down-arrow button, you see a list that contains an entry for each host found in the /etc/hosts file on the system on which the xlvm application was launched. To select a host, you may either click an item from the host list or directly type in the name of a host. | |
| Name Matches | This is a text field in which to enter a glob text pattern to match against the names of the discovered filesystems. Only those filesystem names matching the pattern are displayed in the icon panel. An empty pattern matches all object names. For more information on glob expressions, see the glob reference page. | |
| Type Matches | This is a group of toggle buttons allowing you to specify which type(s) of objects are to be displayed in the main window icon panel.
| |
| Flush Cache | When a search for resources is executed on a given host, all selected types of resources are retrieved and placed in a cache. Subsequent searches on that host use the cache rather than requesting a new list of objects from the host. If this toggle button is selected, the cache is emptied and a new list is retrieved from the host. |
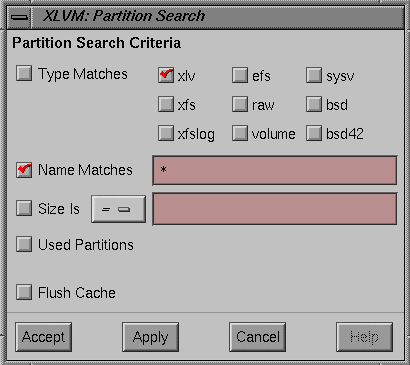
When you invoke the dialogs to create volumes, plexes, or VEs, you must begin the construction with disk partitions. Each dialog that allows you to create volume objects contains a button labeled Partition Search... that brings up this dialog, shown in Figure 4-21:
The Partition Search dialog buttons are shown in Figure 4-21, above, and have the following meanings:
| Accept | Collects the data from the dialog and searches for available partitions. The dialog is removed. | |
| Apply | Accepts the current information in the dialog, but the dialog remains open so that you can continue to search for partitions. | |
| Cancel | Closes the dialog. No action is taken and any changes to the dialog are discarded. | |
| Help | Brings up this help card. |
The following fields are available in this dialog:
| Type Matches | This field is a group of toggle buttons that allow you to specify which type or types of partitions are to be returned from the search. If the Type Matches toggle button is not selected, all partition types are returned. | |
| Name Matches |
| |
| Size Is | This field allows you to limit the partitions returned from the search using the size of the partition. The size is interpreted to be in megabytes. The following operators can be used in the field:
| |
| Used Partitions | If this toggle button is checked, partitions that are in use are included in the search. Normally, partitions that are currently used by an existing volume are not returned from the search. | |
| Flush Cache | When a search is executed on a given host, all partitions for all disks on the host are retrieved and placed in a cache. Subsequent searches on that host use the cache rather than requesting a new list of partitions from that host. If this toggle button is selected, the cache is flushed and a new list is retrieved from the host. |
The Volume Information dialog is a non-editable subset of the New Volume dialog, and it is shown in Figure 4-22:
The Volume Information dialog buttons are shown at the bottom of Figure 4-22. The buttons have the following meanings.
| Cancel | Closes the dialog. | |
| Help | Displays this help file. |
The dialog shares many of the same fields as the New Volume dialog. The meanings are the same except where noted.
| Host Name | This field is a label that displays the name of the current host. | |
| Volume Name | This field displays the volume name. |
The volume summary is shown at the top center of Figure 4-22. There are five columns of information, with a row for each possible subvolume. The possible subvolumes are Data, Log, and RT. The columns have the following meanings:
| Subvolume | There is a radio button for each possible subvolume (Data, Log, or RT). The selected radio button indicates the current subvolume. The information from the selected subvolume is visible in the data display matrix. | |
| Plexes | The number of plexes defined for each subvolume. | |
| VEs | The total number of volume elements contained in each subvolume. | |
| Partitions | The total number of partitions used by each subvolume. | |
| Size | The total size for each subvolume. |
The data display matrix is the same as the data input matrix described in “Create Volume Data Input Matrix”, except that it cannot be edited in this instance.
The graphic is the same as that described in “Create Volume Dialog Graphic”.
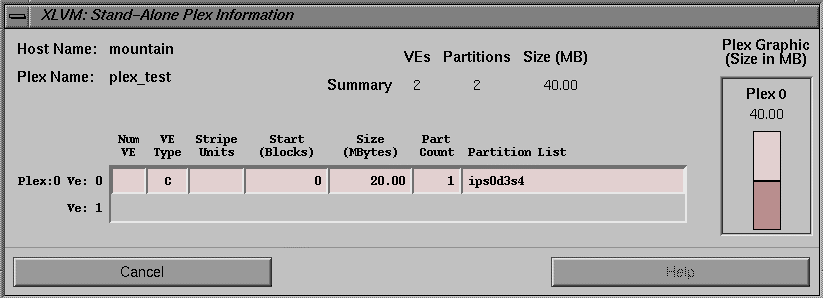
The Plex Information dialog is a non-editable subset of the New Plex dialog, and it is shown in Figure 4-23:
The Plex Information dialog buttons are shown at the bottom of Figure 4-23, and have the following meanings:
| Cancel | Closes the dialog. | |
| Help | Displays this help information. |
The dialog shares many of the same fields as the New Plex dialog. The meanings are the same except where noted.
The following fields are shown:
| Host Name | This field is a label that displays the name of the current host. | |
| Plex Name | This field displays the name of the plex. |
The plex summary is shown at the top center of Figure 4-23. There are three columns of information, with a row for each possible partition. The columns have the following meanings:
| VEs | The total number of volume elements contained in the plex. | |
| Partitions | The total number of partitions used by the plex. | |
| Size | The total size of the plex. |
The data display matrix is the same as the data input matrix described in “Create Plex Data Input Matrix”, except that it cannot be edited in this instance.
The graphic is the same as that described in “Create Plex Dialog Graphic”.
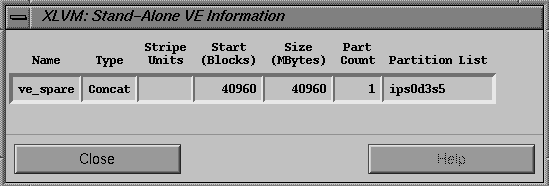
The VE Information dialog is a non-editable subset of the New VE dialog, and it is shown in Figure 4-23:
The VE Information dialog Buttons are shown at the bottom of Figure 4-24, and have the following meanings:
| Close | Closes the dialog. | |
| Help | Displays this help information. |
The following fields of information are displayed.
| Name | This field displays the name of the VE. | |
| Type | The type of the VE, either Stripe or Concatenate. | |
| Stripe Units | Specifies the number of blocks to write to one disk before writing to the next disk in the stripe set. This figure is expressed in 512 byte blocks. | |
| Start | Specifies that the VE should start at the given block number within the plex. | |
| Size | The total size, in megabytes, of the volume element. | |
| Part Count | The number of partitions that make up the VE. | |
| Partition List | The names of the partitions that make up the VE. |
