The xlvm application allows you to graphically manipulate your logical volumes and their component parts. For more information on logical volume theory and practice, see the IRIX Admin: Disks and Filesystems book.
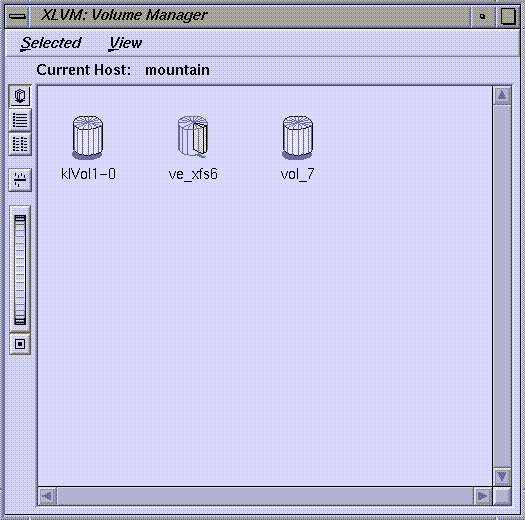
This is the first window you see when you invoke xlvm:
All other xlvm windows are accessed through this one. The window consists of two parts: the menu bar and the display area. The menu bar provides options for operations on the disks shown in the display area. The display area shows you an icon for each volume element, plex, and logical volume discovered on the selected host. There are three types of icons, each representing a particular object:
Logical Volume icons show a cylinder divided into wedges with all the wedges filled in with color.
Plex icons show a cylinder divided into wedges with some of the wedges filled in with color and some outlined.
Volume Element icons show an outline of a cylinder divided into wedges with one wedge filled in with color.
The icons are shown in Figure 4-2:
The menu bar provides three pulldown menus. Each menu provides a list of options. The menus are called Selected, View, and Help.
The Selected menu provides the following options:
| New | This option opens a cascading menu that offers several dialog choices:
| |
| Attach | This option brings up the Attach dialog, operating on a selected volume or plex icon in the icon panel. If a volume or plex icon is not currently selected, this option is available, but generates an error. | |
| Detach | This option brings up the Detach dialog, operating on a selected volume or plex icon in the icon panel. If a volume or plex icon is not currently selected, this option is available, but generates an error. | |
| Remove | This option brings up a dialog to confirm that the objects represented by the selected icons should be deleted. The list of objects to be deleted is printed in the dialog. | |
| Make Template | This option makes a template out of the selected icon. A new icon appears in the template section of the display area. | |
| Get Info | This option prints information about the icon or icons selected in the display area. Each type of object displays a different information dialog:
| |
| Quit | Quits the application. A confirmation dialog is displayed. |
The same menu is available by pressing the right-hand mouse button while the cursor is positioned in the display area. The menu items that are active at any given time depend on the icon or icons selected for operations:
If no icon is selected, only the “New” and “ Quit” options are active.
If one icon is selected, all options are active.
If more than one icon is selected, the “New,” “Remove,” “Get Info,” and “Quit” options are active.
You may select an icon by clicking the left mouse button with the cursor positioned over the desired icon. You may select multiple icons by pressing the left mouse button and dragging a box around the desired block of icons, or by selecting a single icon and then pressing the <Shift> key while selecting additional icons.
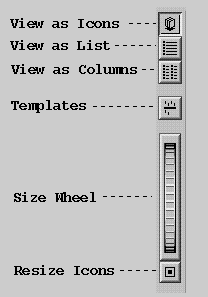
The View menu provides ways to change the way the information in the xlvm window is presented to you. Except for the “ Search...” option, the options on this menu correspond to the buttons on the left side of the xlvm window as shown in Figure 4-3. You can change the view mode with the menu or by clicking the button of your choice:
The View Menu has the following options:
| Search... | This option brings up the host selection window. Using this window, you can select any host and use xlvm to view the volume resources on that host. Note that the host in question must have the XFS Manager software installed, and must be running the xfsmd daemon to successfully report its resources. | |
| as Icons | This option directs xlvm to display each volume resource on the host as an icon with the name of the resource under the icon. Icons are displayed in rows from left to right alphabetically by the icon name. | |
| as List | This option directs xlvm to display each resource on the host as a smaller icon with the resource name to the right of the icon. Icons are displayed alphabetically by the resource name in a single column. | |
| as Columns | This option directs xlvm to display each resource on the host as a smaller icon with the resource name to the right of the icon. Icons are displayed in as many columns as the width of the window and length of names permit, alphabetically ordered from top to bottom in each column, and by columns from left to right. | |
| Templates | This option is an independent switch. When this option is selected, the display area is divided into two parts, one for resources on the current host and one for icons representing the templates available on the host from which xlvm was invoked. The display mode selected for the resources is also imposed on the templates. |
Additionally, the xlvm main window offers a “thumb wheel” that you can use to control the size of the icons and resource names in the display. Use the mouse and the left mouse button to “turn” the thumb wheel up or down to make the icons smaller or larger. At the bottom of the thumb wheel is a button thart, when pressed, restores all icons and names to their default size.
The Help menu has the following options:
| Click for Help | This option allows you to place your mouse cursor anywhere in the window, usually on a button or a needed input area, and click the left mouse button to see the help card for that segment of the window or button. | |
| Overview | This option starts up the help system at the overview card for this application. | |
| Topics | There are a number of topical options, each one representing a help card on the listed topic. | |
| Index | This option opens an index of the help information topics and subtopics available for this application. | |
| Product Info | This option brings up a help card containing general information about this application. |
The area directly beneath the menu bar displays the name of the current host, as shown in Figure 4-4:
You can change the current host by selecting the “Search...” option from the View menu as described in “xlvm View Menu and Buttons”.

