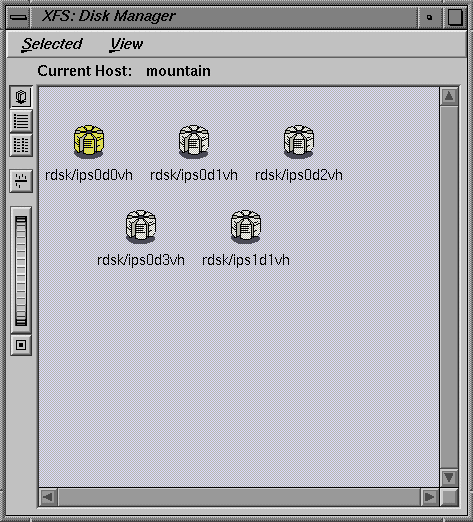
This is the first window you see when you invoke xdkm:
All other xdkm windows are accessed through this one. The window consists of two parts: the menu bar and the display area. The menu bar provides options for operations on the disks shown in the display area. The display area shows you icons for all disks on the selected host.
The menu bar provides three pulldown menus. Each menu provides a list of options. The menus are called Selected, View, and Help.
The Selected menu provides the following options:
| Partition Disk | This option brings up the Disk Partition dialog. Use this option to partition or repartition a local disk (or multiple disks) you have selected from the display area. | |
| Get Info | This option brings up a dialog window showing all available information about the selected disk (or multiple disks). This information includes the device name, type of disk, and size and configuration information. This dialog does not display partition information. | |
| Make Template |
| |
| Quit | This option quits xdkm. First, a confirmation dialog is displayed and the action must be confirmed before xdkm exits. |
The same menu is available by pressing the right-hand mouse button while the cursor is positioned in the display area. The menu items that are active at any given time depend on the disk or disks selected for operations:
If no disk is selected, only the “ Quit” option is active.
If one disk is selected, all options are active.
If more than one disk is selected, all options except “Make Template” are active.
You may select a disk by clicking the left mouse button with the cursor positioned over the desired disk icon. You may select multiple disks by pressing the left mouse button and dragging a box around the desired block of icons, or by selecting a single icon and then pressing the <Shift> key while selecting additional icons.
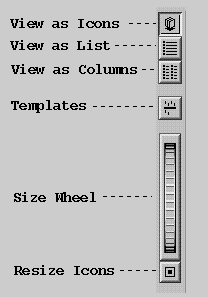
The View menu provides ways to change the way the information in the xdkm window is presented to you. Except for the “ Search...” option, the options on this menu correspond to the buttons on the left side of the xdkm window as shown in Figure 2-2. You can change the view mode with the menu or by clicking the button of your choice:
The View menu has the following options:
| Search... | This option brings up the host selection window. Using this window, you can select any host and use xdkm to view the disks on that host. Note that the host in question must have the XFS Manager software installed, and must be running the xfsmd daemon to successfully report its disk resources. | |
| as Icons | This option directs xdkm to display each disk on the host as an icon with the device filename of the disk under the icon. Disks are displayed in rows from left to right alphabetically by the device filename. This is the default display. | |
| as List | This option directs xdkm to display each disk on the host as a smaller icon with the device filename to the right of the icon. Disks are displayed alphabetically by the device filename in a single column. | |
| as Columns | This option directs xdkm to display each disk on the host as a smaller icon with the device filename to the right of the icon. Disks are displayed in as many columns as the width of the window and length of device names permit, alphabetically ordered from top to bottom in each column, and by columns from left to right. | |
| Templates | This option is an independent switch. When this option is selected, the display area is divided into two parts, one for disks on the current host and one for icons representing the templates available on the host from which xdkm was invoked. The display mode selected for the disks is also imposed on the templates. |
Additionally, the xdkm main window offers a “thumb wheel” that you can use to control the size of the icons and device names in the display. Use the mouse and the left mouse button to “turn” the thumb wheel up or down to make the icons smaller or larger. At the bottom of the thumb wheel is a button that, when pressed, restores all icons and device names to their default size.
The Help menu has the following options:
| Click for Help | This option allows you to place your cursor anywhere in the window, usually on a button or a needed input area, and click the left mouse button to see the help card for that segment of the window or button. | |
| Overview | This option starts up the help system at the overview card for this application. | |
| Topics | There are a number of topical options, each one representing a help card on the listed topic. | |
| Index | This option opens an index of the help information topics and subtopics available for this application. | |
| Product Info | This option brings up a help card containing general information about this application. |
The area directly beneath the menu bar is where the name of the current host is displayed, as shown in Figure 2-3:
You can change the current host by selecting the “Search...” option from the View menu as described in “xdkm View Menu and Buttons”.
The display area is the main part of the xdkm window. In this area, icons and the device filenames of each disk on the selected host system are displayed. To select a disk, click it once. The icon changes color to show the disk has been selected. Once a disk is selected, you can open the Disk Partition dialog for that disk.
Any of the following actions open the Disk Partition dialog:
Double-click the selected icon
Use the right mouse button to pull down the Selected menu and select the option “Partition Disk.”
Use the left mouse button to pull down the Selected menu from the menu bar and select the option “Partition Disk.”
For more information on the Selected menu, see “xdkm Selected Menu.”
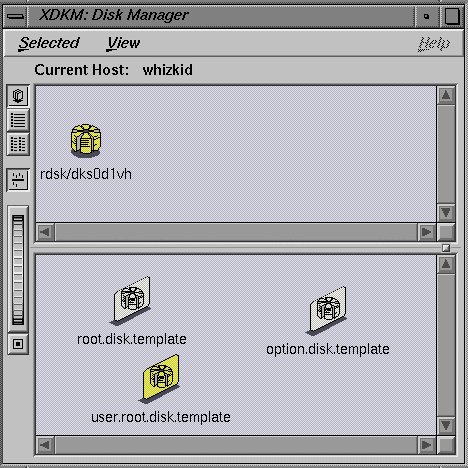
If you select the “View” option to see disk templates, the display area is divided into two parts: The top part displays disks on the currently selected host, and the bottom part displays disk templates.
A template is a set of parameters for a disk, stored in a file, that can be applied quickly and easily to new disks or disks being reformatted, without having to enter each parameter through a dialog window.
A disk template icon is displayed in the templates section of the xdkm display area for each template discovered on the host from which xdkm has been launched. Unlike the contents of the main icon panel, that of the template icon panel does not change when the current host is changed. The xdkm window with the template section displayed looks similar to Figure 2-4:
A template icon may be dragged and dropped on the Disk Partition dialog. When this is done, the parameters defined in the template are used to fill in the partition information for that disk. The parameters may be changed before the partition is finalized; you are not required to use the template exactly as it is.
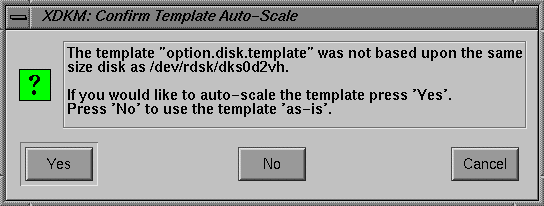
Templates work best when used on disks of identical size and use, and are intended for use when a number of systems are to be configured in an identical manner. However, when applied to a disk of different size from the original template, a dialog appears displaying options for you. The dialog is shown in Figure 2-5:
If you select yes, the values of the template are scaled to fit the disk being partitioned. If you select no, the values of the template are imposed as if the disk was the same size as the template expects. If you select cancel, the operation is canceled and no template parameters are imposed.


