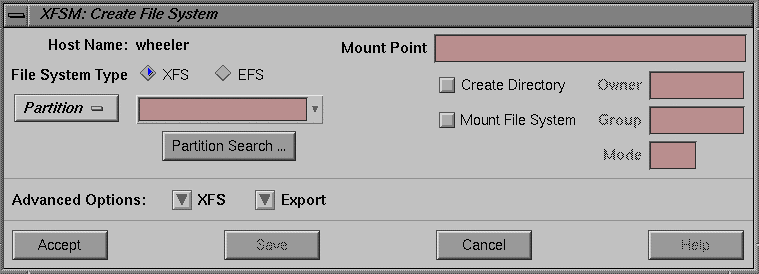
When you select the “ New” option from the Selected menu, you see the Create File System dialog. This dialog window allows you to specify a partition on a disk or a logical volume and create a filesystem on it. Apart from the main window, this window is the most important part of xfsm.
You have a choice of filesystem types and other parameters for your filesystem. You can also choose to export the new filesystem with NFS.
Depending on the type of filesystem you are making and the parameters you assign, this dialog window changes form and size and offers different parameter options. For example, the parameter options for an XFS filesystem are quite different from those for an EFS filesystem. When you first bring up the dialog, it looks similar to Figure 3-3:
The standard and expansion parts of this dialog are discussed and shown below.
The Create File System dialog buttons are shown at the bottom of Figure 3-3. The buttons have the following meanings:
| Accept | Collects the data from the dialog and creates a new filesystem. Then, the dialog is removed. | |
| Apply | This button accepts the current information in the dialog, but the dialog remains open so that you can continue to create filesystems. | |
| Cancel | Closes the dialog. No action is taken and any changes to the dialog are discarded. | |
| Help | Brings up this help screen. |
The following sections detail the various fields and parameter sections that you may see when working with the Create File System dialog. Note that many of these sections depend on other parameters, so you do not see each section during all transactions.
| Host Name | This field is a label that displays the name of the current selected host. | |
| File System Type |
| |
| Volume/Partition Option Menu |
The labeled button on the left sets the selection list to either Volume for logical volumes, or Partition for individual disk partitions. The text entry field on the right allows you to specify a disk partition or logical volume. Note that the field contains a down-arrow button on the right that expands the field into a list of all available partitions or logical volumes. Below these selections is a push button that displays the Volume Search or Partition Search dialog, depending on the current selection setting. These dialogs are described in “xfsm Volume/Partition Search Dialog”. |
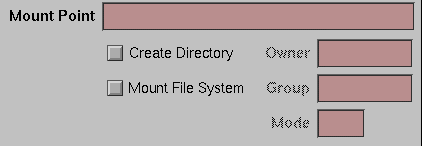
The mount point section of the dialog includes a text field in which to enter the mount point directory pathname and some buttons and text fields for specifying mounting instructions for the new filesystem. It is shown in Figure 3-4:
The following buttons and fields provide mounting instructions for the new filesystem:
| Create Directory |
| |
| Mount File System |
| |
| Owner | This is a text field to specify the owner for the directory specified in the Mount Point field. This field is available only if the Create Directory toggle button is checked. | |
| Group | This is a text field to specify the user group for the directory specified in the Mount Point field. This field is available only if the Create Directory toggle button is checked. | |
| Mode | This is a text field to specify the octal permission mode for the directory specified in the Mount Point field. This field is available only if the Create Directory toggle button is checked. |
Depending on the parameters and button selections you have made in the main portion of the Create File System dialog, there are several advanced options that you can select. It is recommended that advanced options be set only by those users who completely understand the options being set. For example, there are different advanced options available for XFS and EFS filesystems. There are also advanced options for exporting new filesystems with NFS. The Advanced Options section of the Create File System dialog appears as shown in Figure 3-5:
In Figure 3-5, the XFS button is shown, indicating that an XFS filesystem is being created. If an EFS filesystem were being created, the button would be labeled EFS. Click either button to see the desired set of available options.
When you click the XFS Advanced Options button, you see the following additional fields, as shown in Figure 3-6:
The advanced options shown are available when creating XFS filesystems. All numeric values are assumed to be in bytes unless the suffixes KB or MB are present, indicating Kilobytes and Megabytes, respectively. If an unacceptable value is entered, an error message is shown detailing the acceptable values for the particular field. The following list details the XFS Advanced Options:
| Blocks option menu |
| |
| Blocks text field |
|
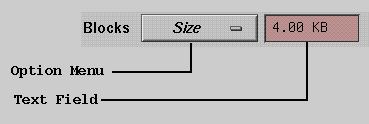
Figure 3-7 shows the locations of the option menu and text field:
| Inodes option menu |
| |
| Inodes text field |
| |
| Data Size | This text field allows you to specify the desired size of the data subvolume for this filesystem. A default value is provided. | |
| Log Size | This text field allows you to specify the desired size of the log subvolume for this filesystem. A default value is provided. | |
| Part of Data Section |
| |
| RT Size | This text field allows you to specify the desired size of the RT subvolume for this filesystem. This field is visible only when the underlying disk resource for the XFS filesystem is a logical volume that has an RT subvolume defined. | |
| RT Block Size | This text field allows you to specify the desired block size of the RT subvolume for this filesystem. This field is visible only when the underlying disk resource for the XFS filesystem is a volume that has an RT subvolume defined. A default value is provided. |
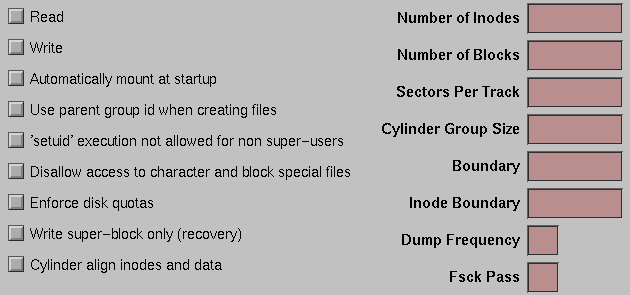
When you click the EFS Advanced Options button, you see the following additional buttons and fields, as shown in Figure 3-8:
The advanced options shown are available when creating EFS filesystems. If an unacceptable numeric value is entered, an error message is shown detailing the acceptable values for the particular field. The following list details the EFS Advanced Options:
| Read | This button indicates the filesystem is readable. | |
| Write | This button indicates the filesystem is writable. | |
| Automatically mount at startup |
| |
| Use parent group id when creating files |
| |
| 'setuid' execution not allowed for non super-users |
| |
| Disallow access to character and block special files |
| |
| Enforce disk quotas |
| |
| Write super-block only (recovery) |
| |
| Cylinder align inodes and data |
| |
| Number of Inodes |
| |
| Number of Blocks |
| |
| Sectors Per Track |
| |
| Cylinder Group Size |
| |
| Boundary | This text field allows you to specify the boundary (in disk blocks) to which each cylinder group should be aligned. If this field is left empty, a default value is used. | |
| Inode Boundary |
| |
| Dump Frequency |
| |
| Fsck Pass | This text field allows you to specify the pass number used during parallel fsck(1M) execution. If this field is left empty, a default value is used. |
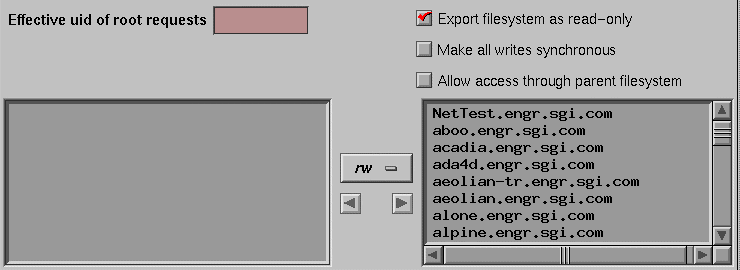
When you click the Export Advanced Options button, you see the following additional fields, buttons, and menus, as shown in Figure 3-9:
The advanced options shown are available when exporting filesystems for use by the optional NFS software. The following list details the Export Advanced Options:
| Effective uid of root requests |
| |
| Export file system as read-only |
| |
| Make all writes synchronous |
| |
| Allow access through parent file system |
| |
| Host list | This is a scrolled list of hostnames at the bottom right of this screen section. The names on this list represent the hosts that may receive this exported filesystem. Double-clicking on a name in the list adds that host to the chosen list on the left panel in the screen section. | |
| Chosen list | This is a scrolled list of the hosts that will receive this exported filesystem. The items in the list are arranged in two columns. The first column contains one of two values: rw or root, indicating full read and write access and root-only access, respectively. This value indicates how the filesystem is to be exported to the host name displayed in the second column. Double-clicking on an item in the list removes that item from the chosen list. By pressing the right mouse button when the mouse cursor is inside the chosen list, you can display a popup menu. The popup menu contains two entries: rw and root. When one of these entries is chosen, the value for the first column of any selected items in the list is changed to that value. | |
| Option Menu | The option menu located between the host list and the chosen list defines the value of the first column of the chosen list for hostnames that are added to that list. There are two possible values: rw and root. | |
| Arrow buttons | There are two arrow buttons located between the host list and the chosen list that provide another method for adding and removing items from the chosen list. To add items to the chosen list, select one or more hostnames from the host list and press the left arrow button (the one that points to the chosen list). To remove items from the chosen list, select one or more hostnames from the chosen list and press the right arrow button (the one that points to the host list). |
