The following sections in this chapter describe the function and physical components of the I–brick, and explain how to add and replace PCI cards in the I–brick:
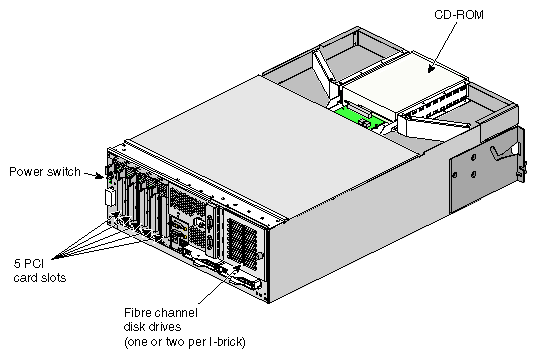
The I–brick provides standard base I/O for all SGI Origin 3000 series servers. This brick supports five hot-pluggable PCI cards configured on two PCI buses, two sled-mounted 3.5-in. Fibre Channel disk drives, and a CD-ROM. The I–brick also provides access to a network via a 10/100-Base-T Ethernet port, and access to peripherals via various other ports.
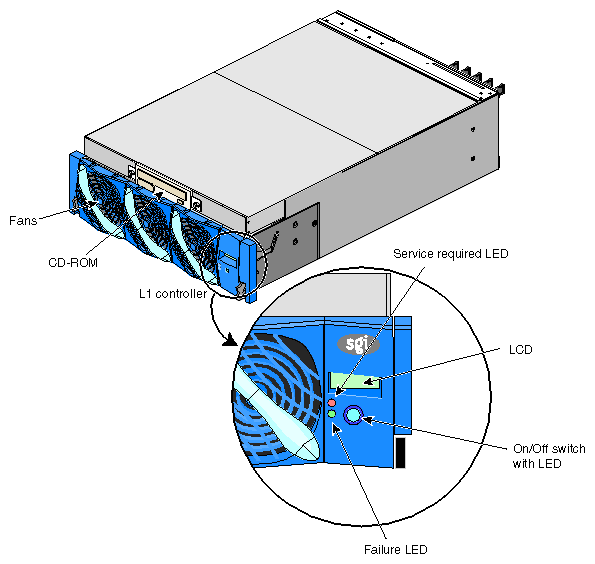
The following are descriptions of the I–brick's front panel items and internal components (Figure 5-1 shows the I–brick's front panel items):
L1 controller and display. L1 controller generates I–brick status and error messages that appear on the liquid crystal display (LCD).
On/Off switch with LED. Press this switch to turn on the I–brick internal components. Alternatively, you can turn on the I–brick internal components at an L2 controller touch display or a system console.
L1 controller switches and LEDs:
On/Off switch LED. Lights green when the I–brick internal components are on and turns off when they are off.
Service required LED. Lights orange to indicate that an item is broken or not operating properly (for example, a fan is off), but the I–brick is still operating.
Failure LED. Lights red to indicate that a system failure has occurred and the I–brick system is down.
Internal Components:
The I–brick contains one or two 3.5-in. Fibre Channel disk drives. One is standard; the second is optional. The disks connect to the Fibre Channel controller via the Input connector on the Fibre Channel bulkhead card.
The Fibre Channel disk drives are boot drives and are configured as separate drives or as mirrored images. The Fibre Channel disk drives is where your server operating system resides.
| Warning: Only an SGI system support engineer (SSE) can add or replace a Fibre Channel disk drive module for you. |
The CD-ROM is a single removable media drive in the front of the brick (see Figure 5-1). It connects to the IEEE internal 1394 connector of the PCI motherboard.
IEEE 1394 is a high-performance serial bus protocol that provides a low-cost, high-bandwidth universal interconnect technology for digital media, storage, networking, and other applications.
The power board contains the logic components of the L1 controller, DC to DC convertors, and voltage regulator modules (VRMs). The DC-to-DC converters and VRMs convert the 48 VDC coming from the power bay to the voltage levels required by the components of the brick.
The power board supplies an average of 17.5 W (5.3 A, 3.3 V or 3.5, 5.0 V) of power to each PCI slot; however, a PCI card may consume up to 25 W of power. The L1 controller controls how the power board applies power to the PCI cards. The power board applies power to the PCI cards starting with the lowest numbered slot. It continues to apply power to the PCI slots until all of the power has been consumed.
The I–brick L1 controller uses two presense pins in each PCI slot to total the power consumption of the PCI cards. The L1 controller prints a message to the console if there is not enough power for all of the PCI cards.
The L1 controller monitors and controls the environment of the I–brick. It consists of a display, logic components, and an internal cable. The logic components are located on the I–brick power board. The cable connects the display to the logic components.
For general information about the L1 controller, see Chapter 3, “System Control ”.
Figure 5-2 shows the location of the 5 PCI card slots and the Fibre channel disk drives on the I–brick real panel. Figure 5-3 shows all the I–brick rear panel items in close–up detail.
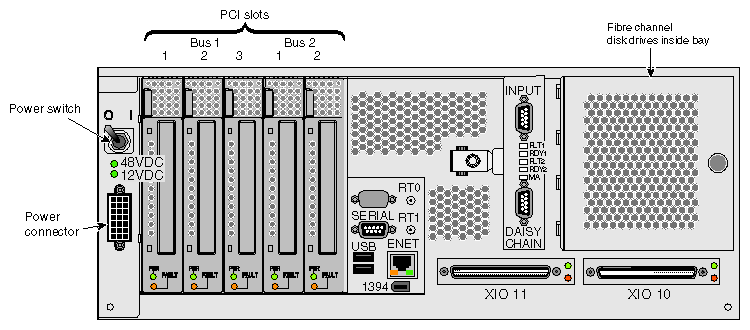
The I–brick rear panel has the following items:
Power switch. Moving the power switch to the 1 position powers on the I–brick L1 controller, and moving it to the 0 position powers off the I–brick L1 controller. Powering on the L1 controller lights the 12 VDC LED green.
48 VDC and 12 VDC LEDs. The power switch must be in the ON (1) position for these LEDs to be on. The 12 VDC lights green when the L1 controller is powered on and operating, and the 48 VDC lights green when the rest of the I–brick internal components are powered on and operating. The internal components are powered on by pressing the On/Off switch located on the L1 controller front panel.
PWR (power) connector. Connects to the power bay to give power to the I-brick.
Five PCI slots. Used to install and replace PCI cards onto your server system (normally, one of the five slots is reserved for a system PCI card to support the system disk drives). See “PCI Card Installation”:
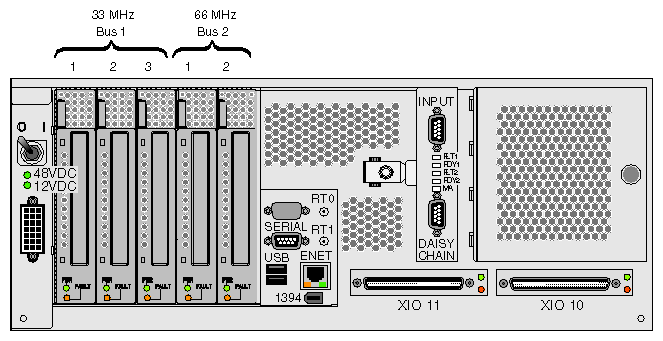
Bus 1 slot (slots 1, 2, and 3). To install 33-MHz PCI cards.
Bus 2 Slot (slots 1 and 2). To install 33-MHz or 66-MHz PCI cards.

Note: A 66-MHz card will operate at 33 MHz if installed in one of the bus 1 slots, or if installed in a bus 2 slot that includes a 33-MHz card installed in one of the other bus 2 slots. PWR (power) and fault LEDs. The power LED lights green when the PCI card is installed correctly and is getting power; the fault LED lights yellow when a fault occurs with the PCI card.
Serial connectors. Can be used as a COM port to connect modems or other serial devices.
Universal serial bus (USB) connectors (2). Can be used to connect auxiliary equipment such as a printer, a scanner, a keyboard, or a mouse.
RT0 and RT1. Real-time interrupts used by the graphics cards to keep the graphics synchronized and in time with each other.
Enet connector (Ethernet). Connects the server system to an Ethernet network.
IEEE 1394 connector. Provides a serial bus protocol connection for digital media, storage, networking, and other applications.
XIO 11 and XIO 10 connectors. Each of these connectors can connect the I–brick to a C–brick. As an option, the second connector can be connected to another C–brick to create a dual-ported I–brick, which would provide greater bandwidth.
XIO 11 and XIO 10 connector LEDs. Light yellow when the connector is cabled securely to the C–brick device, and light green when the connection is negotiated with the C–brick device with which the connector is cabled.
-
Input connector. Connects to the connector on a Fibre Channel card installed in one of the 33-MHz PCI card slots available in the I–brick. This connection interconnects the Fibre Channel disk drive(s) (where the server system's operating system resides) in the I–brick with the PCI card slot bus. This connection enables powering on of the operating system by the C–brick via its connection to one of the I–brick's XIO connectors.
Flt1 LED. Lights yellow if the Fibre Channel disk drive in bay 1 discovers a fault. The disk drive goes off-line if it detects a fault.
RDY1 LED. Lights red when the Fibre Channel disk drive in bay 1 is active and spun up.
FLT2 LED. Lights yellow if the Fibre Channel disk drive in bay 2 discovers a fault. The disk drive goes off-line if it detects a fault.
RDY2 LED. Lights red when the Fibre Channel disk drive in bay 2 is active and spun up.
MIA LED. The media interface adapter (MIA) is a copper to optical converter that allows the Fibre Channel loop to be extended up to 2 km. The MIA LED lights if the MIA discovers a fault condition.
Daisy chain connector. Used to add more Fibre Channel disks to the same Fibre Channel loop as the two internal disk drives connected to the Fibre Channel bulkhead card input connector.
Table 5-1 summarizes the ports on the I–brick rear panel.
Table 5-1. I–brick Connector Ports
Quantity | Port | Connector Label | Purpose |
|---|---|---|---|
1 | Power connector | PWR | Connects to the power bay to give power to the I–brick. |
1 | Serial: RS-232 or RS-422 | Serial | Can be used as a COM port to connect modems or other serial devices. |
2 | Universal serial bus | USB | Can be used to connect auxiliary equipment such as a printer, a scanner, a keyboard, or a mouse. |
1 each | RT0 and RT1 | RT0 and RT1 | Real-time interrupts used by the graphics cards to keep the graphics synchronized and in time with each other. |
1 | 10/100-Base-T Ethernet, RJ45 | Enet | Autonegotiating Ethernet port enables the connection of the server to an Ethernet network. |
1 each | IEEE 1394 internal and external | 1394 | Provides a serial bus protocol connection for digital media, storage, networking, and other applications. |
2 | Crosstown2 | XIO 10 and XIO 11 | Connects the I–brick to a C–brick. 1.2 GB/sec each direction. Crosstown2 ports support two speeds, 800 MB/sec and 1200 MB/sec, which can be selected with software. |
2 | Fibre Channel | Input and Daisy chain | Input connector connects to the connector on a Fibre Channel card installed in one of the 33-MHz PCI card slots available in the I–brick. This connection interconnects the Fibre Channel disk drive(s) (where the server system operating system resides) in the I–brick with the PCI card slot bus. This connection enables the operating system to be loaded by the C–brick via its connection to one of the I–brick XIO connectors. Daisy chain connector is used to add more Fibre Channel disks to the same Fibre Channel loop as the two internal disk drives connected to the system disk Input connector. |
The five hot-pluggable PCI slots support full-length 3.3-V PCI cards with 64-bit data and addressing. The five PCI slots are configured on two buses: bus 1 supports three PCI slots at 33 MHz and bus 2 supports two PCI slots at 66 MHz. Separate buses enable the system to run 66-MHz devices in the same brick as 33-MHz devices. If a PCI bus contains a 33-MHz card and a 66-MHz card, both slots of that bus run at 33 MHz. The PCI bus supports 32-bit and 64-bit PCI cards on the same bus.
You can use various types of PCI cards in the I–brick; for a list of SGI PCI cards, see Table 6-1 in Chapter 6, “P–brick”.
When the I–brick is shipped, any SGI PCI cards that were ordered are installed. The system Fibre Channel controller bulkhead card is standard. Unoccupied PCI slots are populated with empty PCI carriers; these must be present to maintain an even airflow through the PCI slots and to protect against electromagnetic interference (EMI).
Figure 5-4 shows PCI slot numbering in the I–brick.
PCI cards are hot-pluggable. This means that although you do not need to power off the I–brick to install the card, you must power off the PCI card (the slot) in which you are to replace or add a PCI card. For installation instructions, see “PCI Card Description and Installation” in Chapter 6 in Chapter 6, “P–brick”. An SGI SSE can also replace these items for you.