This chapter describes the installation and removal procedures for the customer-replaceable units ( CRUs) in the SGI Onyx 3000 series graphics system. CRUs are hardware components that can be safely removed by an end–user without undue exposure to high electrical power potentials. Instructions for identifying, installing, and replacing CRUs are found in the following sections:
CRUs are limited to the following major hardware components:
Front panels and L1 display (facade)
G-brick (L1) System Controller module
System disk drives
SGI Origin 3000 Series Owner's Guide contains instructions for installing and replacing the following items:
Storage disk drive modules
PCI cards

Warning: To avoid injury to yourself or your system, only SGI support service engineers (SSEs) can install and replace XIO cards and V12 boards on your SGI Onyx 3000 series graphics system.
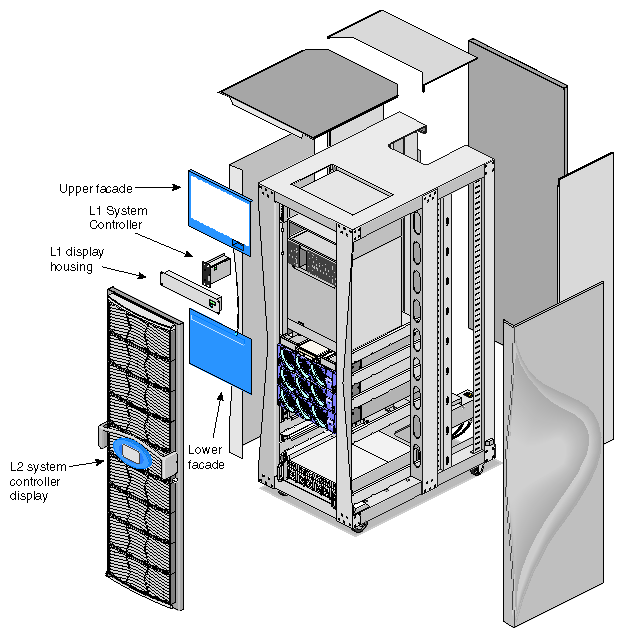
Figure 5-1 shows a rack with CRUs for an SGI Onyx 3000 series graphics system that contains a G–brick. Note that the facade on the G-brick is also removable.
Read the following subsections for general safety information. Before beginning any replacement procedures, observe the precautions in this section.
| Warning: This equipment uses electrical power internally that is hazardous if the equipment is improperly disassembled. |
This equipment is extremely sensitive and susceptible to damage by electrostatic discharge (ESD). The buildup of electrical static potential on clothing and other materials may cause ESD. Use proper ESD preventive measures and observe these precautions:
Wear a properly grounded wrist strap when connecting and disconnecting peripherals.
Be sure that you and all the electrical equipment you handle are at ground potential to avoid damage from ESD.
Warning: Before installing, operating, or servicing any part of this product, please read the “Safety Instructions” in Appendix B. Warning: The motherboard on the I–brick has a lithium battery installed. Only qualified SGI service personnel should replace this lithium battery, and only with the same type or an equivalent type recommended by the manufacturer. Discard used batteries according to the manufacturer's instructions. There is a danger of explosion if the battery is incorrectly replaced. See Appendix B, “Regulatory Specifications”
Ensure that the system files are backed up, and that all users are logged off the system. Always completely power off the system when removing or replacing internal components.
“Powering Off the System” in Chapter 4 explains how to properly turn off and disconnect all system power.
“Keyboard and Mouse Connections” in Chapter 4 details the procedures for bringing the rack back online after adding, removing, or replacing internal components.
The G-brick uses three front panel components (sometimes called a facade). When you remove G-brick facade components, see Figure 5-2 and note the following information:
The top portion of the G-brick facade slots into place at the top and is held by two screws near the bottom and a guide pin (located next to the L1 controller interface). Note that it slides over the L1's On/Off button. Be careful not to break the button when removing or replacing this portion of the facade.
Slots at the bottom of the lower facade hold it in place, and it secures at the top with two screws.
After you remove the upper and lower facade plates, you can undo the L1 display housing bar by removing four screws (two at each end). Note that the display housing also holds the cable connection to the L1 module, which should be carefully detached. Note that the cable should always be detached at the controller end (not at the display end).
Remove the L1 module from the G-brick by undoing the four screws (two at the top and two at the bottom) and sliding the unit out of the G-brick chassis.
