This chapter provides information on using your SGI Onyx 3000 series graphics system in the following sections:
This chapter describes system maintenance and safety information, and the use of your monitor. It also describes how to power on and power off the system from the L2 controller touch display located on the front door of the system rack that has the C–bricks.
You can also power on and power off your graphics system from a system console. Instructions to connect a system console to your graphics system and to power on and power off your graphics system is described in detail in SGI Origin 3000 Series Owner's Guide.
| Warning: Before installing, operating, or servicing any part of this product, please read the “Safety Instructions” in Appendix B. |
SGI Origin 3000 Series Owner's Guide also has the following information to help you use your graphics system:
How to insert PCI cards into the graphics system I–brick and P–brick to provide more functionality to your system.
How to install storage disk drive modules into the optional D–brick to increase storage capacity for your system.
How the L1 and L2 controllers work together to manage and control your system. The guide also lists the L1 and L2 controller commands that you can enter at the system console to manage and control your system.

Note: Chapter 6, “Graphics System Controllers”, describes the functions of the L1 and L2 controllers and the L1 controller messages that appear on the L1 controller display.
Customer maintenance of your graphics system is limited to the outside of the chassis, where the peripherals and cables attach to the I/O panels. No user-serviceable parts are found within the chassis or individual system bricks.
| Warning: The SGI Onyx 3000 series rackmount graphics system operates on 200-240 VAC. Use extreme caution when working around this voltage. Never install or remove power cords without first turning off the equipment. |
There is voltage in the system brick midplanes even if the system has been reset or halted.
| Caution: The graphics rack comes with one or more 24-inch SuperWide color monitors. Always use two people to move the monitors. Be sure to practice proper lifting techniques. |
| Note: This product requires the use of external shielded cables in order to maintain compliance with Part 15 of the FCC rules. |
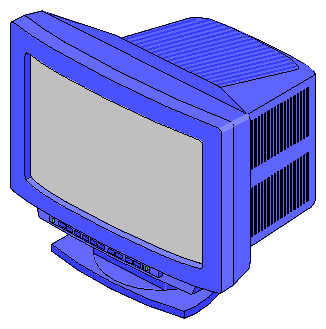
A high–resolution SuperWide (1920 x 1200-pixel) 24-inch monitor, as shown in Figure 4-1, is shipped as a standard monitor for the SGI Onyx 3000 series graphics rackmount systems. To connect your monitor to your graphics system, see “Monitor Cabling Options” in Chapter 3.
| Caution: Before plugging any monitor into either a 100-120 VAC or a 220–240 VAC outlet, be sure that the electrical rating on the label is in either the 100-120 or the 220–240V range, whichever applies. When using a monitor in locations that do not have either of these outlets, contact your SGI system support engineer (SSE) before plugging in the monitor power cable. |
Plug in and turn on your monitor as described in the documentation that accompanies your monitor.
| Note: If you are using a monitor that was not shipped with your SGI Onyx 3000 series graphics system that has adjustable RGB connectors, make sure they are in the 75-ohm position; otherwise, the monitor displays the wrong colors. |
The default monitor resolution supported by the SGI Onyx 3000 series graphics system SuperWide monitor is 1920 x 1200 at 66 Hz. The maximum output bandwidth is about 300 Mpix/sec. With two monitors, the speed of each monitor at a resolution of 1920 x 1200 at 66 Hz is approximately 188 Mpix/sec. If you connect more than two monitors, you must use a combination of lower– and higher–resolution monitors that are within the limit of 300 Mpix/sec.
To change the default video format for your monitor, you may use the setmon command. For more information about the setmon command options, see the setmon(1G) man page.
To use with your SuperWide monitor, your graphics system is shipped with a standard 101-key USB keyboard and a USB mouse that you can directly plug into the USB connectors in your graphics system I–brick.
For instructions to connect and configure your keyboard and mouse to the I–brick, see “Keyboard and Mouse Port Configuration” in Chapter 3.
There are several ways to power on your graphics system. This section documents only the procedure using the L2 controller touch display. For information regarding optional power-on procedures, see SGI Origin 3000 Series Owner's Guide.
| Warning: The rackmount system operates on 200-240 VAC. Use extreme caution when working around this voltage. Never install or remove power cords without first turning off the equipment. |
To prepare to power on the system, note or perform the following:
Confirm that the power cabling between the following items is secure:
Between the G-brick(s) and the external power receptacle(s) (see Figure 4-2).
Between the bricks and the power bay.
Between the power bay and the power distribution unit (PDU).
Between the power distribution unit (PDU) and the power distribution strip (PDS).
For a D–brick, between its power connector and the PDS; the D–brick bypasses the power bay.
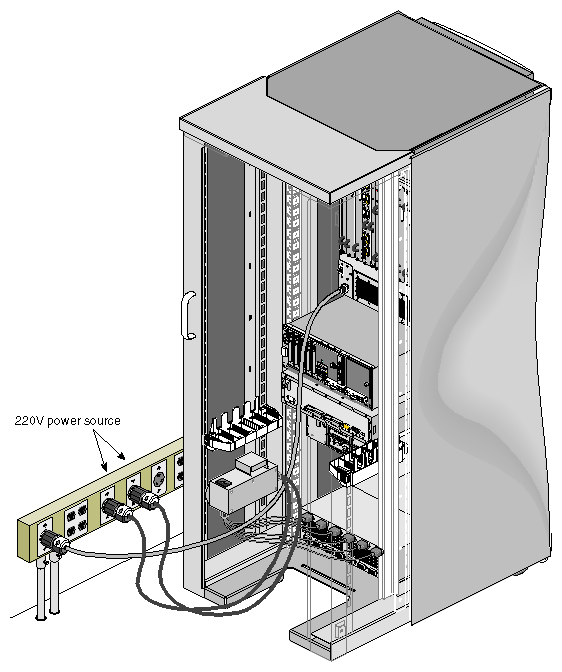
Between the PDU or PDS and the power receptacle (see Figure 4-3).
All these cables should have been properly connected by your SGI system support engineer. If the system includes one or more D–bricks, make sure that each D–brick's Run/Service key switch on the ESI/Ops panel is set to RUN.
Make sure that the PWR (power) switch on each individual brick that you want to power on is set to the On (1) position. This will start the L1 controller for the brick when the brick is powered on. Your SGI system support engineer normally leaves system brick rear power switches in the On (1) position.
Note: The system may malfunction or fail to boot if the rear power switch on one of the bricks is left in the Off (0) position when the system is powered on. Although the L2 controller is optional with the SGI Onyx 3200 graphics system that comes in a short rack enclosure, the L2 controller touch display is not. The L2 controller and L2 controller touch display is included with all the other SGI Onyx 3000 series graphics system models. With an L2 controller, you can power on and power off individual bricks, or power on and off the entire system at the L2 controller touch display located on the front door.
Note: If the graphics system does not have an L2 controller touch display, you power on and off individual bricks or the entire system at a dumb terminal connected to the C–brick console port. The power receptacles used for the graphics brick and the system PDU should be sourced and grounded from the same breaker box. For additional information on this topic, call your SGI system support engineer.
Figure 4-2 shows the connection between a G–brick power cable cord and an external power receptacle.
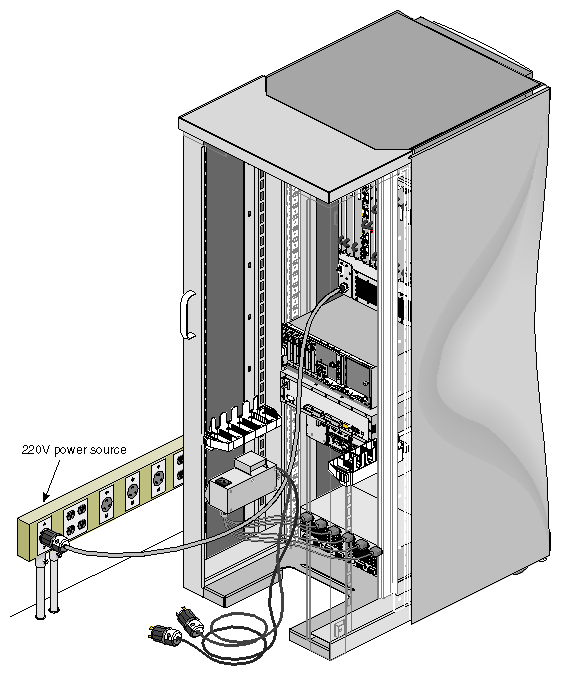
Figure 4-3 shows the connection between a PDU power cable and an external power receptacle.
| Caution: If the difference in ground potential between two chassis connected together with the NUMAlink or Xtown2 cables is greater than 500 millivolts (0.5 V), severe equipment damage can result. |
Power on the rackmount graphics system as follows:
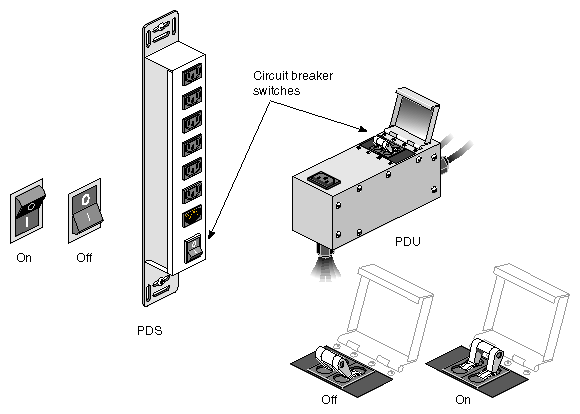
Turn on the PDU and/or PDS circuit breaker switches (shown in Figure 4-4).
If the monitors and other peripherals are equipped with voltage select switches, verify that they are set for the appropriate AC voltage and plug them in. Note that they are normally plugged in to sources outside the rack system.
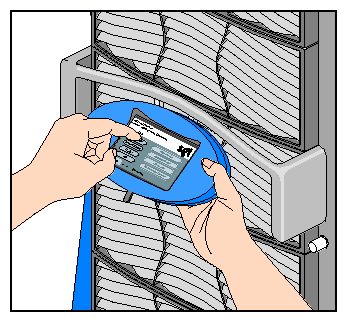
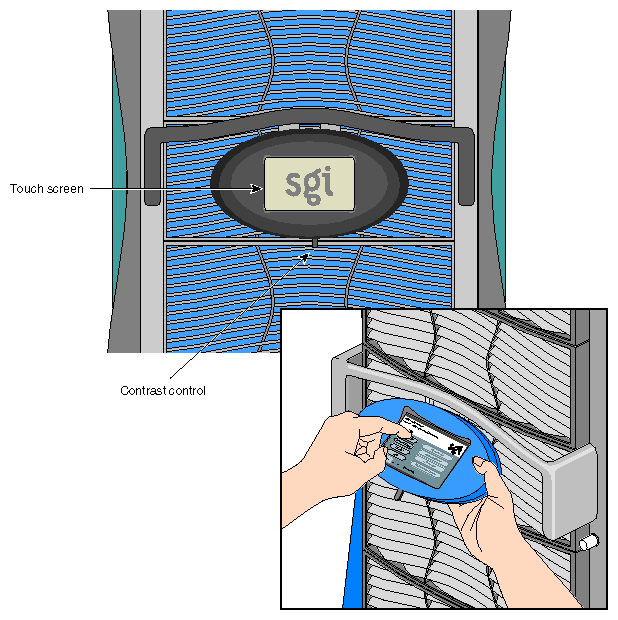
Locate the L2 controller touch display on the front of the rack system (see Figure 4-5). It should be ready for input.
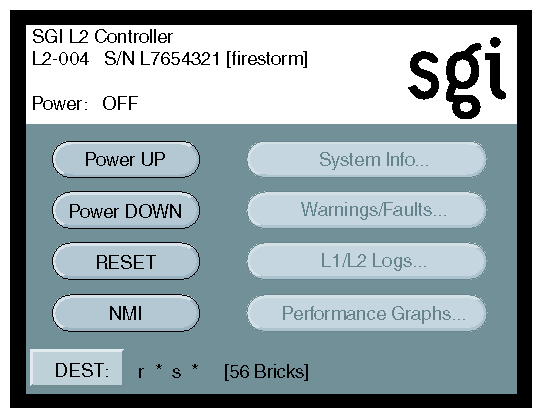
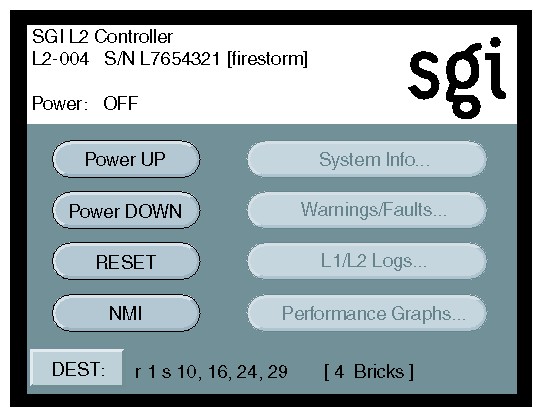
The home window, shown in Figure 4-6, displays the following items:
Rack number (L2-004) of the L2 controller to which the L2 controller touch display is connected.
L2 controller system serial number (L7654321).
Server system name in parentheses (firestorm).
Power status (Power: OFF) for the bricks designated in the destination (DEST) field, which indicates all slots in all racks (r * s *), which amounts to 56 bricks.
To power on selected bricks, a partition, or the entire server, follow these steps:
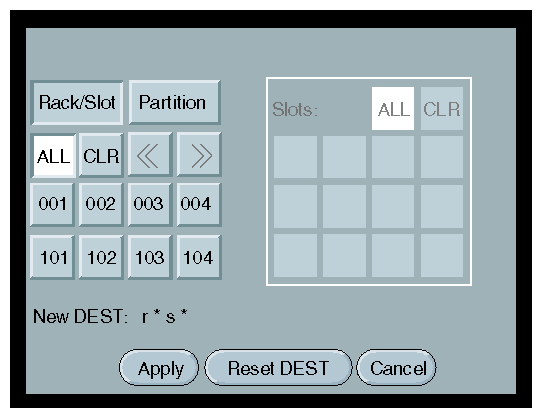
Select the DEST button to select the bricks or partition you want to power on. The destination selection window, shown in Figure 4-7, appears.
You select the bricks by their rack and slot/bay (unit position) number, or by partition. Select ALL if you want to power on all the bricks in all the racks and slots in the server. You can also select the bricks in all the slots of multiple racks, but you cannot select slots for multiple racks.
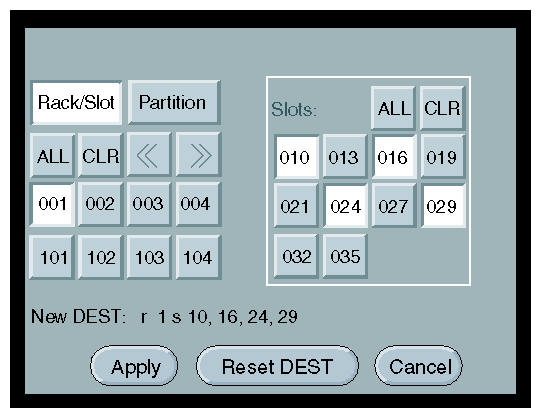
If you want to select individual bricks to power on, select the rack from which you want to select bricks from the Rack/Slot segment of the display. For example, if you select 001, a Slots section on the window with all the slots for bricks in rack 001 appears, as shown in Figure 4-8.
Select slots from the Slots section. (Figure 4-8 shows the selection of slots 010, 016, 024, and 029.) The New DEST setting changes to reflect your selections. After you make your selections, select Apply. The home window appears, which displays r 1 s 10, 16, 24, 29 in the DEST field, as shown in Figure 4-9. This indicates that you have selected slots (bricks) 10, 16, 24, and 29 from rack 1 to power on.
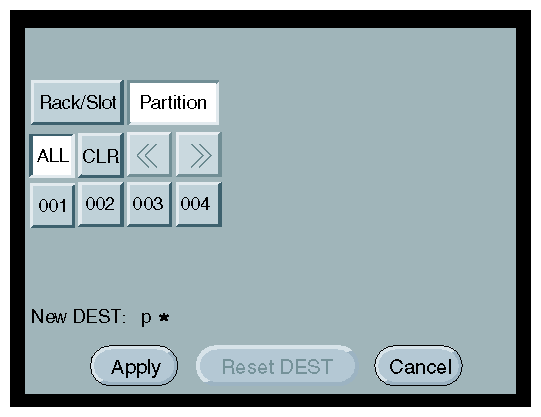
If you want to power on a partition, select Partition from the destination selection window. The partition selection window, shown in Figure 4-10, appears.
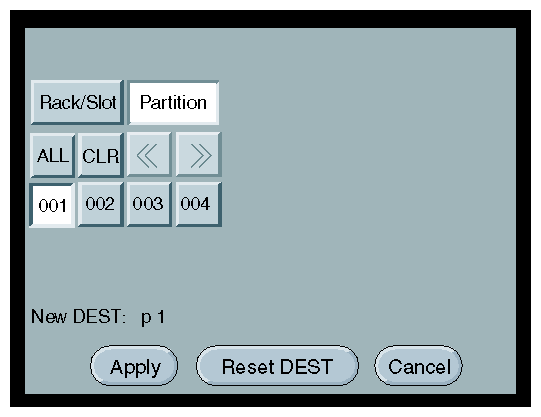
You can select all partitions by selecting ALL from the partition selection window, or you can select a single or multiple partitions by selecting the individual partition numbers. Figure 4-11 shows the selection of partition 001.
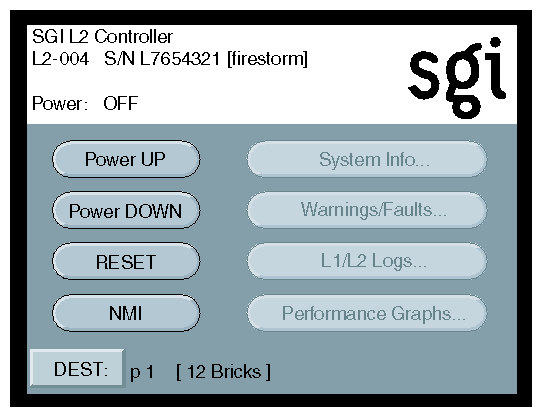
The New DEST field shows p 1, which indicates that partition 001 was selected as the new destination. If you select Apply, your selection is confirmed and the home window, shown in Figure 4-12, appears. The DEST field shows p 1 [12 Bricks], which indicates that all 12 Bricks belonging to partition 1 is the new destination.
After you have selected the destination of the bricks you want to power on, select Power UP on the home window. The Power UP confirmation window, shown in Figure 4-13, appears. This window indicates which bricks will receive the Power UP command. In this example, it will power on all slots (bricks) in all racks (r * s*). If you select OK, the power–on operation is confirmed, and the home window appears. Selecting Cancel stops the power–on operation, and the home window appears.

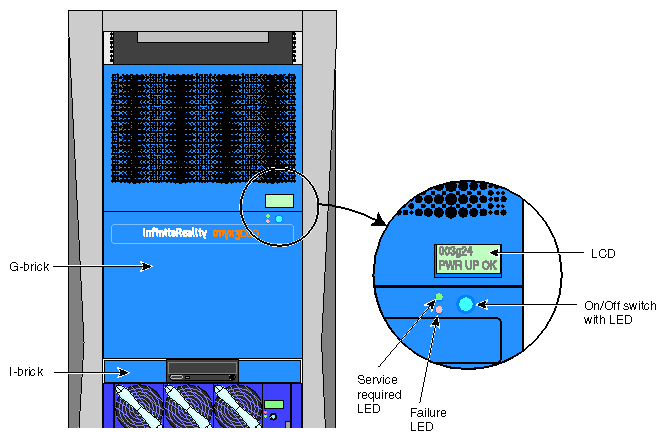
After the system powers on, confirm that the L1 controllers on each are brick are active (see Figure 4-14 for an example).
The system should be powered off only for routine maintenance or repair. If you have a problem during powering off and an error message appears on your L2 controller touch display, see Table 6-2 for a listing of L1 controller messages.
To prepare to power off your graphics system, note the following:
If your system includes optional D–bricks, make sure that the D–brick's Run/Service key switch on the ESI/Ops panel is set to Service.
During the power–off process, the L1 indicators on the individual bricks should display that the system is powering off for each segment of the procedure.
To power off selected bricks, a partition, or the entire system, follow these steps:
Locate the L2 controller touch display on the front of the system (see Figure 4-15).
The home window, shown in Figure 4-16, displays the following items:
Rack number (L2-004) of the L2 controller to which the L2 controller touch display is connected.
L2 controller system serial number (L7654321).
Server system name in parentheses (firestorm).
Power status (Power: OFF) for the bricks designated in the destination (DEST) field, which indicates all slots in all racks (r * s *), which amounts to 56 bricks.
Select the DEST button to select the bricks or partition you want to power on. The destination selection window, shown in Figure 4-17, appears.
You select the bricks by their rack and slot/bay (unit position) number, or by partition. Select All if you want to power off all the bricks in all the racks and slots in the server. You can also select the bricks in all the slots of multiple racks, but you cannot select slots for multiple racks.
If you want to select individual bricks to power off, select the rack from which you want to select bricks from the Rack/Slot segment of the display. For example, if you select rack 001, a Slots section on the window with all the slots for bricks in rack 001 appears, as shown in Figure 4-18.
Select slots from the Slots section. (Figure 4-18 shows the selection of slots 010, 016, 024, and 029.) The New DEST setting changes to reflect your selections. After you make your selections, select Apply. The home window appears, which displays r 1 s 10, 16, 24, 29 in the DEST field, as shown in Figure 4-19. This indicates that you have selected slots (bricks) 10, 16, 24, and 29 from rack 1 to power off.
If you want to power off a partition, select Partition from the destination selection window. The partition selection window, shown in Figure 4-20, appears.
You can select all partitions by selecting ALL from the partition selection window, or you can select a single or multiple partitions by selecting the individual partition numbers. Figure 4-21 shows the selection of partition 001.
The New DEST field shows p 1, which indicates partition 001 was selected as the new destination. If you select Apply, your selection is confirmed and the home window, shown in Figure 4-22, appears. The DEST field shows p 1 [12 Bricks], which indicates that all 12 bricks belonging to partition 1 is the new destination.
After you have selected the destination of the bricks you want to power off, select Power DOWN from the home window. The Power DOWN confirmation window, shown in Figure 4-23, appears. This window indicates which bricks will receive the Power DOWN command. In this example, it will power off all slots (bricks) in all racks (r * s*). If you select OK, the power–off operation is confirmed and the home window appears. Selecting Cancel stops the power–off operation and the home window appears.

If you want to turn off the power switches for any external peripherals, do so in the following order:
Printer (if installed)
Monitors
Other external peripherals
If you want to turn off all power to the system, follow these steps:
Turn the PDU and/or PDS circuit breaker switches (shown in Figure 4-4) to the Off (0) position.
Turn the switch(es) on the back of the G-brick(s) or V–brick(s) to the Off (0) position.
Disconnect the PDU power cable(s) from the wall receptacles.
Unplug the power cord(s) of the G-brick(s) or V–brick(s) from the wall socket(s).
After you complete all these steps, all power to the system is turned off.