This chapter helps you isolate and solve possible problems with your workstation.
The following topics are covered:
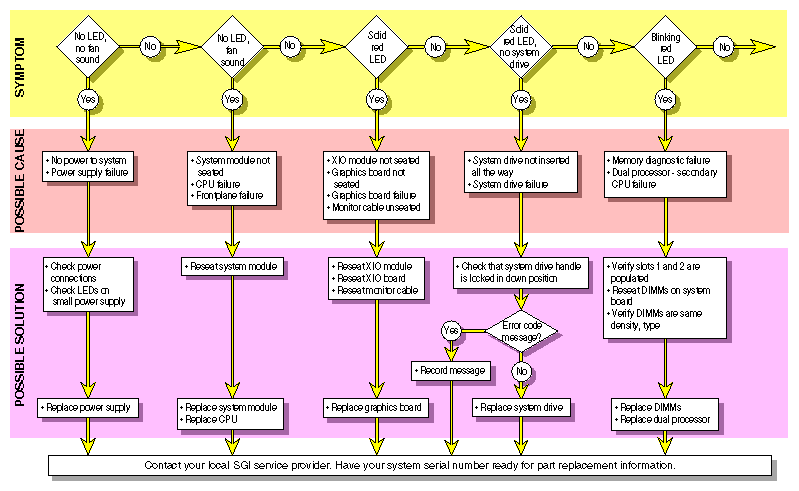
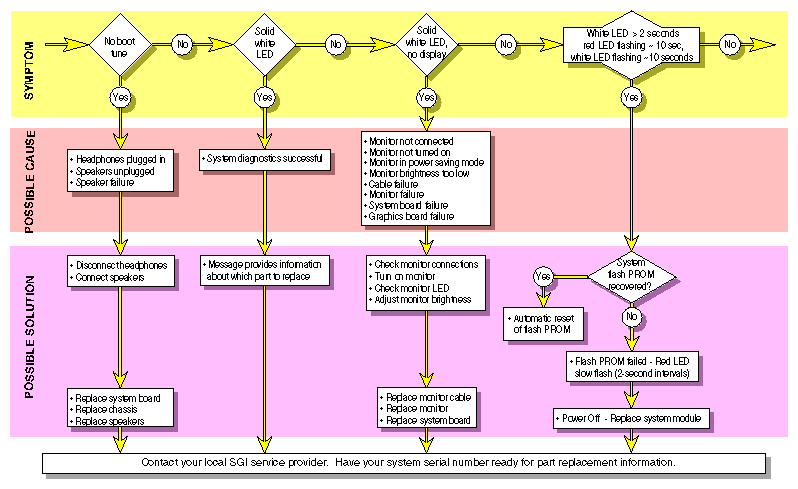
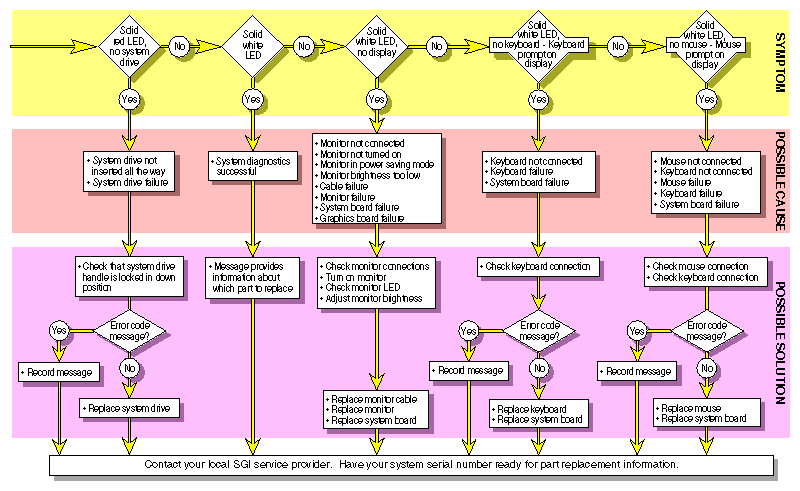
Refer to Figure 8-1, Figure 8-2, and Figure 8-3 on the following pages to isolate and solve possible hardware problems.
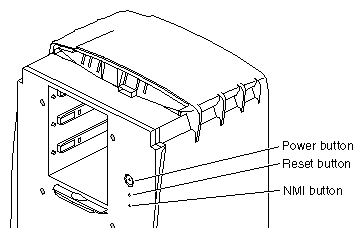
If your system is experiencing problems and no error information is provided, you can force a non-maskable interrupt (NMI). When you press the NMI button, the system saves a record of its activity to a file and then powers down.
| Caution: When you push the NMI button, you lose any work in progress at the moment. |
The NMI button is located behind the bezel, beneath the Power and Reset buttons, as shown in Figure 8-4. To press the NMI button, you must remove the bezel, as described in “Removing the Bezel”. Use a straightened paper clip to press the NMI button.
Customer Support uses the file generated by the NMI button to help diagnose the specific problem that caused the system to malfunction. These files are saved in the var/adm/crash directory. Make sure these files are accessible when you contact Customer Support.
You can use the System Maintenance menu for some specialized tasks, such as installing system software, running diagnostics, recovering the system, entering the command monitor, or selecting your keyboard layout.
Press the power button on the front of your workstation to shut down and power off, as described in “Shutting Down and Powering Off the Octane2 Workstation”.

Note: You can also shut down and power off using the System menu in the Toolchest, as described in Chapter 1. After a few seconds, press the power button to power on.
The Start notifier appears, as shown in Figure 8-5
Click the Stop for Maintenance button in the Start notifier.
The System Maintenance menu appears.
Choose the desired option in the System Maintenance menu.
You can run the following software diagnostic tests on the Octane2 workstation:
Power-On Tests
Confidence Tests
IDE Tests
These tests run automatically for the major hardware components each time you turn on your workstation. If the power-on tests find a faulty component, the lightbar LED on the front of your workstation turns red and an error message usually appears. For more information, go to the beginning of this section and see “Using the LEDs on the Lightbar.”
There are confidence tests for the mouse, keyboard, monitor, audio subsystem, external SCSI devices (excluding hard disks), Presenter, and ISDN connection.
To run the confidence tests, choose Toolchest > System > Confidence Tests. Double-click the icon for the part you want to test, and follow the online instructions.
The Interactive Diagnostic Environment (IDE) tests are more comprehensive than the confidence tests, and run longer (up to 30-45 minutes). To perform these tests, follow these steps:
Turn off your workstation, wait a few seconds, then turn it on again.
After a while, the Start notifier appears, as shown in Figure 8-6.
Click Stop for Maintenance in the System Startup notifier, or press Esc.
The System Maintenance menu appears.
Choose Run Diagnostics in the System Maintenance menu or type 3.

Tip: You can stop the tests at any time by pressing Esc. 
Note: If you cannot access the System Maintenance menu, your system is faulty. If you cannot run the diagnostics, you may have a faulty disk drive or other problem. Contact your local authorized SGI service provider. At the end of the tests a message appears that displays the test results.
Press Enter and then Esc to return to the System Maintenance menu, then restart your system.
In most cases, your system recovers from a system crash automatically when you reboot. If, however, you lose data on your system disk, and you cannot communicate with your workstation using the mouse or keyboard, or over the network, follow the steps in this section. These instructions assume you have a backup tape of your system that was made using the System Manager backup tool, or with the /usr/sbin/Backup script. You also need a CD with the current IRIX operating system level. If you are recovering data from a tape on a remote tape device, you must know the hostname, tape device name, and IP address of the remote system.
| Note: For instructions on creating a system disk from the PROM monitor, refer to your Personal System Administration Guide. For information on installing the operating system or other software, see the Installation Instructions included with your CDs. |
To recover from a system crash, follow these steps:
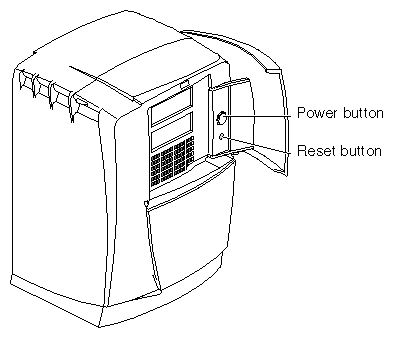
Use a pen tip or an unwound paper clip to press the Reset button located on the front panel, as shown in Figure 8-7.
After a while, the Start Notifier appears, as shown in Figure 8-8.
Click Stop for Maintenance in the Start notifier, or press Esc.
The System Maintenance menu appears.
Choose Recover System in the System Maintenance menu, or type 4.
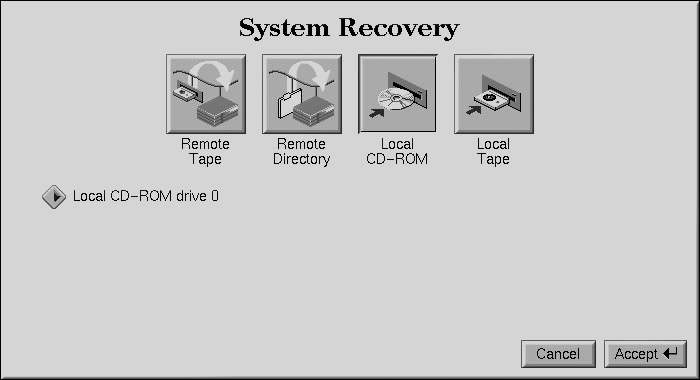
The System Recovery menu appears, as shown in Figure 8-9.
If you have the IRIX CD, and a CD-ROM drive is connected to your system, click Local CD-ROM, and then click Accept in the System Recovery menu.
You are prompted to insert the IRIX CD.
Insert the IRIX CD.
The system copies the required files, which takes about 5 minutes.

Note: If you do not have a CD-ROM drive, use a drive that is connected to another system on the network and click Remote Directory in the System Recovery Menu. You are prompted to enter the remote hostname. Type the system's name, a colon (:), and the full pathname of the remote CD-ROM drive, followed by /dist. For example, to access a CD-ROM drive on the system “mars,” type the following: mars:/CDROM/dist
After the system copies the required files from the local or remote CD, you can restore your data from a recent full backup tape that was created using the System Manager backup tool, or with the /usr/sbin/Backup script.

Tip: If you need to check something on your system during the restore process, you can display a shell prompt by typing sh at most question prompts. If a local tape device is connected to your system, the following message appears:
Restore will be from <tapename> OK? ([Y]es, [N]o): [Y]
tapename is the name of the local tape device.
If you are using a remote (network) tape device and the system does not find a tape device, or you answer No to the above message, the following message appears:
Remote or local restore ([r]emote, [l]ocal):
If you select remote, this initiates a network restoral, and you must know the hostname, tape device name, and IP address of the remote system. You also must know the IP address of your system. The IP address, such as 192.0.2.1, always has four components separated by periods.
If you select local, this means a tape device is connected to your system, and you are prompted to enter the name of the tape device.
Then the following message appears:
Insert the first backup tape in the drive, then press <Enter>, [q]uit (from recovery), [r]estart:
Remove the CD, insert your most recent full backup tape, and then press Enter.
The system pauses while the backup program retrieves several files from the backup tape, and then the following message appears for each filesystem that was installed at the time of the backup.
Erase /x filesystem and make new one (y,n)? [n]
If you answer n for no, the system tries to save as many files as possible. Then it uses your backup tape to replace the files it could not save. In most cases, you should answer no, especially if do not have a recent backup tape. If the file systems are badly damaged, or the backup was from a different level operating system, you may have to answer yes.
If you answer y for yes, the system erases the filesystem and copies everything from your backup tape to the disk. This operation results in a loss of all the data on the filesystem since your last backup.
Then the following message appears:
Starting recovery from tape.
After 2 or 3 minutes, the system displays the names of the files it is copying to your disk.
After the first tape is complete (if it is the first in a set), you are prompted for the second tape, and so on.
After the first tape set (full backup) is completed, you are prompted for any incremental or additional tapes to be restored.
When all the tapes are restored, you are prompted to restart the system.
When the recovery is complete, the following message appears:
Recovery complete, restarting system.

Note: After the system recovery is complete, if your backup tapes are old, or you are changing your operating system level, reinstall the operating system from the IRIX CD that came with your system. When you see the Start notifier, press Esc or click Stop for Maintenance, and then click Install System Software. For more information on installing the operating system, see “Installing Software” in the Personal System Administration Guide or the Installation Instructions included with your CDs.
In the System Maintenance menu, if you choose Install System Software, Run Diagnostics, Recover System, or Enter Command Monitor, a password prompt may appear. If you do not know the password, you can disable it by installing a jumper (a small cap that connects two pins) on the system board inside the workstation. The system board is located in the system module. To install the jumper, you must first remove the system module.
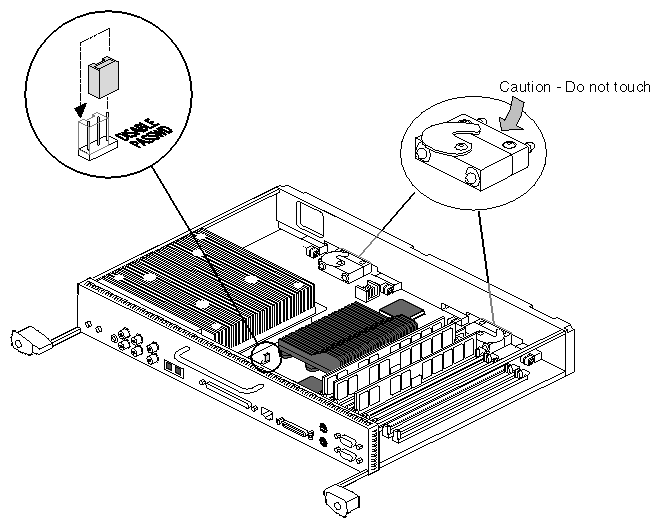
| Note: The jumper is a small plastic cap that resides near the CPU, as shown in Figure 8-10. The jumper sits on the right two of three pins. |
To disable the system maintenance password, follow these steps:
Go to “Preparing the Workstation” and follow the instructions through “Removing the System Module.”
Locate the white rectangle printed on the system board at the base of the jumper.
The rectangle has “Disable passwd” beside it. The white rectangle surrounds the jumper and one pin to the left of the jumper. The jumper is on the middle and right pins.
Pull up on the jumper and remove it.
Place the jumper on the left and middle pins within the rectangle.
The password is now disabled.
Go to “Reinstalling the System Module” and follow the instructions through “Powering On the Octane2 Workstation”.
After you power on your workstation, you can choose another system maintenance password.
Power on your workstation, if it is turned off.
Choose Toolchest > Help > InfoSearch > Online Books > SGI End User > Personal System Administration Guide and select “Creating, Changing and Deleting Passwords” in Chapter 5.
Follow the instructions for creating or changing a password, then return to this page for instructions on moving the jumper.
Go to “Preparing the Workstation” and follow the instructions through “Removing the System Module.”
After you remove the system module, return to this page for instructions on enabling the password.

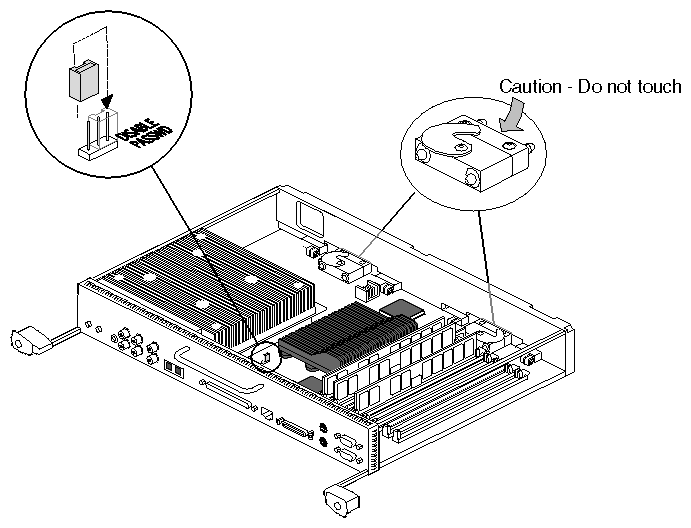
Note: The jumper is a small plastic cap that resides near the CPU. The jumper is on the left side of the 3-pin configuration because the password was disabled by moving the jumper to the left. To enable the password, you must move the jumper to the right. Go to the next step for instructions on moving the jumper to the right. Locate the white rectangle printed on the system board at the base of the jumper, as shown in Figure 8-11.
The rectangle has “Disable passwd” beside it.
The white rectangle surrounds the jumper and one pin to the left of the jumper. The jumper is now disabled, and sits on the left and middle pins.
Pull up on the jumper and remove it.
Place the jumper on the middle and right pins (within the rectangle).
The password is now enabled.
You are ready to replace the system module.
Go to “Reinstalling the System Module” and follow the instructions through “Powering On the Octane2 Workstation”.
If the system does not power off, either it never came up all the way or the operating system is hung. If you do not see any activity for several minutes, follow these steps:
Press the power button again (see Figure 8-12).

Note: If you press the power button a second time, the system powers off immediately, but it is not a clean shutdown. Avoid using this method unless the system does not respond for several minutes after your press the power button the first time. If pressing the power button a second time does not work, use a pencil or pen to press the reset button.
If the system still fails to power off, unplug the power cord from the back of the workstation, and contact your authorized SGI service provider.
To return any part, use the packaging materials and box that came with your replacement part.
For product support information, see page xxii.
