This chapter shows you how to remove and install both the central processor unit (CPU) and memory (DIMMs), which are located in the same area of your workstation. The following topics are covered:
To prepare your workstation for installation or removal of a CPU or memory, follow these steps:
Open the cover and press the power button (see A in Figure 2-1) to power off your workstation.
Unplug the power cable (B) from the electrical outlet and from your workstation.
Press the monitor power switch (C) to turn off your monitor.
Wait 5 minutes before removing the system module.

Warning: The heat sinks on the CPU and system module get very hot. Wait 5 minutes after powering off your workstation before you remove the system module. Test before touching the CPU or heat sinks. If your system has a lockbar installed remove it (a lockbar locks the system module and bezel to the chassis).
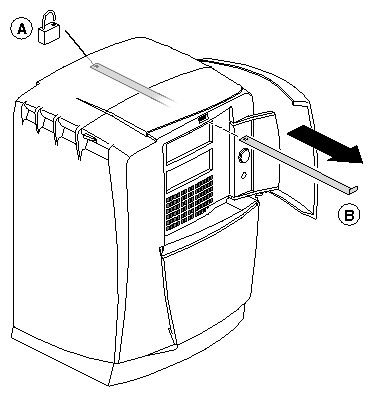
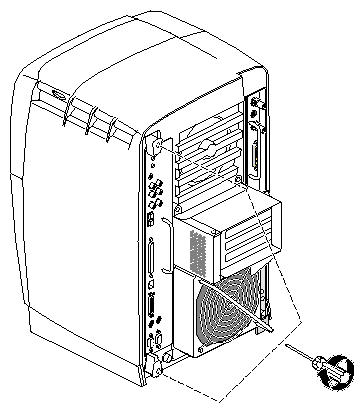
Unlock the lock (see A in Figure 2-2) at the back of your workstation.
Pull the lockbar (B) out of your workstation.
Face the rear of your workstation.
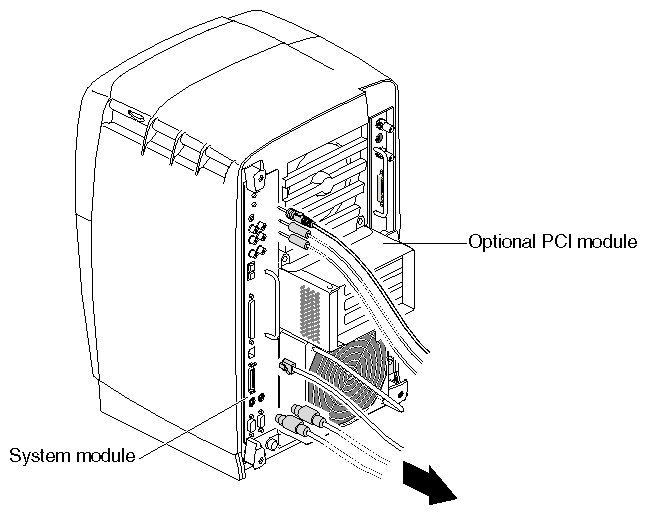
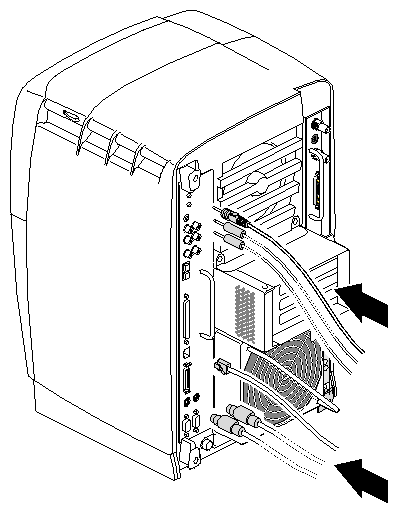
Remove the cables attached to the system module, as shown in Figure 2-3.

| Note: For illustration purposes, the optional PCI module is shown installed. For a description of the PCI module, go to Chapter 4, “Installing and Removing PCI Boards.” |
| Caution: The components inside your workstation are extremely sensitive to static electricity. Always wear the wrist strap when you replace parts inside your workstation. |
Unroll the first two folds of the band (see A in Figure 2-4).
Wrap the exposed adhesive side firmly around your wrist (B), unroll the rest of the band, then peel the liner from the copper foil at the opposite end.
Attach the copper foil to any exposed electrical ground, such as a metal part of the workstation (C).

Use the provided Phillips screwdriver to loosen the two captive screws that secure the sliding handles to the workstation, as shown in Figure 2-5.
Warning: The heat sinks on the CPU and system module get very hot. Wait 5 minutes after powering off your workstation before you remove the system module. Test before touching the CPU or heat sinks. After powering off your workstation, attaching the wrist strap, and waiting five minutes for the heat sinks to cool, you can remove the system module.
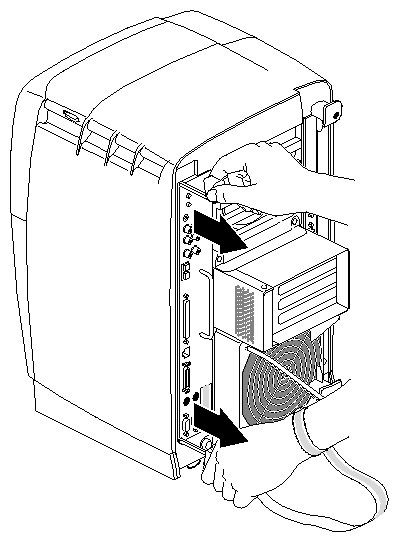
Pull both sliding handles simultaneously until they are completely extended, as shown in Figure 2-6.
This action releases the system module from the workstation.

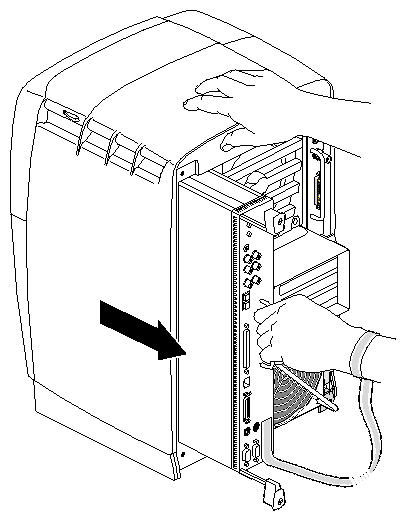
Caution: To avoid damaging the module, do not attempt to remove the module by pulling the sliding handles. Pull the system module from the chassis by grasping the immovable handle with your left hand and bracing your right hand against the top of the workstation, as shown in Figure 2-7.
Support the bottom of the module as you pull it out.
Place the system module on a dry, antistatic surface (such as your desktop) with the CPU and DIMMs facing up.
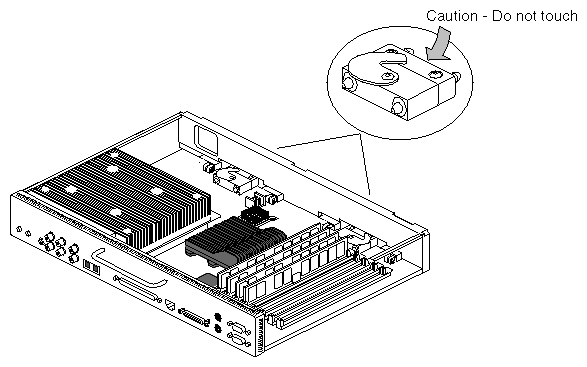
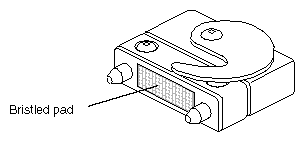
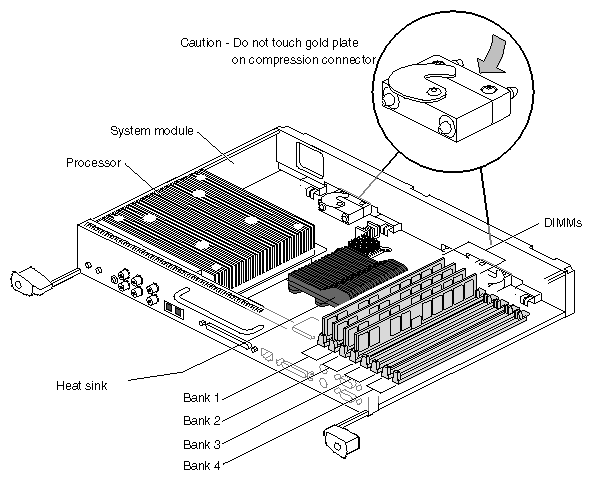
Caution: When you remove the system module from the chassis, do not touch the two compression connectors at the back of the system module, as shown in Figure 2-8. The gold bristled pad on each compression connector is very delicate and easily damaged (see Figure 2-9). Before you remove the system module, read Appendix A, “Care and Cleaning of Compression Connectors.”
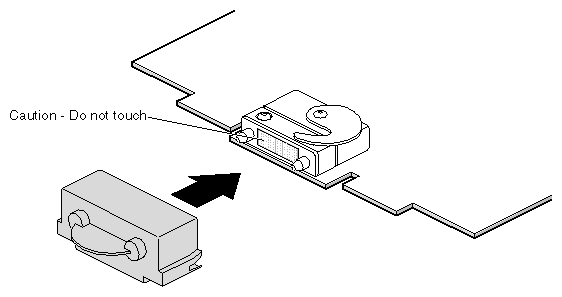
Place a cap on each compression connector on the back of the system module, as shown in Figure 2-10 (compression connector caps are included with your workstation.)
Warning: The heat sinks on the CPU and system module get very hot. Wait 5 minutes before touching them, and then test before touching them.

Your workstation has either a single CPU or a dual CPU installed. Following are instructions for removing and replacing each type of CPU. Follow the same instructions for CPUs of different speeds.
To remove a CPU, power off your workstation, wait 5 minutes to allow the heat sinks to cool, and attach the wrist strap. Then remove the system module, as described earlier in this chapter, beginning on page 36, and follow these steps.
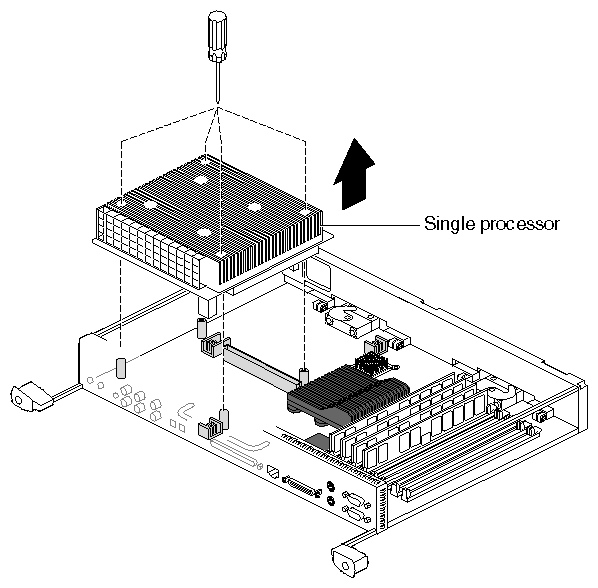
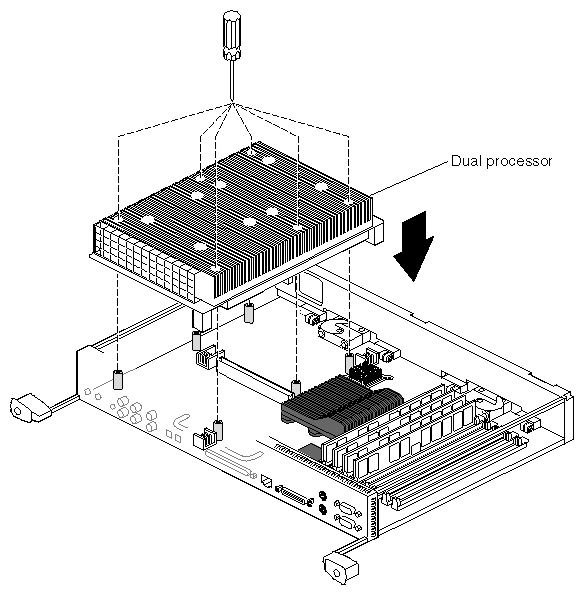
Loosen the four captive slotted screws holding the CPU in place, as shown in Figure 2-11 (the dual processor has six captive screws).
Caution: Do not remove the four inner screws (not slotted) that hold the heat sink to the CPU.
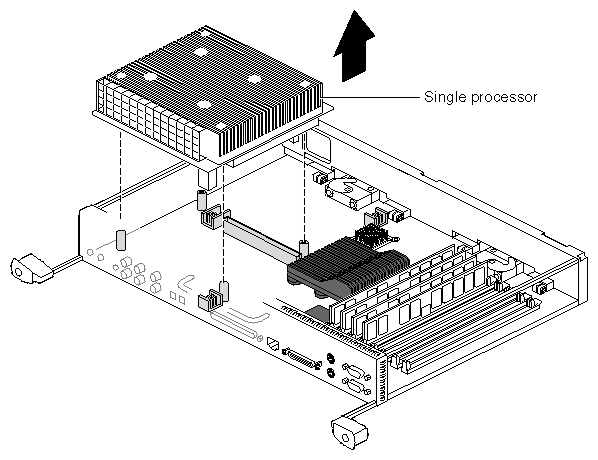
To release a single processor, slide your fingers under its edge closest to the back of the module, then push up to release it, as shown in Figure 2-12. You may need to use two hands to lift it out.
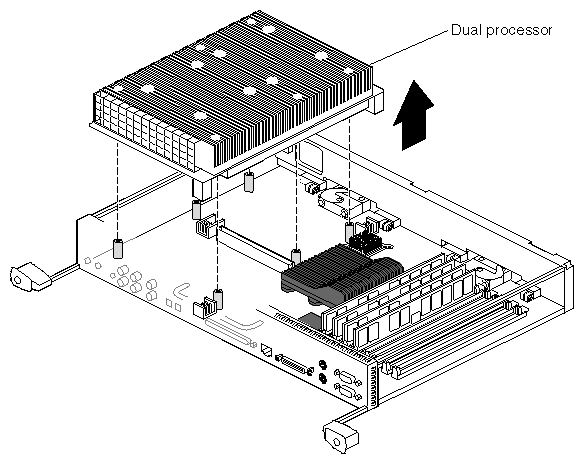
If you have a dual processor, slide your fingers under the side bar of the system module and under the processor, then push up to release it, as shown in Figure 2-13. After releasing the dual processor, lift it out of the system module.
To install a new CPU, power off your workstation, wait 5 minutes to allow the heat sinks to cool, and attach the wriststrap. Then remove the system module and the currently installed CPU, as described earlier in this chapter, and follow these steps:
Turn over the CPU to find the connectors on the base, as shown in Figure Figure 2-14.
Align the connectors with the connectors on the system board.
If you are installing a single processor, place it on the side of the system module closest to the panel of connectors, as shown in Figure 2-15.
Lower the CPU onto the standoffs and connectors.
Tighten the four captive screws to the standoffs (the dual processor has six captive screws).
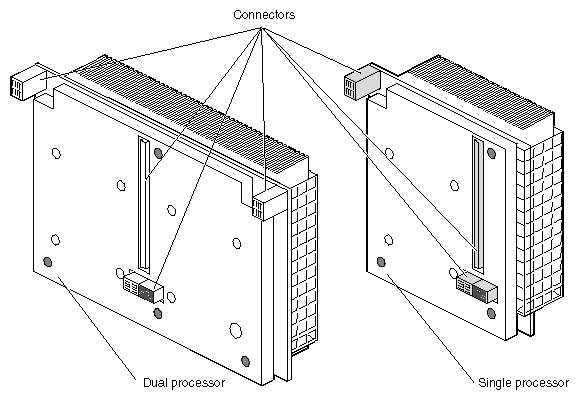
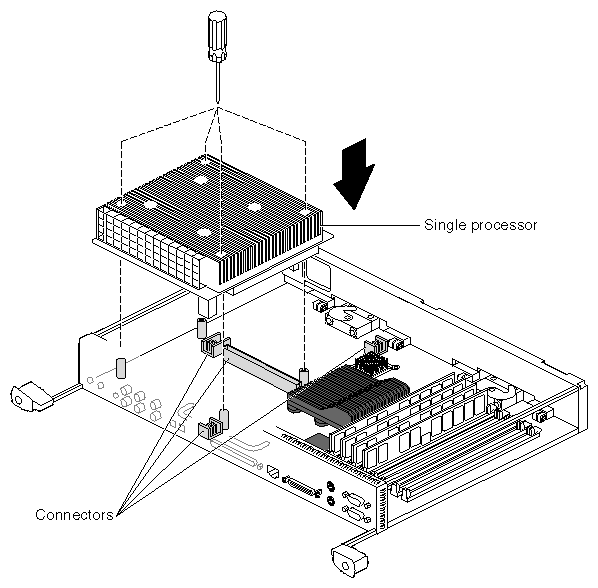
Figure 2-16 shows a dual processor installation.
You are finished replacing the CPU and are ready to reinstall the system module.
To install or remove memory, you must power off the workstation, wait 5 minutes to allow the heat sinks to cool, and attach the wrist strap. Then remove the system module. Follow the instructions for “Preparing the Workstation” through, “Removing the System Module.” Then return to this page.
| Caution: Dual inline memory modules (DIMMs) are extremely sensitive to static electricity. Handle the DIMMs carefully and wear the wrist strap to avoid the flow of static electricity. |
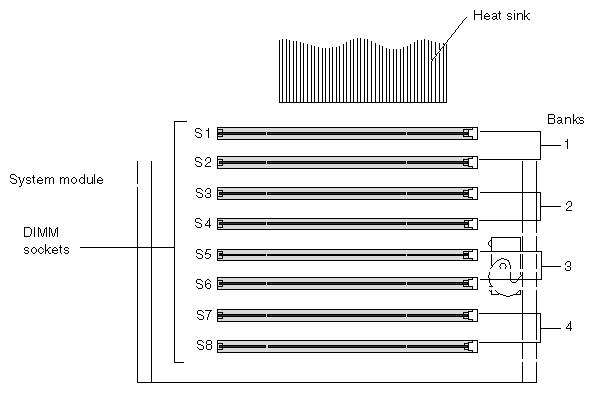
The Octane2 workstation has four DIMM banks with two DIMM sockets in each of the banks. Before you install the two 1 GB DIMMs, review the following information:
The highest density DIMMs must be installed in Bank 1, while lower density DIMMs must be installed in the remaining banks by order of their size (highest density first).
Banks must be filled sequentially; when Bank 1 is full, fill Bank 2. Do not skip banks.
Each bank must be empty, or contain two DIMMs, one in each of the two sockets.
Capacity refers to the number of megabytes or gigabytes of memory in a DIMM: 32, 64, 128, or 256 MB, and so on, or 1 GB.
Minimum memory capacity is 64 MB (2 x 32 MB DIMM).
Maximum memory capacity is 8 GB (8 x 1 GB DIMM).
Minimum memory configuration is 64 MB in a bank (2 x 32 MB DIMM).
Maximum configuration is 2 GB in a bank (2 x 1 GB DIMM).
Figure 2-17 shows the four Octane2 DIMM banks, with two DIMM sockets in each bank.
If you did not power off your workstation, wait 5 minutes to allow the heat sinks to cool, attach the wrist strap, and remove the system module, follow the instructions for preparing your workstation beginning on page 32.
With the system module lying on a flat, dry, antistatic surface, locate the DIMM banks and sockets, as shown in Figure 2-17 and Figure 2-18.
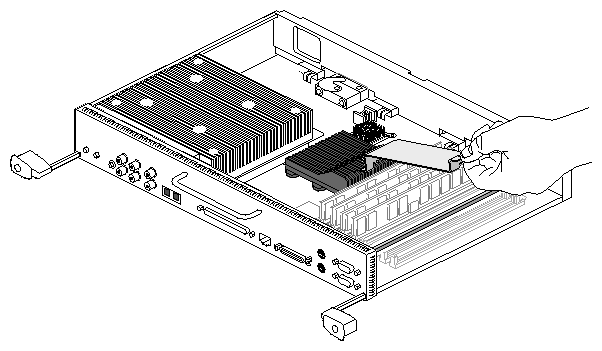
If a DIMM bracket is not installed (see Figure 2-18), skip this section. If a DIMM bracket is installed, as shown in Figure 2-19, you must remove it as follows:
Remove the DIMM bracket from the rail by pushing it toward the heat sink (see the warning on page 32), and bowing the bracket upward, as shown in Figure 2-19.
Slide the bracket off the heat sink.
Caution: Memory modules are extremely sensitive to static electricity. Handle the modules carefully, and wear the wrist strap.

Note: The DIMM bracket is not required for normal operation of your workstation. It was installed in your workstation to protect the DIMMs during shipping. Store the DIMM bracket in a safe place. If you need to ship your workstation, reinstall the bracket to protect the DIMMs.
Memory modules are extremely sensitive to static electricity. Handle the modules carefully, and wear the wrist strap while removing them.
Locate the DIMMs you want to remove.
Caution: Do not touch the connector near the DIMM removal levers. Remove the DIMMs.
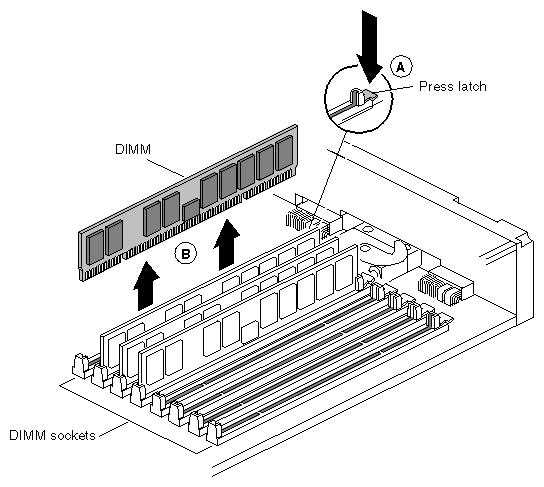
Press down on the latch at the end of the DIMM socket (see A in Figure 2-20). The DIMM partially ejects from the socket.
Remove the DIMM (B).
Note: Both sockets in a DIMM bank must be either empty or populated. If you are removing one DIMM and not replacing it immediately, also remove the other DIMM in the bank and replace it when you install a new DIMM.
If you did not power off your workstation, wait 5 minutes to allow the heat sinks to cool, attach the wrist strap, and remove the system module, follow the instructions for preparing your workstation beginning on page 36. Then follow these steps:
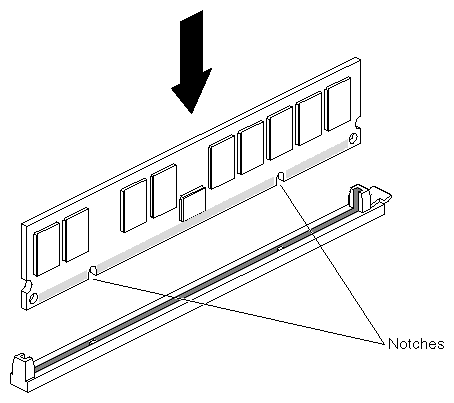
Insert the DIMM into the socket, gently but firmly.
You hear a click as it is seated, and the latch on the end of the socket moves up.
DIMMs are notched on the bottom, as shown in Figure 2-21, so that they cannot be inserted incorrectly.
Check to be sure both sockets in the bank are full. DIMMs must be installed in pairs.
You are finished installing memory and are ready to reinstall the system module.
Remove the caps on the compression connectors on the back of the system module, as shown in Figure 2-22. Do not touch the system module compression connectors as you lift the module into the workstation.
Caution: Do not insert the system module into the workstation unless the power cable is unplugged from the electrical socket. If you insert the system module into the Octane2 workstation with the power cable connected to an electrical socket, the workstation will be damaged.
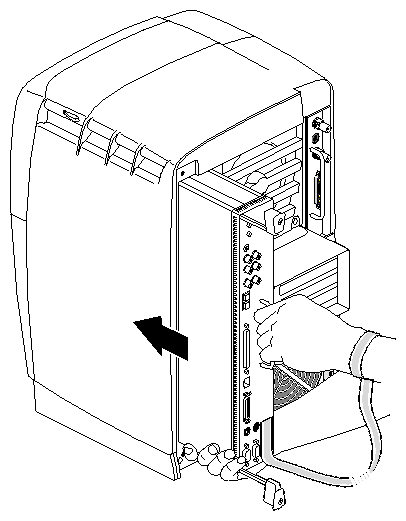
Grasp the system module by its immovable handle and support it with one hand as you slide it into the chassis, as shown in Figure 2-23. Then push the system module completely into the chassis (both sliding handles protrude).
The system module stops when it is slightly out of the chassis.
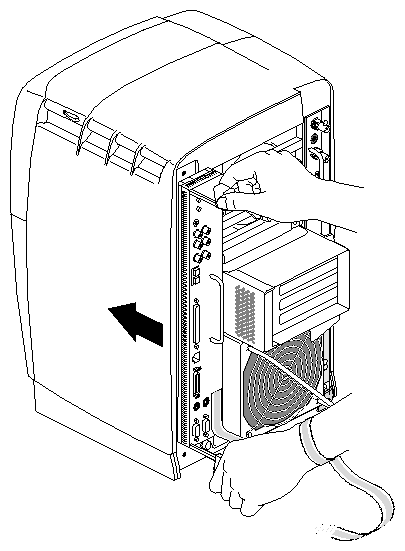
Push both sliding handles simultaneously to connect the system module to the workstation, as shown in Figure 2-24. Then push firmly on the sliding handles to completely lock the system module to the workstation.
The system module is fully seated and locked to the workstation when it is flush with the chassis and the sliding handles are completely recessed.
Tighten the captive screws in the sliding handles until the system module is attached to the chassis, as shown in Figure 2-25.
Remove the wrist strap.
Reconnect any cables you removed, as shown in the example in Figure 2-26.

Plug in the power cable (see A in Figure 2-27).
Press the monitor power button (C) to turn on your monitor.
Note: If the workstation does not boot, reseat the system module.
-
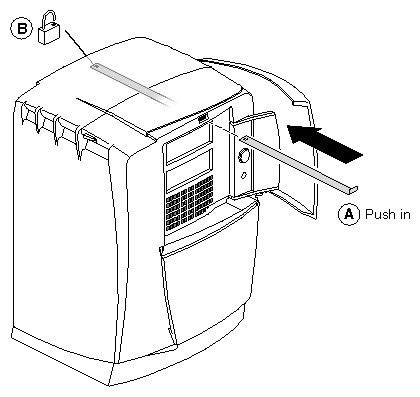
Open the cover on the front of your workstation.
Slide the lockbar into the lockbar slot (see A in Figure 2-28).
Insert the lock (B) through the lockbar at the back of your workstation.

After you power on your system, choose Toolchest > System Manager > Hardware and Devices > About This System and check the amount of memory displayed for Main Memory.
The displayed memory should equal the original amount of memory minus any memory you removed, plus the amount of memory you installed. For example, if you originally had 256 MB, removed two 32 MB DIMMs, and then installed two 1 GB DIMMs, the System Manager should display 2.192 GB of memory.
If the amount of memory is incorrect, follow the directions at the beginning of this chapter to power off your system and check the installation or removal procedure.
Check the angle of the DIMMs. They should be upright and completely seated.
Check that each bank is populated with two DIMMS, and that they are the same type. You must have an even number of DIMMS installed.
Recheck the installation procedure, then power on your workstation. If the amount of memory displayed in About This System is still incorrect, refer to Chapter 8, “Troubleshooting”.