This chapter includes these sections:
DAT Manager is an audio tool that lets you control a digital audio tape (DAT) drive attached to the SCSI port on the back of your workstation. To use DAT Manager, you must have an IRIS that supports audio.
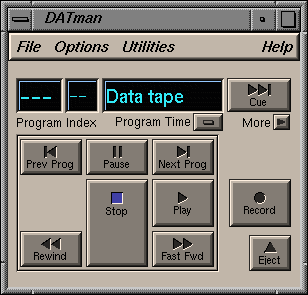
DAT Manager is installed automatically as part of the standard system software on IRIS systems that support audio. DAT Manager is shown in Figure 10-1.
| Note: A more recent tool for DAT play and capture is DAT Player . |
A couple ways to launch DAT Manager:
From the command line (Unix shell), type: datman.
Click the words DAT Manager to open DAT Manager now.
To play a tape using DAT Manager:
Insert a tape into the drive.
The desktop icon for the drive changes to indicate it is loaded.
Click the Play button on the DAT Manager control pad.
You begin to hear music and the program time begins to advance. If the music is too soft or loud, see “Adjusting the Volume of Your Tape.”
To stop the music, click the Pause or Stop button on the DAT Manager display.
| Note: Use the controls on the DAT player rather than the controls in DAT Manager if your player is attached to the line in or digital in jack on the back of your workstation. |
Use the Audio Control Panel to adjust the volume. To open the panel, choose “Audio control panel” from the Utilities menu, or click the words Audio Control Panel now. Move the Speaker sliders up and down to adjust the volume.
You can move to a particular program or time on the tape.
To advance to a particular program, highlight the program number in the Program field, type the number of the program you want, then click the Cue button or press <Enter>.
Some programs are separated into Indexes. You can type an index number in the Index field the same way you type in a program number. Click the Cue button or press <Enter> to change to the chosen index.
To move to a particular point of time on the tape, highlight the time in the Time display in the main portion of DAT Manager window, then type the time you want to move to. Press the Cue button or press <Enter>. The tape advances to the chosen point of time.
Use DAT Manager to record from a tape into an audio file if your DAT drive is attached to the SCSI port on the back of your workstation. Note that recording copyrighted material is subject to copyright laws.
To record from a tape to a file:
Insert a tape into the drive.
The desktop icon for the drive changes to indicate it is loaded.
Choose “Open `Record To' file...” from the File menu.
A file browser appears.
Type a name for the file you're going to create, then click Accept.
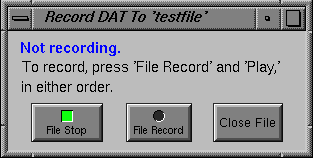
The “Record DAT to...” window appears as shown in Figure 10-2.
When you're ready to record, click the File Record button.
The red light goes on.
Click the Play button in the main DAT Manager window.
The tape begins recording into the file.
To stop recording, click the File Stop button.
You can continue recording into the file by clicking the File Record and File Stop buttons until you're ready to stop recording.
When you've finished recording, click the Close File button to close the file.
A window appears asking you to confirm that you want to close the file. Click Close File again to confirm.
Use DAT Manager to record to a tape if your DAT drive is attached to the SCSI port on the back of your workstation. Note that recording copyrighted material is subject to copyright laws.
To record from an audio file to a tape, follow these steps:
Insert a tape into the DAT drive.
You can use a blank tape, another audio tape, or a data tape that you don't want.
If you use a data tape, be sure to write-enable the tape before you insert the tape into the drive. If the tape is not write-enabled, you will not be able to record. Recording onto a data tape erases all data from the tape.
Choose “Open `Record From' file...” from the File menu.
A file browser appears.
Scan through the directories until you find the file you want, then click the Accept button.
Click the Record button.
The file begins recording to the tape.
To stop recording, click the Stop button.
Select “Close `Record From' file...” from the File menu to close the audio file.
The DAT Manager display consists of the Program field, index field, time display, Cue button, More button, and control pad. This section includes:
The Program field displays the current program number. Advance to the next program by clicking the Next Prog button on the control panel. Go back to the previous program by clicking the Prev Prog button on the control panel.
Times are shown as hours:minutes:seconds:frames. Three different timecodes can be recorded onto a DAT tape.
| Absolute Time | Absolute time is a continuously incrementing time that starts from zero at the beginning of the tape. | |
| Program Time | Program time is the time from the start of the current program. | |
| Running Time | Running time is a continuously incrementing time that starts from an arbitrary time at the beginning of the tape. This field is often used to record SMPTE timecode. |
Press the button below the time display to choose a type of measurement. If the window is expanded to its full size, you can view all three time displays at once. One appears above the Pause button. The other two appear in the catalog display area.
| Note: When a timecode is not recorded on the tape, the display shows hyphens, “--”, instead of digits, “01.” It is common for only a single time code or no time code at all to be recorded. DAT Manager records only absolute time. |
The Cue button allows you to move to a particular program, index, or point of time on a tape. To move to a particular location on the tape:
Highlight the Program, Index, or Time display field.
Type in the particular program number, index number, or time you want to move to.
Click the Cue button. The tape moves to the chosen location.
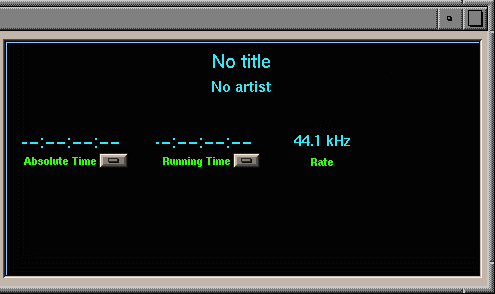
Click the More button in the main DAT Manager window, and further information about the tape you are playing appears as shown in Figure 10-3.
You see a second and third Time display to let you view program time, absolute time, and running time all at once. To the right of these displays is the sampling rate of the tape.
To hide the window, click the Less button in the main DAT Manager window.
Use the buttons on the DAT Manager control pad to play and eject the tape.
Use the following buttons to:
| Play | Play the tape. | |
| Stop | Stop the tape. | |
| Pause | Pause the tape. Click the Play button to resume play. | |
| Fast Fwd | Press down on the button to fast forward until the button is released; or click the button once to fast forward. Click the Pause or Stop button to stop. | |
| Rewind | Press down on the button to rewind until the button is released; or click the button to rewind. Click the Pause or Stop button to stop. | |
| Next Prog | Advance to the next program on the tape. | |
| Prev Prog | Go back to the previous program on the tape. | |
| Record | Record to tape from an audio input or a file. | |
| Eject | Eject the tape. |


