This chapter includes these sections:
CD Manager lets you play compact discs. You can quickly move from one track to another, stop or pause the playback, and create a catalog for each CD.
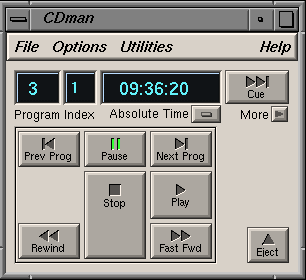
Use CD Manager to play a CD from your SCSI compact disc drive. Use the controls on the compact disc player rather than the controls in CD Manager if your player is attached to the line in or digital in jacks on the back of your workstation. CD Manager is shown in Figure 9-1.
| Note: A more recent tool for playing CD's is CD Player . |
A couple ways to launch CD Manager:
From the command line (Unix shell): cdman.old
Click the words CD Manager to open CD Manager now.
To play a CD using CD Manager:
Insert the compact disc into the disc drive.
The desktop icon for the CD-ROM drive changes. A few musical notes appear to indicate you have loaded a music CD.
Click the Play button on the CD Manager.
You begin to hear music and the program time begins to advance. If the music is too soft or loud, see “Adjusting the Volume of Your CD.”
To stop the music, click the Pause or Stop button on the CD Manager display.
Click Pause if you want to continue playing from the same location. Click Stop to stop playing and return to the begin of the disc.
Use the Audio Panel to adjust the volume. To open the panel, choose “Audio panel” from the Utilities menu, or click the words Audio Panel now. Move the Speaker sliders up and down to adjust the volume.
You can move to a particular program or time on the CD.
To advance to a particular program, highlight the program number in the Program field, type the number of the program you want, then click the Cue button or press <Enter>.
Some programs are separated into Indexes. You can type an index number in the Index field the same way you type in a program number. Click the Cue button or press <Enter> to change to the chosen index.
To move to a particular point of time in the CD, highlight the time in the Time display in the main CD Manager window and type in the time you want to move to. Press the Cue button or press <Enter>. The CD advances to the chosen point of time.
You can catalog a CD so that each time you play it, the title of the CD, the artist, and the individual track titles are displayed. To do this:
Insert the CD into the compact disc drive.
The desktop icon for the CD-ROM drive changes. A few musical notes appear to indicate you have loaded a music CD.
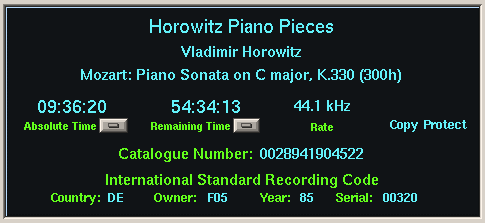
Use the right side of the CD Manager window. See Figure 9-2.
If the right portion of the window is hidden, click the More button to reveal the catalog area.
Highlight the phrase “Enter CD Title Here” in the catalog form, type the name of the CD, then press <Enter>.
Highlight the phrase “Enter CD Artist Here,” type the name of the artist, then press <Enter>.
Highlight the track title field, type the name of the track, then press <Enter>.
Click the Next Track button in the main portion of the CD Manager display, then enter the name of the next track.
Continue to click the Next Track button to enter the names of all the tracks.
The information is saved in a directory called .cddb in your home directory. Whenever you insert the CD into your compact disc drive, the information you entered will appear in the CD Manager catalog display.
| Note: If you've already created a database of CDs in the CDPlayer application, you can merge this database with the CD Manager database using the cddbcvt command. See the cddbcvt command man page for instructions on how to merge these two databases. |
Use CD Manager to record from a CD into an audio file if your compact disc drive is attached to the SCSI connector on your workstation. Note that recording copyrighted material is subject to copyright laws.
To record from a CD to a file:
Insert the CD into the drive.
The desktop icon for the CD-ROM drive changes. A few musical notes appear to indicate you have loaded a music CD.
Choose “Open `Record To' file...” from the CD Manager File menu.
A file browser appears.
Type a name for the file you're going to create, then click Accept.
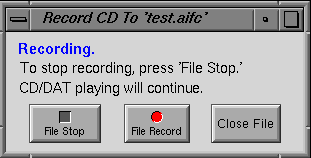
The “Record CD to...” window appears as shown in Figure 9-3.
Click the File Record button.
The red light goes on.
Click the Play button in the main CD Manager window.
The CD begins recording into the file.
To stop recording, click the File Stop button.
You can continue recording into the file by clicking the File Record and File Stop buttons until you're ready to stop recording.
When you've finished recording, select Close File to close the file.
A window appears asking you to click again to confirm that you want to close the file. Click the Close File button again. The file closes.
The CD Manager display consists of the Program field, Index field, Time display, Cue button, More button, and control pad. This section includes:
The Program field displays the current program number. Advance to the next program by clicking the Next Prog button on the control panel. Go back to the previous program by clicking the Prev Prog button on the control panel.
The Time display shows the minutes, seconds, and frames for a chosen type of time measurement. Press the button below the time display to choose a type of measurement. Time measurement choices include:
| Program time | The amount of time elapsed from the beginning of a chosen program. | |
| Absolute time | The amount of time elapsed from the beginning of the CD. | |
| Remaining time | The amount of time left on the CD. |
If the window is expanded to its full size, you can view all three time displays at once. One appears above the Pause button. The other two appear in the catalog display area.
Use the buttons on the CD Manager control pad to play and eject the disc.
| Play | Play the CD. | |
| Stop | Stop play and reset the CD to the beginning. | |
| Fast Fwd | Press down on the button to fast forward until the button is released; or click the button once to fast forward. Click the Pause button to stop. | |
| Rewind | Press down on the button to rewind until the button is released; or click the button to rewind. Click the Pause button to stop. | |
| Next Prog | Advance to the next program. | |
| Prev Prog | Go back to the previous program. | |
| Eject | Eject the CD. |
Figure 9-4 shows the catalog area of the CD Manager window. If you don't see this by default, click the More button to reveal it.
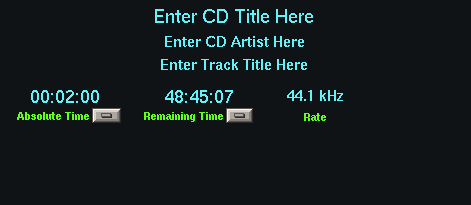
You can enter the title, artist, and track titles into this catalog. The information is stored in a database and appears each time you insert the CD into the drive. To learn how to enter the information into the database, see “Using the Music Catalog.”
A second and third time display lets you view program time, absolute time, and running time all at once. To the right of these displays is the sampling rate of the CD.
Some CDs may have a catalog number or International Standard Recording Code information. These displays appears only if the information exists on the CD.
To hide this window, click the Less button in the main CD Manager window.