This chapter includes:
This section includes:
DAT Player has three primary functions for systems with DAT drives:
Enables you to play audio Digital Audio Tapes (DATs) over your workstation.
Displays a catalog of DAT content.
Provides convenient DAT capture for audio production.
DAT Player automatically captures each track on a tape as an AIFF file. These files are displayed in the Track List as files you can copy to disk.You can also select any range of audio on the tape and save the selection as a new file.
This document follows these conventions:
Links in italics launch a term definition. For example, click: AIFF.
Red words indicate “launch links,” meaning that if you click them, they launch the tool that they name.
The symbol “>” between a menu names menu items indicates a path to a menu choice. For example, “File > Open” means “Open the File menu and choose Open.”
To open DAT Player, launch it from the command line (in a UNIX shell), type: datplayer
| Note: The DAT tools (DAT Player and DAT Manager) are not officially supported for this software release. |
| Note: When you launch DAT Player or insert a DAT in the DAT drive, DAT Player begins scanning the DAT in order to display the content in “The Track List.” Note that if you play a DAT without scanning it first, the DAT content appears as it is played. For example, say you click the scan Stop button after three tracks are scanned, then click the Play button. As the third track ends and the fourth track begins to play, the fourth track information appears in the Track List. In effect, the Track List is built as the DAT plays. |
Insert the tape into the DAT drive and start DAT Player.
A dialog appears indicating that the DAT is being scanned. It is not necessary to scan a tape in order to play it. If you play a DAT without scanning it first, the DAT content appears as it is played. For example, say you click the scan Stop button after three tracks are scanned, then click Play. As the third track ends and the fourth track begins to play, the fourth track information appears in the Track List. In effect, the Track List is built as the DAT plays.
Click the Play button.
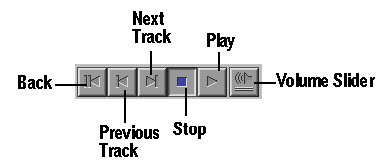
Figure 8-2 points out what each transport control does. Note that when you the click Stop button, DAT Player holds the stopping point. This means that when you click the Play button again, it begins playing from the point you stopped at—like a “Pause” button. To return to the beginning of the tape, click the Back button.
If the music is too soft or loud, see “Adjusting Volume.” For information about selecting certain tracks to play, see also “Moving to a Location on the Tape.”
Use the Volume button (shown in Figure 8-2) to adjust volume of the tape. When you click the Volume button, a slider appears. Moving the slider up raises the volume; down lowers it.
| Note: DAT Player volume operates independently of the Audio Panel volume and other applications with volume settings. |
This section includes “Capturing Audio Tracks” and “Capturing a Selected Range of Audio.” Note that capturing copyrighted material is subject to copyright laws.
Copying a DAT track to your system disk is easy:
Select the track.
See “Moving to a Track” for information on locating the track. A track icon highlights in the Track List when it is selected.

Tip: You can select more than one icon at a time by holding down the Shift key while making additional selections. Choose File > Save Track As... to save the track as a new file.
To save a section of a tape as a new file:
Select a section:
Select (or re-select) by clicking and dragging out a section of the Tape timeline (shown in Figure 8-1). The range of time currently selected is represented by the numbers in the lower left corner of the DAT Player window.
Make sure that Play Selection is enabled. The Play Selection command is under the Options menu.
Listen to the selected section by clicking the Play button.

Note: See also “Moving to a Location on the Tape” for information that may help you locate the section you want to capture. Also, “Using Play Options” describes options such as loop playback.
Choose File > Save Selection As... .
A file browser appears. Type in a name for the new file you are creating, then press the Enter key.
This section includes “Moving to a Track” and “Moving to a Specific Time.”
To advance to a specific track, just click the track number button in the track button area.
You can also click the Next Track or Previous Track buttons (shown in Figure 8-2).
| Note: Alternatively, you can highlight the Track number in the Track field, and type the number of the track you want, then press Enter. |
You can move to a specific time by editing the Absolute or track time fields:
The Absolute field represents time elapsed from the beginning of the tape. For example, it would say “00:00:50” if you pressed the Stop button 50 seconds into the tape. The track time field (the larger number display in the lower left corner of the DAT Player window) represents the amount of time elapsed from the beginning of the current track.
Time is presented as HH:MM:SS, where H= hours, M = minutes, and S = seconds.
To edit either of these fields, click the numbers. Then, enter a time and press Enter.
| Note: In locating a place on a tape, it can be helpful to look at the track Start and Duration fields. Start indicates the point on the tape that the track begins, and Duration indicates how long the track is. |
DAT Player provides a way to fill out a Track List of a tape—you need to do this only once. After the initial list is created, DAT Player will recognize the tape the next time you use it, and will display the relevant track list.
To fill out the track list for a DAT:
Insert the tape into the DAT drive and start DAT Player.
Enter the title and artist in the Title and Artist fields.
Fill in the Track Titles—track icons are listed in the order they occur on the tape.
To edit each Track Title field, click the field, enter a new track title, then press Enter.
| Note: Track icons in the Track List can be dragged to other locations on your system—see “Capturing Audio Tracks.” |
To set repeat playing, select Options > Repeat Options, then choose from “No Repeat,” “Repeat DAT,” and “Repeat Track.”
To set a selection to play repeatedly, select Options > Loop Selection. To turn off Loop Selection, select it again.
“Play Selection” is also under the Options menu. If you click the Play button when Play Selection is enabled, the current selection plays.
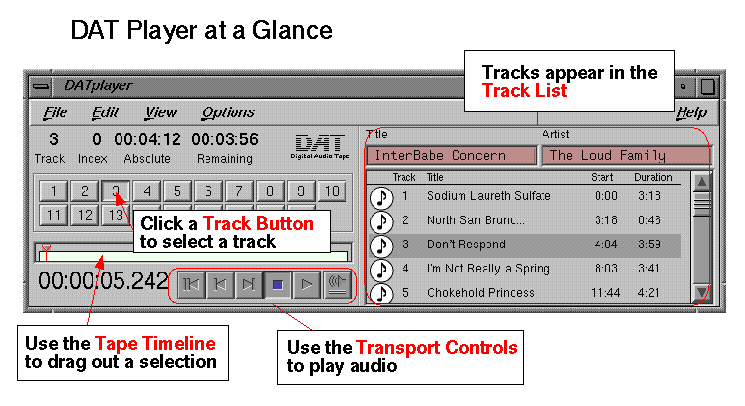
The following sections contain overviews of DAT Player features. Refer to Figure 8-1 for a diagram with feature call outs.
The DAT Player menus are: “The File Menu,” “The Edit Menu,” “The View Menu,” and “The Options Menu.”
| Save Track As... |
| |
| Save Selection As... |
| |
| Eject | Ejects the tape from the DAT drive. | |
| Exit | Exits program. |
| Copy Selection |
| |
| Select All | Selects the entire track. | |
| Select None | Removes any selection. | |
| Extend Selection Right |
| |
| Extend Selection Left |
|
| Track List | Opens and closes “The Track List.” |
| Continue Scanning DAT |
| |
| Rescan DAT |
| |
| Repeat Options | Offers choices for repeat playing of audio on tape. | |
| Loop Selection | This command turns loop selection mode on and off. If you click the Play button when Loop Selection is enabled, the current selection plays repeatedly. | |
| Play Selection | This command turns play selection mode on and off. If you click the Play button when Play Selection is enabled, the current selection plays. |
Indicates which track is currently playing or set to play. You can edit this field to move to a different track.
If you are using a tape with indices, this field displays the current the index number within the current track.
Represents amount of time elapsed from the beginning of the tape. For example, it would say “00:00:50” if you pressed the Stop button 50 seconds into the tape. You can edit this field to move to a specific time. Time is presented as HH:MM:SS, where H= hours, M = minutes, and S = seconds.
Represents the amount of time left on the tape. Time is presented as HH:MM:SS, where H= hours, M = minutes, and S = seconds.
A track button is displayed for each track in the currently loaded tape. To advance to a certain track, click the number of the track you want to play.
Represents the timeline of the currently loaded DAT. You can select a range of audio by clicking and dragging out a section of the timeline.
The track and selection times appear in the lower left corner of the DAT Player window.
Represents the amount of time elapsed from the beginning of the current track. Time is presented as HH:MM:SS.sss, where H = hours, M = minutes, S = seconds.
Use the transport controls to play a file. See Figure 8-2.