This chapter contains these sections:
This section includes:
Sound Track is a program for creating and editing multitrack audio compositions. It is designed to be a companion tool to Movie Maker and Adobe Premiere™ on Silicon Graphics, Inc., workstations; and to be used in the creation of multi-element soundtracks for movies, commercials, audio CDs, computer games, Web pages, and presentations.
For example, some of the things you can do with Sound Track are:
Record and edit sound clips from multiple sources. Then, mix them down into a single audio file, to which you can assign audio parameters such as format and sample rate.
Edit a sound file by cutting, copying, and pasting selected regions. You can also cut, copy, and paste between Sound Track and other digital media tools, such as Movie Maker .
Add effects such as fade in and fade out.
Record and edit voice-overs for a music track.
Insert program and index markers in an audio project, which you can then export to DAT and use as a master tape for duplication.
| Note: To capture audio from a CD in your CD-ROM drive use CD Player instead of Sound Track. See “Capturing Audio From a CD-ROM.” |
The following images offer a visual overview for the new Sound Track user. Click any image to display an enlarged view of the image in a separate window. To understand the concepts of “clips” and “tracks” you may need to first see “Working With Clips” and “Working With Tracks.”
This document follows these conventions:
Links in italics launch a term definition. For example, click: sample rate.
Red words indicate “launch links,” meaning that if you click them, they launch the tool that they name, for example: Sound Track .
The symbol “>” between menu names and menu items indicates a path to a menu choice. For example, “File > Open” means “Open the File menu and choose Open.”
To launch Sound Track immediately, double-click this launch link: Sound Track .
To launch it by clicking an icon:
From the desktop Toolchest, choose Find > Media Tools.
Double-click the Sound Track icon.
To launch it from the command line, type: soundtrack
This section includes “About Projects,” “Building a New Project,” and “Moving and Copying Projects.”
You create a project so that you can work with more than one sound clip at a time. Once your project is complete, you can export it as a single sound file with all clips mixed together.
A project consists of a master project file, associated sound files, and waveform plotting files. When a project is opened in Sound Track, you can play the entire project at once, selectively play and edit it, or export it, mixing all elements down into a single sound file.
When you view the contents of a project in Sound Track, each file in the project is represented by at least one clip on one track. Some files may occupy clips on more than one track because they contain multiple channels. For example, a stereo file contains two channels. On import or recording, each channel of the file is split out to an independent track so that it can be separately edited.
In working with projects and files, keep in mind that the New, Open, Save, and Save As... commands operate only at the project level. The Import and Export commands operate on individual sound files, which are used for data exchange with other sound programs.
| Note: The name of the master project file is the official project name, and the one you select when you want to open the project (see “Opening a Project”). All sound files and waveform plotting files referenced in the project are automatically given the project name as a prefix to aid in identifying them as linked to the project. |
This section describes the basic steps in building a project, with links to more details.
(optional) Use the New Project Dialog.
The default project format is 44.1K sample rate and 16-bit sample width. Also by default, the project contains four tracks and is saved in your home directory. To customize any of these parameters, open the New Project dialog by choosing File > New.
In the Project Directory field, enter the pathname of the directory where you want your project to reside.
(optional) Edit the Initial Number of Tracks field to change the default number. (You may want to see “About Tracks.”) Note that tracks can be created and deleted at any time.
(optional) Choose the sample rate you want to use for all audio that will be included in the project.
(optional) Choose a sample width for the new project.
The dialog helps you choose these parameters by supplying audio quality and disk space information, based on your choices. This is further described in “Controlling Disk Space Factors.”

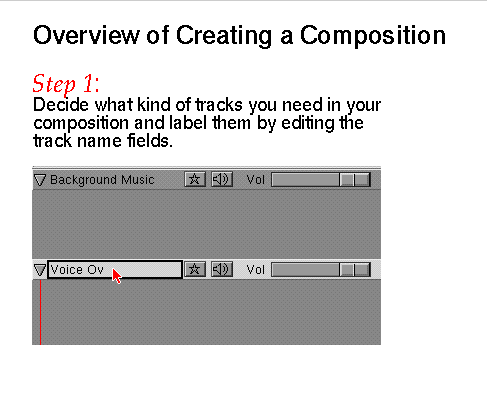
Tip: Choose the highest sample rate and sample width that you think you might use. You always have the option of exporting at lower rates to save disk space, but it is not possible to improve quality by raising these rates after clips have already been recorded or imported into the project. Decide what kind of tracks you need in your project, and label them accordingly.
For example, do you need background music and narration? Do you need a sound effects track? See “Naming Tracks” for instruction.
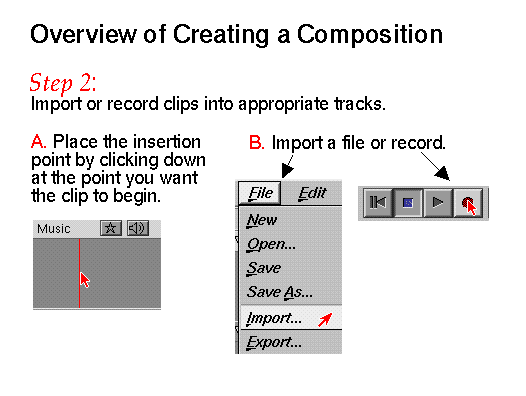
Import or record clips into the appropriate tracks.
See “Recording” and “Importing a File” for details.
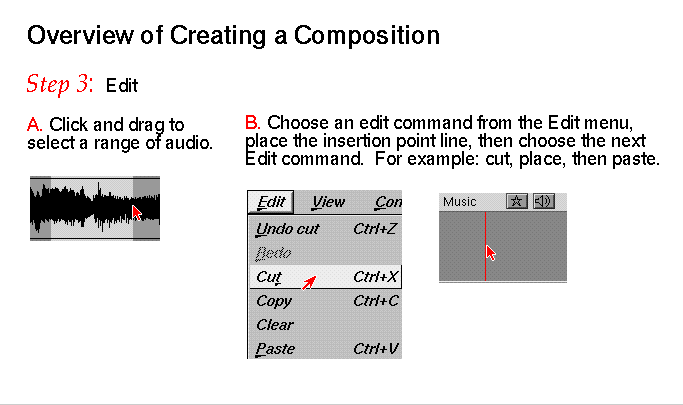
Edit.
See “Editing” for details.
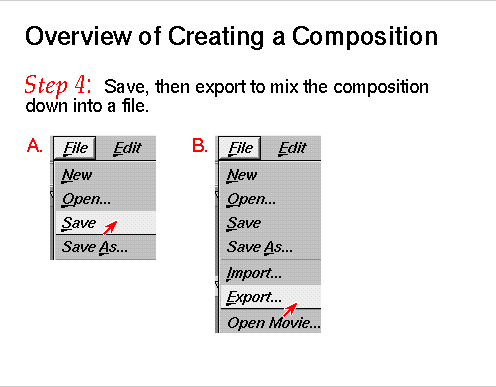
Choose File > Save.
You are prompted to give your project a name when you choose “Save...” or “Save As...”.
If desired, export the project as a file or copy it to a Digital Audio Tape.
To mix the project down into one file, you must export it. See “Exporting Files” for details.
If you want to move or copy a Sound Track project to a new location, it is important to understand that a project consists of a master project file as well as a collection of associated sound files.
To move or copy a project, you have a couple options:
Using the desktop environment, you can drag the project folder (or a copy of the folder) to a new location.
Using a shell, you can use the cp(1M) or mv(1M) commands to move the entire directory. Note also that, from the location of the project directory, you can copy or move projectname*, where projectname is the name you gave the project when you saved it, because Sound Track uses the project name as a prefix for all project files.
There are three different ways to create a new sound file; all of them involve using the File > Export... command:
Record and export
Use Sound Track to record sound (see “Recording With Sound Track”) and then use the “Export...” function to save it as an audio file.
Import, edit, and export
Import an audio file, edit it, and then use “Export” to save it as an audio file.

Note: For creating and editing single-track audio files, you may find the Sound Editor tool more convenient. Sound Track includes all of the Sound Editor functionality, plus a lot more, which makes Sound Track more complicated. Export a project as a sound file
Open or build a project (see “Building and Managing a Multitrack Project”) and then use “Export” to export all or part of it as an audio file.
As explained in “About Projects,” projects and files are different and are therefore handled differently by Sound Track, as described in “Importing a File” and “Opening a Project.”
To open an audio file in Sound Track, choose File > Import File... . Use Import any time you need to bring an audio file into Sound Track, such as when you are inserting a file as a new clip on a track. The file appears at the insertion point, which is the current location of the time indicator (red line). See also “Placing the Insertion Point.”
| Tip: If you wish to import the audio track of a movie file, you can select the movie file in the Import... file browser—Sound Track will import the movie's audio track. |
Important: Before you import a file that contains more than one channel, use the cursor to drag out a selection of the correct number of tracks (you may need to create more tracks to accomodate the channels—see “Creating and Deleting Tracks”). For example, if you are importing a stereo file, you need to first select two tracks, because stereo files contain two channels. If the correct number of tracks are not selected, channels that do not fit into the current selection will not be imported.
When you export your project (mixing it down into a single audio file) you may want to make sure that the audio file takes up as little space as reasonably possible—especially if you want to put it on the Web. Sound Track displays disk space information in the top right-hand corner of the window.
The amount of space an audio file takes up is primarily dependent on the following factors, which you can adjust to meet your needs:
Length of time of composition
The longer the composition, the more disk space is taken up.
Sample rate and sample width
The New Project dialog displays quality and disk space information based on which sample rate and sample width you choose.
The sample rate is the speed at which audio samples are recorded and played back. Higher sample rates result in higher quality at the expense of larger file size. Typically, 8 kHz is fine for human voice recording. Audio CDs are recorded at 44.1 kHz, and audio DATs are recorded at 32, 44.1, or 48 kHz
The sample width is the number of bits used to represent a single sample of audio data, typically expressed in multiples of 8 bits (8, 16, or 24). Larger widths allow for greater dynamic range and precision, both of which influence audio quality. Higher sample widths also mean larger file sizes.
Number of channels
You can choose the number of channels.
Amount of compression used
You can compress an audio file when you export it (see “Exporting Files”). See also “Chart of Audio Compression Schemes.”
The sample rate and sample width of the current composition are displayed at the top center of the Sound Track window.
Also, to get information from a file icon:
Select the audio file icon.
Hold down the right mouse button to display a menu.
Choose “Get Sound Info.”
A window appears that lists a number of parameters, including the sample rate and sample width. Sample width is the first listing next to “Data Format.”
| Note: From the command line (in a Unix shell), you can also use the dminfo(1M) command. |
Table 5-1 below lists some of the different types of audio compression that Sound Track supports. To bring up a separate, printable window of this table, click the blue title.
Table 5-1. Informational Chart of Audio Compression Schemes
Audio Compression Scheme | Approximate Level of Compression (based on compressed file size vs. 16-bit uncompressed file size) |
|---|---|
G711 Mu-law | Results in file 2 time smaller. |
G711 A-law | Results in file 2 times smaller. |
G722 | Results in file 4 times smaller. |
MPEG-1 | Results in file about 2 to 24 times smaller, depending on chosen quality level. |
AWARE | Results in file 2 to 3 times smaller. |
This section explains “Recording With Sound Track,” “Setting the Input Source,” and “Synchronizing to Movies.”
Make sure the source (e.g., microphone or VCR) you are recording from is connected, and selected with the Audio Panel . See “Setting the Input Source” for details.
Use the cursor to set the point in Sound Track at which you wish to start the recording.
To record into a single track, set the insertion point in that track.
To record into all tracks, set the insertion point in “The Time Ruler.”
See “Placing the Insertion Point” for details. Note that all tracks that are currently selected will be recorded to, unless the track Input menu button is set to None.
Tip: Markers can be very helpful in marking points or sections where you want to record later. See “Using Markers” for details. Click the Record button (shown in Figure 5-6).
Note: If there are parallel tracks in the project, they will play as you record. To silence another track for recording, click the Mute button on the track's control bar (shown in Figure 5-8). Begin playing the sound you want to record. For example:
If you are recording your voice, begin speaking into the microphone.
If you are recording from a device, such as a video cassette recorder, connected to the Line In port, click the Play button on the device.
To stop the recording, click the Stop button (shown in Figure 5-6).
If necessary, delete any unwanted parts of the recording. See “Deleting Regions of Sound.”
To capture audio from a compact disc (CD), use CD Player . CD Player displays each track as an individual audio file. You can select a track or a section of the CD, copy it, and then paste it into Sound Track. The pasted section appears at the insertion point.
To record from your CD-ROM drive, see “Capturing Audio From a CD-ROM.”
Use the Audio Panel to select where you want to record from—the microphone or a VCR, for example. To record from a connected microphone or from a device connected to your workstation Line In port:
Choose Default > Input > Analog In.
Position the cursor over the Analog In control panel in Audio Panel.
Hold down the right mouse button and choose Input Source > Microphone or Line In.
| Note: You can find the Audio Panel on the Controls Panels page of your Icon Catalog . |
When you are creating audio for a specific movie, open that movie in Sound Track by choosing Movie > Open. This opens a synchronized movie player. When you click the Sound Track Record button, the movie begins playing at the exact moment that Sound Track begins recording. To locate a place in the movie before recording, scroll through the movie by grabbing and dragging the vertical red line in the movie player timeline. You can also move to a specific time in the movie by editing the movie time display.
When you are done with the synchronized movie player, choose File > Close Movie.
Once you have opened a project, or recorded or imported a sound file, you can edit it in several ways. This section provides instructions for:
| Note: If you are not familiar with the Sound Track concepts of tracks, clips, and markers, refer to: “Working With Clips,” “About Tracks,” and “About Markers.” |
Basic editing with Sound Track includes the following:
To remove a section of audio from a track:
Select the region of audio you want to remove.
See “Selecting Regions of Sound” and “Selecting Clips” for detailed instructions.
Choose “Cut” from the Edit menu.
| Note: Edit > Clear removes sound, but replaces it with silence. |
In a text editor, if you select a word and begin typing, you replace the selected word with the word you type. The same is true with audio in Sound Track. Select a region of sound to replace it.
Select the region of audio you want to replace.
See “Selecting Regions of Sound” for detailed instructions.
Replace the selected audio by doing one of the following:
Replace the audio with silence by choosing Edit > Clear.
Replace the selected region with another audio file by choosing File > Import... .
Replace the audio with a new recording by following the instructions in “Recording.”
Copying, cutting, and pasting within all of the media tools is similar to cutting, copying, and pasting in most text editing applications. When you select a region, then use the Edit > Copy or Edit > Cut command, the data that you selected is stored temporarily in a clipboard.
Select the region of audio you want to copy.
See “Selecting Regions of Sound” or “Selecting Clips” for detailed instructions.
Choose Edit > Copy or Edit > Cut.
Position the insertion point where you want the sound to be pasted.
See “Recording” for details.
Choose Edit > Paste.
The audio is inserted immediately after the insertion point.
| Tip: You can copy and paste audio clips between Movie Maker and Sound Track. To this: select the clip, choose File > Copy, go to the other application, then choose File > Paste. |
Double-click to select the clip.
Drag left or right to move it forward or backward in time.
To move a clip past another clip, hold down the <Ctrl> key while dragging.
| Note: Clips cannot be dragged to different tracks. To move a clip to a different track, use the cut and paste commands. |
The insertion point line is the insertion point for any imported, cut, copied, or recorded clip you bring into a track.
To audibly locate the place you want to make an insertion, use the Play and Stop buttons (shown in Figure 5-6).
Note: To move the insertion point in small increments, use “The Shuttle Slider” (shown in Figure 5-7). Place the insertion point line.
To insert a clip into a single track:
Place the cursor over the place you where you want the sound to occur, then click the left mouse button. A red insertion point line appears on that track.
To insert a clip into all tracks:
Place the cursor over the time in the Time Ruler (shown in Figure 5-8) that you want the sound to occur, then click the left mouse button. The red insertion point line appears on all tracks.
To reposition the insertion point, place the cursor in a different location, then click the left mouse button again.
To select a portion of the track, place the cursor over the waveform, then press the left mouse button and drag the cursor. The selected region is highlighted.
Detailed instructions for drag-selection:
Move the cursor over the clip, then click and hold down the left mouse button.
Continue dragging the cursor to highlight a portion of the waveform.
Release the mouse button when the area you want is highlighted.
| Note: The time range of the region selected is represented in the time display in the lower left corner of the window. You can incrementally resize the selection by clicking on the small arrow buttons under the time display. |
There are useful selection commands under Edit > Select, as follows:
| Select All | Selects all in project, including silent spaces, up to the end of the last clip. | |
| Select All In Range |
| |
| Select To End | Starting from the position of the insertion point, this command selects to the end of track (if there are no current selections). | |
| Select To Beginning |
|
| Note: When one region is selected, you can also continue to select additional regions by holding down the <Shift> key while selecting. To deselect one of the regions, press the <Shift> key and click the selection again. |
| Tip: When trying to pinpoint a start or end point of a region, it is helpful to use “The Shuttle Slider” and “The Zoom Buttons.” |
Clips must be selected before they can be edited. To select a clip, double-click it. The clip highlights when it is selected.
| Note: When one clip is selected, you can also continue to select additional clips by holding down the <Shift> key while selecting. To deselect one of the clips, press the <Shift> key and click the selection again. |
| Note: Clips can also be selected the way any region is selected (as explained in “Selecting Regions of Sound”). |
Resizing a clip is a technique for removing sound from the beginning and/or end of a clip. To resize a clip:
Double-click the clip to select it.
You can select more than one clip for resizing by holding down the <Shift> key.
Click and drag on the very beginning or end of the clip. The parts of the clip that disappear are “cleared,” which means they are replaced with silence.
| Tip: If you have cut a clip, you can restore sections of it by resizing—dragging the clip out at the beginning or ending. |
Clips (shown in Figure 5-5) are recorded segments of audio. They cannot overlap each other on the same track (although different tracks can overlap in time). Also, spaces between clips on a track play as silence. You can edit, cut, copy, and move them as needed.
To find out how to select clips, see “Selecting Clips,” and for other instructions see “Deleting Regions of Sound,” “Replacing Regions With Audio or Silence,” and “Cutting, Copying, and Pasting Regions of Sound.” See also “Moving Clips by Dragging.”
| Tip: You can copy a clip into Movie Maker by selecting the clip and choosing Edit > Copy. Then, in Movie Maker, set an insertion point and choose Edit > Paste. |

This section includes “About Tracks,” “Naming Tracks,”“Collapsing a Clip View,” “Creating and Deleting Tracks,” and “Pan and Track Volume Control.”
Tracks (shown in Figure 5-5) contain a sequence of one or more clips. Tracks make it possible to layer sounds, and are also organizational tools for the project process.
Reasons to use tracks include:
for arranging clips to play simultaneously
for comparing different combinations of sounds to one another by selectively muting and playing certain tracks
to alter pan and track volume on individual parts of a project, for example, to record background music at a lower volume than a voice-over
because you need tracks to preserve the channels in audio that is not monophonic (such as stereo or a multi-channel source like a 4-track tape deck)
for recording from more than one source, because you set individual tracks to record from different sources
This section explains “Naming Tracks,” “Collapsing a Clip View,” “Creating and Deleting Tracks,” and “Pan and Track Volume Control.”
For information on playback control of individual tracks, see “Selective Playing.” For a diagram and explanation of the track control bars, see “The Track Control Bars.”
All tracks are named “Untitled n”—where n is the number of the track—by default. To give a track a specific name:
Double-click the word “Untitled” on the track.
An editing box appears around the word.
Replace “Untitled” with a useful name, such as “Voice Over,” then press the <Enter> key.
| Note: You can use the same name for multiple tracks. |
The clip views for each track appear under the track's control bar. You can hide or “collapse” clip views by clicking on the small triangle next to track's title. Click it again to show the clip view.
The Track menu allows you to create and delete tracks:
When you choose Track > Create, a new track is added under the last selected track in the window. If nothing is selected, the new track is placed under the last track in the window.
When you choose Track > Delete, the tracks that are currently selected are deleted.
Each track contains pan and track volume control sliders, as shown in Figure 5-8. These settings affect audio playback in Sound Track and playback of the exported file, but do not affect recording levels.
The pan slider sets the sound balance between the left and right speakers (for stereo recordings). For example, if the pan slider is pushed all the way to the right, the sound from that track plays out of only the right speaker of a stereo playing device.
The track volume slider sets the track volume level of that specific track only. Moving the track volume slider to right raises the level of that track.
This section contains “About Markers,” “Creating and Deleting Markers,” “Naming Markers,” “Editing Markers,” and “Moving the Cursor to a Specific Marker.”
Markers provide a convenient way to mark specific times and sections for later reference. You can use markers for:
marking selections
marking recording start points
marking places that you plan to use as insertion points
For example, say you have a voice recording from which you want to remove a long pause. Markers, which appear in the time ruler, make it possible to do this with precision. First, you play the track, and as you listen, click the Mark button where the pause starts, then click it again when the pause ends. Next, select one marker and choose Markers > Select to Next > Any. This selects the exact range of sound between the two markers, which you can then delete.
There are two kinds of markers:
Program
Program markers are the kind you use unless you are working on DAT or CD mastering.
Index
Index markers are used in CD or DAT mastering. Program and Index are industry terms: program markers mark the pauses between the cuts (programs) on a CD or DAT, and index markers mark subsections of the programs.
There are three ways to create markers:
Use the Mark button.
To use the Mark button:
Play the region of audio in which you wish to place a marker.
When you hear the point at which you want to add a marker, click the Mark button, and the marker appears in the time ruler.
Note: You can also use the Mark button to create a marker when Sound Track is not playing a file. Choose Markers > New Marker, then “Program” or “Index.”
Choose Markers > Mark Range to create markers at the beginning and end of a current selection.
To delete a marker, click the marker to select it, then choose Markers > Remove Marker. To delete all markers, choose Markers > Remove All.
| Tip: When trying to pinpoint a start or end point of a region, it is helpful to use the “The Shuttle Slider” and “The Zoom Buttons.” |
For organization purposes, it can be useful to label your markers.
Choose Markers > Edit Marker.
Double-click the name field (by default it says “untitled”) to make it editable.
Enter a new name.
Choose Markers > Edit Marker.
Double-click the time field.
Note: You can also edit the name field. Enter a new time.
You can go to a marker by simply clicking on the marker. When you do this, the insertion point line appears at that marker.
You can also choose Markers > Jump to Next (or “Jump to Previous”), and use the rollover menu to choose the type of marker. Selecting “Jump to Next” moves the cursor to the nearest marker on the right. “Jump to Previous” moves the cursor to the nearest marker on the left.
| Tip: If you are using markers a lot, keeping the Edit Marker window open is helpful because it lists all the markers, and clicking on a marker name moves the cursor to that marker location. To open this window, choose Markers > Edit Marker. |
As described in “About Markers,” markers are useful for helping you save regions that you want to select and edit later:
Move the cursor to the beginning or end marker of the region you want to select.
Choose Markers > Select to Next (or “Select to Previous”) and use the Select rollover menu to choose the type of marker you want to select to.
“Select to Next” selects to a marker on the right of the current marker, and “Select to Previous” selects to marker on the left of the current marker.
Alternative Technique: Using the Markers > Edit Markers... window, select one marker in the window, then hold down the <Shift> key while selecting the second marker. The range in between is selected.
The Effects menu contains commands, such as “Fade Out,” that you can apply to selected audio regions. See “Effects Menu” for details.
| Note: The commands on the Effects menu are actually plug-ins, pulled from the /usr/lib/dmedia/plugins/premiere directory. Sound Track supports Adobe Premiere™ plug-ins. This means that if you have any additional Premiere plug-ins installed in this directory, they will also appear in the Effects menu. |
This section includes “Playing All Tracks” and “Selective Playing.”
By default, all tracks play when you click the Play button, unless there are tracks with “The Solo Button” or “The Mute Button” enabled. To play from the beginning of the composition, click the Back button first. Note that audio always begins playing at the point of the red vertical line in “The Time Ruler.”
| Tip: Press your keyboard space bar to start and stop playback. |
When working with Sound Track, you can select what you want to play before playing it. For selective playing, you need to be aware of the mute and solo buttons in the track control bars (see Figure 5-8). Note that audio always begins playing at the point of the red vertical line in “The Time Ruler.”
To select specific tracks for playing, click at the point where you want playing to begin.
To select more than one track, hold down the <Shift> key while selecting additional tracks.
To select a single track for playing and mute all other tracks, click the track's Solo button, then click the Play button (shown in Figure 5-6). You can solo more than one track at a time. Solo temporarily mutes all other tracks regardless of each track's Mute button state.
To mute a track, click the track's Mute button to stop that track from playing the next time you click the Play button. You can also mute more than one track at a time.
To select a section of a track for playing, simply click and drag to select the section (see “Selecting Regions of Sound” for more detail), then click the Play button.
This section includes “Exporting Files,” “Saving a Project,” and “Exporting to Digital Audio Tape.”
The export command allows you to:
export a project, or a selection of the project, as a single audio file
set new audio parameters, including file format, channels, sample rate, sample width, or compression scheme
export a file, or a selection within a file, with a new name and new parameters, as listed above
To use the export command:
If you want to export a selection of a project, make the selection first. If you want to export the entire project, go to Step 2.
Choose File > Export.
Use the special Export file browser to enter a name for the new file, then you have the following options:
Choose “Everything” to export the entire file or project, or choose “Selected Time Range Only.”
Note: If you choose “Selected Time Range Only,” the selected time range applies to all tracks. You can stop specific tracks from exporting by muting them (the mute button is shown in Figure 5-8). Use the File Format menu button to select a file format.
Click the Options button if you want to set channels, sample rate, sample width, or the compression scheme.
Click OK.
To save the current project, choose File > Save as. The Save dialog prompts you to enter a name for the file or project you are working on.
| Note: You cannot save a file, you can only export a file. |
See also “About Projects” and “Opening a Project.”
Exporting to DAT (Digital Audio Tape) lets you pre-master a DAT—Sound Track writes the audio composition and any associated program and index markers to the DAT.
Make sure the DAT drive is connected and the tape is loaded.
Choose File > Export.
Use the File Format menu button to select “Digital Audio Tape.”
(optional) You can change the sample rate by clicking the Options button and using the Audio Parameters dialog.
Click OK in the Export dialog to start writing to the DAT.
This section provides a list of problems you might encounter and offers possible solutions.
You are having trouble trying to capture from a CD.
To capture audio from a CD in your CD-ROM drive use CD Player instead of Sound Track. See “Capturing Audio From a CD-ROM.”
You don't hear any sound (or the sound is too low) when trying to play audio with Sound Track.
Make sure that the tracks that you want to hear are not muted, and that the track volume slider is not pushed too far too the left (see “The Track Control Bars”). Also, check the master volume (see “The Transport Controls”). Also, check the volume on Audio Panel .
Imported files do not contain all of the file's channels.
Before you import a file that contains more than one channel, you must use the cursor to drag out a selection of the correct number of tracks (you may need to create more tracks to accomodate the channels—see “Creating and Deleting Tracks”). For example, if you are importing a stereo file, you need to first select two tracks, because stereo files contain two channels. If the correct number of tracks are not selected, channels that do not fit into the current selection will not be imported.
You accidentally recorded over something that you didn't want to record over.
No need to panic—use Edit > Undo before saving. Keep in mind that when you click the Record button, recording occurs on all selected tracks (with the exception of tracks that have the Input menu button is set to None).
The recording is too soft or too loud.
If you are recording from an external device, you may need to adjust the volume level of the external device before recording. Also, use Audio Panel to adjust the input level.
The audio sounds like it's playing through a loudspeaker.
Open the Audio Panel . If Monitor is enabled, you hear the input signal along with the recording. Click Monitor off if you do not want to hear it. The red check mark disappears when Monitor is disabled.
Sound isn't recording through the microphone.
Start by making sure the microphone cable is connected correctly. After that, open the Audio Panel to make sure “Microphone” is selected as the input source (see “Setting the Input Source”). Also, use Audio Panel to make sure that the input level is high enough.
Many Sound Track commands have keyboard shortcuts, which are displayed on the menu. To use a standard keyboard shortcut, press the keys listed next to the command on the menu. For example, to quit Sound Track, press the <Ctrl> and Q keys simultaneously.
The following table lists some of the most frequently used keyboard shortcuts. To bring up a printable, separate window of this table, click the blue title.
Table 5-2. Sound Track Keyboard Shortcuts
Command | Keyboard Shortcut |
|---|---|
Record | <Ctrl> + R |
Play | Space Bar |
Stop | Space Bar |
Copy | <Ctrl> + C |
Paste | <Ctrl> + V |
Quit | <Ctrl> + Q |
This section includes:
The time ruler provides a reference of time for the audio clips you assemble. There are several time display modes, which you can access by choosing Options > Ruler Units.
The clip views appear under “The Track Control Bars,” representing the sequence of audio clips that are on that track. See “Working With Clips” for more information.
Sound Track menus include:
| New | Choose “New” when you want to create a new project. A dialog box appears asking you to specify the sample rate, number of tracks, and sample width for the new file. See “Opening a Project” for detailed instructions. | |
| Open... | Choose “Open...” when you want to open an existing project. See “Importing Files and Opening Projects.” | |
| Save | Use “Save” to assign a name to your project. | |
| Save As... | Allows you to save a current project under a new name. | |
| Import... | Choose “Import...” any time you want to bring an audio file into Sound Track. This includes bringing an audio file in for the purpose of inserting it into a project, or editing it as a single file. | |
| Export... | Opens the Export dialog. See “Exporting Files.” | |
| Open Movie... | Brings up file browser so you can select a movie for synchronization purposes. See “Synchronizing to Movies.” | |
| Close Movie | Closes the movie that you opened with “Open Movie...” | |
| Exit | Closes Sound Track. |
| Undo | Reverses last command. For example, if you've used the “Cut” command to remove a section of audio, you can choose “Undo cut” to restore the section. | |
| Redo | Reverses the last undo. | |
| Cut | Choose “Cut” when you want to delete a section of audio or move it to a different location in the soundtrack. The selected section disappears from the waveform and is placed in a temporary clipboard. Use the “Paste” command to place the selection elsewhere in the file. See “Deleting Regions of Sound” for step-by-step instructions. | |
| Copy | Choose “Copy” when you want to duplicate a section of audio. The copy is placed in a temporary clipboard. Choose “Paste” when you're ready to paste the copy elsewhere in the file. See “Cutting, Copying, and Pasting Regions of Sound” for details. | |
| Clear | Choose “Clear” to replace a selected section of audio with silence. | |
| Paste | Pastes the cut or copied selection at the insertion point. | |
| Select | Provides a submenu of select commands—see “Selecting Regions of Sound.” | |
| Deselect All | Deselects all current selections. |
| Ruler Units | Allows you to select the time unit. | |
| Marker Numbers |
| |
| Marker Titles | Allows you to turn the display of marker titles on or off. A check mark indicates the display on. | |
| Playback Tracking |
|
| Play | Same function as the Play button. Plays all unmuted tracks, unless Solo is enabled. | |
| Stop | Stops playing. Same function as the Stop button. | |
| Record | Same function as the Record button. See “Recording.” | |
| Go to Beginning |
| |
| Go to End | Moves time indicator to end of composition. | |
| Loop Selection | Turns Loop Selection mode on and off. When Loop Selection mode is on and you click Play, the current selection plays repeatedly. A check mark indicates Loop Selection is on. | |
| Play Selection | Turns Play Selection mode on and off. When Play Selection mode is on and you click Play, only the current selection plays. A check mark indicates Play Selection is on. | |
| Launch Audio Panel... |
|
| Create Track | Adds a new track under the last selected track. If nothing is selected, the new track is placed under the last track in the window. | |
| Delete Tracks | Deletes all currently selected tracks. | |
| Set Name... | Makes selected tracks' name fields editable. | |
| Mute | Lets you mute or unmute selected tracks. You can also choose “Unmute All.” See “The Mute Button.” | |
| Solo | Lets you solo or unsolo selected tracks. You can also choose “Unsolo All.” See “The Solo Button.” |
| Echo | Creates a repeating echo effect in the selected section. | |
| Fade In | Causes sound at the beginning of the selected section to start out from silence and gradually increase to its normal volume. | |
| Fade Out | Causes sound at the end of a selected section to gradually decrease in volume to silence. | |
| Normalize | Choose “Normalize” to increase the sound level of the selected section to its full dynamic range. | |
| Parametric Equalizer |
| |
| Remove DC Offset |
| |
| Reverse | Reverses a selected section of sound so that it plays in reverse. | |
| Set Volume... | Opens a dialog that you can use to set the gain on a decibel scale. |
See “Using Markers.”
| New Marker | Adds a marker at the insertion point. | |
| Mark Range | Creates markers at the beginning and ending of current selection. | |
| Edit Markers... | Brings up the marker editing dialog. | |
| Remove Marker |
| |
| Remove All | Removes all current markers. | |
| Select to Next | Selects to the nearest marker on the right. | |
| Select to Previous |
| |
| Jump to Next | Jumps insertion point line to the nearest marker on the right. | |
| Jump to Previous |
|
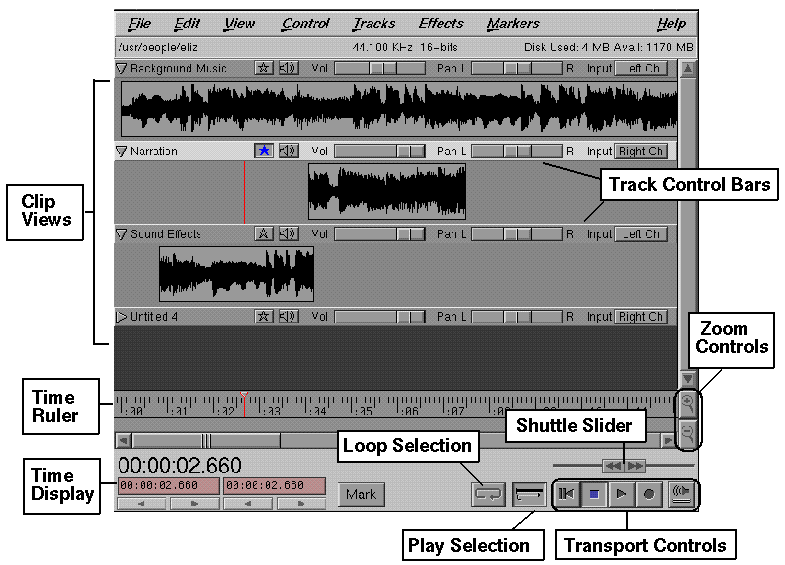
A diagram of the track control bar is shown in Figure 5-8.
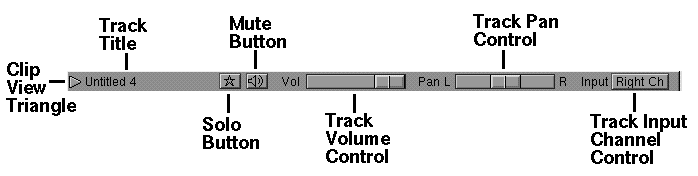
The track control bars each include the following features, listed in the order that they appear from left to right:
By default, the clip view triangle is pointed downward, indicating that the clip view is displayed. To hide the clip view, click the arrow (it turns to point to the right). To open it, click it again.
All tracks are “Untitled n”—where n is the number of the track—by default. In editing a multitrack project, name each track so that you are aware of what type of sound each track contains. See “Naming Tracks” for instructions.
The Solo button is a playback feature that you can use to temporarily isolate a certain track for playback during the editing process. Click it to turn it on or off. When it is blue, it is on. When it is on, that track is selected to play and all other tracks are muted when the Play button is clicked. You can solo more than one track at a time, however.
The Mute button is a playback feature that you can use to temporarily mute certain tracks for playback during the editing process. Click the Mute button to turn it on and off. When it is pressed, it is on. When you click Play, any tracks that are muted do not play.
The Track Volume slider lets you adjust the audio volume of a given track. This affects playback in Sound Track and it also affects the playback after a file is exported. However, it does not affect the recording volume.
The Track Pan slider lets you adjust the pan between the left and right channels of a specific track. This affects playback in Sound Track and it also affects the playback after a file is exported. However, it does not affect the recording pan.
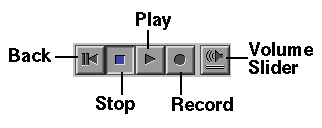
The transport controls are for recording and playback of audio. See “Recording With Sound Track”and “Playing Audio With Sound Track” for details. Figure 5-6 points out the use of each transport control.
Turns Play Selection mode on and off (it is on by default). When Play Selection mode is on and you click Play, only the current selection plays.
Turns Loop Selection mode on and off (it is off by default). When Loop Selection mode is on and you click Play, the current selection plays repeatedly.
The top part of the time display represents the position of the insertion point (or the time indicator, if Sound Track is currently playing). The lower part of the time display represents the beginning and ending points of the current selection. Time is presented as follows: HH:MM:SS:sss, where H = hours, M = minutes, S = seconds.
Adds a marker at the current position of the time indicator. See also “About Markers”
Dragging the slider to the left of center moves the time indicator backward, and to the right moves the time indicator forward. The further you drag the slider from the center, the faster it scans.