This chapter explains
For information on powering on the Origin Vault, see “Turning On the Origin Vault Expansion Option” in Chapter 2. For information on handling Origin Vault expansion option problems, see Chapter 4, “Replacing Origin Vault Components.”
An LED next to the Origin Vault power button lights up to indicate that power is being supplied to the option.
Follow these steps to turn off the Origin Vault expansion option:
Make sure no users are using the data stored in the expansion option. Check the status LEDs for all drives to make sure they are not active.
Turn off the power button at the front; the LED goes dark. The power button is between the 5.25-inch drive bay and the 3.5-inch drives.
Turn off the main power switch at the rear of the Origin Vault, as shown in Figure 3-1.
Disconnect the power cable.
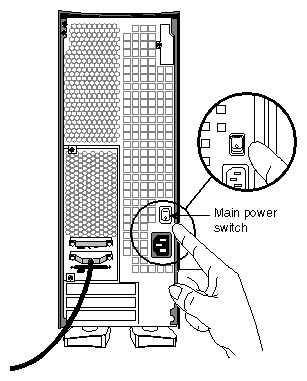
| Note: When you press the power button off (soft power off), residual power is still supplied to the unit as long as the main power switch at the rear is on. The main power switch is a circuit breaker that cuts off all power to the Origin Vault system. |
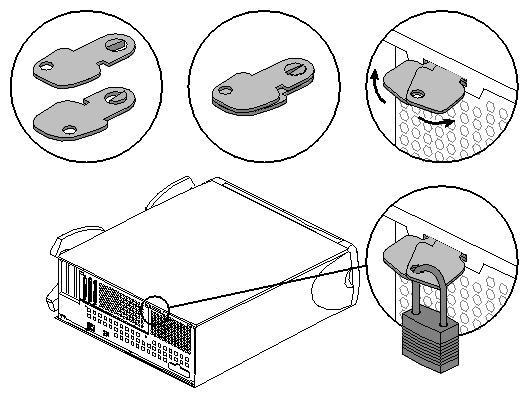
Included in the shipment of your Origin Vault expansion option are two metal tabs that you can use with a padlock to lock the expansion option. To lock the Origin Vault, follow these steps:
Obtain a padlock that fits the holes in the tabs.
Insert the tabs in the slot at the rear of the chassis; the slot location is indicated in Figure 3-2.
Spread the tabs apart so that the holes line up.
Insert the padlock through the holes in the tabs.
Figure 3-2 shows the tabs, their insertion point on the chassis, and their use with a padlock.
To remove a disk drive module, follow the steps below.
| Caution: Origin Vault drives are not hot-pluggable. However, you can exchange a 3.5-inch disk drive module (except for the system disk) in the Origin Vault option without powering it off; this procedure is known as administrative warm swap. See “Warm Swapping Drives (Administrative Warm Swap)”. |
Make sure no users are using the data stored in the expansion option. Check the status LEDs for all drives to make sure they are not active.
If you are removing more than one disk drive module at a time and the modules are unlabeled, attach labels to them identifying the slots from which they came.

Caution: Replacing drives in slots other than their original slots can cause loss of data. Turn off the power button at the front; the LED goes dark. Turn off the power on the back of the Origin Vault expansion option; see Figure 3-1.
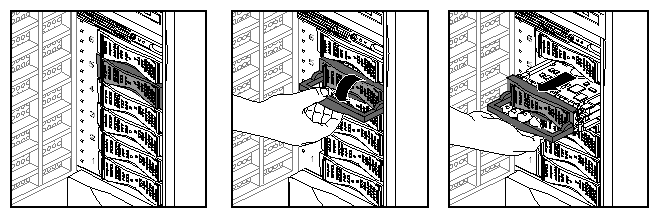
For the disk drive you are removing, pull the drive handle down (tower) or leftward (rackmounted enclosure) as shown in Figure 3-3 and Figure 3-4.
To insert a disk drive module, follow these steps:
Make sure no users are using the data stored in the expansion option. Check the status LEDs for all drives to make sure they are not active.
If the Origin Vault has not already been powered off, turn off the power button at the front; the LED goes dark. Turn off the power on the back of the Origin Vault expansion option; see Figure 3-1.
Follow instructions in “Installing 3.5-Inch Drives” in Chapter 2.
To update the system software to recognize a new drive, reboot. Consult the latest edition of IRIX Admin: Disks and Filesystems if necessary.
You can exchange a 3.5-inch disk drive module (except for the system disk) in the Origin Vault option without powering it off; this procedure is known as administrative warm swap. In the Origin Vault option, only 3.5-inch drives can be warm swapped.
Administrative warm swap utilizes scsiadminswap. When this command is in effect, the SCSI bus for the drive you are swapping is quiesced; that is, all commands for this bus are held off. The default bus-quiesce time is 300 seconds (5 minutes), but you can reset this time limit.
| Note: This procedure also uses system commands that are fully explained in IRIX Admin: Disks and Filesystems; have this publication available before you start the procedure. If the disk is part of an XLV volume, see that publication or reference pages for fuser(1M), xlv_mgr(1M), xlv_make(1M), xlv_assemble(1M), and xlv_shutdown(1M). For information on scsiadminswap, see scsiadminswap(1M). |
An administrative warm swap consists of
Follow these steps:
Make sure that the disk drive module you want to swap is not the system disk. To replace the system disk, you must power down the Origin Vault, as explained in “Replacing and Adding a Disk Drive Module”.
Have ready a grounding strap and the replacement disk drive module.
Disk drive modules ordered from Silicon Graphics are preconfigured; you can install them in the bays with no additional configuration. If you are installing third-party peripherals, or wish to change the configuration of a Silicon Graphics-supplied drive, follow guidelines at the beginning of “Installing 3.5-Inch Drives” in Chapter 2.
Make sure no users are using any filesystems on the disk.
Determine the SCSI bus for this drive.

Note: Once the command for the administrative warm swap is issued, the bus for this drive is quiesced; that is, all commands on this bus are held off for the default bus-quiesce time of 300 seconds (5 minutes) or the time you set. If appropriate, inform users that the bus is not available for this period. As root, unmount all filesystems of the disk you wish to replace; see umount(1M). Use fuser to find and kill processes that use a filesystem.
For XLV volumes, enter commands as follows:
If a filesystem on the disk is an unmirrored XLV volume, enter xlv_shutdown.
If a filesystem on the disk is a mirrored XLV volume, enter xlv_mgr and perform a detach of the plex that uses this disk.
Note: See IRIX Admin: Disks and Filesystems or reference pages for xlv_mgr(1M), xlv_make(1M), xlv_assemble(1M), or xlv_shutdown(1M). -
scsiadminswap -u -b # -d # -t #
where
-u indicates that this operation is an unplug
-b # specifies the SCSI bus for the device
-d # specifies the drive's slot number
-t seconds changes the time to quiesce the bus from the default 300 seconds to the number of seconds specified; there are no lower or upper limits
Caution: This command must be allowed to complete. Once you have pressed Enter for this command, use of the bus for this disk is held off. If the disk drive module cannot be replaced within five minutes (or the time set with the -t option), do not kill the scsiadminswap command, which leaves the SCSI bus in a bad state. Let the command finish, and retry the process later. The following example sequence of commands is used for swapping a disk in slot 2, with partition 7 mounted as /x:
umount /x
scsiadminswap -p -u -b 0 -d 2
mount -t xfs /dev/dsk/dks0d2s7 /x
Attach the grounding strap to ground yourself to a metal part of the Origin Vault.
Note: Be prepared to remove the disk drive module and insert its replacement within five minutes, or the time set with the -t option in step 7. Remove the disk drive module by pulling the drive handle down (tower) as shown in Figure 3-3, or leftward (rackmounted enclosure) as shown in Figure 3-4, earlier in this chapter.
With the grounding strap attached, insert the replacement disk drive module until it is almost flush with the edge of the drive bay.
Latch the drive: For a tower, pull the handle up to latch the drive; for an enclosure in a rack, pull the handle to the left. Remove the grounding strap.
Enter
scsiadminswap -p -b # -d #
where -p indicates that this operation is a plug operation. If desired, you can use the -t option to change the default bus-quiesce time.
Set up the filesystems on the replacement disk depending on the type of filesystem that goes on it:
non-XLV volume:
Mount the filesystem using mount.
unmirrored XLV volume with no prior XLV information on the drive:
Use xlv_make.
Use xlv_mgr and perform an attach.
Mount the filesystem using mount.
mirrored XLV volume with no prior XLV information on the drive:
Mount the filesystem using mount.
Use xlv_assemble.
unmirrored XLV volume with prior XLV information on the drive:
Use xlv_mgr.
Delete the old XLV label information.
Use xlv_make.
Use xlv_mgr and perform an attach.
Mount the filesystem using mount.
mirrored XLV volume with prior XLV information on the drive:
Use xlv_mgr.
Delete the old XLV label information.
Mount the filesystem using mount.
Use xlv_assemble.
| Note: After you have set up the filesystems, notify users that they can write to the disk and the SCSI bus. |
The following example sequence of commands is used to swap a disk containing old XLV information in slot 2 with partition 7 mounted as an unmirrored XLV volume named /lvl:
umount /lv1 xlv_shutdown -n sample_vol scsiadminswap -p -u -b 0 -d 2 xlv_mgr -xc “delete label /dev/rdsk/dks0d2vh” xlv_make (see xlv_make man page for examples) xlv_mgr (perform attach) mount -t xfs /dev/dsk/dks0d2s7 /lv1 |
These procedures require a #2 Phillips screwdriver.
| Caution: Origin Vault drives are not hot-pluggable. You must power the Origin Vault expansion option off to remove or add 5.25-inch drive options. |
To remove a drive option from the 5.25-inch bay, follow these steps:
If you are removing a peripheral and not replacing it with a new one, locate the blanking plate(s) for the carrier (one plate for one half-height peripheral, two for a full-height peripheral).
Make sure no users are using the data stored in the expansion option. Check the status LEDs for all drives to make sure they are not active.
Turn off the power button at the front; the LED goes dark.
Turn off the power on the back of the Origin Vault expansion option; see Figure 3-1.
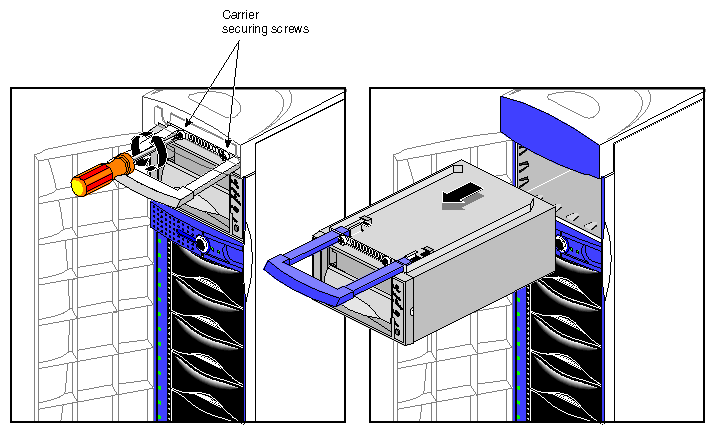
To remove the peripheral carrier from its bay, use a #2 Phillips screwdriver to unscrew the two screws that secure the peripheral carrier to the Origin Vault chassis, as shown in Figure 3-5. Reserve the screws.
Grasp the handle of the peripheral carrier; the handle slides out about an inch. Pull the carrier out of the bay, supporting it with your other hand. See Figure 3-5.
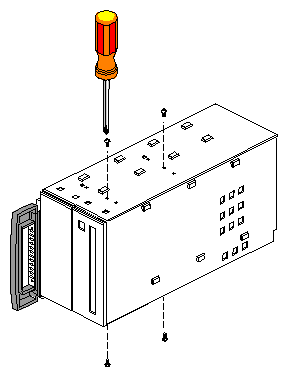
Place the peripheral carrier on a work surface. Remove the EMI shielding plate from the rear of the peripheral carrier:
Unscrew the screw at the bottom of the EMI shielding plate on either side of the carrier, as shown in Figure 3-6.
Pull the shielding plate out from the bottom and then down. This plate has tabs that hook into slots at the top of the carrier.
Unscrew the two screws (for a half-height peripheral) or four screws (for full-height peripheral) on the top and bottom of the carrier that secure the peripheral in the carrier, as shown in Figure 3-7.
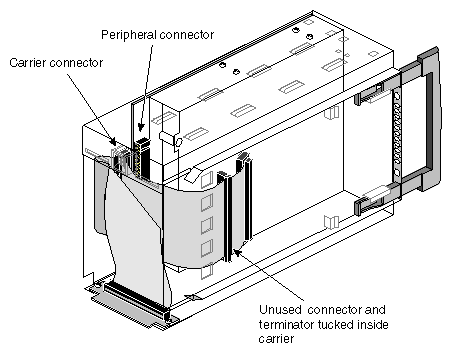
Gently slide the peripheral out of the carrier. It is attached to the inside of the carrier with cables.
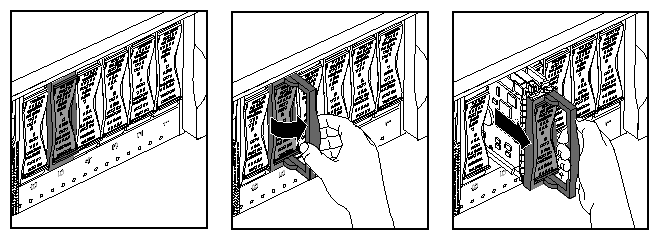
Detach the SCSI connector (on the flat ribbon cable inside the peripheral carrier) from the peripheral; Figure 3-8 shows an example.
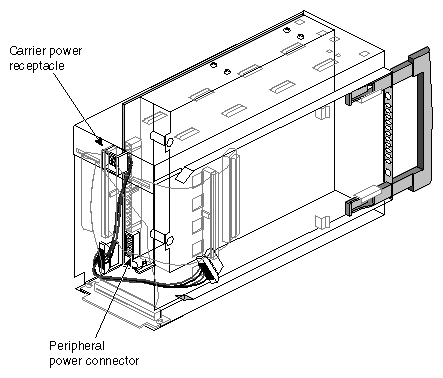
Detach the power cable from the peripheral; Figure 3-9 shows an example.
If you are removing a peripheral and not replacing it with a new one, reinstall the blanking plate(s) for the carrier. Reinstall the peripheral carrier in its bay, using the reserved screws.
If you are installing a new peripheral, follow instructions in “Installing 5.25-Inch Options” in Chapter 2, starting with step 3 in “Preparing the Peripheral Carrier.”

To add a 5.25-inch option to the Origin Vault, follow these steps:
Make sure no users are using the data stored in the expansion option. Check the status LEDs for all drives to make sure they are not active.
Turn off the power button at the front; the LED goes dark. Turn off the power on the back of the Origin Vault expansion option; see Figure 3-1.
Follow instructions in “Installing 5.25-Inch Options” in Chapter 2.
To update the system software to recognize a new drive, reboot. Consult the latest edition of IRIX Admin: Disks and Filesystems if necessary.
Both the front and rear feet on an Origin Vault tower can be swiveled in or out. See Figure 3-10.
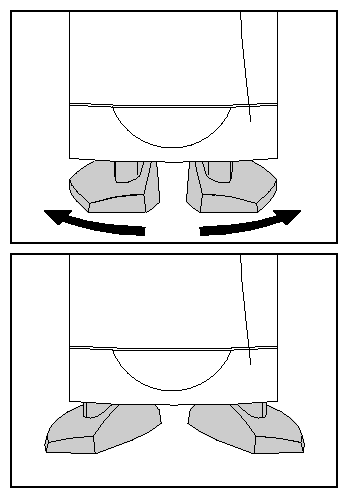
To adjust the feet, raise the tower slightly, or tilt it to one side. Rotate the feet inward or outward, as desired.