This chapter contains the following sections:
The status LED on the front panel of the Origin200 and Origin200 GIGAchannel CPU module can display three colors: green, amber, and red.
Table 4-1 lists the messages displayed by the status LED.
| Note: Only the status LED of the master module of a two-module system displays messages. The status LED of a slave module is inactive. |
Table 4-1. CPU Module Status LED Messages
LED Code | Meaning | Corrective Action |
|---|---|---|
Red briefly, then amber, | If you have just turned on the master power switch, this indicates that the system controller is OK. | N/A |
Green, blinking | The system is booting. | N/A |
Green, blinking, while system is running (if the system is equipped with a redundant power supply) | One half of the redundant power supply has failed. | No immediate action is required, but you may wish to replace the redundant power supply. See “Replacing the Origin200 Power Supply”. |
Green on solid | The system is on. | N/A |
Amber, blinking, followed | Normal power-off sequence. | N/A |
Amber on solid | One of the fans has failed. | Replace the fan. See “Replacing Fans”. |
Red, blinking (during power-off sequence) | A problem with the power supply was detected. | Replace the power supply. See “Replacing the Origin200 Power Supply”. |
Red, blinking | The system temperature is too high, and the server is shutting down. | Check ambient air temperature. If the ambient air temperature is below 104˚F (40˚C), If the ambient air temperature is above 104˚F (40˚C), the system shuts down automatically. Reduce the ambient air temperature. |
Red, blinking during bootup, (followed by shutdown) | The power supply or on-board voltage regulator failed. | Replace the power supply. See “Replacing the Origin200
Power Supply”. |
Red on solid | The system became too hot. | Check the system temperature using the module system
controller (MSC) via the AUX port. |
The following sections describe the locations and functions of the various GIGAchannel status LEDs:
The status LED is located behind the front grille, as shown in Figure 4-1.
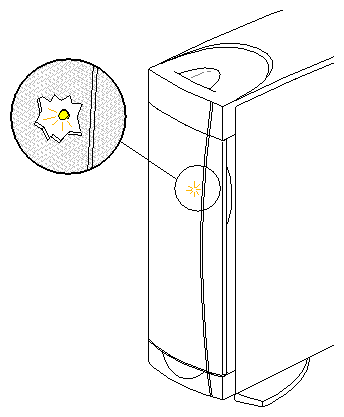
Table 4-2 lists the status messages displayed by this LED.
Table 4-2. GIGAchannel Status LED Messages
LED Code | Meaning | Corrective |
|---|---|---|
Green, blinking | Normal power-on sequence | N/A |
Green, solid | System is on | N/A |
Amber, blinking | One half of the redundant power supply has failed. | No immediate action is required, but you may wish to replace the redundant power supply. See “Replacing the GIGAchannel Power Supply”. |
Blinking red, system shuts down | One of three possible failures: (a) The blower has failed. (b) Power supply or voltage regulator has failed. (c) The system has overheated. | In all cases, refer to the next section, “GIGAchannel Diagnostic LEDs,” to determine the failure. The diagnostic LEDs provide additional information about the exact failure. |
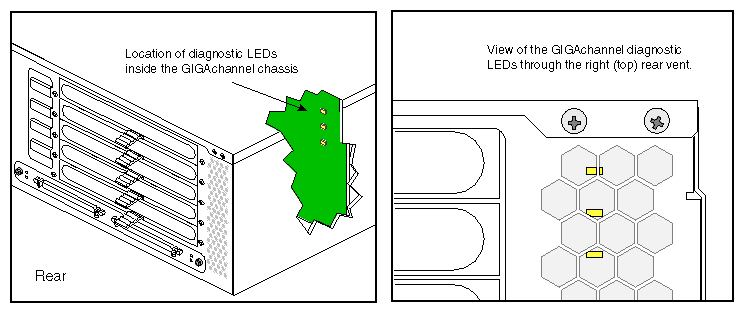
There are three diagnostic LEDs inside the GIGAchannel expansion cabinet. When a failure occurs, the LED that corresponds to the particular failure blinks yellow. The LEDs are visible through the air vent at the rear of chassis to the far right (or top). Figure 4-2 shows the location of the LEDs.
| Caution: Do not attempt to run the system with a failed blower, as the GIGAchannel cabinet can overheat very quickly and damage internal components. |
Figure 4-3 describes what each LED indicates when it is blinking.
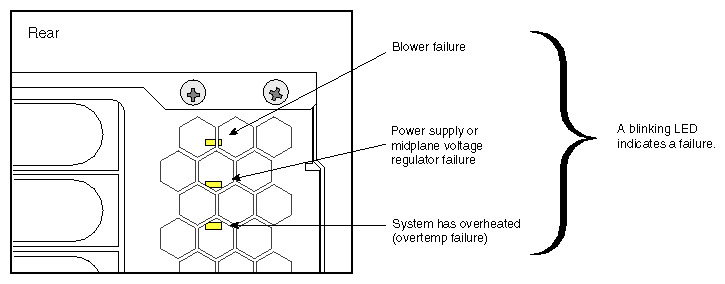
Table 4-3 describes the problems indicated by the LEDs and how to fix those problems.
Table 4-3. GIGAchannel Diagnostic LED Messages
LED | Meaning | Corrective Action |
|---|---|---|
Top (or left-hand) | Blower failure | Turn off the main power switch immediately, then replace the blower as described in “Replacing the Blower”. Caution: Do not attempt to run the system with a failed blower as the GIGAchannel cabinet can overheat quickly and damage internal components. |
Middle | The power supply or voltage regulator on the midplane has failed. | Replace the power supply as described in “Replacing the GIGAchannel Power Supply” in Chapter 5. If this does not correct the problem, replace the midplane as described in |
Bottom (or right-hand) | The GIGAchannel cabinet has overheated (overtemp failure). | Make sure the ambient air temperature is between +41°F and +95°F (+5°C and +35 C). Make sure there is adequate space around the system for proper airflow through the chassis and no obstructions at the front or rear of the chassis. Refer to the Origin200 and Origin200 GIGAchannel Owner's Guide for information about the proper clearances around the server and the direction of airflow through the GIGAchannel cabinet. |
There are two sets of LEDs located on the Crosstown board of the GIGAchannel expansion cabinet, as shown in Figure 4-4.
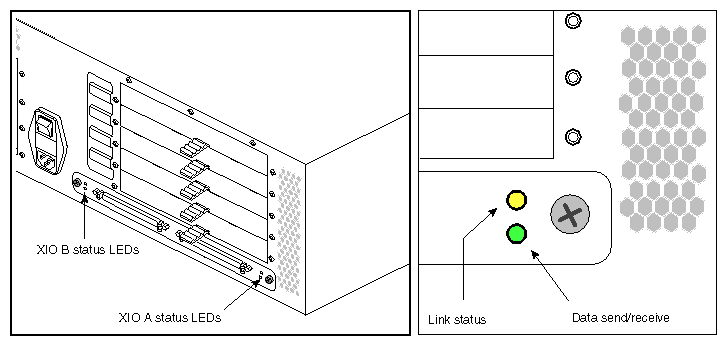
There is one set of LEDs for each of the two XIO ports (A and B). When the XIO cables are properly connected, all of the lights should be on and not blinking. If the Crosstown status LEDs do not light up, but the system appears fine otherwise, see the next section, “If the Crosstown LEDs Do Not Display.”
If the LEDs are not on, but the system appears fine otherwise, check to be sure that the XIO cables are correctly attached:
Connect CPU module connector A to GIGAchannel connector A.
Connect CPU module connector B to GIGAchannel connector B.
If the connections are correct, verify that the cables are attached snugly and that the thumbscrews are tightened.
If checking the connections does not cause the LEDs to light, verify that there is not a problem with one of the cables. Swap the XIO cables and see if the LEDs light.
The Ethernet 10-Base-T/100-Base-TX port contains two integral LEDs: the transmit LED (green) and the packet detect LED (yellow). Figure 4-5 shows their locations.
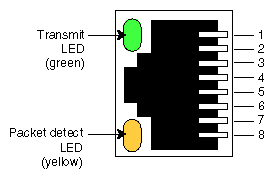
The transmit LED (green) flashes whenever the Origin200 server is transmitting data through the Ethernet port.
The packet detect LED (yellow) flashes whenever the server detects network traffic, even if the data detected is not destined for the server.
The only regular maintenance that the Origin200 server requires is periodic cleaning to remove any dust accumulation. Because the server is designed to be operated in a typical office computing environment that is relatively dust-free, there are no air filters in the system. Therefore, depending upon the amount of dust in the operating environment, you may have to periodically vacuum parts of the server.
| Caution: Do not use an ordinary vacuum cleaner to clean computer equipment. Use only a data vacuum cleaner. Data vacuum cleaners are specially designed to prevent damage to sensitive electronic components from electrostatic discharge (ESD). |
Use the following cleaning guidelines:
With the system running, you can examine the exterior of the chassis for dust accumulation and remove it as necessary with a data vacuum. In both the CPU module and the GIGAchannel expansion chassis, air flows from the front of the chassis to the rear, so most dust accumulation should be at the front of the system.
With the system off:
In the CPU module, remove and examine the 3.5-inch drives, blanking plates, and drive slots for dust. Vacuum off any dust you find and replace the drives and blanking plates.
In the CPU module, remove and examine the peripheral carrier and the bay into which it slides. If dust has accumulated on the rear of the carrier, remove the access plate on the rear of the carrier and examine the interior of the carrier for dust. Vacuum off any dust you find and replace any components you removed.
In both the GIGAchannel expansion cabinet and the CPU module, remove the system cover and chassis access door. Examine the interior of the system, starting with the front areas of the system and proceeding towards the rear. Vacuum off any visible dust, then replace the chassis access door and side panel.
The compression connector used for XIO boards has 96 pads that enable passage of signals between the system (via the midplane) and the XIO board. This compression connector has two parts: One is physically located on the XIO board and the other is on the midplane of the GIGAchannel cabinet. Each pad on a midplane connector is a flat, gold–plated surface. Each pad on an XIO board connector is composed of hundreds of tiny bristles (dendrites). When a bristled pad is pressed into a gold-plated pad, a connection is created for one signal.
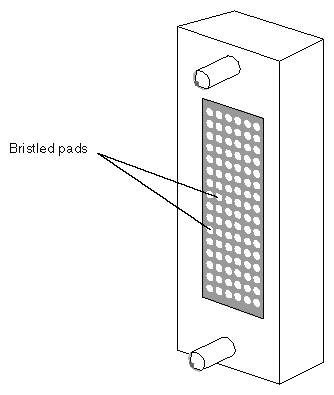
If not protected, the bristled pads can attract and hold dust, lint, grease, powder, and dirt. These substances clog or damage the bristles and prevent them from making proper contact with the gold-plated pads on the system's midplane. It is important to prevent this from occurring. “Guidelines for Storing and Handling the Compression Connector on an XIO Board” explains how to keep the compression connector bristles clean; “Guidelines for Cleaning the Compression Connector on an XIO Board” explains how to clean them if they become dirty.
To avoid damaging an XIO board's compression connector and to keep it in optimal working condition, follow these guidelines whenever the board is not installed:
| Caution: Failure to follow these instructions can result in irreparable damage to the surface of the connector's pads, which may result in intermittent or complete failure of the product. |
XIO options that are not factory-installed are shipped with a protective plastic cap that snaps over the compression connector pad. Always replace this cap if you are storing boards outside of the GIGAchannel cabinet.
Do not wipe or touch the pads of the compression connector with anything (no fingers, no brushes, no cloth, no probes), except as specified in the cleaning instructions. The bristles might be damaged.
Whenever the board is not in an XIO slot, put the protective cap over the compression connector and store the board in an antistatic bag. Make sure to close (fold over) the open end of the bag to minimize exposure to dust and atmospheric gases.
Do not put anything (not even water) onto the pads, except as specified in the cleaning instructions.
Before laying the board down on a surface, make sure that the surface is free of dust, lint, powder, metal filings, oil, water, and other damaging materials.
Do not blow dust, dirt, or powder anywhere near the board when it is not inside its protective bag.
A compression connector should never need cleaning, if you keep the protective cover on whenever the XIO board is not installed. However, if the connector becomes dirty, follow these instructions for removing pollutants.
| Note: Some pollutants can irreversibly damage (corrode or chemically alter) the pad surfaces. Although cleaning may remove the pollutant, it does not repair damage incurred by this contact. |
To remove pollutants, follow these instructions:
Obtain a can of dry, compressed air or inert gas.
The Envi-Ro-Tech Duster 1671 product manufactured by Tech Spray, Inc., is the only product that SGI recommends for this application. Tech Spray can be reached by telephone in the U.S.A. at 806-372-8523. Also, their web site, at http://www.techspray.com, lists their worldwide manufacturing representatives.

Caution: Do not use a cleaning product that contains any of the following ingredients: halogenated hydrocarbons, aromatic hydrocarbons, ethers, sulphur, ketones, or solvents of any kind. These substances can cause irreparable damage to the connector's surface. Prepare the can for use, as instructed on the can. For example, if a tube is provided, attach it to the can's dispensing mechanism.
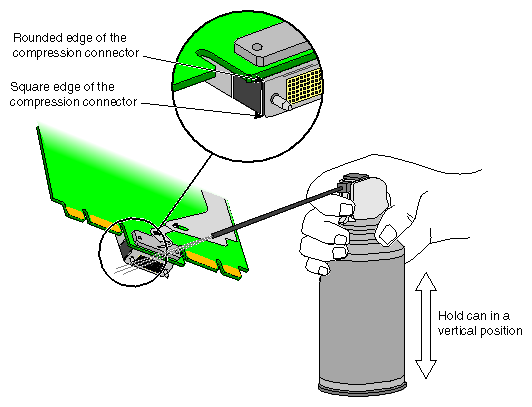
Hold the can vertically.
During subsequent steps, it is important to maintain this vertical position because this helps prevent the non-inert material (expeller gases) from being expelled.
Caution: Tipping or shaking the can while spraying can result in damage to the compression connector from the product's expeller gases. Place or hold the XIO board so that the rounded edge of the compression connector faces up.
Note that the rounded edge is completely closed, so that air cannot flow into the connector, whereas the squared edge has an opening.
Caution: Spraying into the squared (open) edge of the connector can destroy it. Position the XIO board at an angle to the can, so that the tip of the can's applicator is 1 to 2 inches away from the first (topmost) row of pads (as illustrated in Figure 4-7).
Start spraying.
As you spray, move the spray along the length of the connector until the entire length has been sprayed.
Move down a few rows and again spray along the entire length.

Note: Do not shake the can. If any visible material (for example, foam) appears, stop spraying and switch to a new can. This foam blows away once you resume spraying just air. Repeat until all the pads have been sprayed.
When you finish, cover the compression connector with its cap or immediately install the board in an XIO slot.