This chapter provides an overview of the rackmount system chassis and a description of the controls, connectors, and indicators.
System component topics covered include
Figure 2-1 and Figure 2-2 show the major parts of the Onyx2 graphics rack system.
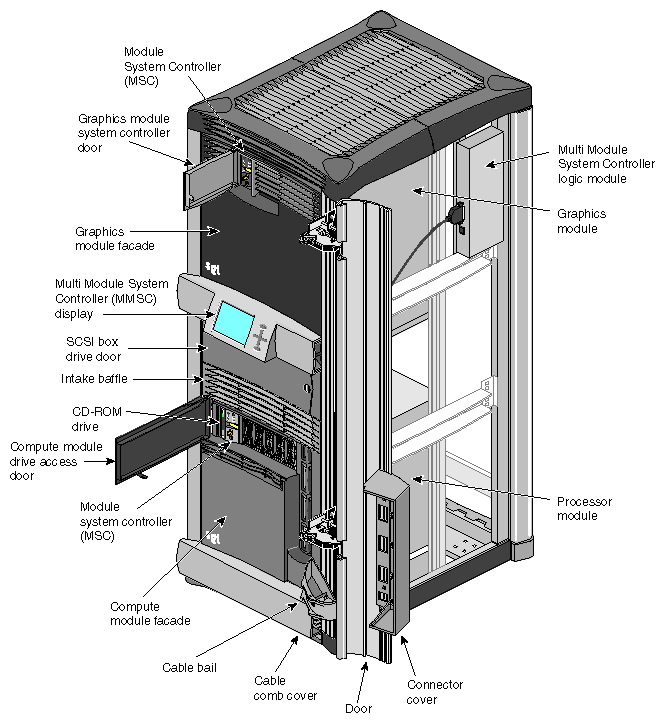
Table 2-1 provides a list of major components on the front of the graphics rack (from top to bottom). A brief functional description of each component is provided.
Table 2-1. Major Components on the Front of the Graphics Rack
Component | Description |
|---|---|
Graphics module and System Controller (MSC) | The graphics module(s) in the Onyx2 rack contains all the video interface and graphics boards. Each module supports one or two graphics pipes and a maximum of 16 monitors. The module's System Controller (MSC) is a part of each module. Its microprocessor reports module status information to the rack's multimodule System Controller (MMSC). |
Graphics module System Controller access door | This door provides access to the graphics module System Controller. |
Multimodule System Controller (MMSC) interface and display | The MMSC display is an intelligent keypad interface that can control all modules in a rack system. The MMSC display panel is a color screen. There is one MMSC display panel per Onyx2 rack configuration. |
Origin Vault SCSI | This drive box enclosure provides six 3.5-inch and two 5.25-inch half-height drive slots for single-ended SCSI drives. |
Air intake baffle | This baffle helps proper airflow through the rack. Note that the top of the rack has a vent as well. Airflow is generally pulled in from the top and front of the rack and exhausted through the back of the rack. |
Compute module System
Controller CD-ROM | One CD-ROM is standard with each graphics rack system. The MSC sits next to the CD drive. The system disk contains the operating system and other key software directories and is always installed to the right of the MSC. Up to five optional SCA (single-connector assembly) data disks install to the right of the system disk. All disks are single-ended, ultra SCSI, or SCSI-2 drives with a transfer rate of up to 40 MBps. |
Compute (processor) module | Compute modules in Onyx2 graphics rack systems provide an independent computing subsystem with a separate set of CPUs, disks, a System Controller, audio, and I/O connections. |
Facade | The removable facade covers the power supply and Router boards for each module in the rack chassis. |
CrayLink Interconnect cabling | This is the physical link that enables different compute modules in a multirack graphics system to communicate and share resources. The CrayLink Interconnect cable is made up of delicate copper strands. Be careful when handling this cable. |
Cable bail | The cable bales hold any CrayLink Interconnect cables in place to prevent excessive cable bending, which can cause damage. |
Cable comb cover | This removable cover hides any CrayLink Interconnect cables inside the rack chassis. |
Cable comb | The comb holds the CrayLink Interconnect in place when the cable is tucked into the grooves. |
Cable door | The cable door hides the CrayLink Interconnect routing between modules in a multirack system. |
Connector cover | The connector cover protects the Router board ports and cabling. |
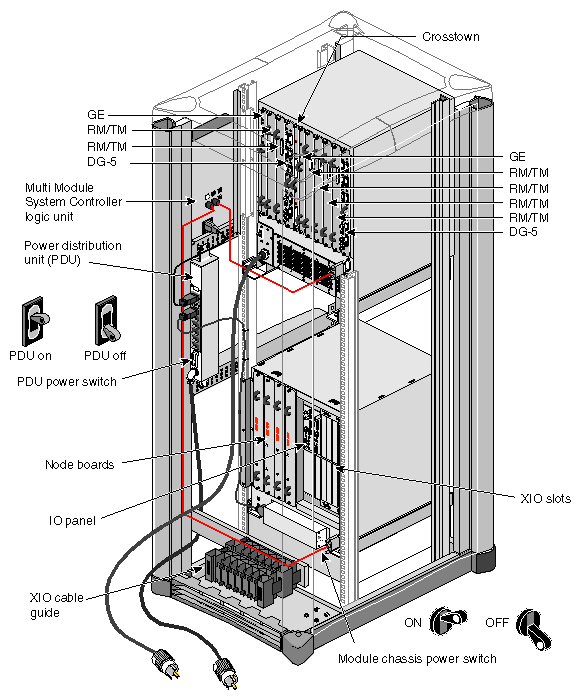
Table 2-2 lists and describes the major components seen at the back of the Onyx2 rack.
Table 2-2. Onyx2 Graphics Rack Rear Components
Component | Description |
|---|---|
Graphics boards | The system graphics boards are located in the rear of the graphics module. All video connections are made at this location. |
Multimodule System Controller (MMSC) logic unit | The MMSC located in the rear of the chassis is a separate microprocessor-controlled unit that interfaces the individual module's MSCs and with another MMSC in a multirack system. |
Power distribution unit | The PDU is the central power source for the rack. The compute module and Origin Vault peripherals box connect to the PDU. Note that the PDU has a separate on and off power switch. |
PDU switch | The PDU switch is the main circuit breaker for the rack's compute module, Origin Vault drive box, and MMSC assembly. |
Node board(s) | Node boards are the processing boards in the Onyx2 system. Each contains two 64-bit CPUs, the HUB ASIC (which provides an interface to the I/O subsystem), the CrayLink Interconnect, a portion of main memory, and optional directory memory. Each Node board can support from 64 MB to 4 GB of memory. A single-rack system can have one to four Node boards. A multirack system can have up to 12 Node boards. |
Graphics BaseIO board | This board (also known as the IO6G) provides basic I/O functions for the graphics system, such as digital and analog audio ports, serial ports, 10/100BaseT Ethernet, and single-ended wide SCSI. A dedicated slot in the XIO cardcage houses the graphics BaseIO board. This board cannot be installed in any of the other XIO expansion slots. |
XIO slot cardcage | The XIO cardcage allows you to install additional I/O boards into the processor compute module chassis. |
XIO cable guide | The XIO cable guide management helps to ensure proper laying out of cables in the rear of the chassis. |
Module chassis power | This switch powers the individual modules on and off. |
The graphics module almost always sits in the top part of the rack system. Exceptions to this rule are found in certain multirack Onyx2 graphics systems configured for maximum graphics pipe support.
Each graphics module holds up to two sets of graphics boards (two pipes). Each pipe supports up to eight monitors.
The pipe on the right of the graphics module (as seen from the back) supports one, two, or four RM/TM assemblies (see Figure 2-3). It is supported by the top KTOWN cable connection on the KTOWN board. The pipe on the left supports one or two RM/TM assemblies and connects to the bottom KTOWN board connector.
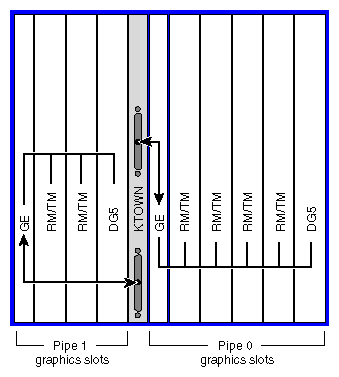
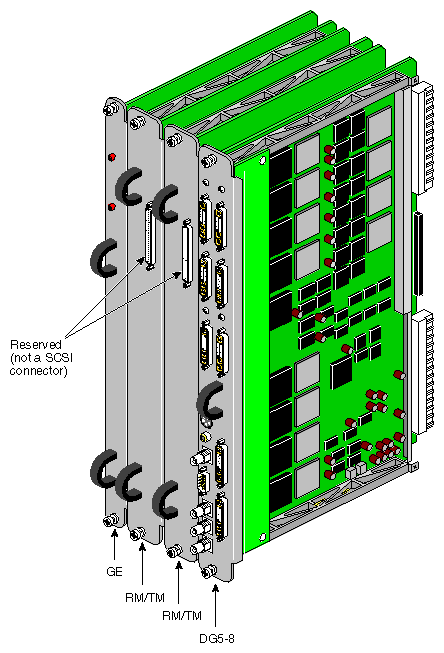
Figure 2-4 shows an example of a two-RM graphics board set that is supported by the rack's graphics module. Note that the 68-pin connectors on the RM/TM assemblies are reserved for caligraphics lights; they are not for SCSI drives.
The following sections describe major hardware components specific to the Onyx2 graphics rack compute module.
There is a direct correlation between the number of Node boards installed in the system's compute module and the number of XIO slots that can be activated.
If a system compute module has only one Node board, then only 6 of the 12 XIO slots are activated. When two Node boards are installed, all 12 of the XIO slots can be activated, if the Node boards are positioned in the correct slots.
Figure 2-5 diagrams the Node-board-to-XIO-board correlation. The Node boards and their corresponding XIO board slots are indicated with either a circle or triangle. When Node 1 is present, XIO slots 1 through 6 (designated by a circle) are activated. When Node 2 is also present, then XIO slots 7 through 12 (designated by a triangle) are activated.
Node boards 3 and 4 also have corresponding XIO slots indicated by a circle or a triangle. For example, if Node boards are installed in slot 1 and slot 3, then only the corresponding XIO slots (1 through 6) are activated.

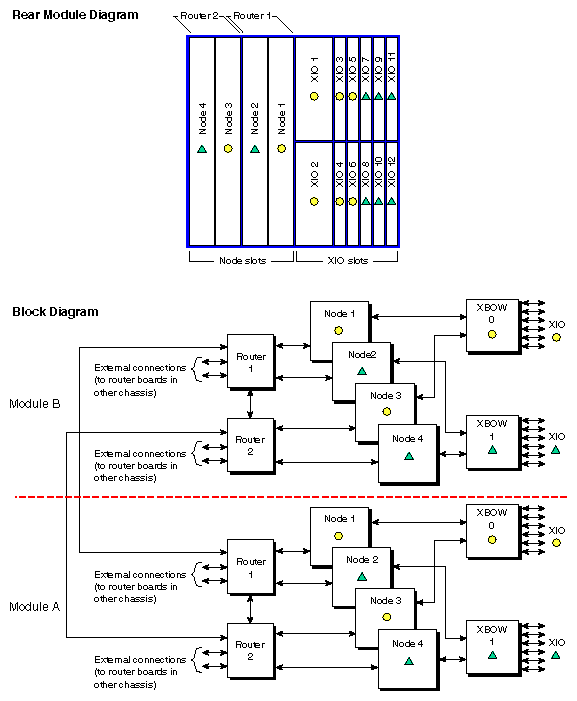
Note that the graphics BaseIO interface board assembly uses one of the XIO slots. Various types of optional interface boards are supported in the XIO slots. These may include:
Fibre Data Distributed Interface (FDDI)
High-performance point-to-point interface (HIPPI)
Multiple Ethernet board
Multiple SCSI port board
Digital I/O Video Option (DIVO) interface board
Certain installation restrictions must be followed when XIO boards are installed or removed. Failure to follow these configuration rules may result in system or peripheral malfunction.
Always ensure these XIO rules are followed:
Keep the graphics BaseIO (IO6G) board assembly installed in XIO slot 1.
Fill the top XIO slots first.
The optional PCI module is installed in XIO slot 2.
Never allow any of these configurations:
Move the BaseIO (IO6G) board assembly to a slot other than XIO 1.
Have a SCSI board installed in XIO slot 2.
Have an XIO board installed in an unsupported slot.
Node board slots are counted from right to left. Router board and XIO board slots are counted from left to right. Refer back to Figure 2-5 for a diagram of the back of the compute module that differentiates the supported XIO slots. The circles and triangles represent the interdependence of the XIO slots and the Node boards that support them.
The graphics BaseIO panel assembly (also known as the IO6G) installs in XIO board slot one and is used to connect external devices to the system. These devices include keyboards, mice, SCSI devices, audio devices, ASCII terminals, printers, and modems. The I/O panel configuration is shown in Figure 2-7.
| Note: If you disconnect a cable from a peripheral device, you should also disconnect it from the I/O connector on the I/O panel. This helps prevent the system from picking up external electrical noise. Connectors are listed in Table 2-3. |
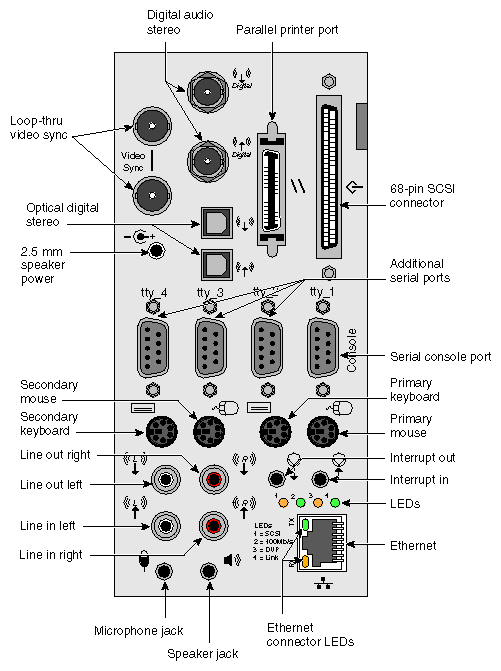
Table 2-3. Graphics Rack BaseIO Panel Connectors
Connector Type | Connector Description | Connector Function |
|---|---|---|
BNC 75 ohm jack | Digital audio out (DO) | Audio output to digital recorder |
BNC 75 ohm jack | Digital audio in (DI) | Input to deskside from digital audio device |
BNC 75 ohm jack | Video sync loopthrough | Video sync in/loopthrough |
BNC 75 ohm jack | Video sync loopthrough | Video sync in/loopthrough |
36-pin IEEE 1284-C | Parallel port | Parallel printer signals to and from external device |
68-pin SCSI single-ended | Ultra (Fast-20) or SCSI-2 | Single-ended SCSI |
2.5 mm tip-sleeve speaker power jack | Single +10 V jack | Powered speaker output for supplied speakers |
Optical | 24-bit digital stereo input | Eight-channel ADAT input |
Optical | 24-bit digital stereo output | Eight-channel ADAT output |
9-pin sub-D (1-4) | PC-compatible male serial ports | Serial RS-232 or 422 data transfer and receipt |
6-pin mini-DIN (1-2) | Mouse connectors | Support mouse signals |
6-pin mini-DIN (1-2) | Keyboard connectors | Support keyboard signals |
2.5 mm RCA jacks (L & R) | Audio line in | Supports analog stereo inputs |
2.5 mm RCA jacks (L & R) | Audio line out | Supports analog stereo outputs |
3.5 mm tip-ring-sleeve jack | Single jack input | Interrupt in |
3.5 mm tip-ring-sleeve jack | Single jack output | Interrupt out |
3.5 mm tip-ring-sleeve jack | Single jack audio output | Analog headphone or supplied powered speakers |
3.5 mm tip-ring-sleeve jack | Single jack audio input | Analog microphone input |
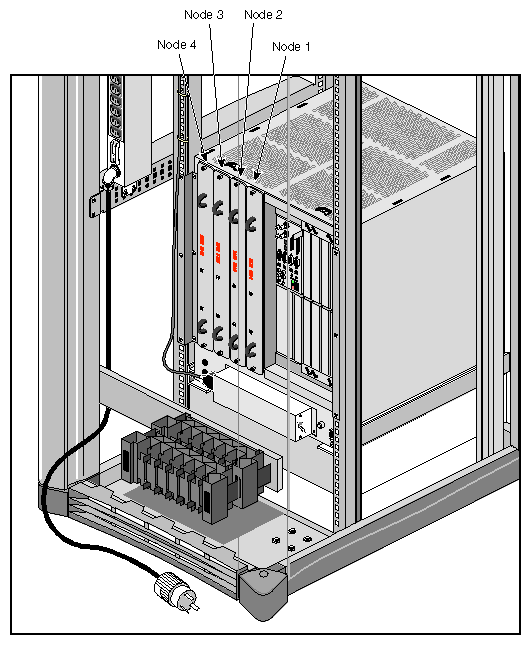
Figure 2-8 shows the location of the CPU Node boards in the compute module. The Node board is the main processing board in the Onyx2 rack system. An individual system compute module may have up to four Node boards. Figure 2-8 also shows the required Node board slot positions in a module. The first Node board must be installed in the rightmost slot (as you face the rear of the chassis). Additional Node boards are added sequentially from right to left.
The Node board consists of these major components:
sixteen slots of main memory
eight slots of optional directory memory
one or two 64-bit processors (all Node boards installed in rack systems should have two processors)
one HUB ASIC
The 64-bit processor (CPU) is the main processor for the Onyx2 graphics rack system. There are two 64-bit CPUs on each Node board. You may hear a module or rack system referred to as an “8P” or “16P” system. The P stands for processor. An 8P system has eight 64-bit processors (four Node boards). The 64-bit processor is also called a microprocessor.
The Node boards in the Onyx2 use SDRAMs mounted on dual-inline memory modules (DIMMs) for main memory. A Node board can have from 64 MB to 4 GB of main memory. Memory upgrades are available in 64, 128, and 512 MB increments.
The HUB on the Node board is the primary communication link between the 64-bit processor(s), the I/O subsystem, the main memory, and the CrayLink Interconnect. The HUB also interfaces with directory memory, which is responsible for maintaining cache coherence.
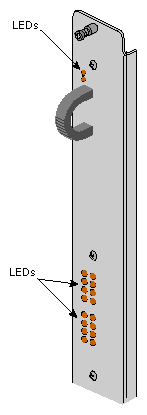
Figure 2-9 shows the outer panel on the Node board. The 18 LEDs provide status information for the individual boards. Two red LEDs are located near the top of the board and a set of 16 yellow ones are located near the middle of the board.
The two LEDs near the top of the board should light only when there is a voltage inconsistency or problem on the Node board. If these LEDs light up frequently, the board may need service. If all the top LEDs on all the Node boards in the system light up, it indicates a system wide power problem. In this case, call your service representative for assistance.
The LEDs grouped near the middle of the board are divided into two vertical sets of eight LEDs (16 total). Each vertical set of eight LEDs represents one of the 64-bit microprocessors installed on the Node board. When only one microprocessor is installed, you can expect to see LED activity on only one vertical set of LEDs.
As a general rule, the bottom LEDs should always show some activity while the system is powered on. The bottom LEDs serve as a kind of “heartbeat” that indicates when a microprocessor is working, even if the system is not generally active. The other seven LEDs light up as the processes that the microprocessor runs increase. The more it is active, the more amber LED activity you see on the Node board.
There are two types of System Controllers for the Onyx2 rack systems—a single module System Controller (MSC) and a rack-mounted multimodule System Controller (MMSC) with a color display interface panel. The MSC does not have the same functional abilities as the MMSC. For more detailed information on operating the System Controllers, see Chapter 6, “Using the System Controllers.”
The MSC and its LED display provide environmental and status monitoring for an individual compute module. Each compute and graphics module in a graphics rack system reports its information to the “multimodule” controller (also known as the MMSC).
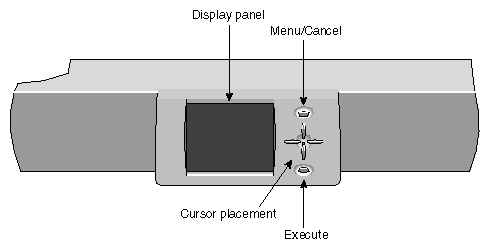
The multimodule controller (MMSC) display (see Figure 2-10) is the single-point administration interface for the rackmount configuration. The individual module controllers are tied to the multimodule controller through a serial connection from the module to the multimodule controller board in the rack.
The MMSC color screen display interface and MMSC logic unit are two separate components.
There is only one MMSC display interface per rack system configuration. It acts as the single point of administration for all compute modules in the rack configuration. In addition, in a multirack configuration, the rack with the MMSC and display should always be placed in the leftmost position.
| Caution: The MMSC front panel display provides a convenient method to power on, shut down, reset, and issue a nonmaskable interrupt (NMI) to the entire rack configuration. Use extreme care when issuing these commands from the display. Make sure that all affected users are notified before a system wide command is executed. |
The Router boards (see Figure 2-11) are multiported, bidirectional data packet controllers that can transport up to 800 MBps per port (in each direction). Each compute module can have one, two, or no Router boards (depending on the number of Node boards that are present). The Router interfaces with the HUB ASIC on Node boards and allows the 64-bit processors on one Node board to directly access the main memory located on another Node board. There are three types of Router boards that can be used in the Onyx2 rack:
Null Router
Star Router
Rack Router
If a compute module has only one Node board, no Router is required. A Router board is required only when there are two or more Node boards.
| Note: The Null and Star Router boards are primarily used in deskside systems. The deskside is equivalent in size to an individual compute module in a rackmount system. |
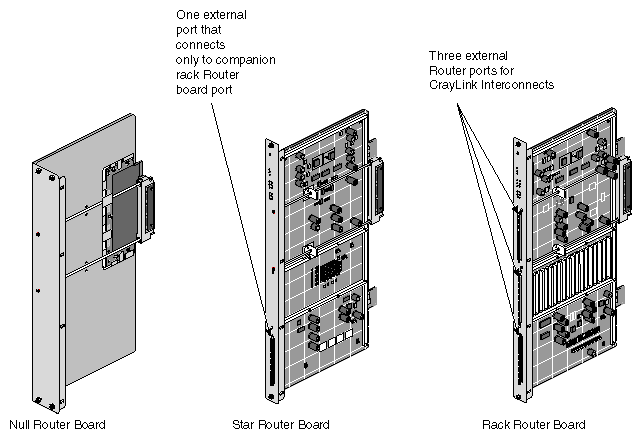
The Null router provides a low-cost method to connect two Node boards in a module. The Null Router board cannot be used for CrayLink Interconnect linking, and it does not have any external router connectors. The Null router board is generally used in deskside systems with only one or two Node boards.
The Star Router is always paired with a Rack Router board for proper operation. This cost-effective router board provides connections with all the Node boards in a module but cannot be used for CrayLink Interconnect linking. The Star Router has one external connector which connects to a port on the companion CrayLink Interconnect router board through a jumper. The Star Router board is generally used in a single-rack Onyx2 graphics system that uses three or four Node boards and does not require connection to additional compute modules.
The Rack Router boards provide CrayLink Interconnection in a multirack Onyx2 system that uses more than one compute module. This Router board can support configurations with up to 64 processors. The Rack Router has six ports that route data at up to 800 MBps (per port). Three of the ports connect internally. The fourth, fifth, and sixth ports can connect to external router ports on other compute modules.
The CrayLink Interconnect and the Xpress Links are the cabled interface that runs between rack Router boards (see Figure 2-12). These cables provide a high speed (800 MBps), scalable interconnection between different modules. These cables also supply physical link redundancy so that if a link fails, another link can take its place.
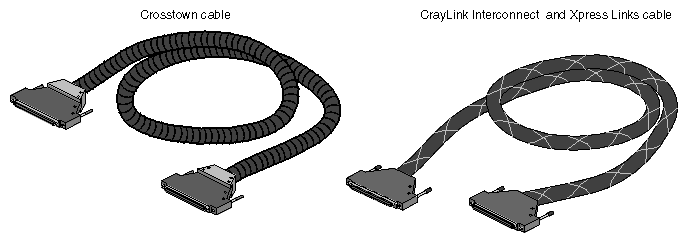
The crosstown cables connect each graphics module's KTOWN interface board directly with the compute module. Each pipe in the graphics module must have its own crosstown cable connection coming from a crosstown XIO board in the compute module. The KTOWN board in the graphics module sits directly between the two board sets in the graphics module.
You generally should not handle these sensitive linking cables; they are very delicate. Observe the following guidelines if you need to move these cables:
Avoid bending the cables tighter than a 1.25-inch (3.2 cm) radius.
Avoid stepping on the cables.
Avoid “hot plugging” in or removing cables while the system is up and running. This can hang or crash the entire graphics rack system.
| Caution: Additional Router and crosstown cable connections should be performed only by Silicon Graphics-certified personnel. |
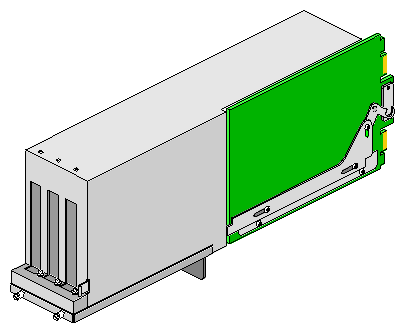
Each compute module in an Onyx2 graphics rack system can support an optional peripheral connector interface (PCI) carrier assembly. The PCI assembly can house up to three third-party PCI boards (see Figure 2-13). Two of the PCI boards can be full-size boards. The third PCI slot accepts only half-size boards. The PCI carrier assembly provides up to 75 watts of power.
This chapter identified and explained the major components that make up a graphics rack system. For information on graphic rack configurations and getting started using your system, go on to the next chapters.