This chapter provides information on using the multimodule System Controller (MMSC) and the module System Controllers (MSCs) in your Onyx2 graphics rack system.
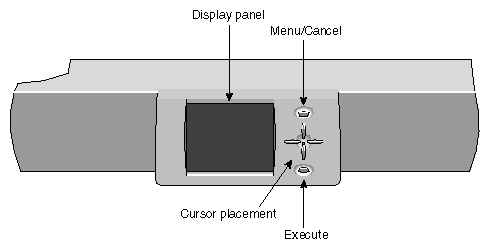
The MMSC monitors and reports status information from the individual compute and graphics modules in the rack system. Information is displayed and commands can be selected using the front panel display and the select buttons on the front of the rack. Figure 6-1 shows the panel and control buttons.
| Note: There is always one display, even with multirack systems. |
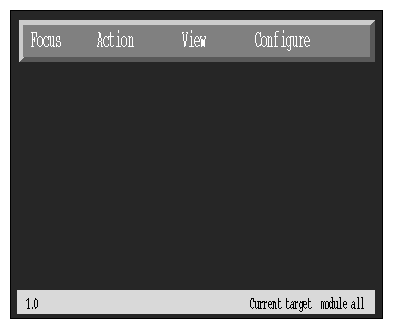
During normal operation, the MMSC interface panel displays a standard processor activity screen, similar to Figure 6-2. The controller interface offers a number of menu items. Select an item by highlighting it with the cursor. Move the cursor by pushing the up, down, left, and right buttons.
To discard a selection, press the top (Menu/Cancel) key. To execute a selection, press the bottom (Enter) key.
The display and keyset is only the interface to the MMSC logic unit. The logic unit must be fully and properly connected and powered on for the display to provide useful information. “System Power-On Procedures” in Chapter 4 provides a system power-on process using the controller interface.
Each compute module in an Onyx2 graphics rack system has its own MSC. The controller interacts with the power supply, internal fan(s), midplane, node and other boards that have on-board regulators in a module.
MSCs do not have the same functional abilities as the MMSC that mounts in the rack. The controller is located in the upper left section on the front of the module. In a processor compute module, it is between the CD-ROM drive and the hard disk bays.
Each MSC provides environmental monitoring for safe operation of the individual compute modules in the rack. The controller connects to the module's midplane by way of an extender board and provides user access to switches and displays at the front of each module.
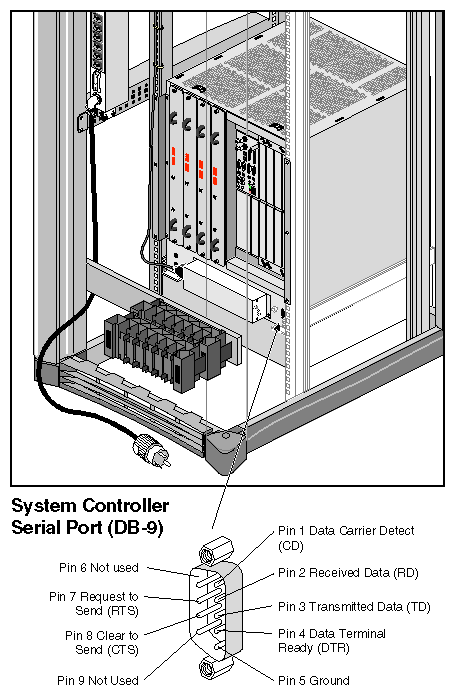
In the lower right section on the back of each module is a 9-pin serial console connector that is a direct mirror of the 8-pin DIN connector on the front panel.
| Note: You may not connect serial devices to both the front and rear MSC serial connectors at the same time. The connectors are wired through the same circuitry and cannot accept or send signals through both ports at the same time. |
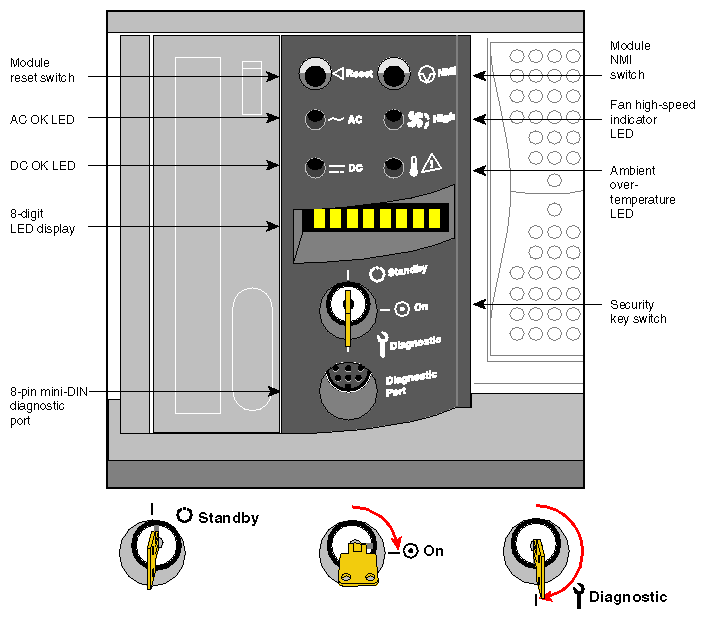
Each module's MSC has one keyswitch, two pushbuttons, and four LED indicators. Messages displayed on the 8-digit LED panel are described in Table 6-1. The following paragraphs provide information on the use or significance of each control or indicator.
The Front Panel Keyswitch selects Standby, On, or Diagnostic status for the system.
The System Reset pushbutton initiates a system-wide reset of the module. The keyswitch must be in the diagnostic position to use this button.
The Non-Maskable Interrupt (NMI) switch issues a reset signal to all Node boards in the compute module. The keyswitch must be in the diagnostic position to use this button.
The AC Power OK green LED lights when the system is plugged into an outlet and the AC circuit breaker is turned on. The Controller is receiving DC voltage (V_5 Aux) through the midplane, as are other boards that require it.
The DC Power OK green LED lights approximately 3.5 seconds after the keyswitch is turned to the On position. This indicates that the module's power supply is enabled and operating properly.
The Fan Speed High amber warning LED lights as an indication that the environmental temperature is higher than optimal, or that a noncritical fan has failed. When a noncritical fan fails, the remaining fans are set at full speed to compensate. When a critical fan fails, the system shuts down. In this case, you see the message MFANFL or FANFAIL on the controller's LED panel. A service call should be placed immediately after confirming that a fan has failed.
The Over-Temperature Fault amber warning LED lights when the controller's incoming air temperature or fan failure detection causes a shutdown of the system. If the environmental temperature exceeds the system's tolerance, or if a critical fan fails, the controller shuts down the system. In some cases, a service call should be placed immediately.
Each module's controller has a number of basic features and functions. Note the following bulleted items:
It issues a reset signal at power-on.
The front-panel mounted keyswitch provides a soft power-off to standby condition.
A front-panel mounted pushbutton on the controller works as a system reset switch for the module.
A front-panel mounted pushbutton non-maskable interrupt (NMI) switch on the controller resets all the module's Node boards (applicable to compute modules only).
It can sense ambient incoming air temperature into a module and adjust fan speed based on that temperature (two speeds). Soft power-off of the module results if ambient temperature is too high for safe operation.
The controller lights an LED display after sensing ambient over-temperature conditions.
It has an NVRAM for storing configuration information (1024 x 8 bits).
The compute module controller monitors fan rotation and automatically increases to high-speed operation when a fan fails. It also signals an impending shutdown when a single critical fan fails, or two or more noncritical fans fail.
The graphics module has a single blower monitored by the controller. It shuts the module down if the blower fails.
It has an LED display for high fan (or blower) speed or fan tray failure (fan high-speed LED).
The controller has an LED display indicator for power supply operations. The AC OK LED indicates AC voltage applied to the module. The DC OK indicates all power supply DC voltages (+12 V, +5 V, +3.45 V) and remote DC voltages (3.3 V, 2.4 V, 1.6 V) are present with no error conditions. The DC OK LED does not indicate regulation or accuracy of the DC voltages present.
It provides a 100 Kbps bidirectional communication path between the MSC, midplane, and HUB ASIC IO space on each Node board in a compute module. This communication path allows the MSC to receive system status messages from all Node boards in a module, and to provide status messages from the MSC and all Node boards in the module. This communication path is referred to as the I2C interface.
It provides the ability to request the module serial number and configuration information via the I2C interface.
The controller has an eight-digit alphanumeric status display. This display is updated by the MSC or the Node board(s) in the system via the I2C interface.
It provides a seven-wire 9600 Baud alternate console diagnostic port for offline configuration and troubleshooting. This port can also be used to communicate with a compute module's Node boards when the IO console port or graphics console is not functional. This interface also supports the minimum requirements for modem support.
Software reset, NMI, and soft power-off commands are provided through the alternate console port.
It supports alternate console port command-line power supply voltage margining. Margining allows the 3.45 V or 5 V outputs of the power supply to be moved 5% higher or lower independently. This does not affect remote regulated termination voltages (1.6 V, 2.4 V, router 3.3 V).
It has alternate console port command-line regulated termination voltage margining for the termination voltages 1.6 V, 2.4V, and 3.3 V, (all termination voltages are margined 5% higher or lower together, not independently). This does not affect the power supply voltages.
In a compute module, it sends early warning, high-priority interrupt (Panic Interrupt) to all Node boards warning of an impending shutdown due to an AC power failure, ambient over-temperature, or the keyswitch being turned to the standby position.
The interlock (removable keyswitch) prevents unauthorized personnel from turning the module on or off, and limits operation of the System Reset and NMI functions. The software password allows access and permissions through the alternate console port.
The MSC front panel has an eight-character LED readout that supplies information about system status or problems.
Table 6-1 lists status messages and provides an explanation of what the impacts may be.
Error Message | Meaning of Message |
|---|---|
SYS OK | The module is operating normally. |
R PWR UP | The module is being powered on remotely via the MSC's serial connection. |
POWER UP | The module is being powered on from the front panel switch. |
PFW FAIL | The AC power supplied to the module has failed or dropped below acceptable parameters. The module has shut down. |
PS OT FL | The module's power supply temperature has exceeded safety limits and the module has shut down. |
PS FAIL | The internal power supply has failed and the module has shut down. |
OVR TEMP | The module's temperature has exceeded acceptable limits and the module has shut down. |
KEY OFF | The MSC's switch has been turned to standby. |
RESET | The controller's switch has been turned to the diagnostic position, and the Reset button pushed. |
NMI | The controller's switch has been turned to the diagnostic position, and the non-maskable interrupt (NMI) button pushed. |
M FAN FL | More than one fan has failed and the module has shut down. |
R PWR DN | The module has been powered off from a remote location. |
PWR CYCL | The module has received the command to power cycle from the console or a remote user. |
HBT TO | The module has registered a heart beat time-out. A non-maskable interrupt is generated, followed by a module reset. |
FAN FAIL | A module fan has failed. If it is fan 1, 2, or 3, the module shuts down. A service call should be placed as soon as possible. |
POK FAIL | A power OK failure occurred on an unidentified board. |