The Multi-Channel Option panel is a graphical user interface that enables you to set video parameters for individual output channels. The panel is a variation of the panel for RealityEngine graphics. If the system detects the presence of a Multi-Channel Option board, the panel appropriate for the Multi-Channel Option is displayed.
If your system has more than one Multi-Channel Option board, run the panel on each pipe; make settings for the appropriate channels in the panel running on that pipe.
| Note: Because field sequential and interlaced formats (for example, 6@640x486_30i) under IRIX 5.1 do not have cursor control, and because display sync can be lost if an incorrect parameter is selected, it is recommended that you run the Multi-Channel Option panel on another Silicon Graphics workstation on your network. |
/usr/sbin/vout |
| Note: This command calls the Multi-Channel Option panel only if the workstation is in Multi-Channel Option mode; otherwise, the standard RealityEngine panel is displayed. |
If the system is running 4.0.5H, 5.0.1, or 5.1 and has more than one Multi-Channel Option, for example, on pipes 0 through 2, type
setenv DISPLAY :0.0
/usr/sbin/vout
setenv DISPLAY :0.1
/usr/sbin/vout
setenv DISPLAY :0.2
/usr/sbin/vout
|
If the system is running a release greater than 5.1, you can specify a pipe number. In this case, the DISPLAY variable only determines where the panel will be displayed and the pipe variable determines which pipe will be controlled. If no pipe variable is specified, the default is pipe 0. For example, for Multi-Channel Options on pipes 0 through 2, type
setenv DISPLAY :0.2
/usr/sbin/vout -p 0
setenv DISPLAY :0.2
/usr/sbin/vout -p 1
setenv DISPLAY :0.2
/usr/sbin/vout -p 2
|
In this example, all three vout panels would be displayed on pipe 2, but would each control a different pipe.
It is recommended that you display the panel on a remote system. For example, to control pipe 2 from a remote system named remote_name, log in remotely to the multipipe system and type
setenv DISPLAY <remote_name>:0
usr/sbin/vout -p 2
|
Figure 3-1 shows the panel.
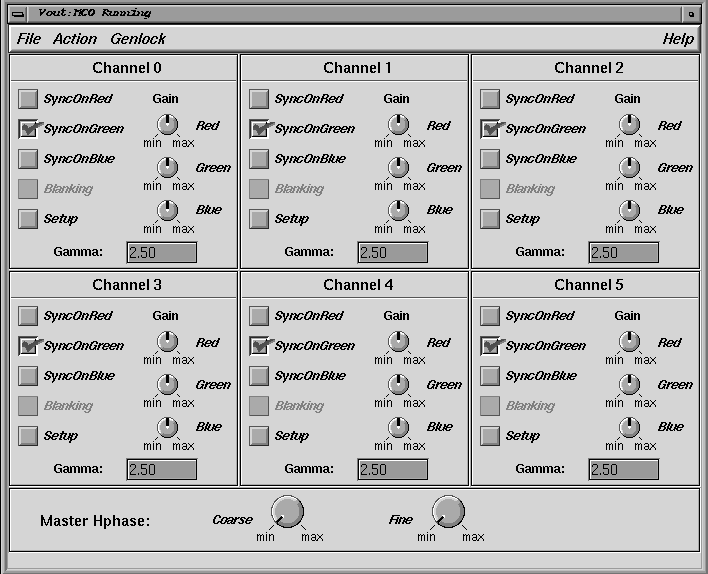
| Note: Settings in this figure may not match factory settings. Setting blanking is not implemented in this version. |
The segments of the panel allow you to set video options for each channel separately. A menu option allows you to apply settings from one segment to all active channels. Changes are reflected in video output as you make them.
This chapter explains
setting channel-specific controls
setting system-wide controls
saving settings
restoring settings
| Note: Factory settings are listed in the section on restoring settings later in this chapter. |
This section explains how to set channel-specific controls:
sync
setup
gamma
gain
| Note: You can calibrate all channels at once by using the “ Group Controls” option in the “ Action” menu, as explained in “Setting System-wide Controls,” later in this chapter. |
Click this box to enable setup, also known as pedestal. Setup is the difference between the blackest level displayed on the receiver and the blanking level; it is also defined as a black level that is elevated to 7.5 IRE instead of being left at 0.0 IRE, that is, the lowest level for active video. Because the video level is known, this part of the signal is used for black-level clamping circuit operation. Setup is typically used in the NTSC video format and is typically not used in the PAL video format.
Enter a gamma value in the text box to correct for inconsistency in the CRT.
The CRT is not linear with respect to voltage; the voltage-to-intensity characteristic is usually close to a power of 1.7. If left uncorrected, the resulting display has too much contrast and detail in black regions is not reproduced. To correct this inconsistency, a correction factor using the 1.7 root of the input signal is included, so that equal steps of brightness or intensity at the input are reproduced with equal steps of intensity at the display.
Use the “Save Changes” option in the File menu to save your settings. Settings made in this panel are stored in an EEPROM on the Multi-Channel Option board.
When you start the Multi-Channel Option, the values that are last saved are automatically used. Thus, you must save settings in order for them to be in effect the next time you use the Multi-Channel Option.
Both factory settings and the user-defined settings last saved are stored on the Multi-Channel Option board's EEPROM.
Factory settings are given in Table 3-1.
Table 3-1. Factory Settings for Panel
Setting | Value |
|---|---|
Sync on red | Disabled |
Enabled | |
Sync on blue | Disabled |
Enabled | |
1.7 | |
93% | |
Setting horizontal phase to maximum is not recommended; loss of lock can occur. Minimum | |
Fine horizontal phase | Minimum |
Disabled | |
TTL sync | Disabled |
Disabled |