In performance analysis, you set up the experiment, run the executable, and analyze the results. To make setup easier, the Performance Analyzer provides predefined tasks that help you establish an objective and ensure that the appropriate performance data will be collected. This chapter tells you how to conduct performance tasks and what to look for.
It covers these topics:
Performance tuning typically consists of examining machine resource usage, breaking down the process into phases, identifying the resource bottleneck within each phase, and correcting the cause. Generally, you run the first experiment to break your program down into phases and run subsequent experiments to examine each phase individually. After you have solved a problem in a phase, you should then reexamine machine resource usage to see if there is further opportunity for performance improvement.
Each experiment has these steps:
Specify the performance task.
The Performance Analyzer provides predefined tasks for conducting experiments. When you select a task, the Performance Analyzer automatically enables the appropriate performance data items for collection.
You should have an objective in mind when you start an experiment. The predefined tasks ensure that only the appropriate data collection is enabled. Selecting too much data can bog down the experiment and skew the data for collection. If you need a mix of performance data not available in the predefined tasks, you can select "Custom Task" from the "Select Task..." submenu, which lets you enable any combination of the data collection options.
Specify where to capture the data.
If you have selected the "Identify bottleneck resources & phases" task, which automatically polls for performance data, this step is not needed. If you want data at specific points in the process, you need to set sample traps. See "Setting Sample Traps" for a brief description of traps or Chapter 4, "Setting Traps," in ProDev WorkShop Debugger User's Guide for an in-depth discussion.
Performance Analyzer sets sample traps at the beginning and end of the process automatically. If you want to analyze data within phases, then you should set sample traps at the beginning of each phase and at intermediate points, if desired.
Specify the experiment configuration parameters.
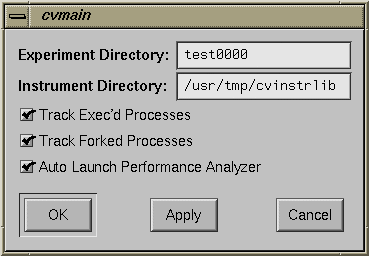
This is an optional step if you use the defaults; otherwise you need to select "Configs..." from the Perf menu. This displays the dialog box shown in Figure 3-1.
The dialog box lets you specify
the experiment directory where the data is to be stored
the instrument directory where the instrumented executable is to be stored
tracking exec'd processes
tracking forked processes
launching the Performance Analyzer automatically when the experiment finishes
Run the program to collect the data.
You run the experiment from the Debugger Main View window. If you are running a small experiment to capture resource usage, you may be able to watch the experiment in real time in Process Meter. Performance Analyzer stores the results in the designated experiment subdirectory.
Analyze the results.
After the experiment completes, you can look at the results in the Performance Analyzer window and its associated views. Use the calipers to get information for phases separately.
To set up a Performance Analyzer experiment, you need to choose a task from the Select Task submenu in the Perf menu in the Debugger Main View (see Figure 3-2).
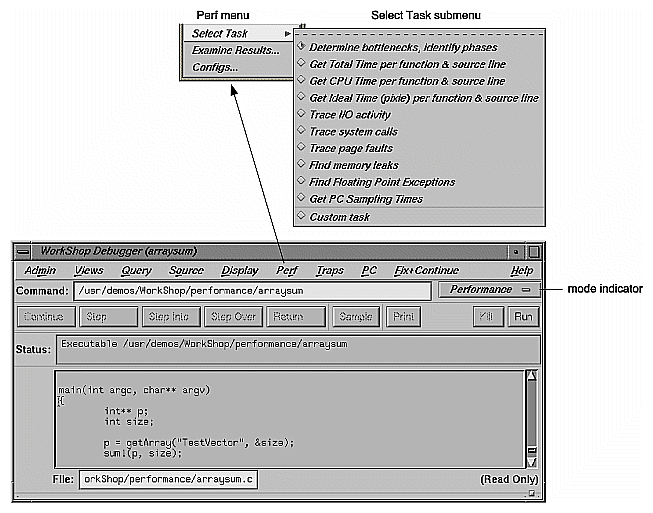
The Select Task submenu provides these tasks:
Determine bottlenecks, identify phases
Get Total Time per function & source line
Get CPU Time per function & source line
Get Ideal Time (pixie) per function & source line
Trace I/O activity
Trace system calls
Trace page faults
Find memory leaks
Find Floating Point Exceptions
Custom task
Selecting a task enables data collection. The mode indicator in the upper right corner of the Main View changes to show that performance analysis is enabled.
For a thorough discussion of setting traps, refer to Chapter 4, "Setting Traps,"in the ProDev WorkShop Debugger User's Guide. Sample traps enable you to record data when a specified condition occurs. You set them from the Debugger Main View, Trap Manager, or Source View. You can define sample traps:
at function entry or exit points
at source lines
for events
conditionally
manually during an experiment
Sample traps at function entry and exit points are preferable to source line traps, because they are more likely to be preserved as your program evolves. This better enables you to save a set of traps in the Trap Manager in a file for subsequent reuse.
Manual sample traps are triggered when you click the Sample button in the Debugger Main View. They are particularly useful for applications with graphical user interfaces. If you have a suspect operation in an experiment, a good technique is to take a manual sample before and after you perform the operation. You can then examine the data for that operation.
If you are unfamiliar with performance analysis, it is very easy to request more data collection than you actually need—this can degrade performance of the Performance Analyzer and skew results. To help you record data appropriate to your current objective, WorkShop provides predefined combinations of options (or tasks), which are available in the Selact Task submenu in the Perf menu. When you select a task, the required data collection is automatically enabled.
"Determine bottlenecks, identify phases" measures machine resource usage and takes pollpoint samples at 1-second intervals.
Call stack data is captured at each pollpoint sample to compute the total time for each function and source line. In call stack profiling, the time spent at a PC (program counter) is determined by multiplying the number of times the PC appears in any call stack by the average time interval between call stacks. Call stacks are gathered whether the program was running or blocked; hence, the time computed represents the total time, both within and outside of the CPU. If the target process was blocked for a long time as a result of an instruction, that instruction will show up as having a high time.
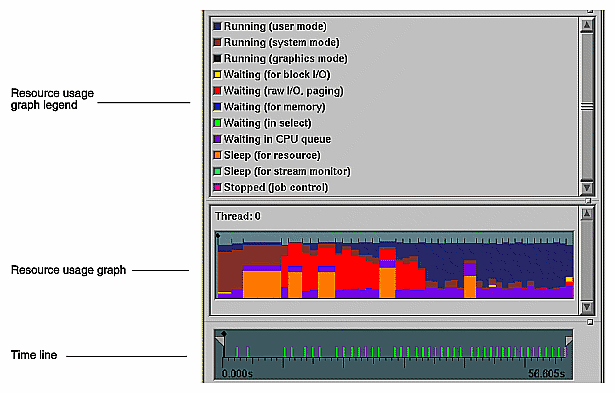
Gathering machine resource usage data lets you observe resource consumption over time. With it, you can break your program down into phases with similar resource consumption. You can analyze individual phases in detail in subsequent experiments. You can view resource usage in Usage View (Graphical), Usage View (Numerical), and in the Usage Chart in the Performance Analyzer main window.
Figure 3-3 shows a typical example of the resource usage graph and time line portion of the main Performance Analyzer window for a "Determine bottlenecks, identify phases" task. The resource usage graph shows the user vs. system time. The legend indicates the use of color in the graph. The time line is below the resource graph; it has a time scale so that you can correlate the resource usage with experiment time and with specific events.
Use "Get Total Time per function & source line" to tune a phase that has been determined not to be CPU-bound. This task records:
call stacks every 100 ms, whether the target program is running or blocked
machine resource usage data at 1-second pollpoints and at sample points
The Total Time values for the PCs are summed up and displayed:
by function in the function list
by source line in Source View
by instruction in Disassembly View
Use "Get CPU Time per function & source line" to tune a CPU-bound phase. It enables you to display the time spent in the CPU by function, source line, and instruction. This task records:
PC every 10 ms
function counts
machine resource usage data at 1-second intervals and at sample points
The CPU time is calculated by multiplying the number of times a PC appears in the profile by 10 ms. PCs are profiled only when the program is running in the CPU; hence, the time computed is the time spent within the CPU, or the CPU time.
If the target process was blocked for a long time as a result of an instruction, that instruction will show up as having a low or zero CPU time. On the other hand, CPU-intensive instructions will show up as having a high CPU time.
The CPU time values for the PCs are summed up and displayed:
by function in the function list
by source line in Source View
by instruction in Disassembly View
Function count data is computed by inserting machine code that increments a counter at the start of the function (this is called instrumentation). This data is used in the function list to show how many times the function was called and also in the call graph to show how many times one function called another function, that is, arc counts.
PC profiling is done by the kernel and is only minimally intrusive. Gathering function counts intrudes substantially due to:
instrumentation code consuming CPU cycles
instrumentation code increasing the target executable size
PC profiling of the instrumented code itself, which distorts the metrics
However, function counts are useful when combined with PC profiling, because they help in the computation of Inclusive CPU times. (Inclusive CPU time is the total time spent in a function and all the functions it calls; exclusive CPU time is the time spent in the function only.) The arc counts indicate what percentage of a function's CPU time can be attributed to each of its callers.
If you only need Exclusive CPU times and are willing to forgo Inclusive CPU times, arc counts, and function count information, you should select "Custom task" and enable PC Profile Counts and set Fine-Grained Usage to 1 second.
Also look at the task "Get Ideal Time (pixie) per function & source line".
Use "Get Ideal Time (pixie) per function & source line" to tune a CPU-bound phase. This task provides exact counts with theoretical times. It is very useful when used in conjunction with the "Get CPU Time per function & source line" task. This approach lets you examine actual versus ideal time. The difference is the time spent as a result of:
load operations, which take a minimum of two cycles if the data is available in the cache and a lot longer if the data has to be accessed from the swap area or second-level cache
store operations, which cause the CPU to stall if the write buffer in the CPU gets filled
floating point operations, which consume more than one cycle
time spent with the CPU stalled as a result of data dependencies
This task records:
basic block counts
machine resource usage data at 1-second intervals and at sample points
The following results are shown in the function list, Source View, and Disassembly View:
execution counts
resulting machine instructions
a count of resulting loads, stores, and floating point instructions
an approximation of the time spent with the CPU stalling (caused by data interlocks)
the ideal time, that is, the product of the number of the machine instructions executed and the cycle time of the machine (The assumption made in the computation of ideal time is that each instruction takes exactly one cycle to execute.)
This task requires instrumentation of the target executable. This involves dividing the code into basic blocks, which are a set of instructions with a single entry point, a single exit point, and no branches within. Counter code is inserted at the beginning of each basic block.
After the instrumented executable runs, the Performance Analyzer multiplies the number of times a basic block was executed by the number of instructions in it. This yields the total number of instructions executed as a result of that basic block (and similarly for specific kinds of instructions like loads or stores).
Note that the execution of the instrumentation code will skew the behavior of the target executable making it almost entirely CPU-bound; so pay no attention to the User vs Sys Time stripcharts.
Use "Trace I/O activity" when your program is being slowed down by I/O calls and you want to find the responsible code. This task records call stacks at every read and write system call, along with file descriptor information, and the number of bytes read or written.
The number of bytes read and written is presented:
by function in the function list
by source line in Source View
by instruction in Disassembly View
The I/O View window displays a graph of the number of bytes read and written for each file descriptor over time, and displays the files involved in the I/O. You can also see the read and write system calls.
Use "Trace system calls" when you suspect that system calls are slowing down performance and you wish to determine the responsible code.
The number of system calls made is presented:
by function in the function list
by source line in Source View
by instruction in Disassembly View
To observe the pattern of system calls over time, look in the syscall event chart of the Usage View (Graphical).
The "Trace page faults" task indicates areas of high page faulting activity and identifies the code responsible. The task records call stacks at every page fault.
The number of page faults is presented:
by function in the function list
by source line in Source View
by instruction in Disassembly View
To observe the pattern of page faulting over time, look in the page fault event chart of the Usage View (Graphical).
Use "Find memory leaks" to determine where memory leaks and bad frees may occur in a process. The task records the call stacks, address, and number of bytes at every malloc, realloc, and free. The currently malloced bytes (that might represent leaks), and the list of double frees are presented in Malloc Error View and the other memory analysis views. The number of bytes malloced is presented:
by function in the function list
by source line in Source View
by instruction in Disassembly View
Use "Find Floating Point Exceptions" when you suspect that large, unaccountable periods of time are being spent in floating point exception handlers. The task records the call stack at each floating point exception. The number of floating point exceptions is presented:
by function in the function list
by source line in Source View
by instruction in Disassembly View
To observe the pattern of floating point exceptions over time, look in the floating point exceptions event chart in the Usage View (Graphical).
Use the "Custom task" selection when you need a combination of performance data collected that is not available through the predefined tasks. Selecting "Custom Task" displays the dialog box shown in Figure 3-4.
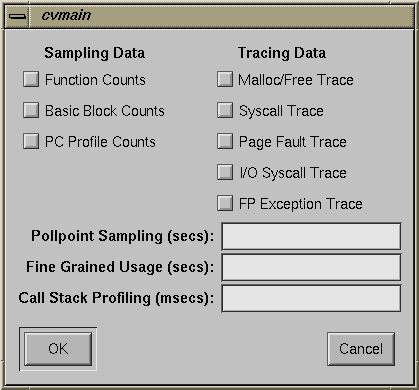
The Custom Task dialog box lets you specify
sampling data—function counts, basic block counts, and PC profile counts
tracing data—malloc/free trace, syscall trace, page fault trace, I/O syscall trace, FP exception race,
recording intervals—the frequency of data recording for pollpoint sampling, fine-grained usage, and call stack profiling
Remember the basic warnings in this chapter about collecting data:
Too much data can bog down the experiment.
Combining PC profiling and basic block counting will cause the instrumented code to be profiled, including the count code.
Call stack profiling is not compatible with count operations or PC profiling.
If you combine count operations with PC profiling, the results will be skewed due to the amount of instrumented code that will be profiled.