As CPUs get faster and storage gets cheaper, applications are moving away from scenes with small, synthetic textures to large textures, taken from real environments, giving the viewer realistic renderings of actual locations.
There has customarily been a trade-off between the complexity of a texture and the area it covers: if a texture covers a large area, its resolution must be limited so that it can fit into texture memory; high-resolution textures are limited to small regions for the same reason.
A cliptexture allows you to circumvent many of these system resource restrictions by virtualizing MIPmapped textures. Only those parts of the texture needed to display the textured geometry from a given location are stored in system and texture memory. OpenGL Performer provides support for this technique, called cliptexturing, as a subclass of a pfTexture called a pfClipTexture. This functionality allows you to display textures too large to fit in texture memory or even in system memory; you can put the entire world into a single texture.
OpenGL Performer supports texture load management from disk to system memory and from system to texture memory, synchronizing clipped regions with the viewpoint, and with the many other tasks needed to virtualize a texture relative to the viewer location.
This chapter describes cliptextures in the following parts:
Cliptexturing avoids the size limitations of normal MIPmaps by clipping the size of each level of a MIPmap texture to a fixed area, called the clip region. A MIPmap contains a range of levels, each four times the size of the previous one. If the clip region is larger than a particular level, the entire level is kept in texture memory. Levels larger than the clip region are clipped to the clip region's size. The clip region is set by the application, trading off texture memory consumption against image quality. The clip region size is set through the clip size, which is the length of the clip regions's sides (in texels).
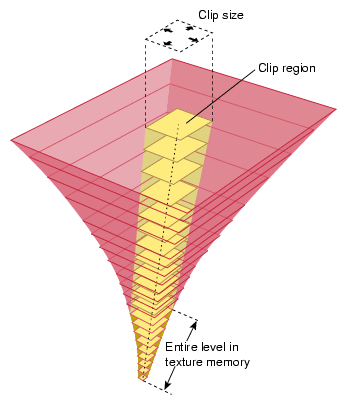
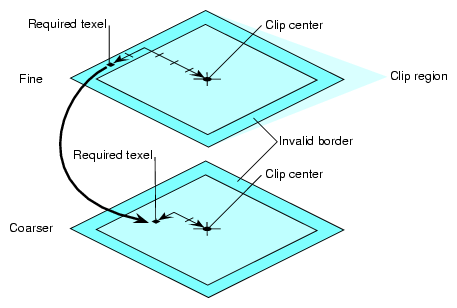
The clip region positioned so as to be centered about the clip center, or as close as possible to the clipcenter while remaining entirely within the cliptexture. The clipcenter is set by the application, usually to the location on the texture corresponding to the location closest to the viewer on the cliptextured geometry. The clipcenter is specified in texel coordinates, which is the texture coordinates (s and t values, ranging from 0.0 to 1.0, scaled by the dimensions of the finest level of the cliptexture, level 0).
Texture memory contains the MIPmap levels, the larger ones clipped to the clip region size; the rectangle of texture memory corresponding to each clipped level is called a tex region. As the viewer moves relative to the cliptextured geometry, the clipcenter must be updated. When this happens, the clipped MIPmap levels must have their texture data updated, in order to represent the area closest to the center. This updating usually must happen every frame, and is done by OpenGL Performer image caches.
To facilitate loading only portions of the texture at a time, the texture data must first be subdivided into a contiguous set of rectangular areas, called tiles. These tiles can then loaded individually from disk into texture memory.
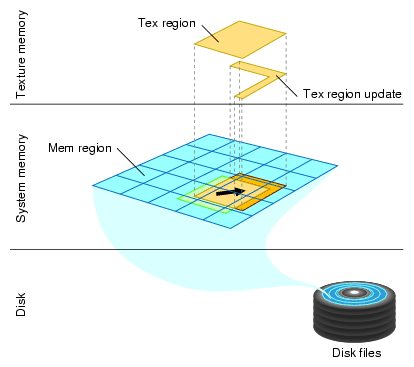
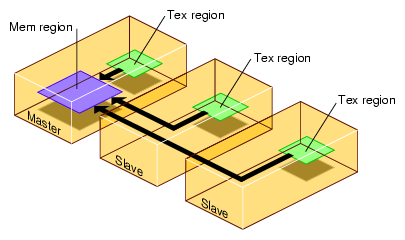
Texture memory must be loaded from system memory; it can't be loaded directly from disk. In order to improve the performance of texel downloading, the region in system memory is made larger than the destination texture memory and organized into a lookahead cache, called the mem region.
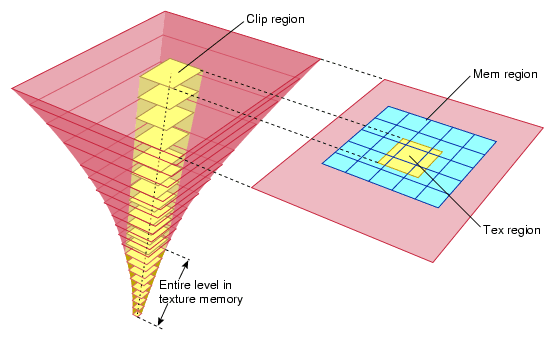
Image caches must know three things in order to update clipped texture levels:
For the cliptexture algorithm to work seamlessly, applications must abide by the following assumptions:
An application can only view a clip region's worth of high resolution texel data on its textured geometry from any viewpoint.
The application views the texture from one location at a time. Multiple views require multiple cliptextures.
The viewer must move smoothly relative to the cliptextured geometry; no “teleporting” (abrupt changes in position).
Given these assumptions, your application can maintain a high-resolution texture by keeping only those parts of the texture closest to the viewer in texture memory; the remainder of the texture is on disk and cached in system memory.
Only the textured geometry closest to the viewer needs a high-resolution texture. Far away objects are smaller on the screen, so the texels used on that object also appear smaller (cover a smaller screen area). In normal MIPmapping, coarser MIPmap levels are chosen as the texel size gets smaller relative to the pixel size. These coarser levels contain less texels, since each texel covers a larger area on the textured geometry.
Cliptextures take advantage of this fact by storing only part of each large MIPmap level in texture memory, just enough so that when you look over the geometry, the MIPmap algorithm starts choosing texels from a lower level (because the texels are getting small on the screen) before you run out of texels on the clipped level. Because coarser levels have texels that cover a larger area, at a great enough distance, MIPmapping is choosing texels from the unclipped, smaller levels.
When a clip size is chosen, cliptexture levels can be thought of as belonging to one of two categories:
The non-clipped levels are viewpoint independent; each non-clipped texture level is complete. Clipped levels, however, must be updated as the viewer moves relative to the textured geometry.
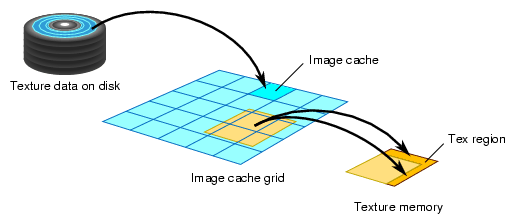
The image cache organizes its system memory as a grid of fixed size texture tiles. This grid of texture data forms a lookahead cache, called the mem region. The cache automatically anticipates texture download requirements, updating itself with texture tiles it expects to use soon.
Image caches update texture memory by transferring image data from disk files. The data is transferred in two steps. Data is moved from disk files a tile at a time into the mem region in system memory. The mem region is updated so that it always contains the image data corresponding to the tex region and its immediate surroundings. The border of extra surrounding data allows the image cache to update the tex region as necessary without having to wait for tiles to be loaded into the mem region from disk.
The image cache also contains a tex region, the rectangle of texel data in a given level's texture memory. This rectangle of data is in texture memory, and is being updated from a corresponding rectangle of data in the memregion. As the center moves, the tex region being loaded into texture memory can get close to the edge of the mem region. When this happens, tiles in the mem region are updated with new data from disk so that the tex region is moved closer to the center of the image data.

As the center moves, the clipped region on each clipped level of the image cache shifts position. The clipped regions on each level move at different rates; each coarser level only moves at one half the speed of the level above it. The image cache reflects the change on its level by tracking the position of the clipped region with its tex region. Data in texture memory must be updated to match the texel data in the translated tex region.
This updating is done by copying rectangles of texel data from the shifted tex region area in the mem region to the appropriate locations in texture memory. The amount of updating is minimized by only updating the portions of the texture memory that actually need new data. The majority of the tex region data only has to shift position in texture memory; this is done by translating texture coordinates, and taking advantage of the wrap mode when accessing texels from texture memory.
By loading textures to system memory before they are needed in texture memory, the latency caused by waiting for tiles downloading from a disk is reduced.
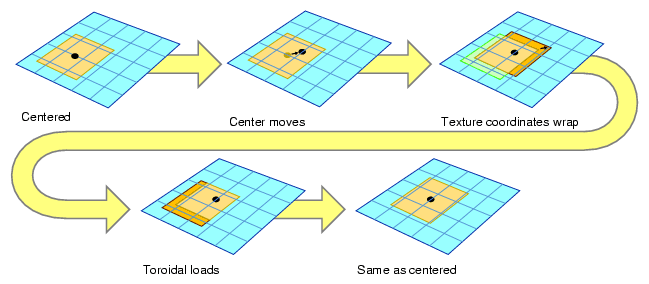
In order to minimize the bandwidth required to download texels from system to texture memory, the image cache's tex regions are updated using toroidal loading. A toroidal load assumes that changes in the contents of the clip region are incremental, such that the update consists of:
New texels that need to be loaded.
Texels that are no longer valid.
Texels that are still in the clip region, but have shifted position.
Toroidal loading minimizes texture downloading by only updating the part of the texture region that needs new texels. Shifting texels that remain visible is not necessary, since the coordinates of the clip region wrap around to the opposite side.
Being able to impose alignment requirements to the regions being downloaded to texture memory improves performance. Cliptextures support the concept of an invalid border to provide this feature. It is the area around the perimeter of a clip region that can't be used. The invalid border shrinks the usable area of the clip region, and can be used to dynamically change the effective size of the clip region. Shrinking the effective clip size can be a useful load control technique.
When texturing requires texels from a portion of an invalid border at a given MIPmap level, the texturing system moves down a level, and tries again. It keeps going down to coarser levels until it finds texels at the proper coordinates that are not in the invalid region. This is always guaranteed to happen, since each level covers the same area with less texels (coarser level texels cover more area on textured geometry). Even if the required texel is clipped out of every clipped level, the unclipped pyramid levels will contain it.
You can use an invalid border to force the use of lower levels of the MIPmap to do the following:
Reduce the abrupt discontinuity between MIPmap levels if the clip region is small: using coarser LODs blends MIPmap levels over a larger textured region.
Improve performance when a texture must be roamed very quickly.
Since the invalid border can be adjusted dynamically, it can reduce the texture and system memory loading requirements at the expense of a blurrier image.
To figure out what part of the texture must be loaded in each of the clipped levels, you must know where the viewer is relative to the geometry being textured. Often this position is computed by finding the location of the cliptextured geometry that is closest to the viewer, and converting that to a location on the texture. This position is called the cliptexture center and it must be updated every frame as the viewer moves relative to the cliptextured geometry.
The clipcenter is set by the application for level 0, The cliptexture code then derives the clipcenter location on all MIPmap levels. As the viewer roams over a cliptexture, the centers of each MIPmap level move at a different rate. For example, moving the clipcenter one unit corresponds to the center moving one half that distance in each dimension in the next-coarser MIPmap level.
Most of the work of cliptexturing is updating the center properly and updating the texture data in the clipped levels reliably and efficiently each frame.
Cliptextures save texture memory by limiting the extent of texture levels. Every level in the mipmap is represented in texture memory, and can be accessed as the geometry is textured. On InfiniteReality systems, there are limits to the number of levels the cliptexturing hardware can access while rendering, which restricts the cliptextures maximum size.
This limit can be exceeded by only accessing a subset of all the MIPmap's levels in texture memory on each piece of geometry, “virtualizing” the cliptexture. The virtual offset is sets a virtual “level 0” in the MIPmap, while the number of effective levels indicates how many levels starting from the new level 0 can be accessed. The minlod and maxlod parameters are used to ensure that only valid levels are displayed. The application typically divides the cliptextured terrain into pieces, using the relative position of the viewer and the terrain to update the parameter values as each piece is traversed.
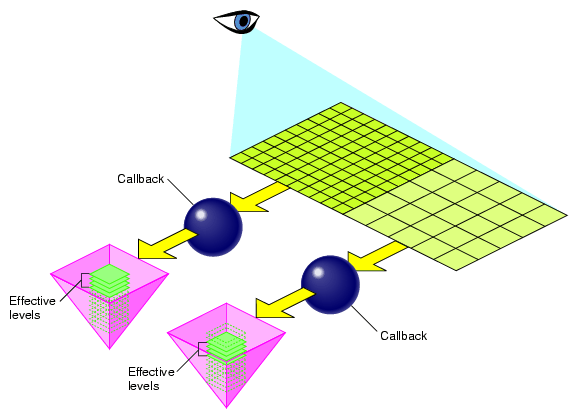
For more information about virtual cliptextures, see “Virtual ClipTextures”.
Ideally, pfClipTextures would be interchangeable with pfTextures in OpenGL Performer. Unfortunately, this is only partially true. The following sections describe some of the differences between OpenGL Performer textures and cliptextures.
Every level is complete in a regular texture. Cliptextures have clipped levels, where only the portion of the level near the cliptexture center is complete. In order to look correct, a cliptextures center must be updated as the channel's viewport moves relative to the cliptextured geometry.
Cliptextures require functionality that recalculates the center position whenever the viewer moves (essentially each frame). This means that a relationship has to exist between the cliptexture and a channel.
Textures only need to be applied once. Cliptextures must be applied every time the center moves (essentially each frame). In order to apply at the right time, cliptextures need to be connected to a pfPipe.
A texture does not know where its data comes from. The application just supplies it as a pointer to a region of system memory when the texture is applied.
Cliptextures need to update their contents as the center moves and they are reapplied each frame. As a result, they need to know where their image data resides on the disk. In order to maximize performance, cliptextures also cache their texel data in system memory. As a result, cliptextures are a lot more work to configure, since you have to tell them how to find their data on disk, and how you want the data cached in system memory.
Since cliptexture levels are so large, OpenGL Performer offers additional features not available to regular textures.
With certain restrictions, cliptexture levels can be partially populated, containing “islands” of high resolution data. This can be useful if the application only needs high-resolution texel data in relatively small, widely scattered areas of a large cliptexture. An example of this might be an airline flight simulator, where high resolution data is only needed in the vicinity of the airports used by the simulator.
For more information about insets, see “Cliptexture Insets”.
To further increase the size of cliptextures that OpenGL Performer can use, the levels themselves can be virtualized; It then selects a subset of all the available texture levels to be loaded into memory. This requires additional support by the application. Virtual cliptextures are described in detail in “Virtual ClipTextures”.
Since cliptextures require both system and texture memory resources, OpenGL Performer has provided functionality to share the system memory resources when a cliptexture is used in a multipipe application. “Slave” cliptextures and a “master” cliptexture share system memory resources, but have their own classes and texture memory.
As a result of their special requirements, cliptextures are used differently than pfTextures with many different OpenGL Performer classes. The following sections describe these differences.
When everything is configured properly, a pfClipTexture is interchangeable with a pfTexture when used in a geostate. Note that when using emulated cliptextures, the pfClipTexture must be assigned to the pfGeoState before the pfGeoState is associated with any pfGeoSet.
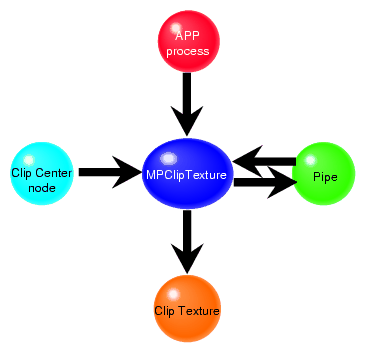
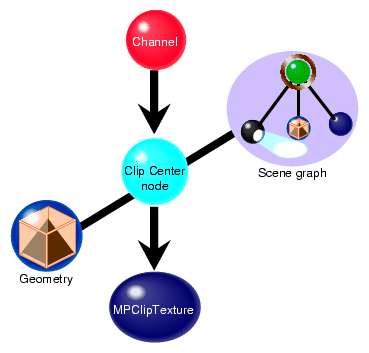
A pfClipTexture can be connected to a pfMPClipTexture, a multiprocessing component, which is connected to a pfPipe. From the pipe's point of view, a pfMPClipTexture is something it can apply to.
Some functionality must be supplied to update a cliptexture's center as the channel moves with respect to the cliptextured geometry. This functionality can be supplied by the application, or OpenGL Performer can do it automatically if the application uses clipcenter nodes.
A clipcenter node is added to the scenegraph and is traversed by the APP process just like every other node in the scenegraph. When the clipcenter node is traversed by a channel, the clipcenter node computes the relationship between the cliptextured geometry and the channel's eyepoint, and updates the cliptexture's center appropriately.
Cliptexture is a large and diverse piece of functionality. As a result, cliptexture support is found in nearly every major library in OpenGL Performer.
The pfImageCache class defines image caches which manage the updating of clipped levels, pfImageTile classes are used to define non-clipped cliptexture levels and define pieces of clipped levels downloaded from disk to system memory. The pfQueue class supports read queues, which manage the read requests from disk to system memory in image caches, while the pfClipTexture class itself defines cliptextures themselves, virtual mipmaps composed of image caches and image tile levels. The pfTexLoad class defines download requests when image caches download texels from system to texture memory.
The libpf library adds multiprocessing support for using cliptextures in scene graphs. the pfMPClipTexture class ties together pfClipTextures, pfPipes, cliptexture centering functionality (often pfuClipCenterNode nodes) and the application itself in a multiprocessing environment. additional functionality in the pfPipe class ensures that cliptextures are applied properly.
The libpfutil library provides easy to use clipcentering functionality through the pfuClipCenterNode class, a subclass of the pfGroup class. This library also provides traversals to simplify the work of finding cliptextures in a scene graph using pfuFindClipTextures(), code for post loader configuration, where pfMPClipTextures are created, and attached to pipes and clipcenter nodes using pfuProcessClipCenters() and pfuProcessClipCentersWithChannel(). The pfuAddMPClipTextureToPipes() and pfuAddMPClipTexturesToPipes() routines connect pfMPClipTextures to the proper pipes, handling multipipe issues in a clean way. Load time configuration is simplified using the pfuInitClipTexConfig(), pfuMakeClipTexture(), and pfuFreeClipTexConfig() along with the appropriate callbacks for image caches and image tiles. Image cache configuration is supported with pfuInitImgCacheConfig(), pfuMakeImageCache(), and pfuFreeImgCacheConfig() routines.
The cliptexture configuration file parsers are supported here; pfdLoadClipTexture() and pfdLoadClipTextureState() work with cliptexture configuration files to simplify the creation and configuration of cliptextures. The companion programs that create and configure pfdLoadImageCache() and pfdLoadImageCacheState(). All of these parsers use the pfuMakeClipTexture() and pfuMakeImageCache() configuration routines.
While the scene graph is being viewed, the application may want to dynamically alter the appearance or performance characteristics of the cliptexture. The mpcliptexture provides functionality to support parameter changes in the APP process, providing frame-accurate updating. Here are some of the parameters that might be changed.
The DTR functionality (described in detail elsewhere in this chapter) is largely automatic. Some high performance applications may need to adjust DTR parameters to improve appearance performance trade-offs.
The invalid border can be adjusted at runtime to shrink the effective size of the clip region. This might be done to provide additional load control beyond the per-level control that DTR provides.
When operating master and slave cliptextures in a multipipe application, the application may want to change the sharemask, which controls the synchronization of parameters between master and slave cliptextures.
The image cache creates requests to read image tiles from disk to the image cache's system memory cache. The read function processes these requests and actually does the data transfer. OpenGL Performer provides set of read functions that attempts to do direct-IO reads for speed, but falls back to normal reads if direct IO is not possible.
The application can replace the OpenGL Performer default function with its own custom read function. This could be useful for implementing special functionality, such as dynamic decompression pfClipTexture data.
Cliptexturing has a large API. Not only is there are lot of cliptexture functionality scattered throughout the library, but there is often more than one way to use a particular piece of functionality. In order to make things clearer, and make it easier to use the API described here, the cliptexture API is grouped and ordered in the same way an application writer would use it.
The API is grouped into four sections:
Before using cliptextures, large textures must be preprocessed, as follows:
Start with the highest-resolution version of the image (texture) and build a MIPmap of the image.
Choose a clip size.
Tile each MIPmap level.
Every image that is larger than the clip size must be cut into tiles. All of the tiles in one MIPmap level must be equal in size. You generally choose a tile size that is about 1/4 of the clip size or less.
Divide the levels into separate files to maximize download performance.
The files should be named properly so that the image caches can access them.
If the configuration parsers are used, cliptexture configuration files are also created at this time.
The following sections describe the steps in this procedure in greater detail.
Building a MIPmap of an image requires an algorithm that performs the following tasks:
Start with the highest-resolution version of the image (texture). The image dimensions in pixels must be in powers of 2, for example, 8192 X 8192.
Average every four adjacent texels of a high resolution image into a single texture (essentially blurring it and shrinking it by a factor of two in both dimensions).
Save the result as a new, blurrier, smaller image.
Convert the MIPmaps into a compatible format.
Repeat the first two steps with each blurrier image until you have a single texel whose color is the average of all the texel colors in the original image.
Each successive reduction is called a level of detail (LOD). The more the reduction, the higher the level of detail, the coarser the image.
There are a variety of tools that tile textures. OpenGL Performer provides some simple ones available in the /usr/share/Performer/src/tools directory for IRIX and Linux and in %PFROOT%\Src\tools for Microsoft Windows. They are listed in Table 15-1.
Program | Description |
|---|---|
rsets | Shrinks and tiles one or more .rgb image files recursively. rsets stops tiling when it reaches the clip size you give it. rsets assumes that the original image is square. |
rgb2raw | Converts .rgb images into a raw format that can be downloaded directly into texture memory. Files should be in a raw format to avoid conversions at download time. |
shrink | Is a subset of rsets functionality; makes a tree-like structure of LOD images from an .rgb image. |
to5551 | Converts from .rgb to the 5551 raw format. |
to888 | Converts from .rgb to the 888 raw format. |
to8888 | Converts from .rgb to the 8888 raw format. |
viewtile | Enables you to view a raw format image tile. |
For more information about MIPmaps, see the OpenGL Programming Guide.
The texel data must be in a format that can be used in OpenGL Performer textures. This means the texels must have contiguous color components, whose size and type match a supported format. Keep in mind that these texels will be loaded dynamically, on an as-needed basis, so the smaller the size of each texel, the better the performance of the cliptexture. You should choose the smallest texel format that provides acceptable color quality. A good choice might be RGBA 5551, which takes up 16 bits per texel. OpenGL Performer provides some tools for converting from rgb format to 5551 or 888 RGBA. They are named to5551 and to888 and are found in /usr/share/Performer/src/tools for IRIX and Linux and in %PFROOT%\Src\tools for Microsoft Windows.
For more information about file formats, see “Building a MIPmap”.
Dividing a texture into tiles allows you to look at a subset of all texels in the texture. In this way, you can selectively download from disk into the texture memory only those texels that the user is viewing and those they might soon look at. Since downloading texture tile files from disk to texture memory takes a long time, the image cashes decide which tiles a viewer might need next and download them in advance.
| Note: In the highest resolution LOD, one texel corresponds to one pixel. |
T exel tiles in each level are loaded into memory separately, from coarsest to finest. The high-resolution tiles take longer to download than the coarser tiles. If a viewer advances through a scene so quickly that the high-resolution tiles cannot download from disk into texture memory in time, lower-resolution tiles are displayed instead. The effect is that if the viewer goes too fast, the tiles become blurry. When the viewer slows down, the tiles displayed are less coarse.
Using lower instead of higher-resolution levels is controlled by cliptexture's load control mechanism, DTR. Without DTR, OpenGL Performer waits for all of the levels to download before displaying any one of them. DTR removes this restriction, displaying the levels that have been downloaded.
If you want to break up a .rgb image into tiles, OpenGL Performer provides the subimg program in /usr/share/Performer/src/tools for IRIX and Linux and in %PFROOT%\Src\tools for Microsoft Windows.
Small tiles, while less efficient, are better at load leveling, since the time it takes to load a new tile into system memory is smaller. It also means that the total size of an image cache in system memory can be smaller. We've found that tile sizes of 512 x 512 and 1024 x 1024 provide a good trade-off between download efficiency and low latency, but download performance is very sensitive to system configuration. Experimenting is the best way to find a good tile size.
After preprocessing the texture data, you need to configure cliptextures. Configuration is actually a two step process; the configuration that can be done by the scenegraph loader, and the configuration that requires pfPipes and pfChannels to be present. This section describes the first stage of configuration.
An application must configure the cliptexture in two steps:
Loader—when the scene graph is constructed.
Post-loading—when the channel and pipes are known to the application.
This process is complex. OpenGL Performer supplies a number of utilities to make the job easier.
To manipulate cliptexture parameters, the application makes calls to the pfMPClipTexture in the APP process. The pfMPClipTexture updates the cliptexture in a frame-accurate manner.
This is the time the scene graph is being constructed. Geostates are pointed to cliptextures; the cliptextures themselves are created and configured using the cliptexture configuration files and the libpfdu parsers. If the application does its own configuration, it should use the libpfutil routines to simplify the process and to ensure adequate error checking. If the application opts to use OpenGL Performer clipcentering support, clipcenter nodes are inserted into the scene graph at the root of the cliptextured geometry and connected to the corresponding cliptexture.
| Note: When using emulated cliptextures, assign the cliptexture to the pfGeoState first, then assign the pfGeoState to pfGeoSets. |
At this stage the scene graph has been created and the channels and pipes have been defined. The libpfutil traversers ( pfuProcessClipCenters() or pfuProcessClipCentersWithChannel()) are used to create pfMPClipTextures, connecting them with the appropriate cliptextures and clipcenter nodes. These routines return a list of pfMPClipTextures, which can be used with pfuAddMPClipTextureToPipes() and pfuAddMPClipTexturesToPipes() to attach the pfMPClipTextures to the appropriate pfPipes. These routines can be used for single pipe and multipipe applications with little or no change to the calling sequence.
Since cliptexture configuration is complex, we provide three different cliptexture configuration API layers, allowing different trade-offs between flexibility and simplicity.
The lowest layer, using the libpr calls, is the most complex and difficult. A cliptexture has the same configuration requirements as a MIPmapped pfTexture, where texel format, type and texture dimensions must be configured. In addition, cliptextures have to know about system memory caching, the file configuration of the texture data, load control, read queue, and other cliptexture specific configurations.
Using the libpr layer directly is not recommended, since it is error prone and does not buy much flexibility compared to the libpfutil configuration routines. In the following subsections are the libpr calls you must consider when configuring a cliptexture directly.
These are the functions needed to configure the cliptexture itself. The cliptexture contains two types of levels: image cache levels and image tile levels. Image caches support clipped levels in a cliptexture. They know where their texture data resides on disk, they understand clip regions, and set up system memory caching and updating. Every properly-configured image cache points to an image tile, called a proto tile, which contains global information about the texel format, size, and file information about the image tiles the image cache uses to update clipped texture levels.
Image tiles can be used by themselves to represent unclipped levels. Essentially the unclipped level is represented by a single tile covering the entire level. Because image tiles do not understand clip regions and cannot do dynamic updating, image tiles cannot be used to represent clipped levels.
There are also image tile calls in this sequence. They are used to configure the image cache's proto tile, which is used as a template for the tiles the image cache will use to load texel data from disk to system memory cache.
To configure an image cache proto tile, use the following calls:
Image caches can be used independently of cliptextures, if they are, they need to be associated with a pfTexture, and that texture needed to be configured.
To configure a pfTexture, use the following calls:
Image caches can have a de fault tile defined, which is the tile to use if a tile on disk can't be found. Default tiles can be useful for “filling in” border regions of a cliptexture level. Default tiles are covered in more detail in section “default_tile”.
To configure the default tile, use the following calls:
Image tiles need their own configuration, since they need to know about the file they should load from texel formats, etc.
Using the libpr calls to configure a cliptexture is difficult and error prone. OpenGL Performer provides utilities to make cliptexture configuration easier and more robust. The configuration utility API is broken into two groups. One group is used to configure cliptextures, the other configures image caches. Each group contains three functions, an init function, a config function, and a free function. These functions work with a structure that the application fills in.
The initialize function initializes the optional fields in the structure with default values, and the mandatory fields with invalid values. Configuring the structure allows the configuration function to do more error checking, and to allow the application to avoid the tedium of filling in optional field. The application then sets fields in the structure to parameterize how the cliptexture or image cache should be configured. The application then calls the configuration function on the filled in structure. The free function is then called with the structure to ensure that all allocated values are freed.
Methods to configure the cliptexture include the following:
Methods to configure the image cache include the following:
All of these functions are defined in libpfutil/cliptexture.c. The structures themselves are defined in pfutil.h.
Filling the pfuImgCacheConfig structure to create and configure the image cache is considerably simpler than setting fields in the pfuClipTexConfig structure. This is because the cliptexture configuration must also create and configure image cache and image tiles to populate its levels. The configuration code does this supplying a function pointer to configure the image cache levels and a function pointer for configuring image tile levels. Each function pointer also has a void data pointer so you can pass data to the functions. The function pointers expect functions with the following forms:
pfImageCache *exampleICacheConfigFunction(pfClipTexture *ct,
    int level, struct _pfuCilpTexConfig *icInfo)

pfImageTile *exampleITileConfigFunction(pfClipTexture *ct,
    int level, struct _pfuClipTexConfig *icInfo)
|
The cliptexture and image cache configuration parsers, described in the next section, use the configuration utilities. You can look at the parsers as example code. For example, you may want to look at pfdLoadImageTileFormat() and pfdLoadImageCache() formats for example functions for the function pointers. The parsers are in the /usr/share/Performer/src/lib/libpfdu/pfdLoadImage.c file for IRIX and Linux and in file %PFROOT%\Src\lib\libpfdu\pfdLoadImage.c for Microsoft Windows.
The easiest and most commonly used method to configure cliptextures is to create cliptexture and image cache configuration files, then use the configuration parsers to create and configure cliptextures. The configuration files can be created and stored along with the texture data files. Configuration files allow an application or loader to simply call a single function to create and configure cliptextures.
Configuration files are ascii text files containing a token parameter format. Values are separated by white space and the token parameter sequences can be placed in the file in arbitrary order. Comments can also be added to the configuration files, making them self-documenting.
Four parser functions are available to create and configure cliptextures and image caches using configuration files:
pfClipTexture *pfdLoadClipTexture(const char *fileName) pfImageCache *pfdLoadImageCache(const char *fileName) |
These parser functions take a configuration file name, and use it to configure and create a cliptexture or an image cache respectively. The cliptexture configuration file may refer to image cache configuration files, which will be searched for and used automatically.
Two other versions of these parsers also take a pointer to a configuration utility structure. This allows you to preconfigure using the configuration structure and then finish with the parser and configuration files.
pfClipTexture *pfdLoadClipTextureState(const char *fileName,
    pfuClipTexConfig *state)

pfImageCache *pfdLoadImageCacheState(const char *fileName,
    pfuImgCacheConfig *state)
|
The parsers use OpenGL Performer's pfFindFile() functionality to search for the configuration files. The parsers support environment variable expansion and relative pathnames to make it simpler to create configuration files that refer to other configuration or data files.
To successfully use cliptextures, you must first prepare the texture data and create the configuration files:
Create an image cache configuration file for each level using an image cache in the cliptexture.
The configuration file should describe the following:
Format and tiling of the texture data.
Location and names of the files containing the texture data.
Size of the tex region in texture memory.
Size and layout of the mem region in system memory.
Create a cliptexture configuration file.
It contains the following:
Name and location of each image cache configuration file.
Names and locations of the texture data for each image tile level in the cliptexture. Remember, image tile levels cannot be clipped levels; so, they can only be used in the pyramid levels. Image cache levels can be used anywhere.
General properties of the cliptexture.
Look at the example cliptexture configuration files in the /usr/share/Performer/data/clipdata directory for IRIX and Linux and in %PFROOT%\Data\clipdata for Microsoft Windows. The cliptexture configuration files use the .ct suffix. The image cache configuration files use .ic for their suffixes.
Test the image cache configuration files individually, using the pguide/libpr/C/icache program.
Test the cliptexture configuration file using the /sample/C/clipfly or /sample/C++/clipdemo sample appllications or the /pguide/libpr/C/cliptex or the /pguide/libpf/C/cliptex programs.
When the configuration and data files are complete and tested, your application can create and configure a cliptexture by calling pfdLoadClipTexture(fname) using the name of the cliptexture configuration file. If more control is needed, you can use pfdLoadClipTextureState(fname, state) initializing and configuring the configuration utility cliptexture structure, pfuClipTexConfig.
Unfortunately, cliptexture configuration is not trivial, even with documentation and example programs. Success in creating working configuration files requires a two-prong approach:
Keep them simple: set the minimum number of fields possible. Take advantage of the default values. Try to find a similar example configuration file to copy from.
Work bottom-up: create and test image cache configuration files first, gradually building up to the cliptexture configuration file.
We have found that parameterized naming of the image caches and tile files works the best. If you have named your files consistently, this can be easy. If things do not work, you can fall back and name your file explicitly as a sanity check. Read the error messages carefully; they try to point out where in the configuration file the parser found problems. If you need more information, try rerunning the program with PFNFYLEVEL set to 5 or 9.
A number of example configuration files and cliptextures are available on the OpenGL Performer release. Working from one of them can save a lot of time. Some places to look are the following:
data/clipdata/hunter
data/clipdata/moffett
data/asddata
Note that emulated cliptextures are currently incompatible with pfASD.
Finally, your application might be able to take advantage of some of the cliptexture loaders. The libpfim loader supports loading a cliptexture, and updating its center as a function of viewposition. The libpfct loader creates a cliptexture with simple terrain. Virtual cliptextures, mentioned in “Virtual ClipTextures”, can also be created using the libpfspherepatch or libpfvct loaders. These loaders can be used as examples if you need to write your own loader that supports cliptextures. The libpfct and the libpfspherepatch loaders are the most up-to-date cliptexture loaders and include support for emulated cliptextures as well as support for virtual cliptextures on InfiniteReality systems.
I mage cache configuration files supply the following information to OpenGL Performer:
Format of the texel data.
Size of the entire texture at a particular MIPmap level.
How to find the files containing the texel data for this image cache.
Size and layout of image cache tiles in memory.
Size of the image cache that should be kept in texture memory.
A default image tile to use if one is missing.
The size each level should be clipped to.
The amount of border that should be invalidated at each level.
C onfiguration fields are either tokens or parameter values, as listed in Table 15-2. All fields are character strings and all parameters must be separated by white space. The token names marked with an asterisk (*) are optional and default to reasonable values.
Table 15-2. Image Cache Configuration File Fields
Token Name | Parameters | Description |
|---|---|---|
ic_version2.0 | no data field | Start of image cache config files: type and version |
*tex_size | 3 integers | Area of tex memory for level if not tex_region_size |
*header_offset | integer | Beginning of file to skip over in bytes |
*tiles_in_file | 3 integers | Dimensions of grid of tiles stored in each file |
*s_streams | filepath list | List of streams used to access files in S dimension |
*t_streams | filepath list | List of streams used to access files in T dimension |
*r_streams | filepath list | List of streams used to access files in R dimensions |
*default_tile | filepath string | Tile to use if expected tile is not available |
*page_size | integer | System page size; memory allocation alignment |
*read_func | 1 or 2 strings | Custom read function; library, func or func in app |
*lookahead | integer | Extra tiles in mem region for lookahead caching |
ext_format | string | External format of stored texels |
int_format | string | Internal format used by graphics hw |
img_format | string | Image format of stored texels |
icache_size | 3 integers | Size of complete image level in texels |
tex_region_size | 3 integers | Area to load in texture memory; matches clip size |
mem_region_size | 3 integers | Dimensions of system memory cache in tiles |
tile_size | 3 integers | Dimensions of each file in texels |
tile_format | scanf-style string | Parameterized path to tile files |
tile_params | list of symbols | Parameter types in order in tile_format string |
The ic_version2.0 token must be first in an image cache configuration file. This token identifies the file as an image cache configuration file and the format (version) of the configuration file.
Next the parser looks for tokens and any associated data values. In general, the order of the tokens in the file must follow the sequence specified in the table above. The tokens marked with an asterisk are optional. Optional tokens have default values, which are used if the token and value are omitted.Tokens can have the following:
No arguments
A fixed number of arguments
A variable number of arguments
If a token has a fixed number of arguments, the token must be followed by a white space-separated list containing the specified number of arguments. If the token has a variable number of arguments, one of its arguments specifies the number of arguments used.
Any time a token is expected by the parser, a comment can be substituted. A comment cannot be put anywhere in the file, however. For example, if a token expects arguments, you cannot place a comment between any of them; you have to place it after all of the previous tokens arguments. There are a variety of supported comment tokens; they are interchangeable. The comment tokens are #, //, ;, comment, or rem.
One of the first things that must be specified in an image cache is the format of the texel data. This includes the external format (ext_format), internal format (int_format) and image format (img_format). The arguments expected by these format parameters are the ASCII string names of the format's enumerates. For example, a valid external format would be ext_format PFTEX_FLOAT. Consult the pfTexture man pages for a list of the valid formats of each type.
The next set of parameters that must be specified in the image cache configuration file is its size on disk, in system memory, and in texture memory. The icache_size token requires the size of the image cache. This means the dimensions, in texels, in the s, t, and r dimensions of the complete texture at this level. Since three dimensional textures are not currently supported, the r parameter will always be 1.
An image cache's texels are organized into a set of fixed sized pieces, called tiles. Both in system memory and on disk, the texels are broken up this way. At any given time, an array of these texel tiles are cached in system memory. They are arranged as an array in system memory. If the center of the image cache nears the edge of this array, the most distant tiles are dropped out, and new tiles are read in from disk. The larger the array of tiles in system memory, the more of the complete texture is cached there, and the less likely new tiles may need to be swapped in. The benefit is offset by the cost of tying up more system memory to hold the texel tiles.
The arrangement and dimensions of tiles in system is defined for each image cache, and is set with the mem_region_size token. This token expects three arguments which determine the number of tiles in the s, t, and r dimensions of the grid. Since three dimensional textures aren't currently supported, the r dimension is always 1.
A subset of the texels in system memory are cached in the texture memory itself. These texels are arranged in a rectangular region. The dimensions of this region are defined by the tex_region_size token. It expects three arguments, the number of texels in the s, t, and r dimensions. Again, since three dimensional textures are not supported, the r value is always 1.
The image cache configuration file allows some leeway in the arrangement of texel tiles on disk. There can be one or more tiles on each disk file, and the file itself could contain non-texel information at the beginning of the file. The tiles themselves can have user-specified dimensions. While there is some flexibility in how tiles are stored in files on disk, there are restrictions also. Any header must be the same size for every file in an image cache. The same is true for the tile size, and the number and layout of tiles in each file. If there is more than one tile in a file, the tiles must be arranged in row-major order. In other words, as you pass from the first tile to the last, the s dimension must be incrementing fastest.
The image cache texel data is stored in one or more files. The configuration file provides a way for OpenGL Performer to find these files. The files usually have similar names, varying in a predictable way, such as by tile position in the image cache array and size of the image cache. The files themselves are grouped in on or more directories. The file name and file path information is divided into a number of groups within the configuration file. There is a scanf-style string specifying the path to find image cache files. There are a number of parameters in the string that vary as a function of the tile required and the characteristics of the image cache.
The next group of tokens describes the location of the configuration files defining the location of the texture data tiles for the image cache. You can define the texture tile configuration filenames with a scanf-style string containing parameter values, as is done with image caches. To create parameterized image cache names, you must define the tile_format and tile_params tokens.
The tile_format token is followed by a scanf-style string describing the file path and filename of the image cache configuration files. The argument contains constant parts, interspersed with %d or %s parameters. The number of parameters must match the number of symbols supplied as parameters to the tile_params token. If the tile_format string starts with the pattern $ENVNAME, ${ENVNAME}, or $(ENVNAME), then the value of ENVNAME will be assumed to be an environment variable and expanded into the base name.
The possible values of the image tile file name parameters is given in the table below.
Table 15-3. Image Tile Filename Tokens
Image Tile Filename Tokens | Description |
|---|---|
PFIMAGECACHE_TILE_FILENAMEARG_VSIZE_S | Virtual size S width |
PFIMAGECACHE_TILE_FILENAMEARG_VSIZE_T | Virtual size T width |
PFIMAGECACHE_TILE_FILENAMEARG_VSIZE_R | Virtual size R width |
PFIMAGECACHE_TILE_FILENAMEARG_TILENUM_S | Tiles from origin in S |
PFIMAGECACHE_TILE_FILENAMEARG_TILENUM_T | Tiles from origin in T |
PFIMAGECACHE_TILE_FILENAMEARG_TILENUM_R | Tiles from origin in R |
PFIMAGECACHE_TILE_FILENAMEARG_TILEORG_S | Texels from origin in S |
PFIMAGECACHE_TILE_FILENAMEARG_TILEORG_T | Texels from origin in T |
PFIMAGECACHE_TILE_FILENAMEARG_TILEORG_R | Texels from origin in R |
PFIMAGECACHE_TILE_FILENAMEARG_STREAMSERVERNAME | From streams |
PFIMAGECACHE_TILE_FILENAMEARG_CACHENAME | The tile_base value |
PFIMAGECACHE_TILE_FILENAMEARG_FILENUM_S | Files from origin in S |
PFIMAGECACHE_TILE_FILENAMEARG_FILENUM_T | Files from origin in T |
PFIMAGECACHE_TILE_FILENAMEARG_FILENUM_R | Files from origin in R |
The header_offset argument specifies the size of the file's header in bytes. This many bytes will be skipped over as a file is read. The tiles_in_file token requires three arguments, specifying the number of tiles in the s, t, and r dimensions. The r dimension must always be 1, since 3D textures are not supported. The tile_size parameter defines the texel dimensions of each tile in s, t, and r. Again, r must be 1. Both the header_offset and the tiles_in_file tokens are optional. They default to the values 0 and 1 1 1, respectively, specifying no header and a single tile in each file.
One of the major bottlenecks to sustained cliptexture performance is the speed of copying texels from disk to system memory. Cliptextures can be configured to maximize the bandwidth of this transfer by distributing image tiles over multiple disks and downloading them in parallel. The streams section of the configuration file is used for this purpose.
A stream, short for stream device, can be thought of as a separate disk that can be accessed in parallel with other disks. Each disk is mounted in a file system and, therefore, has a unique filepath segment. The streams tokens allow you to identify these stream filepath segments and how the image tiles are distributed among them. The stream devices are arranged in a three dimensional grid with s, t, and r dimensions just like the image tiles are in memory. The stream device is accessed by taking the position of the tile, counting tiles from the origin in the s, t, and r directions, and generating a coordinate, modulo the number of stream devices in the corresponding s, t, and r directions. The s, t, and r values generated are used to look up the appropriate stream device. If the stream server name is part of the tile file name format string, it effects which disk is used to find the tile.
Stream servers improve bandwidth at the expense of duplicating image tiles over multiple disks. You must insure that the proper image tiles are available for any disk which is addressed by the tile's s, t, and r coordinates modulo the available number of stream servers for each of those dimensions. The stream server tokens are optional. The s_streams token is followed by a list of filepaths. These are the names that will be indexed from the list by taking the s coordinate of the tile's position in the image cache grid, modulo the number of s stream devices. The names in the s_stream list do not have to be unique.
The t_streams and r_streams tokens work in exactly the same way, in the t and r directions, respectively.
Sometimes only a subregion of the entire cliptexture is of interest to the application. This is especially true when you consider that the number of tiles in the s, t, and r directions must all be a power of two. To save space, improve performance, and make creating image caches more convenient, a default tile can be defined, and tiles of no interest can simply be omitted. If a tile cannot be found and a default tile is defined, then the default one is used in place of the missing one.
Unlike normal tiles, which are read from disk as they are needed, the default tile is loaded as part of the configuration process. The tile is named in the configuration file as the argument to the default_tile token. The argument is a filepath to the default tile. If the tile_base token has been defined, it is pre-pended to the file path; otherwise, it is used as is.
Image cache configuration files supply the following information to OpenGL Performer:
format of the texel data
Size of the highest resolution level (level 0)
Size of clipped levels in texture memory
How to find the configuration files for each image cache
Size of the smallest level to be loaded as an image cache
Number of effective levels for virtual cliptextures
Number of allocated levels for virtual cliptextures
Additionally, if no image-cache configurations are used, the cliptexture configuration file will include the following:
Size of image tiles on disk
Number of tiles to be stored in RAM for each level
Format of tile filenames
Size of header in tile files
Configuration fields are either tokens or parameter values, as listed in Table 15-4. All fields are character strings and all parameters must be separated by white space.
Table 15-4. Cliptexture Configuration File Fields
Token Name | Parameters | Description |
|---|---|---|
# or // or ; or comment | comment | comment symbols; comment to end of line |
ct_version2.0 | no data field | the beginning of the file: type and version |
ext_format | string | external format of stored texels |
int_format | string | internal format used by graphics hw |
img_format | string | image format of stored texels |
virt_size | 3 integers | size of complete texture at level 0 (finest level) |
clip_size | integer | size of clip region square for clipped levels |
*invalid_border | integer | width of clip region perimeter to not use |
*tile_size | 3 integers | size of tiles (used if no icache config files) |
*smallest_icache | 3 integers | smallest icache-level dimensions |
*lookahead | integer | extra tiles in mem region |
*icache_format | scanf string | icache fnames: no field? list files |
*effective_levels | integer | levels used for texturing in virtual cliptexture |
*icache_params | string list | format tokens in order |
*icache_files | list of filenames | only if icache_format is default |
*tile_files | list of filenames | pyramid; only if tile_format default |
*effective_levels | integer | levels used for texturing in virtual cliptexture |
*allocated_levels | integer | total virtual cliptexture levels in texture memory |
*header_offset | 1 integer | byte offset to skip user's file header |
*tiles_in_file | 3 integers | Image tile arrangement in each file |
*read_func | 1 or 2 strings | custom read function; lib & func or func in app |
*tile_format | scanf string | Tile filename format |
*tile_params | string list | format parameter tokens in order |
*page_size | integer | system page size; memory allocation alignment |
The ct_version2.0 token must be first in an cliptexture configuration file. This token identifies the file as an cliptexture configuration file and the format (version) of the configuration file.
Next the parser looks for tokens and any associated data values. In general, the order of the tokens in the file must follow the sequence specified in the table above. The tokens marked with an asterisk are optional. Optional tokens have default values, which are used if the token and value are omitted.
Tokens can have the following:
No arguments
A fixed number of arguments
A variable number of arguments
If a token has a fixed number of arguments, the token must be followed by a white space-separated list containing the specified number of arguments. If the token has a variable number of arguments, one of its arguments specifies the number of arguments used.
Any time a token is expected by the parser, a comment can be substituted. A comment can't be put anywhere in the file, however. For example, if a token expects arguments, you can't place a comment between any of them; you have to place it after all of the previous tokens arguments. There are a variety of supported comment tokens; they are interchangeable. The comment tokens are #, //, ;, comment, or rem.
One of the first things that must be specified in a cliptexture is the format of the texel data. This includes the external format (ext_format), internal format (int_format) and image format (img_format). The arguments expected by these format parameters are the ASCII string names of the format's enumerates. For example, a valid external format would be ext_format PFTEX_FLOAT. Consult the pfTexture man pages for a list of the valid formats of each type.
The next group of tokens characterizes the image cache itself. The virt_size token expects three integer arguments. They define the s, t, and r dimensions of the level 0 layer of the cliptexture in texels. The clip_size token describes the size of each layer that exists in texture memory. It takes one integer, describing the s and t dimensions of the clipped region. This value is the same for all levels of a cliptexture. If the image cache configuration files' clip_size differs from this value, the cliptexture overrides it.
The invalid_border defines the region of each clipped level that should not be used. If a texel is needed in that region, the next level down is used instead. If the invalid border is large, the system may have to go down multiple levels, or even down to the pyramidal, unclipped part of the MIPmap. The invalid border argument is a single integer, describing the width of the border in texels.
The smallest_icache token describes the s, t, and r dimensions of the lowest level that is described as an image cache. This parameter is needed because the unclipped, pyramidal part of the MIPmap can also be configured as image caches. This is an optional token. If it is not included in the file, the last clipped level is considered the smallest image cache in the cliptexture.
The next group of tokens describes the location of the configuration files defining the image cache levels of the cliptexture. There are two methods of describing where the image cache configuration files. You can explicitly list the filenames in order with icache_files.
The other method is to define the image cache configuration filenames with a scanf-style string containing parameter values, as is done with image caches. This is usually the preferred method. To create parameterized image cache names, you must define the icache_format and icache_params tokens. If the format string starts with the pattern $ENVNAME, ${ENVNAME} or $(ENVNAME), then the value of ENVNAME will be assumed to be an environment variable and expanded into the base name.
The icache_format token is followed by a scanf-style string describing the file path and filename of the image cache configuration files. The argument contains constant parts, interspersed with %d or %s parameters. The number of parameters must match the integer given with the num_icache_params token. The tile parameters themselves follow the icache_params token.
The number of parameters must match the number of parameters in icache_format. All of these parameters are optional. The list of available parameter tokens is given in Table 15-5.
Parameter Token Name | Description |
|---|---|
PFCLIPTEX_FNAMEARG_LEVEL | Cliptexture level (top is 0) |
PFCLIPTEX_FNAMEARG_LEVEL_SIZE | Largest value of level's virtual size |
PFCLIPTEX_FNAMEARG_IMAGE_CACHE_BASE | Value of icache_base |
PFCLIPTEX_FNAMEARG_TILE_BASE | Value of tile_base |
Uniquely naming that file for each level of the cliptexture, the parameter values are used to construct the name of the image cache configuration file.
Near the bottom of the cliptexture, the size of lower levels are too small to warrant image caches. These levels are specified directly, referring to a single filename containing a single image tile for each level. The filenames for these tile files are specified in exactly the same way as the image cache configuration files are. Instead of icache_base, icache_format, num_icache_parameters, and icache_parameters, tile_base, tile_format, num_tile_parameters, and tile_parameters are used. The parameters available for use in the tile_format string are identical to the ones used for icache_format.
If image cache configuration files and/or image tiles are to be explicitly named, they are listed in order, from the top (largest) level to the bottom, using the icache_files and tile_files tokens. These tokens can only be used if the corresponding format, num_parameters, and parameter tokens are not. The number of filenames listed after icache_files and tile_files must exactly match the number of cached and uncached levels, respectively, in the cliptexture.
The header_offset argument specifies the size of the file's header in bytes. This many bytes will be skipped over as a file is read. The tiles_in_file token requires three arguments, specifying the number of tiles in the s, t, and r dimensions. The r dimension must always be 1, since 3D cliptextures are not supported. The tile_size parameter defines the texel dimensions of each tile in s, t, and r. Again, r must be 1. Both the header_offset and the tiles_in_file tokens are optional. They default to the values 0 and 1 1 1, respectively, specifying no header and a single tile in each file.
The image cache texel data is stored in one or more files. The configuration file provides a way for OpenGL Performer to find these files. The files usually have similar names, varying in a predictable way, such as by tile position in the image cache array and size of the image cache. The files themselves are grouped in on or more directories. The file name and file path information is divided into a number of groups within the configuration file. There is a scanf-style string specifying the path to find image cache files. There are a number of parameters in the string that vary as a function of the tile required, and characteristics of the image cache.
The tile_format token expects a scanf-style argument. If the string starts with the pattern $ENVNAME, ${ENVNAME} or $(ENVNAME), then the value of ENVNAME will be assumed to be an environment variable and expanded into the base name.
The argument contains constant parts, interpersed with %d or %s parameters.The tile parameters themselves follow the tile_params token. The number of parameters must match the number of parameters in tile_format.
The possible values of the image tile file name parameters are given in the table below.
Table 15-6. Image Tile Filename Tokens
Image Tile Filename Tokens | Description |
|---|---|
PFIMAGECACHE_TILE_FILENAMEARG_VSIZE_S | Virtual size S width |
PFIMAGECACHE_TILE_FILENAMEARG_VSIZE_T | Virtual size T width |
PFIMAGECACHE_TILE_FILENAMEARG_VSIZE_R | Virtual size R width |
PFIMAGECACHE_TILE_FILENAMEARG_TILENUM_S | Tiles from origin in S |
PFIMAGECACHE_TILE_FILENAMEARG_TILENUM_T | Tiles from origin in T |
PFIMAGECACHE_TILE_FILENAMEARG_TILENUM_R | Tiles from origin in R |
PFIMAGECACHE_TILE_FILENAMEARG_TILEORG_S | Texels from origin in S |
PFIMAGECACHE_TILE_FILENAMEARG_TILEORG_T | Texels from origin in T |
PFIMAGECACHE_TILE_FILENAMEARG_TILEORG_R | Texels from origin in R |
PFIMAGECACHE_TILE_FILENAMEARG_STREAMSERVERNAME | From streams |
PFIMAGECACHE_TILE_FILENAMEARG_CACHENAME | The tile_base value |
PFIMAGECACHE_TILE_FILENAMEARG_FILENUM_S | Files from origin in S |
PFIMAGECACHE_TILE_FILENAMEARG_FILENUM_T | Files from origin in T |
PFIMAGECACHE_TILE_FILENAMEARG_FILENUM_R | Files from origin in R |
If the cliptexture has a very regular structure from level to level, the cliptexture configuration file can be augmented with some extra fields, and the image cache configuration files dispensed with. We recommend you start with the image cache configuration files, however, because it makes it easier to gradually create and test your configuration files using the icache and cliptex utilities in the /usr/share/Performer/src/pguide/libpr/C directory for IRIX and Linux and in %PFROOT%\Src\pguide\libpr\C for Microsoft Windows.
Image cache configuration files can be removed if the image caches of the cliptexture are essentially the same, and configuration of each image cache is simple. The image caches should only differ in size between levels; the tile size, formats, tile filename format, etc. should be the same. Also image cache configuration files are not optional when features like streams are configured.
To stop using image cache configuration files, you should add a tile_size token to the cliptexture configuration file, and be sure to have tile_format and tile_params specified.The tile specification in the cliptexture configuration file will be used for all tile files: the ones used by the image caches and the ones representing pyramid levels.
In order to make the parser stop using the image cache configuration files, remove the entries referring to them such as icache_format, icache_params, or icache_tiles.
An example of a cliptexture configuration file that does not use image cache configuration files is /usr/share/Performer/data/clipdata/hunter/hl.noic.ct for IRIX and Linux and %PFROOT%\Data\clipdata\hunter\hl.noic.ct for Microsoft Windows.
There are a number of cliptexture configuration steps that cannot be completed until the OpenGL Performer application's pipes and channels have been created. This configuration stage centers around configuring cliptextures to be properly applied and centered each frame.
Two jobs must be accomplished. Each cliptexture must be attached to a pipe through its own pfMPClipTexture so it can be applied each frame, and a centering callback must be established to update the cliptexture as the channel's viewpoint moves with respect to the cliptextured geometry.
pfMPClipTexture is a multiprocess wrapper for a pfClipTexture. A pfMPClipTexture allows you to do the following:
Change the center of the pfClipTexture in the APP process.
Automatically schedule the necessary texture downloading (applying) in the CULL process. Downloads are then performed in the DRAW process.
Control the cliptexture parameters in the APP process.
To automatically apply of the pfClipTexture at the correct times and in the correct processes, you must do the following:
Attach the pfMPClipTexture to the cliptexture you want to control.
Attach the pfMPClipTexture object to a pfPipe using the pfPipe.

Note: If you use pfMPClipTexture, you should never call either pfUpdateMPClipTexture() or pfApplyMPClipTexture(); the pfPipe should do the applying.
When you attach a pfMPClipTexture to a pfPipe using pfAddMPClipTextureToPipes() or pfAddMPClipTexturesToPipes(), pfPipe automatically updates and applies pfClipTexture at the correct time. The functions take three arguments: a pfMPClipTexture or list of pfMPClipTextures, a pipe to which to attach (called the master pipe), and a list of other pipes the application wants to use with the pfMPClipTextures.
pfAddMPClipTextureToPipes(pfMPClipTexture, masterpipe, pipe_list)
pfAddMPClipTexturesToPipes(pfMPClipTexture_list, masterpipe, pipe_list)
The pipe_list is used for multipipe applications. It is the list of pipes that slave pfMPClipTextures should be attached to. Setting pipe_list to NULL is equivalent to adding slave pfMPClipTextures to every other pipe in the application.
There are additional libpf routines that can be useful:
pfRemoveMPClipTexture() detaches a pfMPClipTexture from a pfPipe. If a pfMPClipTexture is removed that is the master of other pfMPClipTextures, the slaves will be removed from their pipes as well.
pfGetNumMPClipTextures() returns the number of pfMPClipTextures attached to a pfPipe.
pfGetMPClipTexture() returns a pointer to the pfMPClipTexture that is attached to a pfPipe.
You can do this directly with the libpf API using the following calls:
pfNewMPClipTexture()—Create a new pfMPClipTexture.
pfMPClipTextureClipTexture()—Attach the pfMPClipTexture to the cliptexture.
pfAddMPClipTexture() - (a pfPipeCall)—Attach the pfMPClipTexture to a pipe.
pfMPClipTexturePipe()—Specifies to the pfMPClipTexture the pipe to which it is attached.
OpenGL Performer provides utilities to make it easy to attach pfMPClipTextures to pipes, and to automatically do pfMPClipTexture centering as well. As a bonus, the utility code requires little or no changes to convert a single pipe application to a multipipe one.
To use the pfMPClipTexture utilities, you need to use OpenGL Performer's clipcenter nodes to center the pfMPClipTexture. clipcenter nodes are a subclass of pfGroup nodes. They have additional functionality that allows them to connect to a pfMPClipTexture, the cliptextured geometry (through their child nodes), and properly update the pfMPClipTexture's center each frame. At load time, clipcenter nodes are placed at the root of the subtree containing the cliptextured geometry. All the cliptextures in the scene are created configured and attached to the clipcenter node at this time as well.
Once you have a scenegraph with geometry, cliptextures, and clipcenter nodes, it is easy to make pfMPClipTextures, attach them to pipes and to centering callbacks. The function pfuProcessClipCenters() traverses the scene graph, looking for clipcenter nodes. As each node is encountered, the function creates an MP cliptexture, attaches it to the associated cliptexture and the clipcenter node, and saves a pointer to the MP cliptexture in a pfList. When the function returns, it provides the list of MP cliptextures that were created. The pfuProcessClipCentersWithChannel() routine performs the same operations but also sets a channel pointer in the clipcenter node. When the channel pointer is set, the clipcenter node only will update a pfMPClipTexture center when that channel traverses it. This is useful for multichannel applications.
In order for cliptextures to be rendered correctly, the clipcenter must move along with the viewer. OpenGL Performer has made this task simpler by providing a special node for the scene graph that does this calculation and applies it to the cliptexture each frame. This node, called the clipcenter node, is a subclass of a pfGroup node. In addition to pfGroup functionality, pfuClipCenterNode's can do the following:
Points to the cliptexture. This allows cliptextures to be attached to clipcenter nodes at load time.
Points to the geometry textured by the clipcenter node's cliptexture. The clipcenter node is assumed rooted in the subtree containing the cliptextured geometry.
Points to an optional simplified version of the cliptextured geometry to make centering calculations go faster.
Points to the pfMPClipTexture attached to the cliptexture. The node also has API to automatically create an pfMPClipTexture and attach it to the cliptexture.
Contains a replaceable post-APP callback function for updating a pfMPClipTexture's center.
Can point to a pfChannel and only update the pfMPClipTexture center when that pfChannel traverses the clipcenter node.
The clipcenter node uses a simple algorithm, setting the cliptexture center to be the point on the textured geometry closest to the viewer. Other algorithms can be used by replacing the callback function.
Clipcenter nodes can be created by calling the utility routine pfuNewClipCenterNode(). There are set and get functions to attach cliptextures, channels, custom centering callbacks, simplified cliptextured geometry, as well as a get to return the pfMPClipTexture. See the pfuClipCenterNode man page for details on the API.
The clipcenter node source code is available in pfuClipCenterNode.C and pfuClipCenterNode.h in the /usr/share/Performer/src/lib/libputil directory for IRIX and Linux and in %PFROOT%\Src\lib\libpfutil for Microsoft Windows. It is implemented as a C++ class with C++ and C API. It also has example code illustrating how to subclass the clipcenternode further to customize it.
If the configuration has been done properly, and if pfuClipCenterNodes have been used for centering, most of the per-frame operations for cliptextures is automatic. Centering is computed and applied by the clipcenter nodes during the APP traversal, and cliptexture application is automatically handled by the pfPipes attached to the pfMPClipTextures.
Cliptextures use a lot of texture memory, system memory (for their caches) and disk I/O bandwidth. Many multipipe applications produce multiple views from the same location, looking in different directions. It would be very inefficient to create a completely separate cliptexture for each pipe; although there is separate texture memory and graphics hardware from each pipe, the system memory and disk resources are shared by the entire system.
Cliptextures have been designed to support multipipe rendering without excessive drain on system memory and disk I/O bandwidth. Cliptextures that are to be used in multiple pipes can be split into master and slave cliptextures. The master cliptexture is complete; it contains an image cache and a region of texture memory to control. A slave cliptexture points to its master and shares its image cache, using it to download into its own texture memory. All the slave cliptextures share their master's system memory cache and disk I/O resources, reducing the load on the system.
Master and slave relationships can be established between image caches, cliptextures, and pfMPClipTextures. The process starts with an object already configured the way you want. Then another object of the same type is created and is set to be a slave of the configured object. This is done with the setMaster() function. When an object is made the slave of another object, it automatically configures itself to match it's master. It also makes all the connections necessary to share its master's resources.
If two cliptextures are made into a master and slave, all of their image caches must have the same master-slave relationship. This is done automatically. This is also true for pfMPClipTextures. The pfMPClipTextures that will be the master and slave must be connected to cliptextures. Only the masters have to be configured, however. When the other pfMPClipTexture becomes a slave, it configures its cliptexture and makes it and its image caches slaves as well.
OpenGL Performer tries to make multipipe cliptexturing as transparent as possible. Simply call setMaster() on a cliptexture and pass it a pointer to the cliptexture that should be its master:
pfMPClipTexture *slave_mct = pfNewMPClipTexture()
pfClipTexture *slave_ct = pfNewClipTexture()
pfMPClipTextureClipTexture(slave_mct, slave_ct)
pfMPClipTextureMaster(slave_mct, master_mct)
master_mct is a pfMPClipTexture that is already configured.
At this point, slave_mct and master_mct are connected; slave_mct is configured to match master_mct and shares its image cache resources. The cliptextures and image caches are also configured and linked. To make pfClipTextures or pfImageCaches masters and slaves, use the same procedure.
Attaching a pfMPClipTexture to a pfPipe with pfAddMPClipTexture() provides automatic multipipe support. If a pfMPClipTexture is added to a pipe that is already connected to another pipe, the function silently creates a new pfMPClipTexture, makes it a slave of the pfMPClipTexture that is already connected to another pipe, and adds the slave to the pipe in place of the one passed as an argument to the function.
Although it is not difficult to set up master and slave cliptextures directly, it is usually not necessary.The previously described utility routines, pfuAddMPClipTextureToPipes() and pfuAddMPClipTexturesToPipes() can take multiple pipe arguments. A master pipe and a list of slave pipes is specified. The routine makes the pfMPClipTexture a master and attaches it to the master pipe. It then creates slave pfMPClipTextures, attaches them to the master cliptexture, and attaches a slave cliptexture to each pipe in the slave pipes list. This routine does extra checking of pipe and cliptexture state, and is guaranteed not to generate errors, even if the function is applied more than once.
A group of cliptextures grouped by master-slave relationships can do more than share mem region resources. By default, slave cliptextures also track a number of their master's attribute values. This means changing a master's center, for example, automatically causes the slaves to change their center locations to match their master's. The attributes that a slave can track are divided into groups called share groups. The application can control which groups are shared by setting a slave's share mask. Changing the sharing of a slave only affects that slave's sharing with its master. Changing the master share mask has no effect. The share mask is set with the following call:
pfMPClipTextureShareMask(uint mask) |
The mask can be set using one or more of the following values:
PFMPCLIPTEXTURE_SHARE_CENTER—Slaves track the master's center.
PFMPCLIPTEXTURE_SHARE_DTR—Slaves track DTR: DTR mode, tex load time (actual or calculated), fade count, and blur margin.
PFMPCLIPTEXTURE_SHARE_EDGE—Slaves track texture level parameters, LODbias invalid border.
PFMPCLIPTEXTURE_SHARE_LOD—Slaves track minLOD and maxLOD.
PFMPCLIPTEXTURE_SHARE_VIRTUAL—Slaves track lodOffset and num effective levels.
PFMPCLIPTEXTURE_SHARE_DEFAULT—A bit-wise OR of all the masks listed above.
PFMPCLIPTEXTURE_SHARE_DEFAULT is the default share-mask value, which provides maximum sharing between master and slave cliptextures. If an application would like to control one or more slaves independently, it needs to change the slave's share mask; then start setting the slaves parameters directly as needed.
At the first application or formatting of a cliptexture, OpenGL Performer compares the expected size of the cliptexture texel data in texture memory against the systems texture memory size. If it looks like the cliptexture will not fit into texture memory, it shrinks the clip size by two and tries again. It will keep shrinking the clip size until either the cliptexture will fit or the clip size is zero. The system takes into account texture memory banking and paging to come up with a more accurate estimate.
Note that the resizing mechanism does not take into account other textures or cliptextures in use by the application. You should adjust your application so that OpenGL Performer does not have to auto-shrink the cliptexture. See “Estimating Cliptexture Memory Usage” for calculating cliptexture system memory and texture memory usage.
During the checking phase, OpenGL Performer also checks to see if cliptextures are supported in hardware. If cliptexturing is not supported, one of two emulation modes will be selected: PFCTEMODE_FRAGPROG or PFCTEMODE_BASIC. PFCTEMODE_FRAGPROG uses ARB fragment programs to blend imagery stored in multiple texture units and is automatically selected on systems that support the ARB fragment program extension. The BASIC cliptexture emulation mode is selected on all other platforms and only requires OpenGL 1.0 functionality. Both emulation modes work by transparently assigning cliptextured geometry (pfGeoSets) to dedicated pfDrawBins that are managed internally within the library. Pre- and post-draw callbacks for such pfDrawBins are used to override and restore graphics state and to render cliptextured geometry using the cliptexture emulation state.
Once cliptextures have been configured and connected into the application, they can be manipulated by the application in the APP process. Applying and centering cliptextures happens each frame, and is usually an automatic process, set up during post-load configuration. Other parameters that can be adjusted include load control parameters, min and max LOD levels, and virtual cliptexture control. Some of these parameters may only need to be set once in the application, others, like the parameter setting for virtual cliptextures, need to happen multiple times per frame.
The virtualization of pfTextures into pfClipTextures, allowing very large texture maps, comes at a price. As the clipcenter moves, cliptextures have to download data from disk to system memory, and from system memory to texture memory. Because of these download requirements, cliptextures are sensitive to available system bandwidth. Without some sort of download load control, a fast moving center would cause a cliptextures to “freeze”, waiting for the system to catch up with its updates.
While mem region updates happen asynchronously, tex region updates must happen in the DRAW process, competing with geometry rendering and individual texture loading. Real time applications require that cliptextures, like other OpenGL Performer features, must be controlled in a way such that an upper bound can be set on their use of resources. OpenGL Performer's cliptexture load control, called Dynamic Texture Resolution (DTR), provides this functionality.
Dynamic Texture Resolution ( DTR) is similar to Dynamic Visual Resolution (DVR): the bandwidth requirements are adjusted to meet system limitations by lowering the resolution of the texture data displayed by the cliptexture.
DTR controls bandwidth by analyzing the cliptexture in the CULL process. It checks each cliptexture level, ensuring that the mem region contains updated tiles corresponding to the tex region, and that there is enough time to update the tex region within the download time limit.
This checking goes from level to level, from coarser levels to finer ones. When a level is found that cannot be displayed, DTR adjusts the cliptexture parameters so that no levels above the finest complete level are displayed. At that point, DTR stops checking levels until the next frame. In order not to waste CULL processing time on levels that are not visible, DTR will not try to sharpen more than one level beyond the current minLOD and virtualLODoffset values. It will go one level beyond these values so that it can react quickly if the values change.
In this way the cliptexture updating will always keep up with the movement of the clipcenter, and will never display invalid data. When the center moves too quickly, DTR will “ blur down” to coarser complete levels, then “sharpen up” to finer levels when the center slows down and the system can catch up. In this way DTR can trade visual quality against updating bandwidth. The visual result is that the faster a viewer goes, the less time there is to download texture and the blurrier the texture data gets.
The nature of cliptexturing makes load control work. When the clipcenter moves, this change is reflected at every clipped level of the cliptexture. But because each texel in a level covers four times the geometry of the texel in the next finer level, the clipcenter only moves half the distance each time you go down a level. This translates into less demanding texture download requirement.
DTR has other features, such as read queue sorting, which prioritize the order in which read requests are done to improve mem region update performance. The rate at which levels are blurred and sharpened can also be controlled to minimize visual artifacts.
DTR controls three aspects of load control, which can be turned on and off independently: tex region updating (from the mem region in system memory), mem region updating (loading from disks), and read queue sorting (reducing the latency of read requests for downloads from disk to the mem region).
pfMPClipTextureDTRMode(DTRMode)
DTRMode is a bitmask; if a bit is set, that DTR feature is enabled. It has the following bits defined:
All three bits are enabled by default, which means that DTR has all modes enabled. Besides the bitmask to control what parts of DTR are enabled, there are parameters to available to adjust load control performance. The DTR parameters and how they affect DTR functionality are discussed the following subsections.
The memload component of DTR is relatively simple; it computes whether all the tiles in a level's mem region that cover the tex region are valid. If any are not, the tex region cannot be updated and DTR invalidates that level. If the texload component of DTR is enabled, DTR must also compute the time it takes to download from the mem region to the tex region. The application provides the load control with a total download time in milliseconds:
pfMPClipTextureTexLoadTime(float _msec) |
This is the total time DTR has available to update the cliptexture's texture memory each frame. As DTR analyzes each cliptexture level that needs updating, it computes all the regions in the level's texture memory that need updating.If a level can be updated, DTR determines whether there is enough download time left to update the level. If there is, DTR marks that level valid, subtracts the time needed to download that level from the total, and starts analyzing the next finest level in the cliptexture.
OpenGL Performer contains texture download cost tables, which DTR uses to estimate the time it will take to carry out those texture subloads. These tables are a 2D array of floating point values, indexed by width and height of the texture rectangle being subloaded. The cost tables themselves are indexed by machine type and can be read by the application. The application can also define its own cost tables and configure the system to use it. The cost table API is shown below:
pfPerf(int type, void *table) pfQueryPerf(int type, void **table) |
The text field indicates whether the cost table should be the one chosen by the system:
PFQPERF_DEFAULT_TEXLOAD_TABLE - The one supplied by the application
PFQPERF_USER_TEXLOAD_TABLE - The one currently in use.
PFQPERF_CUR_TEXLOAD_TABLE - The default table is the current one unless a application supplies a cost table, in which case, the application's cost table takes precedence.
For more details on cost tables, see the man pages for pfPerf() and pfQueryPerf(). The cost table structure is named pfTexSubloadCostTable, defined in /usr/include/Performer/pr.h for IRIX and Linux and in %PFROOT%\Include\pr.h for Microsoft Windows.
The DTR load control system is designed to minimize visual artifacts as it adjusts for different download demands. Instead of abruptly sharpening the texture as new levels with valid texture data become available, DTR blurs in new levels over a number of frames, making the process of load control less noticeable. The application can control the rate at which newly valid levels are displayed. The application sets a fade count, which controls the number of frames it takes to fade in a new level . Each frame, the cliptexture will sharpen 1/fadecount of the way from its current (possible fractional) level to the next level. This process is repeated each frame, resulting in an exponential fade-in function. If the fade count is 0, then fading is disabled, and DTR will show new levels immediately.
pfMPClipTextureFadeCount(int _frames) |
If the clipcenter roaming speed leaves barely enough bandwidth to bring in a new cliptexture level, a distracting “LOD flicker” between two cliptexture LOD levels can result. Since DTR must blur immediately if a level becomes invalid, the only way to prevent flicker is to be conservative when sharpening, building in a hysteresis factor. The parameter called blur margin helps determine when DTR should sharpen.
The blurmargin parameter also helps cliptextures blur smoothly when DTR cannot keep up. It is a floating point value, which can be interpreted as a fraction of the cliptexture's tex load time. When blurmargin is not zero, DTR will load all the levels it can within the texload time, but not display all of them. Instead it will only sharpen to the level that would have been reached if the texload time was scaled by blurmargin. This leaves a cushion of extra time that can be used up before DTR will be forced to blur to a coarser level. The default blurmargin value of .5 usually causes the finest level displayed to be one level coarser then the finest level loaded.The application can adjust blurmargin with this call:
pfMPClipTextureBlurMargin(float margin) |
DTR needs this cushion in order to fade smoothly. A cliptexture can only fade between two valid levels; if it waits until its current level is invalid, the cliptexture must immediately jump to the next coarser level or it will show invalid data. This abrupt blurring is very noticeable. The blur margin allows the DTR system to anticipate when it will lose a level, and smoothly fade to the next coarser level over a number of frames.
Using the texload time, blur margin, and fade count parameters is sufficient to control a single cliptexture from a pipe, but the interface is awkward if multiple cliptextures are applying from the same pipe. Since each pipe has the same amount ofDRAW process time available per frame, no matter how many cliptextures are applied from it, it would be more convenient to provide a total amount of download time, then divide it among the cliptextures using the pipe.
OpenGL Performer provides this interface using the total texload time and texload time fraction parameters. The application can set the total texture download time available on a pipe, then assign fractional values for each cliptexture, indicating how the download time should be divided. The total texload time is a pfPipe call, while the fractional values are set on pfMPClipTextures:
pfPipeTotalTexLoadTime(float msecs) pfMPClipTextureTexLoadTimeFrac(float frac) |
The fractional values should indicate the relative priority of each pfMPClipTexture on the pipe. The fractional values do not have to add up to 1; the DTR code will normalize them against the sum of all the fractional values set on the pipe's pfMPClipTextures.
The total tex load time on the pipe is scaled by the normalized fractional value on each cliptexture. The scaled tex load time is then used as the cliptexture's texture download time. Explicitly setting the tex load time on a pfMPClipTexture will override the computed fractional time.
When the clipcenter moves quickly, the number of read requests for texture data tiles that move into the clipped levels mem regions can grow much faster than the read function can service them. If there is not enough bandwidth to display a particular level, its read requests may become “stale”, becoming obsolete as the location of the requested tile moves into, then passes out of a level's mem region.For DTR to be robust, the read queue must be culled and sorted to remove stale read requests, and move the requests for tiles closest to the clipcenter to the front of the queue. The cliptexture's read queue is a sorting queue, which means that a function can process the elements of the queue asynchronously. DTR uses the read queue to cull read requests for tiles that are no longer in their mem region, and to prioritize the other requested tiles as a function of level and distance from the clipcenter. Sophisticated applications can provide their own sorting function.
Sometimes an application may want to force a cliptexture to completely reload itself. For example, The pfuGridifyClipTexture() function modifies the cliptexture's texel data in system memory with a system of grid marks to make debugging and analysis easier. It modifies the read function to add a grid to every tile as it's loaded into system memory, then invalidates the cliptexture. For more information on gridify, look at the source code in the /usr/share/Performer/src/lib/libpfutil/gridify.C file for IRIX and Linux and in %PFROOT%\Src\lib\libpfutil\gridify.C for Microsoft Windows.
Invalidating a cliptexture forces it to completely reload its texture memory. Invalidating is only supported for cliptextures, not MPcliptextures. This means that an application cannot call invalidate from the APP process. Instead, it must call invalidate from the CULL process, usually in a pre-cull callback. The invalidate call itself is simple:
pfInvalidateClipTexture(pfClipTexture *cliptex) |
Invalidation is not needed for normal operation, but it is useful as a way to immediately update a cliptexture's texture memory.
| Note: Emulated cliptextures on systems other than InfiniteReality systems are never virtual. |
Regular cliptextures limit the size of each level but do not restrict the number of levels you can access. Virtual cliptextures take the virtualization a step further by allowing you to use only a subset of all the levels for which you have data.
Although InfiniteReality supports cliptextures of virtual size up to 8Mx8M = 2^23x2^23 texels (that is, 24 levels), the hardware is only capable of addressing a region of at most 32Kx32K = 2^15x2^15 texels (that is, 16 levels). By limiting the set of texture MIPMap levels, the cliptextures can be enlarged. A larger, virtual, cliptexture is defined just like a normal cliptexture, except that the size of the cliptexture can exceed the 32K X 32K maximum level size dictated by the hardware.
Virtual cliptextures do use more texture memory and require more callbacks in the CULL process, but they allow enormous cliptextures that are limited only by the precision of the texture coordinates. Cliptextures over one million texels on a side have been demonstrated.
Although virtual cliptextures require dividing the cliptextured geometry into sections for a given MIPmap levelrange, the division is much coarser and less restrictive than texture tiling. Cliptextured geometry usually does not need to be clipped to sectional boundaries, for example, since there is a lot of leeway when there are more MIPmap levels available than are needed for a given section of geometry.
For a sample application implementing virtual cliptextures, see /usr/share/Performer/src/pguide/libpf/C/virtcliptex.c for IRIX and Linux.
The application is responsible for choosing which 16 (or less) levels can be accessed at any given time by setting two parameters: virtualLODOffset and numEffectiveLevels. Most applications make numEffectiveLevels the maximum number allowed by the hardware, 16 on InfiniteReality. Smaller values may be chosen in some cases to improve stability. VirtualLODOffset sets the initial level in the cliptexture where 0 is the finest level.
For example, if numEffectiveLevels = 16 and virtualLODOffset = 0 then the texels the hardware can access are limited to the 32Kx32K region surrounding the current clipcenter, measured in finest-level texels (actually somewhat less than this. On IRIX and Linux, see the file /usr/share/Performer/doc/clipmap/IRClipmapBugs.html or /usr/share/Performer/doc/clipmap/IRClipmapBugs.txt for details on cliptexture limitations on InfiniteReality graphics). On Microsoft Windows, see the file %PFROOT%\Doc\clipmap\IRClipmapBugs.html or %PFROOT%\Doc\clipmap\IRClipmapBugs.txt. Attempting to access outside this range results in the value of the nearest texel in the good region; that is, the texels forming the border of the 32Kx32K area will appear to be “smeared” out to fill the virtual cliptexture.
Increasing virtualLODOffset from 0 to 1 doubles the size of the accessible region in both S and T (so that it is 32Kx32K level 1 texels, which are twice as big as level 0 texels) but makes the finest level inaccessible.
The maximum virtualLODOffset allowable is numVirtualLevels-numEffectiveLevels; when set to that value, the entire S,T range of the virtual cliptexture is accessible, and the finest level from which texels are available is the 32Kx32K level.
In general, it is appropriate to choose a large value of virtualLODOffset when the viewpoint is far away from the scene and more S,T area is visible; smaller values of virtualLODOffset are appropriate as the eye moves closer to the scene, gaining needed higher resolution at the expense of range in S,T.
Changing virtualLODOffset and numEffectiveLevels has no effect on the contents of texture memory nor any effect on the texture coordinates stored in the geosets and passed to the graphics: the texture coordinates, as well as the clipcenter, are always expressed in the space of the entire virtual cliptexture rather than the smaller “effective” cliptexture of up to 16 levels within it. (In contrast, changing the clipcenter requires texture downloading; thus it is a much more expensive operation and therefore it is not practical to change the clipcenter more than once per frame, whereas virtualLODOffset and numEffectiveLevels can be changed multiple times per frame, as we will see in the following subsections.)
OpenGL Performer supports two different methods for managing virtualLODOffset and numEffectiveLevels of a cliptexture. The simpler of the two methods allows the parameters to be set and changed at most once per frame; the more sophisticated method allows them to be changed multiple times per frame (different values for different parts of the scene). In addition to virtualLODOffset and numEffectiveLevels described earlier, the parameters minLOD, maxLOD, LODBiasS and LODBiasT often need to be set in the same way; so, we will show how to set those as well.
The easy way to manage the virtual cliptexture parameters is to set the values of the parameters on the pfMPClipTexture controlling the pfClipTexture:
int LODOffset, numEffectiveLevels; float minLOD, maxLOD; float LODBiasS, LODBiasT, LODBiasR; ... mpcliptex->setVirtualLODOffset(LODOffset); mpcliptex->setNumEffectiveLevels(numEffectiveLevels); mpcliptex->setLODRange(minLOD, maxLOD); mpcliptex->setLODBias(LODBiasS, LODBiasT, LODBiasR); |
You make these calls in the APP process, either in the main program loop, a channel APP func, or a pre- or post-node APP func. The last value you give during the APP in a particular frame will be used for rendering that frame and all subsequent frames until you change the value again.
This simple technique is the one that is used by the clipfly program when you manipulate the LODOffset and EffectiveLevels sliders (when using a naive scene loader such as the .im loader that does not do its own management of virtualLODOffset and numEffectiveLevels): clipfly makes these calls in its channel pre-APP function.
This technique is also used by the .spherepatch loader; in this case, the calls are made in a post-APP function of a node in the scene graph, using parameters that are intelligently chosen based on the current distance from the eye to the closest point on the textured geometry and are updated every frame.
Notice that even though the .spherepatch loader manages the virtualLODOffset and numEffectiveLevels, you can still modify or override its behavior with the clipfly GUI controls. This is accomplished using a special set of “limit” parameters that are provided as a convenience and stored on the pfMPClipTexture. The intended use is for applications such as clipfly to set the limits based on GUI input or other criteria:
mpcliptex->setLODOffsetLimit(lo, hi); mpcliptex->setEffectiveLevelsLimit(lo, hi); mpcliptex->setMinLODLimit(lo, hi); mpcliptex->setMinLODLimit(lo, hi); mpcliptex->setLODBiasLimit(Slo, Shi, Tlo, Thi, Rlo, Rhi); |
Then the callback functions of intelligent loaders such as .spherepatch query the limits:
mpcliptex->getLODOffsetLimit(&lo, &hi); mpcliptex->getEffectiveLevelsLimit(&lo, &hi); mpcliptex->getMinLODLimit(&lo, &hi); mpcliptex->getMinLODLimit(&lo, &hi); mpcliptex->setLODBiasLimit(&Slo, &Shi, &Tlo, &Thi, &Rlo, &Rhi); |
The loaders use the limits to modify the selection of the final parameters sent to pfMPClipTexture.
The limits are not enforced by pfMPClipTexture; they are provided merely to facilitate communication from the application to the function controlling the parameters. That function is free to ignore or only partially honor the limits if it wishes.
The limits may also be queried frame-accurately from the pfMPClipTexture in the CULL process, so they can also be used by scene loaders such as the .ct loader that use the per-tile method described in the next section.
Many applications require accessing a wider range of the cliptexture's data than can be obtained by a single setting of virtualLODOffset and numEffectiveLevels. This can be accomplished by partitioning the database into “tiles” roughly according to distance from the eye or from the texture's clipcenter and setting the parameters for each tile every frame in the pre-CULL func of the pfGroup or pfGeode representing that tile by calling pfClipTexture::applyVirtual(), pfTexture::applyMinLOD(), pfTexture::applyMaxLOD(), and pfTexture::applyLODBias().
Choosing a database tiling strategy requires careful thought and tuning. The most conceptually straightforward method is to use a static 2D grid-like spatial partitioning. This method requires tuning the granularity of the partitioning for the particular database and capabilities of the machine: if a tile is too big and sufficiently close to the eye, there may be no possible combination of virtualLODOffset and numEffectiveLevels that allows access to both the necessary spatial range and texture LOD range without garbage in the distance or excess bluriness in the foreground; but if there are too many tiles, the overhead of changing the parameters for each tile can become excessive.
In general, assuming the maximum active area is 32Kx32K (as it is on InfiniteReality), each tile should be small enough so that it covers at most approximately 16K texels at the finest texture LOD that will be used when rendering it; this is so that when the clipcenter is close enough to the tile to require accessing that finest texture LOD, the 32Kx32K good area centered at approximately the clipcenter will be able to cover it with some slop left over to account for the inexact placement of the good area (see the IR cliptexture bugs doc). (Finer tiles such as 8Kx8K or even 4Kx4K can be used for improved stability under extreme magnification; see the IR cliptexture bugs doc).
This rule has two important consequences:
If your cliptexture has insets (that is, localized regions in which higher-resolution data is available) you can make the tiling coarser in the regions where only low-resolution data is available and finer at the insets.
If you use pfLODs to optimize your database, the coarse LODs of the pfLOD can (and should) be tiled more coarsely than the fine ones.
This is because the coarser LODs are used at far distances, and at those far distances the Mipmapping hardware will only want to access correspondingly coarse texture levels anyway, so the 16Kx16K can be measured in terms of the texels of those coarse texture levels.
A more general tiling strategy that requires less empirical database tuning than the static tiling method is to make the tiles be concentric rings around the texture's clipcenter (in 2D) or around the eye point (in 3D), with sizes increasing in approximately powers of 2. However, since the clipcenter and view position changes, this means the tiles must move as well, which requires dynamically changing the topology of the scene graph and/or morphing the geometry so that the tiles always form those concentric rings around the current focus.
The .ct loader and pfASD's ClipRings both use this dynamic strategy. The .ct loader is interesting in that the morphing is done for the sole purpose of forming these concentric tiles for virtual-cliptexturing an otherwise trivial scene. It looks like simply a square textured by the cliptexture, but if you turn on scribed mode in perfly or clipfly, you can see the morphing rings that make up the square.
To do per- tile updates, use the following procedure:
On each tile (typically a pfGroup or pfGeode) put a pre-node CULL func:
tile->setTravFuncs(PFTRAV_CULL, tilePreCull, NULL);
Make sure the effect of the tile's pre-CULL func happens in the DRAW before the contents of the tile are rendered, and that the tile's contents do not co-mingle with other tiles (this is not guaranteed by default, for the benefit of CULL whose sole purpose is to return a CULL result without losing the advantages of uncontained CULL sorting):
tile->setTravMode(PFTRAV_CULL, PFTRAV_CULL_SORT,
    PFN_CULL_SORT_CONTAINED);
In the pre-node CULL func for the tile, set the parameters:
static int tilePreCull(pfTraverser *trav, void *)
    {
    int virtualLODOffset, numEffectiveLevels;
    float minLOD, maxLOD;
    float biasS, biasT, biasR;

    //Choose intelligent values for parameters.

    cliptex->applyVirtualParams(virtualLODOffset,
    numEffectiveLevels);
    cliptex->applyMinLOD(minLOD);
    cliptex->applyMaxLOD(maxLOD);
    cliptex->applyLODBias(biasS,biasT,biasR);
    }
The values given to the apply functions are not stored in the pfClipTexture or retained from frame to frame; when you call these functions, they override the corresponding values stored in the cliptexture.
It is not necessary to call all four of the apply...() functions; only use the ones you care about (for example, most applications would not care about LODBias). However, if you ever call a given one of these functions, applyMinLOD(), for example, on a particular cliptexture for any tile, then you must call applyMinLOD() for every tile on that cliptexture during that frame and forever after; if you omit it, the tile will not necessarily get the value stored on the pfMPClipTexture or pfClipTexture; rather, it will get whatever value happened to be most recently set when rendering that tile in the DRAW (which may be nondeterministic due to CULL sorting of the scene graph).
The libpfutil library provides the function pfuCalcVirtualClipTexParams(), which can be very useful in selecting the virtual cliptexture parameters, regardless of whether you are updating per-frame or per-tile.
Essentially, you give to pfuCalcVirtualClipTexParams() every piece of information you know about the cliptexture:
the tile in question
the limits specified elsewhere, for example, by the clipfly GUI
pfuCalcSizeFinestMipLOD() returns the lower bounds on minLODPixTex, which is one of the input parameters to pfuCalcVirtualClipTexParams().
The function returns optimal values for virtualLODOffset, numEffectiveLevels, minLOD, maxLOD. You can do the following with them:
Set on the pfMPClipTexture in the APP process if your application is using the per-frame method.
Apply to the pfClipTexture per-tile in the CULL process if using the per-tile method.
For more details, you may also want to read the commented source code to understand its constraints and heuristics, and how to modify pfuCalcVirtualClipTexParams to implement your own algorithm if it does not exactly suit your needs.
Sometimes the read function supplied by OpenGL Performer to download texture data from disk to mem region is not good enough. The application may need to do additional operations at read time, such as uncompression, or may need a more sophisticated read function, such as an interruptible one for reading large tiles from slow storage devices. A read function may need to signal an applications secondary caching system; for example, reading from tape storage to disk.
OpenGL Performer provides support for application supplied custom read functions. The read function is supplied at configuration time, and there is API in both the configuration utilities and the cliptexture and image cache configuration files for supplying a read function.
A read function is called by the image caches read queue. The read queue expects a read function with the following function signature:
int ExampleReadFunction(pfImageTile *it, int ntexels) |
The image tile pointer provides information about the read request, such as the disk to read from, the dimensions and format of the texel data, and the destination tile in system memory to write to. The ntexels argument is an integer indicating the number of texels to read from disk. The read function returns another integer indicating the number of texels actually read. Two example read functions, ReadNormal() and ReadDirect(), are supplied in /usr/share/Performer/src/lib/libpfdu/pfdLoadImage.c for IRIX and Linux and in %PFROOT%\Src\lib\libpfdu\pfdLoadImage.c for Microsoft Windows. These functions are C versions of the C++ functions that OpenGL Performer uses to read texture data. In OpenGL Performer, the ReadDirect() function is called by the read queue; it tries to use direct I/O to get the highest possible disk read performance. If the read direct call fails, it calls ReadNormal(), which uses normal fopen()-style read.
When providing a read function at configuration time, You supply the function name, and optionally the name of a DSO library containing the function. If no dynamic shared library is supplied, the read function is searched for in the application's executable.
To set custom read functions using the configuration utilities, simply fill in the readFunc field in the pfuImgCacheConfig or pfuClipTexConfig structure (the first structure has priority over the second if both are set). The field should contain a pointer to the custom read function. Be sure the function has the proper signature.
When supplying custom read functions in the configuration files, you simply provide an entry in one of two formats:
read_func ReadFunctionName read_func DSOlibraryName ReadFunctionName |
For hints on when and how to use custom read functions, see the customizing read functions in “Custom Read Functions”.
This section provides guidelines for using cliptextures, describing common cliptexture application techniques, ways to solve problems, and some hints and tips to make using cliptextures easier.
Cliptexture load control makes it possible to create cliptextures with incompletely filled levels. A cliptexture, being much larger than an ordinary texture, may not be used in a homogeneous way. Some areas of the cliptexture may be viewed in detail, others only at a distance. A good example of this usage pattern is flight simulation. The terrain around an airport will be seen from low altitude, terrain far from population centers may never be seen below 40,000 feet. It is also possible that high resolution data is simply not available for the entire cliptexture. Both of these cases make it valuable to create cliptextures with incompletely populated levels.
Regions of filled in data are called insets. Insets can be any shape, and do not need to match tile boundaries (although this requires filling the rest of the tile with super sampled data). For an inset to work properly, all of the levels from the pyramid up to the finest level desired, must be available within the inset boundaries.
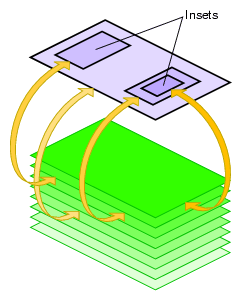
Insets are supported in cliptextures as a natural consequence of load control. As the clipped region moves from a region that has texel data to one that does not, DTR will blur the texture down to the highest level that can completely fill the clipped region.
In large cliptextures, it may not be practical or even desirable to completely fill each level with texel data. Cliptexture's load control, DTR, automatically adjusts the finest visible level based on what texels are available. If finer levels are not available, DTR automatically “blurs down” to the highest complete level in the clip region.
Applications may use insets if there are only limited areas where the viewer is close to the terrain. An example application would be a commercial flight simulator, where the inset high-resolution data would be around the airports where the aircraft takes off and lands. The terrain over which the aircraft cruises can be lower resolution.
To create insets properly, you have to understand how DTR load control works. At the beginning of each frame, DTR examines a level's mem region to see if the tiles covering the tex region are all loaded. If the tiles are all available, DTR will make that level visible.
DTR does this examination starting with the coarsest clipped level. If the current level is complete, it marks that level as visible and repeats the process for the next finest level, until it gets to the top level or finds an incomplete level.
To create an inset, assume you have a cliptexture that is complete at a coarse level. You choose an area of the clipmap that you would like to have visible at some finer level. In order to make that area available, you have to provide texel data in that area for each level from the coarse complete level to the finer level you want to show.
When the clip region is completely enclosed by the finer level data, DTR checks all the levels from the pyramid level on up, and allows the finer level to be shown in that area. (The pyramid levels are always complete; see Figure 15-1.)
Because DTR works from the bottom up (coarser to finer levels), an inset area must have texel data available from the finest level all the way down to the pyramid level. If a level's clip region is missing or incomplete, DTR does not allow the image to sharpen up to that level; the inset gets blurry.
When the clipcenter is set such that the clip region is completely enclosed by the insetted area, a properly constructed inset is sharp, using the finer resolution texel data. But what happens when the clip region only partially covers an inset? In that case, DTR does not sharpen up beyond the finest complete level, and the clip region gets blurry, including the part of the clip region covered by the inset. Remember, the clip region only sharpens to the finest level that is complete within the clip region.
This bluriness may not be a problem. If you know that the application moves far enough away from the terrain before the clip region crosses an inset border, MIPmapping uses the coarser texture levels before DTR forces the texture to use them. Sometimes, the application would like a static boundary between the inset and the surrounding coarser data, even when crossing an inset boundary close to the textured geometry.
Getting a static inset border requires creating a boundary of supersampled data around the inset. This means creating texel data for the insetted levels that is deliberately made as blurry as the surrounding base level. This border of blurry data must be at least as wide as the clip region to ensure a smooth transition.
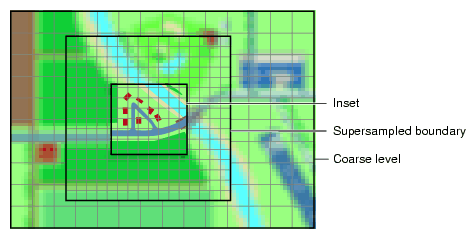
How does this work? When the clip region crosses an inset border, it starts to cover the boundary region. Since the boundary region has the same levels filled in as the inset region, DTR still sees complete data up to the same finer level. The texel data of the border has been blurred, however, so it looks like the coarser base level. This allows a hard transition between the finer inset data and the surrounding coarse data. Since DTR still sees complete levels, as you move away from the inset, it does not suddenly blur.
Since the boundary data is at least as wide as the clip region, the inset boundary has moved out of the clip region before the clip region hits the far edge of the boundary region. At this point, DTR blurs down to the coarser base level, since the finer data is no longer incomplete, but there is no visual change, since the boundary texels were blurry already.
| Note: Supersampled borders do not guarantee a seamless transition between insets and their surroundings, only that the inset region does not suddenly blur or sharpen as the clip region crosses the inset border. Seamless transitions only happen if the application is careful to get far enough from the clipmapped terrain to already be using the coarse levels before crossing the inset border. |
Insets do not have to be any particular size or shape, although they are usually multiples of the tile size, and at least as big as the clip region so they can be viewed without a seam of bluriness. Typically, insets are designed so when the application is close enough to view the finer inset levels, the clip region is already completely enclosed by the inset region.
Keep in mind that insets are not the same size on each level, since texels from coarser levels cover more geometry. If an inset is not a multiple of the tile size at a given level, the tile has to be partially inset data, and partially supersampled data, or all fine data, since DTR does not work with partial tiles.
Because cliptextures are a voracious consumer of system and texture memory, it is important to accurately predict the system resources required to run a cliptexture application. It is better to customize your application than to rely on the cliptexture auto resizing feature, since auto-resizing does not take into account multiple cliptextures or pfTextures in your application.
Cliptextures use both system memory (texel caching, read queue elements as well object overhead) and texture memory. The following estimation ignores the smaller contributors to system memory overhead and concentrates on image cache consumption of system memory for mem regions and tex regions in texture memory.
The following values are required to estimate system memory requirements:
Size of clipmap level 0
Clip size (in texels)
Tile size (in texels; assuming tile size is the same for all levels)
Texel size in bytes
The value of parameter lookahead in the cliptexture configuration file
Given these values, compute the estimate for system memory requirements using the following procedure:
Round up clip size to even multiple of tile size in each dimension.
Divide each dimension by tile size in that dimension.
Add the number of tiles specified by parameter lookahead to each dimension.
You now have the number of tiles in each dimension per clipped level.
Multiply the texel dimensions together.
Scale by the size of each texel.
Add in the fixed cost of image cache structs.
You now have the system memory cost in bytes for each clipped level.
Treat each level bigger than clip size as clipped. Add 4/3 of the clip size scaled by the texel size for the pyramid levels.
This estimate is a bit too conservative, since the lowest clipped levels may exceed the entire level size with a border of two tiles. It is a function of tile size and clip size.
Scale the clipped level size by the number of clipped levels.
The example uses the following values in its estimation:
2M top level
1K clip size
512 tile size (everything square)
1 byte texel size (LMV example)
4 for parameter lookahead
Example 15-1 estimates system memory requirements using the preceding procedure.
Example 15-1. Estimating System Memory Requirements
No-op: 1K, 1K (for both s and t).
1K/512 = 2, 2 (for both s and t).
2+4 = 6, 6 (for both s and t; add lookahead)
6 * 512 = 3K, 3K (for both s and t)
3K * 3K = 9M
9M * 1 = 9M
9M * 10 = 90M (for 2M -> 4K levels) + 2M (for 2K level) = 92M
4/3 * 1K * 1K= 1.3M
Total Size 92M + 1.3M = 93.3M
The following values are required to estimate texture memory requirements:
clip size (in texels)
whether the clipmap is virtual or non-virtual
number of levels in use (if less than 16)
Given these values, you can compute the estimate for texture memory requirements using one of the following guidelines:
If the clipmap is virtual, multiply the number of levels by the square of the clip size.
If the clipmap is non-virtual, do the following:
Multiply the number of levels bigger than the clip size by the square of the clip size.
Add 4/3 times the clip size squared.
There is, however, a further complication involved in accurately estimating texture memory requirements. The following subsection describes it.
InfiniteReality rendering boards come with either 16, 64, 256, or 1024 megabytes of texture memory. Unfortunately, you cannot just use the texture memory any way you want. The texture memory is divided into two equal banks. Each adjacent Mipmap level, clipmapped or not, must be placed in opposite banks. This ends up restricting the amount of texture memory available for clipmapping.
A further restriction is that texture formats can take up 16 bits or 32 bits of data per texel, but nothing in between. This means an 888 RGB format takes up 32 bits per texel, just like an 8888 RGBA format.
To give you an example of this restriction, consider an example using RGB texel data, 8 bits per component, and a clip size of 2048 by 2048. The largest level is 8K by 8K. The system has an RM board with 64M of texture memory; so, it would seem that there is plenty room, but the following calculation shows otherwise:
The cliptexture is non-virtual; so, the total texture memory requirement is the clip size times the number of clipped levels plus 4/3 of the pyramid.
4K, 4K levels are clipped to 2K X 2K: RGB, 8 bits per channel 4 bytes (not 3) per texel times 2K X 2K = 4M of texels per level.
There is 6M of texture memory per clipped level.
So, that is 32M of texture memory.
2K and below is the pyramid; so, 4/3 of 16M = 21-1/3M.
The total is 53-1/3M of texture memory.
Unfortnately, the texture does not fit into texture memory because of the following:
64M of texture memory means two 32M banks.
Each level must be in the opposite 32M bank.
Consequently, 8K level becomes 16M in bank 0 (16M left).
At the 4K level, 16M goes into bank 1 (16M left).
At the 2K level, 16M goes into bank 0 (0M left).
At the 1K level, 8M goes into bank 1 (8M left).
At the 512 level, there is no room in bank 0
The best you could do is to have only one clipped level, as follows:
At the 4K level,16M goes into bank 0 (16M left).
At the 2K level, 16M goes into bank 1 (16M left).
At the 1K level, 8M goes into bank 0 (8M left).
At the 512 level, 4M goes into bank 1 (12M left).
At the 256 level, 2M goes into bank 0 (6M left) and so on.
Probably a better solution would be to use the 5551 format RGBA texels, which only use 16 bits per texel, allowing more levels, as follows:
At the 32K level, 8M goes into bank 0 (24M left).
At the 16K level, 8M goes into bank 1 (24M left).
At the 8K level, 8M goes into bank 0 (16M left).
At the 4K level, 8M goes into bank 1 (16M left).
At the 2K level, 8M goes into bank 0 (8M left).
At the 1K level, 4M goes into bank 1 (12M left).
At the 512 level, 2M goes into bank 0 (6M left).
At the 256 level, 1M goes into bank 1 (11M left) and so on.
You can get a lot more mileage out of smaller texel formats than fewer levels. This becomes even more true for RMs with only 16M of texture memory.
OpenGL Performer provides good support for multipipe cliptextures, allowing applications to ignore many of the differences between single pipe and multipipe operations. The primary issue in multipipe applications is knowing when to make master/slave cliptextures, what parameters should be shared, and when and how to create separate centers in different master and slave cliptextures.
When it is possible, it is desirable to make master/slave cliptexture groups in multipipe applications. Master/slave groups share the same mem regions and disk access bandwidth, reducing the load on the system. Masters and slave can also take advantage of sharegroups, automating some of the work of synchronizing slave cliptextures with their masters.
Master and slave cliptextures do not work when the different cliptextures represent different textures. Separate cliptextures must be created for each texture that has to be displayed. Another condition that prevents using master/slave cliptexture groups is when the center for the cliptexture in each pipe is completely independent. Master and slave cliptextures assume that the tex region for each cliptexture is always completely enclosed by the shared mem region. If that assumption is violated, the cliptexture data will be invalid for the parts of the tex region outside of the shared mem region, and the cilptextures will print error messages.
There is no reason for the slave cliptextures to have the same centers as the master, as long as the tex regions always stay within the mem region. Sometimes it is desirable for an application to have views with slightly different viewpoints for each pipe. This can be done by turning off clipcenter sharing and having the application set a slave's center directly. The application is responsible for keeping the tex region inside the master's mem region at all times. The position of the master's center determines the groups mem region, so the master's center can not be offset from the center of the mem region.
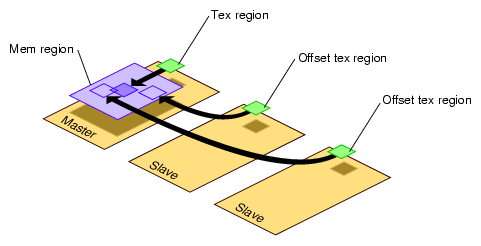
Virtual cliptextures are one of the most challenging features to use in an OpenGL Performer application. Cliptextures themselves are challenging enough, since they tie together functionality in the scene graph, pfPipes and pfChannels. Virtual cliptextures add an additional level of complication, since they require that the application segment the terrain, estimate the texture LOD levels needed for each terrain segment based on the current eyepoint, and update the virtual cliptexture parameters appropriately.
Some tips to consider when working with virtual cliptextures:
Get your application working with a non-virtual cliptexture first. It is hard to separate virtual cliptexture problems form basic cliptexture configuration problems (which are usually easier to fix).
Start off with a single segment and as little complexity in the application as possible; then get that working. It makes debugging much simpler.
When in doubt, print it out. For debugging purposes, a well placed set of pfNotify() statements can be really helpful. It is also useful to set up a canonical scene, where you know what parameters should be generated, then compare them against what the program does.
Take maximum advantage of sample code and utilities. Try to re-use some of the example code provided by OpenGL Performer. Using (or just reading) through the loaders, example programs, and utilities listed in this section “Cliptexture Sample Code” can save you hours of work.
Normally, bandwidth from disk to system memory is optimized by image cache configuration. You can use the streams feature in image cache configuration files to maximize bandwidth by configuring the system with more disks and disk controllers, and copying the texture data files over multiple disks. By using the streams feature in image cache configuration files, you can then parallelize the disk downloads over separate disks and disk controllers. You can also stripe disks to increase disk download bandwidth.
Texture memory bandwidth is more a matter of careful rationing of DRAW process time each frame. You will have to ration between sending geometry and texture data to the graphics pipeline. You can adjust the cliptexture's texload time to minimize idle time in the draw process. DTR computes texture download time using a cost table to estimate what the download updates will cost each frame. It is a good estimate but not a perfect one. You may have to build in some time margin in the DRAW process to avoid dropping frames.
Download time setting can be as simple as finding the minimum time that still allows the cliptexture to be completely sharpened when the clipcenter is stationary. If the texload time is too small, a cliptexture can get “stuck” and never sharpen beyond a given level.
If you are a sophisticated user, you might consider adjusting the invalid border as well, which will change the effective clip size of the cliptexture. This could be used to allow a new level to be gradually loaded over a number of frames, trading off a finer visible level against a smaller effective clip region.
Custom read functions allow the application to control what happens when texture data is downloaded from disk. Operations include: texture data decompression, texture data image processing, signaling an update of a disk cache from tape, etc. As described in the API section, replacing the read function is fairly easy to do in OpenGL Performer.
There is one caveat: increasing the overhead of read functions can have undesirable consequences. The latency of read operations determines the minimum size of the image cache mem regions, since they need to lookahead to compensate for high latency reads. Low bandwidth read operations affect how fast the center can move before DTR must blur down to coarser levels.
One way around these problems is to implement a lookahead disk cache. Rather than have the read function decompress files, have it read files from a cache of files that have already been decompressed by an asynchronous process. The read function can signal the other process to decompress more files as it gets close to the edge of the cache.
Texture data image processing, since it is relatively fast compared to disk reads, usually does not require such elaborate measures. Changing the read function can be done in conjunction with modifying the image cache mem region data to ensure that all data read from disk is processed. A good example of this technique is the gridify feature, described in “Invalidating Cliptextures”.
The best way to learn to use cliptextures is to work from existing code. OpenGL Performer has a number of demo programs, test programs, loader code, and utilities, with different levels of sophistication:
/usr/share/Performer/src/pguide/libpr/C/icache.c for IRIX and Linux and %PFROOT%\Src\pguide\libpr\C\icache.c for Microsoft Windows
This is a simple libpr-style program that uses an image cache and the texture transform matrix to scroll texture across a polygon.
/usr/share/Performer/src/pguide/libpr/C/icache_mwin.c for IRIX and Linux and %PFROOT%\Src\pguide\libpr\C\icache_mwin.c for Microsoft Windows
This program is a multiwindow version of icache; it uses master and slave image caches. Note that the tex regions of the slaves image caches are offset from the master.
/usr/share/Performer/src/pguide/libpr/C/cliptex.c for IRIX and Linux and %PFROOT%\Src\pguide\libpr\C\cliptex.c for Microsoft Windows
This is a simple libpr-style program that uses a cliptexture to display a bird's eye view of data. On a system that supports cliptexturing, it moves the clipcenter, allowing the user to see the rectangle of texture resolution move as the center translates between opposite diagonals.
/usr/share/Performer/src/pguide/libpr/C/cliptex_mwin.c for IRIX and Linux and %PFROOT%\Src\pguide\libpr\C\cliptex_mwin.c for Microsoft Windows
This is a multiwindow version of cliptex. It uses master and slave cliptextures.
/usr/share/Performer/src/pguide/libpf/C/cliptex.c for IRIX and Linux and %PFROOT%\Src\pguide\libpf\C\cliptex.c for Microsoft Windows
This is a libpf implementation using cliptextures. Rather than use clipcenter nodes, it uses a simple centering mechanism based on the x and y coordinates of the channel's viewpoint.
/usr/share/Performer/src/pguide/libpf/C/virtcliptex.c for IRIX and Linux and %PFROOT%\Src\pguide\libpr\C\virtcliptex.c for Microsoft Windows
This is the virtual cliptexture version of the cliptex program. It will take any size cliptexture and virtualize it. It divides a flat terrain in the x,y plane into a rectangular grid, attaching geodes with callbacks to each grid square. The callback calculates the virtual cliptexture parameters and applies them.
/usr/share/Performer/src/sample/C/perfly for IRIX and Linux and %PFROOT%\Src\sample\C\perfly for Microsoft Windows
This sample application supports cliptextured scene graphs. It assumes that the loaders will do the basic configuration, but it does the post loading cliptexture configuration, creating pfMPClipTextures and attaching them to pipes. It assumes that clipcenter nodes are in the scene graph and that they will do the centering work. Pressing g will toggle the gridify feature.
/usr/share/Performer/src/sample/C/clipfly for IRIX and Linux and %PFROOT%\Src\sample\C\clipfly for Microsoft Windows
This is the cliptexture version of the perfly sample application. It contains extra interface sliders and buttons that allow you to control many more cliptexture parameters.
/usr/share/Performer/src/sample/C++/clipdemo for IRIX and Linux
It demonstrates how to set up a virutal cliptexture on regularly tiled terrain.
/usr/share/Performer/src/lib/libpfdb/libpfim/pfim.c for IRIX and Linux and %PFROOT%\Src\lib\libpfdb\libpfim\pfim.c for Microsoft Windows
This is the OpenGL Performer example loader. It contains simple tokens to create clipcenter nodes and cliptextures. It is a good starting point for cliptexture configuration in the loader.
/usr/share/Performer/src/lib/libpfdb/libpfct/pfct.C for IRIX and Linux and %PFROOT%\Src\lib\libpfdb\libpfct\pfct.C for Microsoft Windows
This is a more sophisticated cliptexture sample loader. It automatically creates some simple cliptextured geometry, and supports virtual cliptextures, providing the geometry segmentation and scene graph callbacks.
/usr/share/Performer/src/lib/libpfdb/libpfvct/pfvct.C for IRIX and Linux and %PFROOT%\Src\lib\libpfdb\libpfvct\pfvct.C for Microsoft Windows
This is a very simple pseudo loader that will adjust a cliptextures parameters so it can be used as a virtual cliptexture, even if its dimensions are smaller than 32K by 32K.
/usr/share/Performer/src/lib/libpfspherepatch/pfspherepatch.C for IRIX and Linux and %PFROOT%\Src\lib\libpfspherepatch\pfspherepatch.C for Microsoft Windows
This is a cliptexture loader designed to apply a cliptexture to a sphere. It is a good example of a specific cliptexture application.
/usr/share/Performer/src/lib/libpfutil/gridify.C for IRIX and Linux and %PFROOT%\Src\lib\libpfutil\gridify.C for Microsoft Windows
The gridify functionality illustrates techniques for dynamically modifying cliptexture data and illustrates how to replace the cliptexture's read function.
/usr/share/Performer/src/lib/libpfutil/trav.c for IRIX and Linux and %PFROOT%\Src\lib\libpfutil\trav.c for Microsoft Windows
The function pfuFindClipTextures() illustrates how to traverse the scene graph to find cliptextures.
/usr/share/Performer/src/lib/libpfutil/pfuClipCenterNode.C for IRIX and Linux and %PFROOT%\Src\lib\libpfutil\pfuClipCenterNode.C for Microsoft Windows
This code defines the clipcenter node and contains example code for creating customized clipcenters by subclassing.
/usr/share/Performer/src/lib/libpfutil/clipcenter.c for IRIX and Linux and %PFROOT%\Src\lib\libpfutil\clipcenter.c for Microsoft Windows
The pfuProcessClipCenters() and pfuProcessClipCentersWithChannel() functions illustrate how to use clipcenters in an application.
/usr/share/Performer/src/lib/libpfutil/cliptexture.c for IRIX and Linux and %PFROOT%\Src\lib\libpfutil\cliptexture.c for Microsoft Windows
The pfuAddMPClipTextureToPipes() and pfuAddMPClipTexturesToPipes() functions illustrate how to work with cliptextures and pipes.